|
|
PBP Commentary |
Coming up we have a super heavyweight MMA rules bout between Grace Anatomy (ranked 0 p4p, 0 weight class) and Fred Ward (ranked 0 p4p, 0 weight class). Rumors backstage are that the fighters have been paid to keep it standing but we know that would never happen in MMA!
 |
|
 |
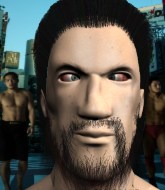
| 169 cm
25
260 lbs
2 - 0 - 0 |
|
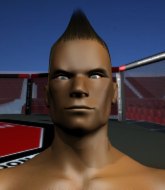
220 cm
26
280 lbs
6 - 4 - 0 |
BJJ White Belt
Solid boxing
Very quick |
|
BJJ White Belt
Excellent boxer
Granite chin |
|
| |
|
Ladies and gentlemen. This fight is 3 rounds, in the super heavyweight division.
Introducing the fighter to my left, fighting out of the red corner.
With a record of
2 - 0 - 0, fighting out of Helsinki, Grace Anatomy!
And introducing the fighter to my right, fighting out of the blue corner.
With a record of
6 - 4 - 0, fighting out of New York, Fred Ward!
The judges for this bout are Marco Blurström, Matti Vanhoillinen and Arvi Lind.

The bell rings for round one and we are underway!
Anatomy slips in close and lands a nice hook before moving back out of range.
Ward has his front leg slapped to the side - a nice low kick landing there from Anatomy.
Anatomy throws a jab when Ward was well out of range.
Anatomy throws a hook to the side of Ward's head but Ward sees it coming and ducks under it beautifully.
Anatomy misses with a right hand
and Ward counters with a straight right hand.
Anatomy showing good head movement there, avoiding the strikes from Ward.
Anatomy misses with a lunging right hand
enabling Ward to counter with a crisp jab.
Grace Anatomy seems to be the more aggressive standup fighter in this bout.
Ward swings for the body but Anatomy moves out of range.

Anatomy rushes Ward and pushes him back against the cage in a clinch.
Anatomy scores with a shoulder strike.
Ward wants to break the clinch but can't.
Anatomy swings wildly with an uppercut but Ward uses good head movement to avoid it.
Ward trying to stall but Anatomy improves his position.
Anatomy struggles to land a body shot inside as Ward controls his hands.
This has been an exciting period of action!
Anatomy misses with a hook from the clinch.
Ward blocks an uppercut.

That's one minute gone in the round.
Ward avoiding damage.
A quick uppercut on the inside from Anatomy.
Ward blocking some punches.
Anatomy lands a left hand.
A short body shot lands from Anatomy as the two fighters clinch.
A quick uppercut on the inside from Anatomy.
Anatomy lands a hook to the side of the head.
A short right hand to the side of the head by Anatomy.
A short right hand to the side of the head by Anatomy.
Ward trying to control the position but instead, Anatomy has worked for underhooks and has pushed Ward into the cage.
Anatomy can't find room to land a body shot as Ward controls the action.

That's two minutes gone in the round.
Anatomy fails to land with a short punch on the inside.
Anatomy throws a head punch that misses.
Ward blocks an uppercut.
Ward taking a breather.
Anatomy tries to throw a body punch but Ward avoids it by throwing Anatomy back against the cage.
Anatomy struggles to land a body shot inside as Ward controls his hands.
Ward misses with a punch to the body.
The crowd are loving this. Great action here.
Anatomy is leaning against Ward and scores with a nice uppercut to the body.
Anatomy throws a blind hook that connects with the side of Wards head.
A right handed body shot lands from Anatomy.
The pace really dropping off here, momentarily.
Anatomy throws a head punch that misses.

That's three minutes gone in the round.
Ward is trying to slow down the pace of the fight but Anatomy is keeping busy.
Anatomy lands a shot to the body.
Anatomy lands with a short punch from the clinch.
Good body shot from Anatomy.
Ward looks winded!
Anatomy lands a hook to the side of the head.
Anatomy lands a body punch in the clinch.
This is a great period of action - very entertaining stuff!
Anatomy lands a body shot in the clinch.
The referee calls for Anatomy to work.
A real battle for position is taking place between these two warriors.
Anatomy lands an uppercut.
A left hand lands to the body for Anatomy.

That's four minutes gone in the round.
Anatomy lands with a short punch from the clinch.
Nice body punch from Anatomy - that landed with a thud.
Ward's head jolts backwards as he takes an uppercut right on the button!
Anatomy lands a body punch in the clinch.
Anatomy pushes Ward back against the cage and lands a hook to the side of the head.
Anatomy works for underhooks and lands a body shot in the process.
A short uppercut from Anatomy.
Anatomy is working Ward over against the cage.
Anatomy taking a breather.
The crowd are going absolutely nuts as the round comes to an end - what a fantastic round of action!
Anatomy lands a left hand that snaps the head of Ward backwards.
Anatomy lands with a short head shot on the inside.
Anatomy lands with a good tight uppercut to the head.
And thats the end of the round the fighters go back to their corners.
Grace Anatomy dominated that round.
OK. That's time! The bell goes and we're back to the action.

Ward throws out a loose jab but Anatomy uses good head movement to avoid it.
Anatomy is really dominating this fight. Is there anything that Ward can do to turn this around?
A jab from Anatomy misses.
Anatomy dodges the punch combination from Ward.
Anatomy is really struggling to find his range with his punches. Ward's reach advantage is clearly causing him problems.
Anatomy throws a series of punches but Ward moves out of range.
Ward uses some good footwork to avoid the body shot by Anatomy.
Ward misses with a wild body shot.
Anatomy looks to land a combination but Ward avoids it well.
Ward displays some good footwork, moving neatly out of range as Anatomy throws out the jab.
Anatomy swings wildly with a right hand that was never going to find it's target.
Anatomy looks to land a left hand but Ward moved out of range nicely.
Anatomy throws an ugly left hook that misses
and Anatomy takes a counter punch right on the button for his troubles.
Ward gets cracked with a nice right hand there by Anatomy.
Anatomy misses the jab.
Anatomy swings wildly with a right hand that was never going to find it's target.
Ward slips a straight right by Anatomy.
That's one minute gone in the round.
Anatomy swings widly with a right hand
and Ward counters with a two punch combo.
Ward rushes forward with a series of wild hooks but Anatomy moves out of range and avoids them all easily.
Ward is breathing heavily.
Anatomy throws a hard body shot but it just misses.
Anatomy ducks down and throws a hook to the body but Ward moves away.
Anatomy is really head hunting here, hardly looking to strike to the body at all.
Ward will need to tighten up his combinations if he doesn't want to gas himself out, swinging at thin air.
Anatomy jabbing away but nothing is landing.
Anatomy throws an ugly left hook that misses
letting Ward counter with a right hand.
Anatomy misses with a straight right.
A telegraphed right hand from Ward misses the target.
Ward slips a straight right by Anatomy.
Anatomy tries to clinch but Ward moves out of range.
Anatomy throws a big shot that misses.
Ward misses with a wild body shot.
That's two minutes gone in the round.
Ward slips under a jab from Anatomy.
The fighters are starting to get sweaty, which will make takedowns a bit more tricky.
Anatomy throws a combination but comes up with nothing but fresh air.
Anatomy throws a jab but it's blocked by Ward.
Anatomy lands a jab to Ward's midsection.
Anatomy takes one on the chin but seems OK.
The crowd are loving this. Great action here.
Ward scores with a jab to the head.
Ward misses with a wild body shot.
Ward connects with a slap. Keep your fist closed son.
Ward looks to land a combination but Anatomy avoids it well.
Fred Ward is looking to throw some combinations by the looks of things.
Anatomy misses with a left hand
and Ward counters with a stiff right hand.
Ward swings away but doesn't land with a series of punches.
Anatomy scores to the head and body with a nice combination!
Ward throws a monster uppercut resembling something out of street fighter but it doesn't land.
A swing and a miss from Ward.
That's three minutes gone in the round.
Ward displays some good footwork, moving neatly out of range as Anatomy throws out the jab.
Ward misses with a double jab.
Ward fails to land with a series of punches.
Anatomy misses the jab.
Anatomy slips a jab and a cross from Ward.
Ward dodges the punch combination from Anatomy.
Ward is using his reach advantage to land shots from outside his opponent's range.
Ward throws a hard body shot but it just misses.
Ward tries to bum rush Anatomy with a series of wild strikes but Anatomy uses good footwork to avoid the assault.
Ward dodges the punch combination from Anatomy.
Ward tries to land with a swinging hook to the body but Anatomy was well out of range. Poor timing from Ward.
Anatomy scores with a sloppy punch to the body. Not much technique there but it did the business.
Ward moves into range and throws a combination. A nice jab followed by a hook to the body.
Fred Ward seems to be getting the better of the standup.
That's four minutes gone in the round.
Anatomy on the wrong end of a vicious looking body shot.
Ward slips a jab from Anatomy.
Ward looks to score with a combo but nothing lands.
Ward looks to score with a combo but nothing lands.
Anatomy scores with a punch to the head.
Ward throws out a loose jab but Anatomy uses good head movement to avoid it.
A big left from Ward misses.
Anatomy swings wildly with a right hand that was never going to find it's target.
Anatomy punishes Ward's body with a nice straight punch.
As the round comes to an end the crowd are showing their appreciation for a great round of action.
Anatomy fakes high and swings low for a body shot but Ward manages to avoid it.
A swing and a miss from Ward.
Ward swings wildly with a right hand that was never going to find it's target.
Ward throws a right and a left that both miss.
And thats the end of the round the fighters go back to their corners.
A close second round but Fred Ward will probably get the nod - 10:9.
The fighters' corners scream their final instructions, as the referee calls time. Here we go, back to the action! This is the final round!

Ward steps to the side to avoid the strikes from Anatomy.
A looping hook to the body misses from Ward. Anatomy does a little dance to reset his feet.
Ward throws a shot from downtown. Anatomy moves away and avoids it.
Ward bobs and weaves well there to avoid the strikes.
Anatomy missing with a left hand there. Ward was out of range so wasted energy throwing that one.
Ward steps to the side to avoid the strikes from Anatomy.
Anatomy dips to his left and cracks Ward with an uppercut!
A big left from Ward misses.
Ward throws out a token jab with nothing on it.
A big left from Anatomy misses.
Ward moves away from the strike by Anatomy.
Anatomy throws a predictable looking body shot
and Ward counters with a left to the body.
Anatomy cracks Ward with a right hand to the side of the head.
Anatomy misses the shot to the body.
Both fighters are breathing heavily.
Anatomy is looking to take this fight into the clinch.
That's one minute gone in the round.
Anatomy misses with a wild body shot.
Anatomy misses the shot to the body.
Ward misses with a jab, cross combination.
Anatomy misses with a wild body shot.
Sloppy strikes from Anatomy. Those never looked like landing.
Anatomy takes the fight into the clinch.
Anatomy tries to throw a body punch but Ward avoids it by throwing Anatomy back against the cage.
Ward trying to stall but Anatomy improves his position.
Anatomy tries to land a shot to the body but it's blocked.
Ward misses with a hook to the ribs.
Anatomy lands with a right to the head.
That's two minutes gone in the round.
Ward has Anatomy pushed against the cage.
With the fighters clinched against the cage, Anatomy creates a bit of distance for himself and scores with a nice uppercut.
Anatomy misses with a shot to the kidneys.
Ward controlling the action here for a moment.
Ward misses with a hook from the clinch.
Anatomy misses with a shot to the kidneys.
Anatomy tries to land a shot to the body but it's blocked.
Anatomy misses with some punches.
That's three minutes gone in the round.
A head punch on the inside from Anatomy fails to land.
Anatomy will no doubt start fighting again in a minute but for now he's just having a little rest, leaning Ward up against the cage.
Grace Anatomy has scored more points in the clinch so far.
Ward throws a head punch that misses.
Ward is trying to break the clinch but Anatomy has him pressed against the cage.
Ward stalling here - the referee won't stand for too much of that.
Anatomy digs a right hand into Ward's ribs. Those have got to be taking their toll on Ward's gas tank.
Anatomy misses with a shot to the kidneys.
A bit of stalling here from Ward.
Anatomy prevents Ward from breaking the clinch.
That's four minutes gone in the round.
A battle for position here, against the cage.
Anatomy tries to throw a body punch but Ward avoids it by throwing Anatomy back against the cage.
Anatomy misses with the head strike.
Anatomy pushes Ward back against the cage and lands a hook to the side of the head.
An uppercut on the inside fails to land for Anatomy.
Ward wants to break free. God knows he wants to breaaaak freeee.
Ward tries to circle away but Anatomy has him pinned against the cage.
Ward stalling against the cage.
The crowd applaud the fighters efforts here as the round comes to an end.
Anatomy wants to stall.
Ward working hard to break the clinch.
And that's the end of the fight!
Grace Anatomy showed his dominance in that final round.
Well Anatomy has outscored his opponent in every aspect of the fight today. Only a scarily incompetent judge or two will keep him from a well deserved win... Over to the ring announcer for the scorecards.
Ladies and gentlemen, after 3 rounds of action, we go to the scorecards for a decision.
Judge Marco Blurström scores the fight 29:28
Judge Matti Vanhoillinen scores the fight 29:28
Judge Arvi Lind scores the fight 29:28
In favor of your winner, by unanimous decision... Grace Anatomy!
|
|
|
|
|
|
|
|
|
|
|
|
|
|
|
|
|
|
|
|
|
|
|
| S |
C
A |
G |
S |
C
B |
G |
|
S |
C |
G |
|
energy
A | B |
|
hype
A | B |
|
pop
A | B |
|
mgr
A | B |
|
FIGHT
RATING
66% |
|
|
|
|
|
|
