|
|
PBP Commentary |
Coming up we have a heavyweight MMA rules bout between Miko Maia (ranked 0 p4p, 0 weight class) and Dirk Blaylock (ranked 0 p4p, 0 weight class). Maia comes to the cage accompanied by Hells Bells. Blaylock has chosen Head Like a Hole as his entrance music, which hasn't gone down very well with the crowd. Man, I cannot wait for this one!
 |
|
 |
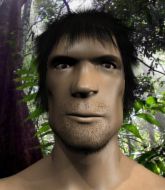
| 196 cm
32
267 lbs
27 - 18 - 0 |
|
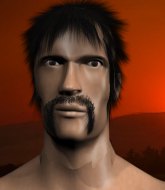
192 cm
27
273 lbs
16 - 6 - 0 |
Good wrestling
World class boxer
Cardio machine |
|
Good wrestler
World class boxer
Granite chin |
|
| |
|
Ladies and gentlemen. This fight is 3 rounds, in the heavyweight division.
Introducing the fighter to my left, fighting out of the red corner.
With a record of
27 - 18 - 0, fighting out of Hilo, Miko Maia!
And introducing the fighter to my right, fighting out of the blue corner.
With a record of
16 - 6 - 0, fighting out of Las Vegas, Dirk Blaylock!
The judges for this bout are Chris Saunders, Roger Salmon and Josh West.

The bell rings for round one and we are underway!
Blaylock throws a right and a left that Maia avoids nicely.
Blaylock misses with a double jab.
Maia shoots in looking for a takedown. Blaylock tries to sprawl out of it but Maia keeps driving through. The fighters are pinned against the cage. Blaylock manages to get underhooks and after a bit of a struggle, circles away and we're back to standing.
Blaylock throws a series of punches but Maia avoids them all with ease.
Maia throws the left hand but Blaylock avoids the punch easily.
Nice uppercut there from Maia.
Maia ducks down and throws a hook to the body but Blaylock moves away.
Maia uses some good footwork to avoid the body shot by Blaylock.
Sloppy strikes from Blaylock. Those never looked like landing.
Blaylock tries to clinch up but Maia circles away and keeps his distance.

Maia looking to score a takedown here. Blaylock is defending well but Maia drives through and ends up in Blaylock's guard.
The referee is pacing around the two fighters - he looks like he's thinking about a standup.
Blaylock keeping moving, preventing Maia from controlling successfully.
Maia looking to sit in guard and control but Blaylock gets the butterfly guard and sweeps. He's now in the guard on the top.
The fans in attendance giving it up for the two fighters, who have really let it all hang out in the last minute or so!
Blaylock loading up with the ground and pound but he's missing more than he's landing in this flurry.

That's one minute gone in the round.
Blaylock lands a nice shot whilst sitting in his opponent's guard.
Maia working the defensive guard well to avoid strikes from Blaylock.
Maia is trying to keep Blaylock in close.
Blaylock showing good wrestling skills to control the position.
Blaylock throwing elbows and punches but not connecting, as Maia works some decent striking defense from the bottom.

That's two minutes gone in the round.
Maia pulls Blaylock in close to his closed guard and prevents Blaylock from doing any damage or advancing position.
Maia is trying to control the position from the bottom.

The ref stands the fighters back up. Miko Maia wasn't doing enough on the ground.
Maia circles away from the clinch attempt.

Blaylock looking to shoot here. He's gone for it and he's landed a takedown into side control! Oh, that's bad for Maia!
Blaylock trying to control the action but Maia is working from the bottom.
Blaylock might have to switch it up a bit here because his efforts to control Maia haven't been going to plan, at least at the current moment in time.
The ref warns both fighters not to hold the cage as they work up against the meshing.

That's three minutes gone in the round.
Blaylock creates some space and throws a big elbow, but Maia sees it coming and moves his head just enough to avoid the strike.
Maia is looking for a sweep.
Maia can't do much from the bottom here.
Maia defending against the ground and pound.
Blaylock is looking to take a break and control but Maia is keeping him honest, looking to work from the bottom.
Maia tries to improve position but can't.

That's four minutes gone in the round.
Maia is trying to stand back up. He's worked his way up against the cage but Blaylock has just dragged him back down to the mat.
Blaylock landing strikes.
Blaylock is chipping away with strikes.
Blaylock trying to control the action but Maia is working from the bottom.
We've seen a great period of action over the last minute or so - credit to both fighters for going all out!
Maia being controlled for a moment.
Blaylock is chipping away with strikes.
And thats the end of the round the fighters go back to their corners.
Dirk Blaylock dominated that round.
The fighters get back to their feet, the hooter sounds and we're back to the action!

Maia connects nicely with a jab. Noted by the judges no doubt.
Blaylock throws a looping overhand right but Maia ducks down to avoid it.
Maia throws a hard body shot but it just misses.
Blaylock throws out a loose jab but Maia uses good head movement to avoid it.
Blaylock fails in his attempt to clinch.
Maia shoots in looking for a single leg takedown. Blaylock is trying to defend but Maia finishes it well and ends up in half guard. Let's see if he can advance position further.

Maia is trying for a guillotine from the top but the pressure isn't in the right place so Blaylock is just riding it out for now. Maia eventually gives up the hold.
Maia seems very keen to just sit and control from half guard but Blaylock does not like that idea so much and is remaining active off his back.
That's one minute gone in the round.
Blaylock is looking for a sweep. Maia is wise to his cunning plan and keeps the top position.
Maia is pressing down on Blaylock's thigh, looking to free his foot. Blaylock is holding on for now.
The fighters are pressed up against the cage, both looking to find a bit of space to work.
Maia seems very keen to just sit and control from half guard but Blaylock does not like that idea so much and is remaining active off his back.
Maia thumps the canvas. Not on purpose obviously - he just missed Blaylock's head.
Maia trying to control the pace.
Miko Maia has forced the referee to step in and bring the fight back to the feet.
Blaylock fakes high and swings low for a body shot but Maia manages to avoid it.
Blaylock connects with a hook to the side of his opponent's head.

It looks like Miko Maia has been cut.
That's two minutes gone in the round.
Blaylock avoids the body shot from Maia.
Maia swings wildly with a hook that is half blocked by Blaylock.
Blaylock takes a jab right on the kisser.
The crowd cheering loudly, showing their appreciation for the quality fight we're seeing here.
Maia misses the jab.
Maia looks to land a left hand but Blaylock moved out of range nicely.
Maia lands a lovely overhand right.
Blaylock gets caught napping as Maia dives in and scores a takedown. Blaylock manages to retain guard.
Maia trying to control the position from guard on top but Blaylock is wriggling around, looking for whatever he can.
Blaylock trying to control the position here.
Maia looking to sit in guard and control but Blaylock gets the butterfly guard and sweeps. He's now in the guard on the top.
That's three minutes gone in the round.
Blaylock controlling from the top position.
Blaylock has the superior BJJ but he's also working some ground strikes into his gameplan.
Maia keeping moving, preventing Blaylock from controlling successfully.
Maia has a closed guard, preventing anything of note from happening. Perhaps he's looking to stall.
That's four minutes gone in the round.

The ref calls for a clean break and stands the fighters back up. Dirk Blaylock wasn't active enough on the ground.
Blaylock tries to clinch up but Maia circles away and keeps his distance.
Maia connects with a right hand. Blaylock shakes it off.
Blaylock just misses with a punch to the body.
Blaylock lands a pitter patter jab to the forehead of his opponent.

Blaylock moves into the clinch.
Maia works for underhooks and lands a body shot in the process.
This has been an exciting period of action!
Maia tried to land a shot to the body but connects with Blaylock's elbow.
Blaylock tries to land a knee to the head but misses.
Maia lands a left hand.
Maia prevents a takedown attempt there.
Maia prevents a body shot from Blaylock.
As the round comes to an end the crowd are showing their appreciation for a great round of action.
Maia prevents a body shot from Blaylock.
Blaylock goes for a takedown in the clinch but Maia prevents it.
Maia scores with a nice hook to the head.
And thats the end of the round the fighters go back to their corners.
Miko Maia dominated that second round.
The cut man is working on Miko Maia's cut.
That's the end of the round. The referee orders the cornermen out of the cage so we can get back down to business. So, we enter the final round. Let's see if either fighter can bring us a finish, or whether we're going to the judges scorecards.

Maia scores with a hook to the body. Blaylock takes a step back and tries to catch his breath.

It looks like Dirk Blaylock has been cut.
Maia lands a really nice looking cross but Blaylock seems unphased.
Maia displays good takedown defense there as he swats away a double leg from Blaylock.
Maia scores with a big left there. The judges will like that one.
Miko Maia is winning the standup battle so far.
Maia is moving around nicely and scores here with a single head shot.
Blaylock ducks down and throws a hook to the body but Maia moves away.
Maia connects with a looping right hand.
The crowd are loving this. Great action here.
Blaylock slips under a jab from Maia.
Maia connects with a looping right hand.
Maia jabs Blaylock right on the nose. Blaylock blinks but takes it well.
Blaylock moves in looking to clinch but Maia pushes him off.
Maia lands with a kick to the temple. Blaylock shrugs as if to say "is that all you've got?"
Maia lands with a hook. Blaylock tried to avoid it but it clipped the top of his head.
Blaylock takes a jab on the nose. He smiles like he loves it and keeps coming.
Blaylock clobbers Maia with an overhand right that has the crowd gasping. That made a horrendous noise.
Blaylock throws a combination. Maia tries to block but a couple of punches get through.
That's one minute gone in the round.
Blaylock tries to clinch but Maia moves out of range.
Maia connects with a single shot there.
Maia misses with a hook.
Blaylock fakes with an overhand right and moves in to clinch with Maia, pushing him back against the cage.
A short left from Maia.
Blaylock blocks an uppercut.
A head punch on the inside from Maia fails to land.
The pace slowing considerably in the clinch, as Blaylock takes a break from that fighting nonsense to think about the finer things in life.
Blaylock struggles to land a body shot inside as Maia controls his hands.
Blaylock tries for a takedown but Maia manages to get underhooks.
Blaylock throws a vicious knee straight up the middle but Maia blocks it with crossed arms.
Blaylock stalling the fight.
Still in the clinch, Blaylock scores with a nice short uppercut.
Blaylock has a body lock and is looking for a takedown. Maia is bouncing around trying to prevent the takedown and somehow he has indeed managed to stay on his feet.
Miko Maia has stuffed three takedown attempts in the round now. That's going to take a lot out of Dirk Blaylock.
Maia throws a head punch that misses.
Blaylock is trying to work for a single leg takedown but Maia pulls him back up using the underhooks.
A short left from Maia.
Fantastic stuff here - a very entertaining period of action, which has drawn cheers from the crowd.
Maia working on landing some head shots here - that one got through nicely.
That's two minutes gone in the round.
A head punch on the inside from Maia fails to land.
Both fighters working to control the clinch.
Maia misses with the head strike.
Maia misses with a punch on the inside.
Blaylock wants to break free but Maia has control.
Maia tries to land a shot to the body but it's blocked.
A right hook to the body lands for Maia.
Blaylock takes a big intake of breath there - he's definitely tired.
Maia throws a blind hook that connects with the side of Blaylocks head.
Maia stalling the fight.
A left hand lands to the body for Maia.
Maia is trying to drag Blaylock to the mat but Blaylock just about manages to keep his footing. He used the cage to his advantage there.
Maia lands a short shot on the inside that snaps the head of Blaylock backwards.
Maia lands a right hand that snaps the head of Blaylock backwards.
Blaylock blocking some punches.
An uppercut on the inside fails to land for Maia.
Blaylock wants to push off and get back to the center of the mat but Maia has him pressed against the cage.

Maia breaks from the clinch.
That's three minutes gone in the round.
Blaylock walks into a left hand.
Maia takes a jab on the nose there. A little bit of blood seems to be coming out. Hopefully that won't affect his breathing.
Blaylock takes a really solid shot there but just smiles back and shrugs his shoulders.
Maia shoots in for a takedown and gets it. Let's see what he's got on the mat.
Maia throwing strikes but missing.
Blaylock keeping full guard, as Maia tries to pass.
Blaylock wants to sweep here but Maia controlling him for the moment.
Maia trying to control the position from guard on top but Blaylock is wriggling around, looking for whatever he can.
Dirk Blaylock has got the better of the ground game so far.
That's four minutes gone in the round.
Maia's corner is telling him to maintain position.
If this pace continues, the referee will definitely step in and force a standup.
The ref stands the fighters back up because Miko Maia just wasn't active enough.
Blaylock staying out of range there.
Maia is really head hunting here, hardly looking to strike to the body at all.
This has been an exciting period of action!
Blaylock's jab looks to have found its range, popping Maia under the eye.
Maia swings wildly with a hook that is half blocked by Blaylock.
Blaylock tries for a takedown but Maia sees it coming a mile off and avoids it easily.
Maia misses with a body shot. Nice footwork from Blaylock.
Nice shot lands for Maia.
Maia leaves Blaylock with his face pressed against the mat as he sprawls beautifully, defending against a solid takedown attempt.
The crowd are going absolutely nuts as the round comes to an end - what a fantastic round of action!
This fight brought to you by 5M nutrition - it's mmmmm tasty. Nice jab by Blaylock.
Maia slaps away a takedown attempt from Blaylock, before circling back to the center of the mat.
Blaylock lands a beauty of a right hand that gets the crowd cheering.
And that's the end of the fight!
Miko Maia showed his dominance in that final round.
I think Maia has won this one but let's see what the judges have to say. Over to the ring announcer for the scorecards.
Ladies and gentlemen, after 3 rounds of action, we go to the scorecards for a decision.
Judge Chris Saunders scores the fight 29:28
Judge Roger Salmon scores the fight 29:28
Judge Josh West scores the fight 29:28
In favor of your winner, by unanimous decision... Miko Maia!
Miko Maia decided to go for the less than humble approach in his post fight interview, telling everyone how he is going to conquer the world. The crowd seemed to like it when really that sort of approach could have gone either way.
|
|
|
|
|
|
|
|
|
|
|
|
|
|
|
|
|
|
|
|
|
|
|
| S |
C
A |
G |
S |
C
B |
G |
|
S |
C |
G |
|
energy
A | B |
|
hype
A | B |
|
pop
A | B |
|
mgr
A | B |
|
FIGHT
RATING
91% |
|
|
|
|
|
|
