|
|
PBP Commentary |
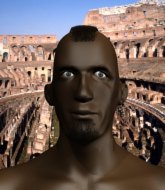
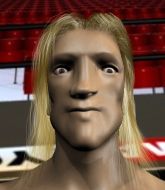
Coming up we have a bantamweight MMA rules bout between TJ Dillashaw (ranked 0 p4p, 0 weight class) and Hanz Stokenhizer (ranked 0 p4p, 0 weight class). Dillashaw comes to the cage accompanied by Jump Around-House of Pain. Stokenhizer comes into a darkened arena with his song building. The Lucky Bullets "Cross the Line" kicks in, the lights come on and the crowd goes wild! What a showman! These two fighters really are very evenly matched on the feet - it will be fascinating to see who can assert themselves in that aspect of the fight.
 |
|
 |
| 168 cm
23
136 lbs
8 - 3 - 0 |
|
184 cm
39
139 lbs
16 - 26 - 1 |
Good wrestling
Solid boxing
Cardio machine |
|
Good wrestler
Good kicks
Knockout power |
|
| |
|
Ladies and gentlemen. This fight is 3 rounds, in the bantamweight division.
Introducing the fighter to my left, fighting out of the red corner.
With a record of
8 - 3 - 0, fighting out of Los Angeles, TJ Dillashaw!
And introducing the fighter to my right, fighting out of the blue corner.
With a record of
16 - 26 - 1, fighting out of Los Angeles, Hanz Stokenhizer!
The judges for this bout are Don Winkell, Timothy Bukovac and Jack Bonds.

The bell rings for round one and we are underway!
Stokenhizer explodes with a nice body kick and back out of range. Nice work.

Dillashaw rushes Stokenhizer and pushes him back against the cage in a clinch.
Dillashaw is trying to pull guard but Stokenhizer turns him against the cage and we stay in the clinch.
Dillashaw wants a takedown but no success here.
Dillashaw tries to pull guard but Stokenhizer holds him up against the cage and eventually Dillashaw drops back down to his feet.
That's three failed takedown attempts in the round for TJ Dillashaw. That's going to take a lot out of him.
Stokenhizer throws a vicious knee straight up the middle but Dillashaw blocks it with crossed arms.
Dillashaw tries for a takedown. No joy.
Stokenhizer is trying to wear down his opponent with knees to the body.
Dillashaw has dropped down and is looking to force the takedown but it's defended by Stokenhizer after a bit of a struggle.
Stokenhizer is defending well against a takedown attempt.
Dillashaw has a body lock and is looking for a takedown. Stokenhizer is bouncing around trying to prevent the takedown and somehow he has indeed managed to stay on his feet.
Dillashaw changes levels and goes for a takedown here. Stokenhizer fights it off and pushes away nicely.

Stokenhizer has closed the distance and engaged Dillashaw in a clinch.

That's one minute gone in the round.
Dillashaw has dropped down and is looking to force the takedown but it's defended by Stokenhizer after a bit of a struggle.
Dillashaw tries to score a body lock takedown but Stokenhizer shows good agility there to stay on his feet.
Stokenhizer scores with a knee to the head.
Dillashaw wants to take the fight to the mat but Stokenhizer manages to get underhooks and keep the fight in the clinch.
Dillashaw is looking for a takedown up against the cage. Stokenhizer gets underhooks though and prevents the takedown attempt.
Dillashaw takes a knee right on the jaw!
Stokenhizer gets through Dillashaw's defenses to land a nice punch to the side of the head.
Stokenhizer prevents a takedown attempt there.
Dillashaw looking for a takedown.

That's two minutes gone in the round.
Dillashaw tries to pull guard but Stokenhizer forces him back to his feet, against the cage.
Come on Stokenhizer - let's have some action - none of this stalling nonsense.
Stokenhizer lands a knee to the head there! That was nasty!
Stokenhizer tries to land a knee to the head but misses.
Stokenhizer throws a vicious knee straight up the middle but Dillashaw blocks it with crossed arms.
Dillashaw is looking to take this one to the mat.
Dillashaw tries to pull guard but Stokenhizer won't allow it.
Dillashaw goes for a body shot but it's blocked.
Stokenhizer slowing the pace effectively.
Dillashaw wants a takedown.
Stokenhizer is defending well against a takedown attempt.

That's three minutes gone in the round.
Stokenhizer connects with a nasty looking knee right to Dillashaw's face.
Stokenhizer throws a vicious knee straight up the middle but Dillashaw blocks it with crossed arms.
Stokenhizer using the Thai plumb to throw knees but Dillashaw has his back arched nicely, preventing the strike.
A knee to the head by Stokenhizer.
Stokenhizer misses with a knee to the head.
Stokenhizer with the Thai clinch, lands a knee to the head.

Stokenhizer jumps guard.
The referee is asking the fighters to pick up the pace.
Dillashaw is intent on slowing down the pace of the fight, simply looking to control.
Stokenhizer keeping moving, preventing Dillashaw from controlling successfully.

Dillashaw gets to his feet. Stokenhizer looking to butt scoot but the ref puts an end to that. On your feet son!
Dillashaw pushes Stokenhizer up against the cage in a clinch.

That's four minutes gone in the round.
Stokenhizer landing knees to the head.
Dillashaw wants a takedown.
Dillashaw is working on a leg, looking for a takedown but Stokenhizer is defending well.
Stokenhizer gets double underhooks to prevent a takedown attempt from Dillashaw.
Dillashaw looking for a takedown.
Dillashaw is trying to work for a single leg takedown but Stokenhizer pulls him back up using the underhooks.
The crowd are loving this. Great action here.
As the round comes to an end the crowd are showing their appreciation for a great round of action.
Dillashaw fails to pull the fight into his guard.
Stokenhizer is a painfully thin specimen of a man. You do wonder whether a good body kick would snap him clean in two.
Dillashaw drops down looking for an ankle pick but Stokenhizer pulls his leg out and moves away.
The fight moves into the clinch position.
And thats the end of the round the fighters go back to their corners.
A close round but Hanz Stokenhizer will probably get the nod.
That's time! Dillashaw's corner gives him a slap on the ass as he gets ready to fight.

Stokenhizer tries a head kick but it misses.
The fight moves into the clinch position.
Dillashaw has a body lock and is looking for a takedown. Stokenhizer is bouncing around trying to prevent the takedown and somehow he has indeed managed to stay on his feet.
Stokenhizer is pressed up against the cage. Dillashaw has hold of a leg and is looking to drag Stokenhizer down to the mat. Stokenhizer avoids the attempt though and has circled away. We're back to striking at a distance.
Dillashaw pushes Stokenhizer up against the cage in a clinch.
Dillashaw jumps guard but his hands slip and he falls flat on his back. Well, he's made himself look a right mug there, as Stokenhizer walks away with a smile on his face. Dillashaw gets slowly back to his feet and shakes his head.
That's three failed takedown attempts in the round for TJ Dillashaw. That's going to take a lot out of him.
Stokenhizer defends well against a solid takedown attempt from Dillashaw.
Both fighters are looking to counter, which isn't making for the most exciting fight in the world.
Dillashaw moves into the clinch.
That's one minute gone in the round.
Dillashaw tries to jump guard but he falls flat on his backside. Stokenhizer smiles and moves away.
Dillashaw fails with a takedown attempt from distance.
Dillashaw with a poor takedown
and Stokenhizer counters with a head kick.
Horrible takedown by Dillashaw or perhaps it was just good defense by Stokenhizer which made him look bad.
Stokenhizer swinging wildly here.
That's two minutes gone in the round.

Dillashaw closes the distance and scores a nice trip takedown into half guard. Stokenhizer did well to prevent Dillashaw getting side control.
Dillashaw wants to take a breather but Stokenhizer is having none of it.
Stokenhizer trying to control here.
Stokenhizer is looking for a sweep. Dillashaw is wise to his cunning plan and keeps the top position.
The referee claps his hands together and tells the fighters to work.
Dillashaw trying to control the action but Stokenhizer is working from the bottom.
That's three minutes gone in the round.

We're going to have a standup here because TJ Dillashaw wasn't active enough for the referee's liking.
A head kick from Stokenhizer lands but Dillashaw takes it in his stride.
Dillashaw clinches.
Dillashaw has a body lock and is looking for a takedown. Stokenhizer is bouncing around trying to prevent the takedown and somehow he has indeed managed to stay on his feet.
Dillashaw is looking for a takedown.
Stokenhizer gets double underhooks to prevent a takedown attempt from Dillashaw.
Dillashaw has dropped down and is looking to force the takedown but it's defended by Stokenhizer after a bit of a struggle.
Dillashaw is working for takedown but Stokenhizer is calmly controlling the position for now.
That's four minutes gone in the round.
Dillashaw tries to pull guard but Stokenhizer holds him up against the cage and eventually Dillashaw drops back down to his feet.
Dillashaw tries for a takedown. No joy.
Stokenhizer with an attempt at a knee that misses.
Dillashaw tries to score a body lock takedown but Stokenhizer shows good agility there to stay on his feet.
Dillashaw drops to a knee looking for a takedown but Stokenhizer gets the underhooks and prevents it.
Stokenhizer connects with a knee to the head.
The crowd applaud the fighters efforts here as the round comes to an end.
Stokenhizer connects with a nasty looking knee right to Dillashaw's face.
Dillashaw tries to score a body lock takedown but Stokenhizer shows good agility there to stay on his feet.
Dillashaw is looking for a takedown up against the cage. Stokenhizer gets underhooks though and prevents the takedown attempt.
And thats the end of the round the fighters go back to their corners.
TJ Dillashaw dominated that second round.
That's the end of the round. The referee orders the cornermen out of the cage so we can get back down to business. This is the final round!

Dillashaw shoots for a double leg takedown but Stokenhizer sprawls well. He's pushed Dillashaw's face into the mat and manages to get back to his feet relatively easily.
Stokenhizer swings and misses with a hook to the body.
Stokenhizer keeps the fight standing with a nice sprawl.
Dillashaw dives in and grabs Stokenhizer's left leg, looking for a takedown. Stokenhizer pushes down on Dillashaw's head and hops out.
That's three failed takedown attempts in the round for TJ Dillashaw. That's going to take a lot out of him.
Dillashaw has managed to clinch.
Dillashaw tries to pull guard but Stokenhizer won't allow it.
Dillashaw is working on a leg, looking for a takedown but Stokenhizer is defending well.
Dillashaw tries to pull guard but can't drag his opponent to the mat. Stokenhizer just stands there and leans against the cage.
That's one minute gone in the round.
Stokenhizer with the Thai clinch. He's looking to land a big knee but he's not managed it this time.
Dillashaw tries to jump guard but he falls flat on his backside. Stokenhizer smiles and moves away.
Dillashaw tries to score a power double leg takedown but Stokenhizer sees that one coming and sprawls well. That will dishearten Dillashaw somewhat.
Both fighters are breathing heavily.
Dillashaw shoots for a double leg takedown but Stokenhizer sprawls well. He's pushed Dillashaw's face into the mat and manages to get back to his feet relatively easily.
TJ Dillashaw seems to be the more aggressive standup fighter in this bout.
Stokenhizer misses with a half-hearted attempt at a head kick.
That's two minutes gone in the round.
Dillashaw gets tackled into the cage by Stokenhizer. Stokenhizer maintains the clinch.
Dillashaw tries to pull guard but can't drag his opponent to the mat. Stokenhizer just stands there and leans against the cage.
Dillashaw is looking for a takedown up against the cage. Stokenhizer gets underhooks though and prevents the takedown attempt.
Dillashaw wants to take the fight to the mat but Stokenhizer manages to get underhooks and keep the fight in the clinch.
Dillashaw tries for a takedown. No joy.
Stokenhizer prevents a takedown attempt there.
Stokenhizer jumps guard and drags Dillashaw to the mat. He's obviously going to be looking for submissions off his back.
Dillashaw trying to control the position from guard on top but Stokenhizer is wriggling around, looking for whatever he can.
Dillashaw postures up in Stokenhizer's guard and throws a big left but Stokenhizer blocks it.
The ref warns both fighters not to hold the cage as they work up against the meshing.
That's three minutes gone in the round.
Stokenhizer avoiding any damage from the ground and pound.
Stokenhizer working a defensive guard here.
Stokenhizer keeping moving, preventing Dillashaw from controlling successfully.
Dillashaw is frustrating his opponent with some stalling tactics from top position.
The referee must be thinking about standing these guys back up.
The ref stands the fighters back up because TJ Dillashaw just wasn't active enough.
Dillashaw changes levels and looks for a double leg takedown. Stokenhizer tries to avoid it but Dillashaw manages to keep hold of a leg and drag Stokenhizer to the ground. Stokenhizer escapes though and pops straight back up to his feet.
That's four minutes gone in the round.
Dillashaw shoots in and scores a nice double leg takedown into half guard.
Dillashaw tries to stand but his hand is stuck under Stokenhizer.
Dillashaw is trying to control the action in half guard but Stokenhizer is working away on the bottom, looking perhaps to get back to full guard.
Stokenhizer is looking to control Dillashaw's leg but it's slowly edging free. Can Stokenhizer avoid being mounted?
Dillashaw is keen to just control but Stokenhizer is a slippery customer.
The crowd applaud the fighters efforts here as the round comes to an end.
Dillashaw is figuring out what he wants to do next.
The referee looks like he's ready to step in and stand the fighters back up.
The ref stands the fighters back up because TJ Dillashaw just wasn't active enough.
Dillashaw forces Stokenhizer back against the cage and clinches.
And that's the end of the fight!
TJ Dillashaw showed his dominance in that final round.
I think Dillashaw has won this one but let's see what the judges have to say. Over to the ring announcer for the scorecards.
Ladies and gentlemen, after 3 rounds of action, we go to the scorecards for a decision.
Judge Don Winkell scores the fight 29:28
Judge Timothy Bukovac scores the fight 30:27
Judge Jack Bonds scores the fight 29:28
In favor of your winner, by unanimous decision... TJ Dillashaw!
An intense looking TJ Dillashaw took to the microphone post fight and gave a little speech: 'Just Like I said im gonna beat him so bad.I just give him an ass whoppin,And look at him PITY,WEAK,DOUCHE,and DISGUSTING OLD MAN..LETS JUST BE HONEST MAN HES A CLOWN IN THE SPORT,a REJECT,THE SPORT DOESNT NEED HIM.GO HOME AND FIND ANOTHER JOB,YOU DONT BELONG HERE.'.
|
|
|
|
|
|
|
|
|
|
|
|
|
|
|
|
|
|
|
|
|
|
|
| S |
C
A |
G |
S |
C
B |
G |
|
S |
C |
G |
|
energy
A | B |
|
hype
A | B |
|
pop
A | B |
|
mgr
A | B |
|
FIGHT
RATING
40% |
|
|
|
|
|
|

