|
|
PBP Commentary |
Coming up we have a bantamweight MMA rules bout between Alex Brealey (ranked 0 p4p, 0 weight class) and Mitsuyo Maeda (ranked 0 p4p, 0 weight class). The atmosphere really building for this one as we go over to our ring announcer for the fighter introductions!
 |
|
 |
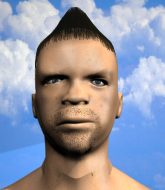
| 177 cm
35
134 lbs
19 - 7 - 0 |
|
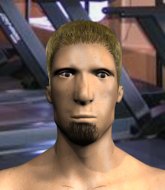
170 cm
32
142 lbs
23 - 17 - 0 |
Abu Dhabi Champ
World class boxer
Granite chin |
|
TWGC Champion
Decent boxing
Fast |
|
| |
|
Ladies and gentlemen. This fight is 3 rounds, in the bantamweight division.
Introducing the fighter to my left, fighting out of the red corner.
With a record of
19 - 7 - 0, fighting out of New York, Alex Brealey!
And introducing the fighter to my right, fighting out of the blue corner.
With a record of
23 - 17 - 0, fighting out of St Petersburg, Mitsuyo Maeda!
The judges for this bout are , Frank Antenori and Jack Bonds.

The bell rings for round one and we are underway!
Maeda takes one to the side of the head.
Brealey displays good takedown defense there as he swats away a double leg from Maeda.
Brealey throws a wild combination but nothing lands.
Maeda takes a punch right to his stomach. That took the wind out of him momentarily.
Brealey looks to score with a jab to the body but Maeda is just out of range.
Brealey looks to have improved his striking defense since last time we saw him fight.
Brealey ducks down and throws a hook to the body but Maeda moves away.
Maeda will have to do better than that with his takedown attempts.

Maeda closes the distance and scores a nice trip takedown into half guard. Brealey did well to prevent Maeda getting side control.
The referee claps his hands together and tells the fighters to work.
Maeda working some ground and pound from close in. He's looking to maintain this position and strike for a while by the looks of things... although he'll probably advance to full mount in a minute now I've said that.
Maeda stalling.
Maeda thows a huge punch but Brealey dodges it nicely.
Brealey trying to hold on to Maeda's head to control him but Maeda postures up.
Brealey wants to get back to full guard.

That's one minute gone in the round.
Maeda lands strikes from half guard.
Brealey pushes Maeda off looking to stand but Maeda dives back in and keeps control.
Brealey on the receiving end of some nice ground and pound.
The fighters are pressed up against the cage, both looking to find a bit of space to work.
Maeda is working hard to pass the guard. He's done it - he's now in full mount! Trouble for Brealey!
Maeda working Brealey over with strikes here.
Brealey wants to try and get back to his feet.
Maeda lands a shot to the body, followed up by a shot to the exposed head of his trapped opponent.
Maeda looking to ground and pound his opponent to a finish here.
Brealey is trying to escape the mount.
The crowd cheering loudly, showing their appreciation for the quality fight we're seeing here.
Brealey bucks up and manages to get a nice reversal! He's in guard on the top - nicely done!
Brealey in full guard, throwing the ground and pound. No damage this time.
Brealey trying to control but Maeda is working from the bottom.
Maeda wants to sweep but no luck.

That's two minutes gone in the round.
Brealey wants to control from the top but Maeda keeps moving.
Maeda looks more muscular than last time we saw him. He must have been on the weights.

Maeda is working an open guard so Brealey takes the opportunity to get back to his feet.
Brealey scores with a sloppy punch to the body. Not much technique there but it did the business.
Brealey pivots as if he's going to throw a leg kick but stops half way.
Maeda tries to shoot in for a takedown. He's got hold of a leg but Brealey swivels and escapes.
Alex Brealey has stuffed three takedown attempts in the round now. That's going to take a lot out of Mitsuyo Maeda.
Maeda keeping a good distance there, avoiding the body shot.
Brealey swings and misses with a hook to the body.
Maeda has a takedown stuffed.
Maeda checks a low kick from Brealey.
Alex Brealey is looking to keep the fight on the feet at all costs.

That's three minutes gone in the round.
Brealey swings and misses with a hook to the body.
Brealey throws a shot from downtown. Maeda moves away and avoids it.
Maeda has his takedown stuffed
and Brealey counters with a good right hand that lands right on the jaw.
Brealey swings away with a leg kick that misses.
Brealey really does look like a pencil wearing a pair of gloves. Let's hope he has a gameplan to suit that ridiculous body shape.
Brealey stuffs a takedown. It's all about dictating where the fight takes place and Brealey wants it to stay on the feet.
Maeda manages to get an easy takedown there - catching Brealey on his heels. He'll look to pass Brealey's guard now, I'm sure.
Brealey has Maeda pulled in close to control his posture.
Maeda preventing the sweep.
Brealey keeping moving, preventing Maeda from controlling successfully.
Maeda controlling from the guard. I say controlling but really, he's stalling.
Brealey wants to stand and escape but Maeda is having none of it.

That's four minutes gone in the round.
Brealey avoiding any damage from the ground and pound.

The referee has ruled that neither fighter is active enough on the ground and has stood them back up.
A lazy left from Brealey finds it's target.
Maeda with a lazy takedown attempt
and Brealey counters with a leg kick.
Wooooo! Give it up for these two warriors! They are putting on a show!
Brealey misses with a leg kick.
Brealey fakes high and swings low for a body shot but Maeda manages to avoid it.
Brealey displays good takedown defense there as he swats away a double leg from Maeda.
Jab, cross, leg kick. Nice combination by Brealey!

It looks like Mitsuyo Maeda has been cut.
Maeda feints and then dives in with a takedown. That was a long way out but the feint bought him enough time to close the distance and complete the takedown. Now we'll play guard for a bit and see who can get the better of that position.
The crowd are going absolutely nuts as the round comes to an end - what a fantastic round of action!
Brealey wants to stand up but Maeda is controlling him.
Maeda distracts Brealey with his right hand and drops a big elbow with his other arm.
Brealey keeping moving, preventing Maeda from controlling successfully.
And thats the end of the round the fighters go back to their corners.
A close round but Mitsuyo Maeda will probably get the nod.
The cut man is working on Mitsuyo Maeda's cut.
OK. That's time! The bell goes and we're back to the action.

Brealey throws a body punch but Maeda moves out of range.
Maeda shoots in and drives through. Brealey sprawls well.
Brealey throws a right and a left that both miss.
Brealey tries to sprawl but Maeda drives through with a takedown into half guard.
Brealey pushes Maeda off looking to stand but Maeda dives back in and keeps control.
Maeda with the ground and pound but Brealey uses the opportunity to regain guard.
Brealey manages to sweep nicely, so he's now on top. Maeda manages to get himself to full guard.
Maeda trying to strike from the bottom but really, it's not the best position to be doing that from!
Maeda looking to sweep here. No luck so far.
Maeda is persisting with the attempt to improve his position.
Brealey passes into half guard under a barage of strikes.
Maeda is trying to get back to full guard.
That's one minute gone in the round.
Ground and pound from Brealey.
Brealey not landing any meaningful shots this time.
Brealey working the head and body with strikes.
Brealey prevents Maeda from improving his position.
Brealey performing his best blanket impression for a moment.
Brealey missing with the ground and pound from half guard.
Maeda is looking to improve his position.
Brealey scoring with strikes to the body and head.
Maeda regains full guard. Nicely done.
That's two minutes gone in the round.
Brealey is looking to stand up but Maeda won't let him.
Brealey makes a bit of distance and scores with some ground and pound, still in guard.
Brealey throws a strike but Maeda rolls with it and manages to sweep. Now he's in guard on top.
Brealey is working from a closed guard but he's struggling to control his opponent.
Brealey manages to sweep nicely, so he's now on top. Maeda manages to get himself to full guard.
The crowd cheering loudly, showing their appreciation for the quality fight we're seeing here.
Brealey has decided he wants to stand but the closed guard of Maeda is proving hard to escape from.
Brealey tries to free his leg and advance position but Maeda is retaining full guard.
Brealey has been looking to land a fair amount of strikes on the ground. He might be looking to soften his opponent up in order to work for a submission.
Maeda has a butterfly guard looking to sweep but Brealey has passed into side control.
Maeda dodges the ground and pound from Brealey.
That's three minutes gone in the round.
Maeda gets back to half guard.
Maeda has hold of Brealey's hands but Brealey slips his arm to the side and lands an elbow.
The fighters are battling for position here. Maeda manages to regain full guard. Nice work.
Brealey lands a couple of elbows.
Maeda tries to land a sweep but no joy.
Maeda keeping moving, preventing Brealey from controlling successfully.
Maeda wants to sweep here but Brealey controlling him for the moment.
Brealey wants to get up but he can't break Maeda's closed guard. He needs to be careful trying to break the legs open, as he's open to submissions here.
Maeda looking to hit a scissor sweep but Brealey is one step ahead there.
That's four minutes gone in the round.
Brealey controls the pace of the fight for a moment.

We're going to have a standup here because Alex Brealey wasn't active enough for the referee's liking.
Maeda tries for a takedown but Brealey circles away easily
and Brealey counters with a straight right hand.
Brealey stuns Maeda with a nice body shot, before stepping back out of range.
Brealey thows a body shot but no joy.
Fantastic stuff here - a very entertaining period of action, which has drawn cheers from the crowd.
Brealey defends well against a solid takedown attempt from Maeda.
Alex Brealey has stuffed three takedown attempts in the round now. That's going to take a lot out of Mitsuyo Maeda.
As the round comes to an end the crowd are showing their appreciation for a great round of action.
Brealey throws a hard body shot but it just misses.
Brealey misses with a wild body shot.
Brealey throws a body punch but Maeda moves out of range.
Brealey stuffs the takedown.
And thats the end of the round the fighters go back to their corners.
Alex Brealey dominated that second round.
The cut man is working on Mitsuyo Maeda's cut.
The minute break is over - no more time for sponges and pep talks - back to the action! This is the final round!

Maeda scores a trip takedown into side control. Nice.
Brealey prevents Maeda from moving into mount.
Brealey is putting a lot of effort into getting back to his feet here.
Check out the look on Maeda's face as he threw that strike - that's one determined fighter!
The ref warns both fighters not to hold the cage as they work up against the meshing.
Brealey is looking to work his way out of this bad position but Maeda is controlling him well.
Brealey takes a couple of big shots there - the referee warns him that he has to defend himself better.
You can see the frustration on Brealey's face, being in this tough position on the bottom.
Maeda is trying to ground and pound but Brealey uses the momentary lack of control by Maeda to regain half guard.
Brealey blocking the ground and pound attempt from Maeda.
Brealey pushes Maeda off but Maeda dives into side control.
Maeda trying to control the action but Brealey is working from the bottom.
That's one minute gone in the round.
Sloppy strikes there by Maeda.
Brealey tries to get back to half guard but can't.
Brealey manages to get one leg in to regain half guard.
Brealey wants to control but Maeda is keeping busy.
Maeda not throwing his punches with enough precision this time.
Brealey is trying to stand up here but Maeda is controlling him well.
Brealey is working for an escape here. He's hooked one of Maeda's legs and he's managed to sneak out and take Maeda's back!
Brealey misses with an elbow to the head.
Brealey is trying to stick to Maeda's back but Maeda is turning into Brealey. He's managed to reverse the position - now he's in Brealey's guard. Polite applause from the crowd in appreciation of some nice Jiu Jitsu by Maeda.
Maeda stands and throws Brealey's legs to the side, diving into side control.
That's two minutes gone in the round.
Maeda working the ground and pound.
Brealey is looking to regain half guard here but Maeda keeps moving and retains side control.
The crowd are loving this. Great action here.
Brealey is pushing Maeda's head away, looking to escape. Maeda manages to hold on to the position though.
Brealey is not in a great position here, taking some shots.
Maeda working away.
Brealey is in a bad position, trying to hold on for dear life but he is really struggling to maintain any sort of control.
Brealey is looking to reverse the position.
Maeda working away.
Maeda trying to control the action but Brealey is working from the bottom.
Maeda looks up at the clock and then as Brealey takes his cue and looks up at the clock too, Maeda smacks him right in the chops with a big elbow! How rude!
That's three minutes gone in the round.
Maeda lands a nice forearm strike.
A lull in the action here.
Maeda working the head with strikes.
Maeda lands a knee to the body and follows it up with some ground and pound to the head. That will wear Brealey down.
Maeda wants to control but Brealey is keeping him busy.
The strikes coming from Maeda are missing the target in this wave of attacks.
Maeda trying to control the action but Brealey is working from the bottom.
Maeda landing strikes.
Maeda advances nicely into full mount.
That's four minutes gone in the round.
Maeda scoring with strikes but Brealey is staying in there.
Brealey can't escape the position.
Fantastic stuff here - a very entertaining period of action, which has drawn cheers from the crowd.
Maeda wants to control the pace but Brealey is squirming around nicely.
Maeda landing strikes from the mount and Brealey is in trouble!
Brealey is desperately trying to get back to half guard.
Maeda scoring with some good ground and pound from mount here. Will he manage to finish Brealey?
Brealey gets back to half guard.
Brealey regains full guard. Nicely done.
Brealey wants to stand and escape but Maeda is having none of it.
The crowd are going absolutely nuts as the round comes to an end - what a fantastic round of action!
Brealey looking to hit a scissor sweep but Maeda is one step ahead there.
Maeda wants to control from the top but Brealey keeps moving.
And that's the end of the fight!
Mitsuyo Maeda comfortably won the final round on my scorecard.
I think Maeda has won this one but let's see whether the judges agree with me. Over to the ring announcer for the scorecards.
Ladies and gentlemen, after 3 rounds of action, we go to the scorecards for a decision.
Judge Percy O'Donnell scores the fight 29:29
Judge Frank Antenori scores the fight 28:29
Judge Jack Bonds scores the fight 28:29
In favor of your winner, by majority decision... Mitsuyo Maeda!
Mitsuyo Maeda made sure to mention his sponsor, Ultra Fight Gear in his post fight interview.
|
|
|
|
|
|
|
|
|
|
|
|
|
|
|
|
|
|
|
|
|
|
|
| S |
C
A |
G |
S |
C
B |
G |
|
S |
C |
G |
|
energy
A | B |
|
hype
A | B |
|
pop
A | B |
|
mgr
A | B |
|
FIGHT
RATING
90% |
|
|
|
|
|
|

