|
|
PBP Commentary |
Coming up we have a heavyweight MMA rules bout between Dirk Blaylock (ranked 0 p4p, 0 weight class) and Damo Bodhidharma (ranked 0 p4p, 0 weight class). Blaylock's ring entrance music is that housewives' favourite, Head Like a Hole. Both fighters really staring each other down here, as Damo Bodhidharma enters the cage!
 |
|
 |
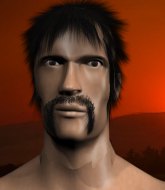
| 192 cm
28
273 lbs
19 - 7 - 0 |
|
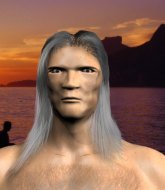
180 cm
29
265 lbs
21 - 15 - 0 |
Good wrestling
World class boxer
Insanely flexible |
|
Good wrestler
World class MT
Good gas tank |
|
| |
|
Ladies and gentlemen. This fight is 3 rounds, in the heavyweight division.
Introducing the fighter to my left, fighting out of the red corner.
With a record of
19 - 7 - 0, fighting out of Las Vegas, Dirk Blaylock!
And introducing the fighter to my right, fighting out of the blue corner.
With a record of
21 - 15 - 0, fighting out of Amsterdam, Damo Bodhidharma!
The judges for this bout are Jack Bonds, Frank Antenori and Don Winkell.

The bell rings for round one and we are underway!

Blaylock clinches up against the cage.
Blaylock is trying to drag Bodhidharma to the mat but Bodhidharma just about manages to keep his footing. He used the cage to his advantage there.
Blaylock tried to land a shot to the body but connects with Bodhidharma's elbow.

Bodhidharma escapes the clinch and we're back to striking.
Blaylock tries to clinch but Bodhidharma moves out of range.
Bodhidharma finds nothing but air with that leg kick attempt.
Blaylock throws a jab to the body, straight down the pipe. Boom. That sent Bodhidharma stumbling backwards but he manages to regain his composure quickly.
Blaylock tries to clinch but Bodhidharma is having none of it.
A head kick misses from Bodhidharma.
Blaylock wants to clinch.
We've been hearing reports that Blaylock has been drilling takedowns in recent sessions so let's see if that has an impact on the result of this fight.
Dirk Blaylock seems to be the more aggressive standup fighter in this bout.
Blaylock tries to grapple but his opponent circles

and Bodhidharma counters into the clinch. Nicely done.
Blaylock is working hard here but doesn't seem to be able to control effectively, up against the cage.
A head punch on the inside from Bodhidharma fails to land.

That's one minute gone in the round.
Bodhidharma taking a breather.
Blaylock misses with a hook to the ribs.
Blaylock tries a shoulder strike but it doesn't do any damage.
Bodhidharma has Blaylock pushed against the cage.
Bodhidharma wants to break free. God knows he wants to breaaaak freeee.
Bodhidharma's corner are urging him to control the action in the clinch for a moment, rather than mount any serious offense. I'm sure the crowd appreciate those instructions... not.
Blaylock misses with the head strike.
Bodhidharma blocking some punches.
Bodhidharma is clearly stalling here... Pick up the pace son.
Bodhidharma has had enough of the clinch and is looking to separate.
Blaylock slows down the pace here.

That's two minutes gone in the round.
Blaylock working aggressively here.
Blaylock lands a nice shot to the body.
Blaylock misses with a knee strike.
Blaylock goes for a body shot but it's blocked.
Blaylock lands a nice uppercut.
We've seen a great period of action over the last minute or so - credit to both fighters for going all out!
Blaylock tries to stall but Bodhidharma uses the opportunity to gain a better position.
Bodhidharma looks more muscular than last time we saw him. He must have been on the weights.
Bodhidharma is trying to push Blaylock away but Blaylock has him pressed against the cage, so he's going nowhere.
A real battle for position is taking place between these two warriors.
Bodhidharma breaks the clinch.
Bodhidharma takes a jab on the nose there. A little bit of blood seems to be coming out. Hopefully that won't affect his breathing.
Bodhidharma throws a body kick but he was well out of range there.
Damo Bodhidharma is looking to keep the fight on the feet at all costs.
Blaylock misses with a looping left.
Blaylock checks the leg kick.
Bodhidharma takes a jab right on the nose. That must have hurt but he shrugs his shoulders and looks to return the favor.

That's three minutes gone in the round.
Blaylock swings and misses with a hook to the body.
Blaylock moves in looking to clinch but Bodhidharma pushes him off.

Blaylock shoots in for a takedown from distance. He catches Bodhidharma napping and manages to drive through into side control!
The referee is asking the fighters to pick up the pace.
Blaylock trying to control the position but Bodhidharma is working away.
Blaylock cracks Bodhidharma with a big right hand but Bodhidharma just smiles back at him and invites him to have another go.
Bodhidharma can't do much from the bottom here.
Blaylock sitting in side control, looking to soften his opponent up with elbows and hammerfists but Bodhidharma is avoiding damage well and looking to escape the position.
Blaylock working the ground and pound but he's contacting the mat, not the fighter.
Bodhidharma is trying to get back to his feet.
The ref warns both fighters not to hold the cage as they work up against the meshing.
Bodhidharma is trying to improve his position.
You can see the frustration on Bodhidharma's face, being in this tough position on the bottom.

That's four minutes gone in the round.
Blaylock controlling the position from side mount.
Blaylock has been looking to land a fair amount of strikes on the ground. He might be looking to soften his opponent up in order to work for a submission.
We've seen a great period of action over the last minute or so - credit to both fighters for going all out!
Blaylock misses with the ground and pound.
Blaylock wants to control but Bodhidharma is keeping him busy.
Blaylock will need to keep those long limbs tucked in whilst he's on the ground, to prevent any submissions.
Blaylock in side control lands a decent elbow.
The crowd are going absolutely nuts as the round comes to an end - what a fantastic round of action!
Bodhidharma is in a bad spot here and he knows it... just holding on for now.
The fighters are starting to get a bit slippery now, which will make submissions a bit more difficult.
Bodhidharma parries the strikes from Blaylock easily there. Blaylock is wary of posturing up too much because it might enable Bodhidharma to escape.
And thats the end of the round the fighters go back to their corners.
Dirk Blaylock dominated that round.
The referee calls time. The cornermen exit stage left and we're back to business.

Bodhidharma avoids the clinch attempt nicely.
Bodhidharma throws a half hearted mid kick.
Blaylock swings and misses with a hook to the body.
Bodhidharma throws a head kick that misses.
Blaylock darts in and out, connecting with a jab.
Sloppy strikes from Blaylock. Those never looked like landing.
Blaylock throws a series of punches but Bodhidharma moves out of range.
Bodhidharma swats away the attempt to clinch by Blaylock.
Bodhidharma leaves Blaylock with his face pressed against the mat as he sprawls beautifully, defending against a solid takedown attempt.
Bodhidharma lunges at Blaylock with a hook that half lands and is half blocked by Blaylock's hand.

It looks like Dirk Blaylock has been cut.
Fantastic stuff here - a very entertaining period of action, which has drawn cheers from the crowd.
Bodhidharma avoids the clinch attempt nicely.
Bodhidharma scores with a head kick.
Damo Bodhidharma is looking to throw some combinations by the looks of things.
That's one minute gone in the round.
Blaylock wants to clinch
and Bodhidharma counters with a thumping low kick.
Blaylock shoots in for a takedown but Bodhidharma shows good takedown defense.
Blaylock tries to grapple but his opponent circles
and Bodhidharma counters by moving into the clinch. Good anticipation by Bodhidharma.
Bodhidharma working some nice short punches in the clinch.
Blaylock misses with a body punch.
Blaylock doesn't land with the attempted body shot.
Bodhidharma prevents a body shot from Blaylock.
Blaylock using the Thai plumb to throw knees but Bodhidharma has his back arched nicely, preventing the strike.
Blaylock trying to land knees to the body.
Bodhidharma manages to break the clinch.
Bodhidharma misses with a head kick.
A head kick misses from Bodhidharma.
That's two minutes gone in the round.
Blaylock rushes Bodhidharma and pushes him back against the cage in a clinch.
Bodhidharma prevents the takedown attempt.
That's three failed takedown attempts in the round for Dirk Blaylock. That's going to take a lot out of him.
This is a great period of action - very entertaining stuff!
Bodhidharma is trying to push Blaylock away but Blaylock has him pressed against the cage, so he's going nowhere.
Bodhidharma managing to block the knees to the body from Blaylock.
Blaylock misses with a knee to the head.
Blaylock trying to control the position but instead, Bodhidharma has worked for underhooks and has pushed Blaylock into the cage.
Bodhidharma pushes off and circles away, back to the middle of the mat.
A big left from Blaylock misses.
Blaylock closes the distance but Bodhidharma moves to the side
and Bodhidharma counters with a three punch combo that has Blaylock backing up. Blaylock nods at Bodhidharma to acknowledge the strikes.
Bodhidharma connects with a solid leg kick.
Blaylock connects with a slap. Keep your fist closed son.
That's three minutes gone in the round.
Blaylock changes levels and looks for a double leg takedown. Bodhidharma tries to avoid it but Blaylock manages to keep hold of a leg and drag Bodhidharma to the ground. Bodhidharma escapes though and pops straight back up to his feet.
Bodhidharma throws a nice head kick!
Blaylock shoots in looking for a takedown but Bodhidharma manages to keep the fight standing, pushing Blaylock's face into the canvas for good measure before circling away.
Damo Bodhidharma seems to be getting the better of the standup.
Bodhidharma misses with a half-hearted attempt at a head kick.
Bodhidharma scores with a punch to the gut of his opponent.
Both fighters are absolutely exhausted here.
Bodhidharma fails to land with a series of punches.
Bodhidharma lands a vicious shot with the stealth of a sniper and the strength of a viper. Are vipers that strong? I can think of lots of things that are stronger than a viper - not many rhyme with sniper though.
Fantastic stuff here - a very entertaining period of action, which has drawn cheers from the crowd.
Blaylock throws a loose over hand right and dives in with a double leg takedown. Bodhidharma tries to sprawl but it's too late and the fighters hit the mat. Blaylock is in Bodhidharma's guard.
We get told so often about how wrestlers don't like to be on their backs. Let's see if Bodhidharma can do anything to dispel that myth.
Bodhidharma not looking particularly offensive just at the moment.
Bodhidharma might have to switch it up a bit here because his efforts to control Blaylock haven't been going to plan, at least at the current moment in time.
Blaylock trying to control but Bodhidharma is working from the bottom.
Blaylock tries to free his leg and advance position but Bodhidharma is retaining full guard.
That's four minutes gone in the round.
Bodhidharma wants to stand and escape but Blaylock is having none of it.
Bodhidharma is looking to stand back up... there's a bit of a scramble and Blaylock dives into side control.
Blaylock lands a knee to the body and a forearm to the face.
Blaylock is looking to take a break and control but Bodhidharma is keeping him honest, looking to work from the bottom.
Bodhidharma really doesn't want to stay on the ground with Blaylock. If he can't get it back to his feet, it's only a matter of time before he'll be tapping out.
Bodhidharma is looking to reverse the position.
The crowd are going absolutely nuts as the round comes to an end - what a fantastic round of action!
Blaylock tries to advance to mount but can't.
Blaylock working the ground and pound but he's contacting the mat, not the fighter.
And thats the end of the round the fighters go back to their corners.
Damo Bodhidharma showed his class in that round. I'd imagine he'll take it on all the scorecards.
The cut man is working on Dirk Blaylock's cut.
The corners get their ten second warning. Both fighters stand from their stools and stare eachother down, ready to get back to the action. Let's get this one finished - here comes the final round!

Blaylock tries to grapple but his opponent circles
and Bodhidharma moves into the clinch.
Blaylock with the Thai clinch. He's looking to land a big knee but he's not managed it this time.
Bodhidharma lands a knee to the body.
Blaylock prevents Bodhidharma from breaking the clinch.
Bodhidharma avoiding damage as Blaylock throws knees to the body.
Blaylock tries to score a body lock takedown but Bodhidharma shows good agility there to stay on his feet.
Blaylock gets through Bodhidharma's defenses to land a nice punch to the side of the head.
Bodhidharma lands an uppercut.
Bodhidharma softening up his opponent with strikes, against the cage.
Dirk Blaylock's cut is getting worse.
We've seen a great period of action over the last minute or so - credit to both fighters for going all out!
A short right hand to the side of the head by Bodhidharma.
Bodhidharma lands with a good tight uppercut to the head.
Bodhidharma blocking some punches.
Blaylock goes for a takedown in the clinch but Bodhidharma prevents it.
That's one minute gone in the round.
Bodhidharma is working hard here but doesn't seem to be able to control effectively, up against the cage.
A left hand lands to the body for Bodhidharma.
Damo Bodhidharma seems to be working more effectively in the clinch in the fight so far.
Both fighters are breathing heavily.
Bodhidharma's corner calls for him to break the clinch, which he does.
Blaylock is using his height advantage well here, landing a good percentage of his punches.
Blaylock is looking to clinch but Bodhidharma is avoiding it.
Bodhidharma tries a head kick but it misses.
A jab from Bodhidharma finds it's way through Blaylock's defenses.
Blaylock fails with an attempt to clinch.
Blaylock tries to clinch but Bodhidharma moves out of range.
Bodhidharma on the wrong end of an overhand right that came out of nowhere.
A head kick misses from Bodhidharma.
Bodhidharma avoids the body shot from Blaylock.
Blaylock darts in trying to clinch
and Bodhidharma counters into the clinch. Nicely done.
That's two minutes gone in the round.
Bodhidharma breaks the clinch and we're back to striking at distance.
Fantastic stuff here - a very entertaining period of action, which has drawn cheers from the crowd.
Bodhidharma has his hands up protecting his head but a hook from Blaylock finds it's way round the side to connect with Bodhidharma's head.
Blaylock misses with a looping left.
A head kick misses from Bodhidharma.
Bodhidharma tries to move into range but Blaylock moves to the side and lands with a nice right hand.
Blaylock is using his reach advantage well here, landing the more effective single shots from range.
Jab from Blaylock.
Bodhidharma keeps the fight on the outside.
Blaylock misses with a looping right.
Blaylock gets cracked with a nice right hand there by Bodhidharma.
Blaylock misses with a straight right.
Bodhidharma connects with a body shot that sends Blaylock's belly button to the back.
That's three minutes gone in the round.

Bodhidharma lands a left and a right that send Blaylock crashing to the mat, dazed. Bodhidharma thinks about following him to the mat but decides to wave him back up to his feet!
The fans in attendance giving it up for the two fighters, who have really let it all hang out in the last minute or so!
Bodhidharma tries a head kick but it misses.
Bodhidharma throws a shot to the body.
Bodhidharma avoids the clinch attempt nicely.
Bodhidharma lands a big head kick that sends Blaylock tumbling to the mat! Bodhidharma takes a step backwards and waves Blaylock back to his feet - he wants the finish!

Blaylock is rocked!
Dirk Blaylock's cut is bleeding quite badly. He's got to try and protect it.
Blaylock moves to clinch but Bodhidharma breaks away
and Bodhidharma counters with a monster head kick that knocks Blaylock out cold! He topples like fallen a tree, crashing to the mat! Timbeeeeeerrr!
Ladies and gentlemen, after 3:33 of round 3, we have a winner by way of KO (Head Kick). Damo Bodhidharma!
Jumping up and down and very excited, Damo Bodhidharma waved his t-shirt featuring Tab out's logo in front of the cameras.
|
|
|
|
|
|
|
|
|
|
|
|
|
|
|
|
|
|
|
|
|
|
|
| S |
C
A |
G |
S |
C
B |
G |
|
S |
C |
G |
|
energy
A | B |
|
hype
A | B |
|
pop
A | B |
|
mgr
A | B |
|
FIGHT
RATING
100% |
|
|
|
|
|
|

