|
|
PBP Commentary |
Coming up we have a light heavyweight MMA rules bout between Woody May (ranked 0 p4p, 0 weight class) and Rome Jones (ranked 0 p4p, 0 weight class). May comes to the cage accompanied by Watch you Bleed by FFDP. Jones is bouncing up and down as he enters the arena, backed by Eminem & Royce Da 5'9 - Above the Law . Over to our ring announcer for the fighter introductions!
 |
|
 |
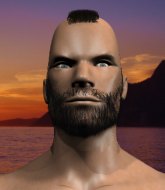
| 190 cm
20
210 lbs
4 - 1 - 0 |
|
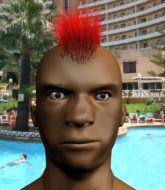
183 cm
19
220 lbs
4 - 1 - 0 |
BJJ Blue Belt
Excellent boxer
KO power |
|
Good wrestler
Basic striking
Tends to cut |
|
| |
|
Ladies and gentlemen. This fight is 3 rounds, in the light heavyweight division.
Introducing the fighter to my left, fighting out of the red corner.
With a record of
4 - 1 - 0, fighting out of St Petersburg, Woody May!
And introducing the fighter to my right, fighting out of the blue corner.
With a record of
4 - 1 - 0, fighting out of Amsterdam, Rome Jones!
The judges for this bout are Aafke Stam, Paul Aken and Nard Betker.

The bell rings for round one and we are underway!
May leaves Jones with his face pressed against the mat as he sprawls beautifully, defending against a solid takedown attempt.
Jab, cross, leg kick. Nice combination by May!

It looks like Rome Jones has been cut.

May gets to the clinch - let's see what his plan is here.
May prevents Jones from breaking the clinch.
Jones is trying to pull guard but May has him pressed against the cage.
Jones stops a takedown attempt from May.
We can't be sure of the tactics at this early stage but we have heard that Jones has been working on his takedowns a lot in the buildup to the fight and we can only assume he's going to look to take this to the mat.
Jones wants to break the clinch but can't.
Jones tries to pull guard but May holds him up against the cage and eventually Jones drops back down to his feet.
Woody May has stuffed three takedown attempts in the round now. That's going to take a lot out of Rome Jones.
Jones wants a takedown.
The crowd are loving this. Great action here.
Jones is looking for a takedown up against the cage. May gets underhooks though and prevents the takedown attempt.
Jones tries to take the fight to the ground by pulling guard but can't manage it.
May working some nice short punches in the clinch.
Jones jumps guard but his hands slip and he falls flat on his back. Well, he's made himself look a right mug there, as May walks away with a smile on his face. Jones gets slowly back to his feet and shakes his head.

May drops Jones with a hook right on the temple. He thinks about going to the ground but Jones looks back up at him and smiles so May waves him back to his feet - he obviously thinks he can knock him out after that shot landed.

Jones is rocked!
May has closed the distance and engaged Jones in a clinch.
Jones is still on wobbly legs! Can May finish him?

That's one minute gone in the round.
May pushes Jones back against the cage and unloads with a body punch.
Jones has May pressed up against the cage and is working for takedown. May manages to improve position though and keeps the fight standing.
Jones is trying to pull guard but May has him pressed against the cage.
Jones tries for a takedown but May manages to get underhooks.

May's corner calls for him to break the clinch, which he does.
May closes this distance looking for a takedown but Jones circles away.
Jones shoots in for a takedown - he's clinched up with May but May pushes him off and we're back to square one.
May drives through and clinches with Jones against the cage.
Jones is trying to pull guard but being pressed up against the cage enables May to keep the fight standing.
May lands a hook to the body. It's hard to tell if that hurt Jones or not.
Jones seems to have recovered his senses.
May taking a break, stalling in the clinch.
May lands a nice looking hook to the body, against the cage.
Jones has May pressed up against the cage and is working for takedown. May manages to improve position though and keeps the fight standing.

Jones has May pressed up against the cage. He's trying to work for a single leg takedown. Jones pulls back from the cage and twists to the side, sending May tumbling to the mat - Jones dives into May's guard.
Jones looks winded!
The crowd cheering loudly, showing their appreciation for the quality fight we're seeing here.
May controls Jones momentarily but Jones frees himself.
May has been talking about how he's improved his wrestling in the run up to the fight so let's see if that's enough to sway the balance.
May wants to sweep but no luck.
Jones trying to pass the guard but can't manage it just yet.

That's two minutes gone in the round.
Jones throws a big right hand that misses.
May is trying to control the position from the bottom.
May is really struggling to control Jones but he's trying to hold on to the position.

Woody May has forced the referee to step in and bring the fight back to the feet.
Nice takedown defense from Jones. No joy for May on that attempt.
May takes the fight into the clinch.
May stalling in the clinch but Jones improves position.
May gets double underhooks to prevent a takedown attempt from Jones.
Jones is looking to break free of the clinch but May has double underhooks.
May prevents Jones from breaking the clinch.

That's three minutes gone in the round.
Jones avoiding damage as May throws knees to the body.
May lands a hook to the side of the head.
Jones tries to jump guard but he falls flat on his backside. May smiles and moves away.
May wants to clinch.
Jones shoots in for a takedown. He's persisting with it as May sprawls well. May wins this battle and keeps the fight standing. Jones gets slowly back to his feet.
May shoots in and drives through. Jones sprawls well.
May throws a head kick but Jones moves out of range.
Jones throws a looping left and ducks down for a takedown. He's got his arms around May's waist but May gets an underhook and avoids the takedown by throwing Jones off to one side.
Jones shoots in with a lovely double leg takedown. May manages to land in full guard to minimise the damage.
The ref warns both fighters not to hold the cage as they work up against the meshing.
May keeping moving, preventing Jones from controlling successfully.

That's four minutes gone in the round.
Jones wants to pass the guard but May is keeping the position.

May has managed to wall walk up one of the corner posts to get back to his feet. Jones is pushing him up against the cage, looking to control the position.
Jones goes for a takedown in the clinch but May prevents it.
Jones is trying to pull guard but May turns him against the cage and we stay in the clinch.
Fantastic stuff here - a very entertaining period of action, which has drawn cheers from the crowd.
May lands a body shot in the clinch.
May goes for a takedown in the clinch but Jones prevents it.
May is working Jones over against the cage.
The crowd are going absolutely nuts as the round comes to an end - what a fantastic round of action!
Jones is looking for a takedown up against the cage. May gets underhooks though and prevents the takedown attempt.
May missing with knees to the body.
And thats the end of the round the fighters go back to their corners.
Woody May dominated that round.
The cut man is working on Rome Jones's cut.
That's time! Back to the action!

May stuffs a takedown. It's all about dictating where the fight takes place and May wants it to stay on the feet.
Jones shoots in for a double leg but May sprawls well. That's going to sap some energy.
No luck for Jones with that takedown attempt.
Woody May has stuffed three takedown attempts in the round now. That's going to take a lot out of Rome Jones.
May throws a shot to the body.
May cracks Jones with a nice right hand that draws applause from the crowd.
May closes the distance and clinches.
Jones is working for takedown but May is calmly controlling the position for now.
May scores with an uppercut up the middle.
We've seen a great period of action over the last minute or so - credit to both fighters for going all out!
Jones blocks an elbow strike from May.
Jones is working for takedown but May is calmly controlling the position for now.
May keeps control of Jones as he tries to wriggle out of the double underhooks.
Jones is trying to pull guard but May turns him against the cage and we stay in the clinch.
Jones is breathing heavily.
May drops Jones onto one knee with a big uppercut from the clinch! Jones is propped up by the cage and works his way back to his feet!
With the fighters up against the cage, May throws an elbow but misses.
Jones goes for a takedown in the clinch but May prevents it.
That's one minute gone in the round.
A short body shot lands from May as the two fighters clinch.
May cracks Jones with a nice body shot.
Jones drops to a knee looking for a takedown but May gets the underhooks and prevents it.
Jones is looking to take this one to the mat.
Jones jumps guard but May stands there with Jones around his waist. Jones gives up and drops back to his feet. We remain in the clinch.
Jones fails to pull guard.
Jones is trying to break the clinch but May has him pressed against the cage.
Jones is trying to push May away but May has him pressed against the cage, so he's going nowhere.
May gets underhooks to prevent Jones's takedown attempt.
That's two minutes gone in the round.
May manages to break the clinch.
Jones looks up at the clock. Bad move! May lands a right hand from hell, dropping Jones. May pounces and finishes the fight with a flurry of punches and elbows.
Ladies and gentlemen, after 2:10 of round 2, we have a winner by way of TKO (Strikes). Woody May!
Woody May really struggled to get his t-shirt on before his hand was raised. Making sure that The Adrenaline Matrix logo gets some air time is pretty tricky when you're all sweaty.
|
|
|
|
|
|
|
|
|
|
|
|
|
|
|
|
|
|
|
|
|
|
|
| S |
C
A |
G |
S |
C
B |
G |
|
S |
C |
G |
|
energy
A | B |
|
hype
A | B |
|
pop
A | B |
|
mgr
A | B |
|
FIGHT
RATING
100% |
|
|
|
|
|
|
