|
|
PBP Commentary |
Coming up we have a heavyweight MMA rules bout between Thomas Hatcher (ranked 0 p4p, 0 weight class) and Bigdog Digdog (ranked 0 p4p, 0 weight class). Over to our ring announcer for the fighter introductions!
 |
|
 |
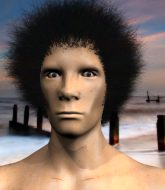
| 200 cm
25
276 lbs
1 - 0 - 0 |
|
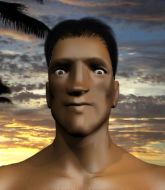
195 cm
25
250 lbs
3 - 1 - 0 |
BJJ White Belt
Excellent boxer
Very strong |
|
BJJ White Belt
Decent boxing
Determined |
|
| |
|
Ladies and gentlemen. This fight is 3 rounds, in the heavyweight division.
Introducing the fighter to my left, fighting out of the red corner.
With a record of
1 - 0 - 0, fighting out of Las Vegas, Thomas Hatcher!
And introducing the fighter to my right, fighting out of the blue corner.
With a record of
3 - 1 - 0, fighting out of Las Vegas, Bigdog Digdog!
The judges for this bout are Robert Twigg, Wesley Smith and Gwen Towbar.

The bell rings for round one and we are underway!
Hatcher misses with a two punch combination.
Hatcher throws a looping left and ducks down for a takedown. He's got his arms around Digdog's waist but Digdog gets an underhook and avoids the takedown by throwing Hatcher off to one side.
Hatcher tries to clinch up against the cage, rushing in to close the distance. Digdog manages to break the clinch and circles back to the middle of the mat.
Digdog misses with a half-hearted attempt at a head kick.
Digdog misses with a wild combination.
Digdog misses with the combination.
Hatcher changes levels and looks for a double leg takedown. Digdog tries to avoid it but Hatcher manages to keep hold of a leg and drag Digdog to the ground. Digdog escapes though and pops straight back up to his feet.
Bigdog Digdog seems to be the more aggressive standup fighter in this bout.
A really sloppy takedown attempt there from Hatcher.
That's three failed takedown attempts in the round for Thomas Hatcher. That's going to take a lot out of him.
Hatcher misses with a few strikes there.
Horrible takedown by Hatcher or perhaps it was just good defense by Digdog which made him look bad.
Digdog bobbing and weaving, closes the distance and lands a hook to the side of Hatcher's head.
Digdog throws a wild combination but nothing lands.
Hatcher takes a punch to the jaw and another one to the bread basket.
Digdog looks to score with a combo but nothing lands.
Hatcher throws a body punch but Digdog moves out of range.
Hatcher pulls out of a head kick attempt.

That's one minute gone in the round.
Digdog swinging wildly here.
Nice takedown defense from Digdog. No joy for Hatcher on that attempt.
Hatcher is breathing heavily.
Digdog misses with a head kick.
Bigdog Digdog is looking to keep the fight on the feet at all costs.
Digdog misses with a two punch combination.

Hatcher moves into range and clinches up with Digdog.
Hatcher jumps guard but Digdog turns him against the cage and keeps the fight standing.
Hatcher keeps the fight in the clinch, despite Digdog's efforts to push away.
Hatcher is trying to push Digdog away but Digdog has him pressed against the cage, so he's going nowhere.
Hatcher jumps guard but Digdog turns him against the cage and keeps the fight standing.
Hatcher tries to pull guard but Digdog won't allow it.
A frustrated look appears on Digdog's face as he tries to break the clinch.
Digdog tries to break the clinch but Hatcher is controlling the position.

That's two minutes gone in the round.
Hatcher is trying to force a seperation but Digdog has the dominant position.
Hatcher tries to land a knee to the head but Digdog blocks with his arms.
Hatcher wants to break free but Digdog has control.
A frustrated look appears on Hatcher's face as he tries to break the clinch.

Hatcher ties up his opponent against the cage and manages to drag the fight down to the ground. Hatcher no doubt will be looking to work submissions from his guard.
We must be close to a standup if these guys don't pick up the pace.
Digdog is looking to stand up but Hatcher won't let him.

Digdog got a little sloppy there for a moment and Hatcher has worked his way into a loose triangle - can he finish it?! No, Digdog has managed to get both his arms back between Hatcher's legs - danger averted.
Hatcher is trying to control the position from the bottom.
Digdog wanted to stand there but Hatcher had control of the position.
The ref warns both fighters not to hold the cage as they work up against the meshing.
Wooooo! Give it up for these two warriors! They are putting on a show!
Digdog stopping the sweep attempt from Hatcher.

That's three minutes gone in the round.
Digdog being controlled here momentarily.
Hatcher looking for a sweep. Not yet Hatcher, not yet.

The ref stands the fighters back up. Thomas Hatcher wasn't doing enough on the ground.
Hatcher showing good head movement there, avoiding the strikes from Digdog.
Decent striking displayed by Digdog there.
Digdog scores with a jab to the jaw.
Digdog chopping away at his opponent's legs.
Digdog throws a head kick but Hatcher moves out of range.
Digdog lets loose with a powerful body kick. Hatcher will feel that in the morning.
Hatcher tries to shoot in for a takedown. He's got hold of a leg but Digdog swivels and escapes.
Digdog misses with a wild combination.
Digdog lands with a nice combination. Hatcher backs away looking to recover.

That's four minutes gone in the round.
Digdog throws a right and a left that both miss.
Digdog throws a series of punches but Hatcher moves out of range.
Wooooo! Give it up for these two warriors! They are putting on a show!
Digdog steps to the side to avoid the strikes from Hatcher.
Hatcher pushes Digdog up against the cage in a clinch.
Digdog wants to break free. God knows he wants to breaaaak freeee.
Digdog wants to break free. God knows he wants to breaaaak freeee.
Digdog tries to circle away but Hatcher has him pinned against the cage.
Hatcher changes levels and goes for a takedown here. Digdog fights it off and pushes away nicely.
Digdog throws a right hand that Hatcher ducks under and follows up with a left that Hatcher also avoids with ease.
As the round comes to an end the crowd are showing their appreciation for a great round of action.
Hatcher shoots in for a double leg but Digdog sprawls well. That's going to sap some energy.
Digdog lands a front kick.
Digdog throws a two punch combo that lands nicely.
And thats the end of the round the fighters go back to their corners.
Bigdog Digdog dominated that round.
Well, the break between rounds is over. Let's get back to the scrappin!

Digdog misses with a two punch combination.
The crowd cheers as Digdog lands an impressive looking overhand right. Hatcher doesn't seem phased though.
Digdog falls off balance throwing a combination
and Hatcher holds on and brings the fighters into a clinch.
Hatcher has Digdog pushed against the cage.
Digdog wants to break the clinch but can't.
Digdog tries to circle away but Hatcher has him pinned against the cage.
Hatcher tries to pull guard but can't drag his opponent to the mat. Digdog just stands there and leans against the cage.
Hatcher can't get the takedown.
Hatcher works for underhooks and lands a body shot in the process.
Digdog tries to break free but Hatcher pushes him back against the cage.
Digdog wants to break free. God knows he wants to breaaaak freeee.
Digdog gets underhooks to prevent Hatcher's takedown attempt.
That's three failed takedown attempts in the round for Thomas Hatcher. That's going to take a lot out of him.
That's one minute gone in the round.
Hatcher looks like he'd prefer to be striking at range right now.

Hatcher breaks from the clinch.
Digdog looks to score with a combo but nothing lands.
A nice leg kick lands there from Digdog.
Digdog will need to tighten up his combinations if he doesn't want to gas himself out, swinging at thin air.
Thomas Hatcher is looking to throw some combinations by the looks of things.
Digdog misses with a wild combination.
Hatcher throws a head kick that misses and slips in the process. He scrambles back to his feet and the fighters circle.
Both fighters are absolutely exhausted here.
Hatcher changes levels and looks for a double leg takedown. Digdog tries to avoid it but Hatcher manages to keep hold of a leg and drag Digdog to the ground. Digdog escapes though and pops straight back up to his feet.
Digdog looks to land a combination but Hatcher avoids it well.
Hatcher shoots in looking for a takedown. Digdog tries to sprawl out of it but Hatcher keeps driving through. The fighters are pinned against the cage. Digdog manages to get underhooks and after a bit of a struggle, circles away and we're back to standing.
No joy there for Digdog, who threw a few shots but didn't land.
That's two minutes gone in the round.
Digdog lands a two punch combo.
Bigdog Digdog seems to be getting the better of the standup.
Digdog throws a series of punches but Hatcher avoids them all with ease.
Hatcher shoots in looking for a takedown. Digdog tries to sprawl out of it but Hatcher keeps driving through. The fighters are pinned against the cage. Digdog manages to get underhooks and after a bit of a struggle, circles away and we're back to standing.
Digdog throws a right and a left that Hatcher avoids nicely.
Digdog misses with a jab, cross combination.
Digdog works over Hatcher's head and body with a nice combination.
Hatcher tries to clinch but Digdog is having none of it.
Digdog misses with a series of wild punches.
Digdog lands a nice looking kick to the body. Hatcher takes a step back to recover.
Hatcher blocks the body kick.
The crowd are loving this. Great action here.
Hatcher fakes high and shoots in for a takedown but Digdog avoids it really well and circles away.
Digdog throws a head kick that misses.
That's three minutes gone in the round.
Digdog throws a body kick that digs right into the meat.
Digdog misses with a few strikes there.
Hatcher tries a head kick but it misses.
Digdog swinging wildly here.
Digdog throws a right and a left that Hatcher avoids nicely.
Digdog throws a head kick that looked like it stung.
Digdog throws a nice looking combination but Hatcher bobs and weaves to avoid any damage.
Digdog misses with a jab, cross combination.
Hatcher shoots in but no luck this time.
Digdog fails to land with a series of punches.
Digdog misses with the combination.
Digdog rushes forward with a series of wild hooks but Hatcher moves out of range and avoids them all easily.
That's four minutes gone in the round.
Hatcher shoots in for a takedown. "I don't think so" says Digdog as he avoids it easily.
Digdog scores with a leg kick.
Thud! ouch! good body kick from Digdog - that will leave a mark!
Digdog misses with a series of wild punches.
Digdog throws a head kick but Hatcher moves out of range.
A punch combination from Digdog misses.
Digdog throws a nice looking combination but Hatcher bobs and weaves to avoid any damage.
A punch combination from Digdog misses.
Digdog throws a right and a left that both miss.
As the round comes to an end the crowd are showing their appreciation for a great round of action.
Digdog throws a combination but comes up with nothing but fresh air.
This has been an exciting period of action!
Digdog displays good takedown defense there as he swats away a double leg from Hatcher.
Digdog scores with a one two! Hatcher had his feet all tangled up there and couldn't avoid the strikes.
And thats the end of the round the fighters go back to their corners.
Bigdog Digdog showed his class in that round. I'd imagine he'll take it on all the scorecards.
The fighters' corners scream their final instructions, as the referee calls time. Here we go, back to the action! This is the final round!

Digdog scores with a nice looking left hook and follows it up with an uppercut!
Digdog looks to land a combination but Hatcher avoids it well.
A punch combination from Digdog misses.
Hatcher slips a jab and a cross from Digdog.
A really sloppy takedown attempt there from Hatcher.
Hatcher clinches with his opponent.
A nice right hand lands inside from Hatcher.
Digdog is trying to force a seperation but Hatcher has the dominant position.
Hatcher is trying to break free.
Hatcher tries to pull guard but Digdog holds him up against the cage and eventually Hatcher drops back down to his feet.
Hatcher tries to score a body lock takedown but Digdog shows good agility there to stay on his feet.
That's three failed takedown attempts in the round for Thomas Hatcher. That's going to take a lot out of him.
Both fighters are breathing heavily.
Digdog is pressed up against the cage. Hatcher has hold of a leg and is looking to drag Digdog down to the mat. Digdog avoids the attempt though and has circled away. We're back to striking at a distance.
That's one minute gone in the round.
Digdog rushes forward with a series of wild hooks but Hatcher moves out of range and avoids them all easily.
Digdog swings away but doesn't land with a series of punches.
Digdog misses with the combination.
Hatcher slips a jab and a cross from Digdog.
Digdog throws a wild combination but nothing lands.
Hatcher doesn't manage to clinch there - Digdog circles away.
Hatcher shoots in for a takedown but Digdog shows good takedown defense.
Ooooh, nice body kick lands from Digdog. Hatcher shrugs it off though.
Digdog fakes a head punch and goes low to the body. Nicely done.
Digdog misses with a double jab.
Jab, jab by Digdog - just one landing.
A solid leg kick lands there for Digdog.
Hatcher closes the distance and clinches up with Digdog, looking for a takedown. Hatcher pushes Digdog against the cage but Digdog circles to the side and manages to break the clinch.
That's two minutes gone in the round.
Digdog misses with a series of wild punches.
Hatcher will be looking to protect his midsection after taking some solid kicks to the body.
A right-left combo lands from Digdog.
Digdog will need to tighten up his combinations if he doesn't want to gas himself out, swinging at thin air.
Digdog lets the fists fly and connects with a left straight followed by a right hook.
Hatcher dives in and grabs Digdog's left leg, looking for a takedown. Digdog pushes down on Hatcher's head and hops out.
The fans in attendance giving it up for the two fighters, who have really let it all hang out in the last minute or so!
Digdog lets loose with a powerful body kick. Hatcher will feel that in the morning.
Hatcher with poor footwork there. He got himself in a bit of a tangle, enabling Digdog to score with a decent uppercut.
Digdog throws a sloppy head kick and Hatcher moves out of range easily.
Digdog throws a quick head kick that skims the top of Hatcher's head.
Digdog shuffles to his left behind two crisp jabs. Hatcher eats them both and turns towards Digdog to reposition himself and eats a stinging right hand-left hook combo.
Digdog lunges in with swinging rights and lefts but Hatcher circles away quickly and effectively.
The step up in weight doesn't seem to be a problem for Digdog. He's performing admirably here against the bigger man.
Hatcher moves into range and clinches up with Digdog.
Hatcher with an attempt at a knee that misses.
That's three minutes gone in the round.
Hatcher lands a hook that snaps the head of Digdog backwards.
Digdog is trying to break free.
Hatcher has Digdog pressed against the cage, preventing Digdog from circling away and getting back to striking at range.
Digdog is trying to work out of this bad position, with his back against the cage.
Hatcher is trying to push Digdog away but Digdog has him pressed against the cage, so he's going nowhere.
Digdog wants to break free. God knows he wants to breaaaak freeee.
Hatcher fails to pull guard.
Digdog looks like he'd prefer to be striking at range right now.
Hatcher jumps guard but Digdog stands there with Hatcher around his waist. Hatcher gives up and drops back to his feet. We remain in the clinch.
Digdog tries to circle away but Hatcher has him pinned against the cage.
That's four minutes gone in the round.
Hatcher tries to jump guard but he falls flat on his backside. Digdog smiles and moves away.
That's a knee to de groin and it's over and out! Hatcher crumples to the ground after an illegal strike from Digdog - the referee stops the clock and Hatcher gets 5 minutes to recover from that one. "I'm sorry" says Digdog. Hatcher manages to get back to his feet and the fight resumes.
Digdog throws a combination but it was largely blocked by Hatcher.
Digdog throws a sloppy head kick and Hatcher moves out of range easily.
Digdog misses with a two punch combination.
Digdog defends well against a solid takedown attempt from Hatcher.
Digdog throws a body kick that digs right into the meat.
A combination from Digdog does no damage.
As the round comes to an end the crowd are showing their appreciation for a great round of action.
Digdog misses with the combination.
A decent looking body kick lands there for Digdog.
Thomas Hatcher has stepped it up - he knows he needs a finish here!
Bigdog Digdog is fighting for a decision - hopefully he's judged it right and he's actually winning the fight.
The crowd cheers as Digdog lands an impressive looking overhand right. Hatcher doesn't seem phased though.
And that's the end of the fight!
Bigdog Digdog comfortably won the final round on my scorecard.
I've got Digdog winning every round here. Surely the decision will go his way and he'll pick up a well deserved decision victory. Over to the ring announcer for the scorecards.
Ladies and gentlemen, after 3 rounds of action, we go to the scorecards for a decision.
Judge Robert Twigg scores the fight 27:30
Judge Wesley Smith scores the fight 27:30
Judge Gwen Towbar scores the fight 27:30
In favor of your winner, by unanimous decision... Bigdog Digdog!
|
|
|
|
|
|
|
|
|
|
|
|
|
|
|
|
|
|
|
|
|
|
|
| S |
C
A |
G |
S |
C
B |
G |
|
S |
C |
G |
|
energy
A | B |
|
hype
A | B |
|
pop
A | B |
|
mgr
A | B |
|
FIGHT
RATING
68% |
|
|
|
|
|
|

