|
|
PBP Commentary |
Coming up we have a welterweight MMA rules bout between Danny Barns (ranked 0 p4p, 0 weight class) and Test Fighter Ii (ranked 0 p4p, 0 weight class). We have two fighters making their debuts here, so let's see who comes out of this one with their first professional victory.
 |
|
 |
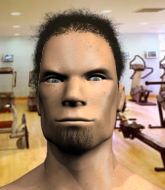
| 177 cm
18
174 lbs
0 - 0 - 0 |
|
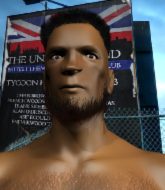
185 cm
25
175 lbs
0 - 0 - 0 |
BJJ Blue Belt
Counter fighter
Granite chin |
|
BJJ White Belt
Excellent boxer
Tends to cut |
|
| |
|
Ladies and gentlemen. This fight is 3 rounds, in the welterweight division.
Introducing the fighter to my left, fighting out of the red corner.
With a record of
0 - 0 - 0, fighting out of The Island, Danny Barns!
And introducing the fighter to my right, fighting out of the blue corner.
With a record of
0 - 0 - 0, fighting out of The Island, Test Fighter Ii!
The judges for this bout are , and .

The bell rings for round one and we are underway!
Fighter Ii misses with a series of wild punches.
Barns misses with a body shot. Nice footwork from Fighter Ii.
Fighter Ii throws a combination but it was largely blocked by Barns.
Nice sprawl there from Fighter Ii as Barns shoots in.
Barns takes a solid shot to the body. That one hurt him but he's trying not to show it.
Fighter Ii looks to land a combination but Barns avoids it well.
Fighter Ii uses good footwork to get in and out and land a nice right hand before Barns has time to react.
Fighter Ii misses with the combination.
Fighter Ii lands a jab followed by a nice looking cross.
Fighter Ii misses with a two punch combination.
Barns checks a leg kick.
Fighter Ii looks to score with a combo but nothing lands.
Barns is looking to take this fight into the clinch.
Barns rushes in with a sloppy looking punch
and Fighter Ii counters with a right hand to the body.
Fighter Ii takes a swing at Barns's ribcage but misses.

That's one minute gone in the round.
Barns shoots in looking for a takedown. Fighter Ii tries to sprawl out of it but Barns keeps driving through. The fighters are pinned against the cage. Fighter Ii manages to get underhooks and after a bit of a struggle, circles away and we're back to standing.
Barns takes a shot right to the bread basket.
Barns throws a jab but it's blocked by Fighter Ii.
Barns misses with a takedown attempt. He shot from a bit too far out.
That's three failed takedown attempts in the round for Danny Barns. That's going to take a lot out of him.
Fighter Ii throws a right hand that Barns ducks under and follows up with a left that Barns also avoids with ease.
Barns misses with a looping left.
Barns checks a low kick from Fighter Ii.
Barns throws an overhand right that lands on Fighter Ii's shoulder, as Fighter Ii tries to avoid the shot.
Fighter Ii ducks down and throws a hook to the body but Barns moves away.
Barns showing good head movement there, avoiding the strikes from Fighter Ii.
Fighter Ii dips down and scores with a jab to the body.

That's two minutes gone in the round.

Fighter Ii gets to the clinch - let's see what his plan is here.

Fighter Ii's corner calls for him to break the clinch, which he does.
Barns missing with a left hand there. Fighter Ii was out of range so wasted energy throwing that one.
Fighter Ii lunges in with swinging rights and lefts but Barns circles away quickly and effectively.
Fighter Ii looks winded!
Fighter Ii throws a hook to the side of Barns's head but Barns sees it coming and ducks under it beautifully.

Barns closes the distance and pushes Fighter Ii back into the cage.
Barns goes for a takedown attempt but Fighter Ii pushes him away and we're back to fighting at a distance.
Barns is looking to clinch.
Barns misses with a takedown attempt - Fighter Ii sprawls well and throws a nice strike on the way out which just misses.
This has been an exciting period of action!
Barns tries to move into range but Fighter Ii moves to the side and lands with a nice right hand.

That's three minutes gone in the round.
Barns pushing out the jab but it's not landing.
Fighter Ii takes a push kick to the midsection and stumbles backwards.
Test Fighter Ii seems to be the more aggressive standup fighter in this bout.
Fighter Ii pushes Barns up against the cage in a clinch.
Barns looking to stall.
Barns lands a body shot.
Barns tries to score a body lock takedown but Fighter Ii shows good agility there to stay on his feet.
Fighter Ii wants to get back to striking at distance but Barns won't allow it.
The pace slowing considerably in the clinch, as Barns takes a break from that fighting nonsense to think about the finer things in life.
Fighter Ii doesn't land with the attempted body shot.
Fighter Ii is trying to break the clinch but Barns is controlling him.

That's four minutes gone in the round.
Barns tried to land a shot to the body but connects with Fighter Ii's elbow.
Barns is looking for a takedown up against the cage. Fighter Ii gets underhooks though and prevents the takedown attempt.
Barns throws an elbow but it misses.
Fighter Ii gets underhooks to prevent Barns's takedown attempt.
Fighter Ii gets through Barns's defenses to land a nice punch to the side of the head.
Fighter Ii is trying to break the clinch but Barns has him pressed against the cage.
Barns tries to work over Fighter Ii's body with a swooping hook but it only glances the target.
Barns keeps the fight in the clinch, despite Fighter Ii's efforts to push away.

Barns is trying to trip Fighter Ii. He has hold of a leg but Fighter Ii is hopping around, keeping his balance for the moment. Barns persists though and gets the takedown into guard.
The fans in attendance giving it up for the two fighters, who have really let it all hang out in the last minute or so!
As the round comes to an end the crowd are showing their appreciation for a great round of action.
Barns works a leg free and moves into half guard.
The fighters are pressed up against the cage, both looking to find a bit of space to work.
Barns seems to be taking a bit of a break to think of his next move. He lands a short punch in the meantime.
Ground and pound from Barns.
And thats the end of the round the fighters go back to their corners.
A close round but Test Fighter Ii will probably get the nod.
The minute break is over - no more time for sponges and pep talks - back to the action!

Barns darts in and clinches Fighter Ii up against the cage.
Fighter Ii escapes the clinch and we're back to striking.
Barns throws a hook but Fighter Ii avoids it easily.
Fighter Ii throws an overhand right that lands on Barns's shoulder, as Barns tries to avoid the shot.
Fighter Ii slips under a jab from Barns.
Fighter Ii throws a low kick, looking for Barns's leg but Barns calmly moves out of range.
Fighter Ii fails to land with a series of punches.
Fighter Ii wants to slow Barns down by chopping away at his legs.
Barns attempts a low kick but it misses it's target.
Fighter Ii clinches up with Barns and pushes him back against the cage.
Barns is really struggling to find his range with his punches. Fighter Ii's reach advantage is clearly causing him problems.
An uppercut to the body lands inside from Fighter Ii.
Fighter Ii's corner are urging him to control the action in the clinch for a moment, rather than mount any serious offense. I'm sure the crowd appreciate those instructions... not.
Fighter Ii stops a takedown attempt from Barns.
That's one minute gone in the round.
Barns looking for a takedown.
Fighter Ii prevents a body shot from Barns.
Good anti-grappling being displayed by Fighter Ii as Barns tries to tie him up.
Fighter Ii tries to break free but Barns pushes him back against the cage.
Barns prevents Fighter Ii from breaking the clinch.
A shot in the inside from Fighter Ii.
Barns has Fighter Ii pressed against the cage, preventing Fighter Ii from circling away and getting back to striking at range.
Fighter Ii tries a body shot but Barns blocks it.
Barns swings wildly with an uppercut but Fighter Ii uses good head movement to avoid it.
Fighter Ii working some nice short punches in the clinch.
That's two minutes gone in the round.
Barns wants a takedown.
That's three failed takedown attempts in the round for Danny Barns. That's going to take a lot out of him.
Barns on the defensive, avoiding the knees to the body.
Fighter Ii lands a shoulder strike.
Barns tries to stall but Fighter Ii uses the opportunity to gain a better position.
Stalling in the clinch from Barns.
Barns is trying to work for a single leg takedown but Fighter Ii pulls him back up using the underhooks.
Barns goes for a takedown attempt but Fighter Ii pushes him away and we're back to fighting at a distance.
Barns looks for a takedown but Fighter Ii sprawls well.
Test Fighter Ii seems to be getting the better of the standup.
Barns misses with a hook. Fighter Ii ducked under it nicely.
Barns thows a body shot but no joy.
That's three minutes gone in the round.
Fighter Ii clinches up against the cage.
The fighters are starting to get sweaty, which will make takedowns a bit more tricky.
Barns drops down looking for an ankle pick but Fighter Ii pulls his leg out and moves away.
Fighter Ii just misses with a punch to the body.
Fighter Ii throws a right and a left that both miss.
Fighter Ii is breathing heavily.
Fighter Ii uses some good footwork to avoid the body shot by Barns.
Barns uses some good footwork to avoid the body shot by Fighter Ii.
Fighter Ii with a body punch. A glancing blow.
Barns tries to keep at a distance but Fighter Ii has taken the fight into the clinch.
Barns drags the fight down to the ground.
That's four minutes gone in the round.
Barns lands a beautiful switch and he's in full mount! That could spell trouble for Fighter Ii!
Barns lands a couple of nice shots there from mount.
Barns with shots to the head and body - Fighter Ii looks very uncomfortable down there.
Fantastic stuff here - a very entertaining period of action, which has drawn cheers from the crowd.
Barns dominating with strikes here.
Barns lands a couple of nice shots there from mount.
Barns working the ground and pound effectively.
Barns lands a big shot there that rocks Fighter Ii but he's holding on and managing to survive for now.

Fighter Ii is rocked!
As the round comes to an end the crowd are showing their appreciation for a great round of action.
Fighter Ii in a bad spot here, taking shots to the head.
Fighter Ii is still in real trouble! Can Barns finish him?
Barns drops a big elbow. That's hurt Fighter Ii! More shots from Barns and the ref steps in! The fight is over!
Ladies and gentlemen, after 4:57 of round 2, we have a winner by way of TKO (Strikes). Danny Barns!
A very excited looking Danny Barns rambled incoherently for about 5 minutes post fight about how awesome he is. It was kinda funny for a while but then everyone got annoyed.
|
|
|
|
|
|
|
|
|
|
|
|
|
|
|
|
|
|
|
|
|
|
|
| S |
C
A |
G |
S |
C
B |
G |
|
S |
C |
G |
|
energy
A | B |
|
hype
A | B |
|
pop
A | B |
|
mgr
A | B |
|
FIGHT
RATING
37% |
|
|
|
|
|
|
