|
|
PBP Commentary |
Coming up we have a middleweight MMA rules bout between Winfred Lindsay (ranked 0 p4p, 0 weight class) and Holla Back (ranked 0 p4p, 0 weight class). Over to our ring announcer for the fighter introductions!
 |
|
 |
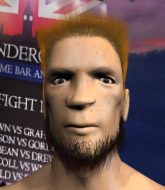
| 184 cm
20
193 lbs
2 - 3 - 0 |
|
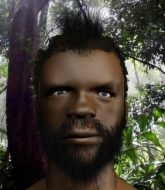
185 cm
20
185 lbs
0 - 5 - 0 |
BJJ Blue Belt
Counter fighter
Cuts easily |
|
BJJ Blue Belt
Brawler
Knockout power |
|
| |
|
Ladies and gentlemen. This fight is 3 rounds, in the middleweight division.
Introducing the fighter to my left, fighting out of the red corner.
With a record of
2 - 3 - 0, fighting out of Amsterdam, Winfred Lindsay!
And introducing the fighter to my right, fighting out of the blue corner.
With a record of
0 - 5 - 0, fighting out of Amsterdam, Holla Back!
The judges for this bout are Patrick Alders, Paul Aken and Wagner Zegers.

The bell rings for round one and we are underway!

Back closes the distance and after a bit of a stuggle, scores a takedown into Lindsay's guard.
We must be close to a standup if these guys don't pick up the pace.
Lindsay is trying to stand up but he's not managed so far.
Lindsay is trying to control the position from the bottom.
Back won't allow Lindsay to get back to his feet.
Lindsay is working from a closed guard but he's struggling to control his opponent.
Lindsay seems keen to control Back's posture.

We're going to have a standup here because Winfred Lindsay wasn't active enough for the referee's liking.
Back throws a leg kick that is checked
and Lindsay counters with a nice uppercut.
Lindsay shoots in looking for a takedown but Back manages to keep the fight standing, pushing Lindsay's face into the canvas for good measure before circling away.
Back shoots in looking for a single leg takedown. Lindsay is trying to defend but Back finishes it well and ends up in half guard. Let's see if he can advance position further.
Back looks winded!
Lindsay is trying to stand.

That's one minute gone in the round.
Back is looking to advance position but Lindsay won't allow it.
Lindsay wants to stand back up but Back manages to pass into side control.
Lindsay is putting a lot of effort into getting back to his feet here.
Lindsay wants to control but Back postures up.

That's two minutes gone in the round.
Back prevents Lindsay from escaping the position.

Back tries for a kimura but Lindsay is defending well.
Lindsay can't do much from the bottom here.
Lindsay is looking to slip a leg under and get half guard but Back is one step ahead and moves to full mount!
Back controlling the position easily from mount.
Back with good strikes from the mount here!
Back looks more muscular than last time we saw him. He must have been on the weights.

That's three minutes gone in the round.
Back controlling his opponent.
Back lands with some vicious ground and pound - can Lindsay hang on?
Lindsay is trying to reverse the position but instead Back has taken his back - oops!
Back trying to secure his dominant position for a moment - making sure Lindsay doesn't escape.
Back is looking to finish with some ground and pound!
Back is looking to finish the fight by rear naked choke. Lindsay knows exactly what he's got planned though, so he's defending well. Maybe a few strikes would soften Lindsay for a finish.

That's four minutes gone in the round.
Lindsay controlling the position well but he knows he's in a bad position.
The fighters are pressed up against the cage, both looking to find a bit of space to work.
Back keeps control of the position as Lindsay tries to break free.
Lindsay looking to stop the rear naked choke attempt by controlling the hands.
Back avoiding Lindsay 's attempts to control his hands.
As the round comes to an end the crowd are showing their appreciation for a great round of action.
Lindsay is trying to get back to his feet but he's not managed it yet.
And thats the end of the round the fighters go back to their corners.
Holla Back dominated that round.
The corners get their ten second warning. Both fighters stand from their stools and stare eachother down, ready to get back to the action.

Lindsay gets caught on his heels momentarily as he allows Back to score an easy takedown into full guard.
Lindsay controlling the position.
Back stops Lindsay from standing up.
Back not doing a lot at the moment. He'll have to show some more aggression or the fight will get stood up.
Back scoring with punches to the head and body.
Back throws a big right hand that misses.
Back is breathing heavily.
A big thud reverberates around the arena there as Back accidentally thumps the mat. Hopefully he's not broken his hand.
That's one minute gone in the round.

Back gets to his feet and steps away from his opponent.
Back wants to clinch up but Lindsay keeps it at a distance.
Back fails in his attempt to clinch.
Lindsay fails with the takedown.
Back throws a lazy head kick

and Lindsay counters with a nice single leg takedown and he's in Back's guard now.
Lindsay postures up in Back's guard and throws a big left but Back blocks it.
Back throws some sloppy strikes off his back.
Lindsay won't allow Back to sweep him here.
Lindsay distracts Back with his right hand and drops a big elbow with his other arm.
That's two minutes gone in the round.
This has been an exciting period of action!
Back is looking for a triangle but Lindsay pushes his legs off easily.
Back throws his legs up looking to secure a triangle. Oh, that looks pretty tight, I gotta say! Lindsay escapes and throws Back's legs to the side, diving into side control!
Lindsay in side control, trying to ground and pound but not landing this time.
Back is trying to improve his position.

Lindsay stands up and beckons Back to his feet.
Back shoots in for a takedown from distance. He catches Lindsay napping and manages to drive through into side control!
That's three minutes gone in the round.
The ground and pound from Back seems to be hitting the mat more than his opponent.
Back working away.
Lindsay is looking to get back to his feet here but Back is keeping cool and he's managed to take Lindsay's back.
Back working for the choke.
Back throwing wild punches that miss their target.
The ref warns both fighters not to hold the cage as they work up against the meshing.
That's four minutes gone in the round.
Back is looking to control Lindsay but Lindsay is wriggling around and keeping busy.
Back is not going to allow Lindsay to sit and survive in this position.
Lindsay wants to get back to his feet.
Lindsay staying busy and making it hard for Back to control.
As the round comes to an end the crowd are showing their appreciation for a great round of action.
Lindsay has the hand control, trying to stop the rear naked choke.
And thats the end of the round the fighters go back to their corners.
Holla Back showed his class in that round. I'd imagine he'll take it on all the scorecards.
The fighters' corners scream their final instructions, as the referee calls time. Here we go, back to the action! Let's hear some noise people - this is the final round!


The fight moves into the clinch position.
Lindsay tries to take the fight to the ground by pulling guard but can't manage it.
A battle for position here, against the cage.
Lindsay has Back pushed against the cage.
Lindsay looking to slow down the pace here.
Back has managed to pull guard. Let's see whether he can work an aggressive guard. It will also be interesting to see what tactics Lindsay uses from the top position.
Back trying to keep a closed guard but Lindsay is proving a slippery customer.
Back takes a big intake of breath there - he's definitely tired.
Back is working an open guard here, looking to improve his position. No doubt that will leave him open to counters but at least he's being more offensive.
Back working the defensive guard well to avoid strikes from Lindsay.
That's one minute gone in the round.
Back is avoiding any damage by keeping wrist control.
Back preventing the ground and pound from doing any damage.
Holla Back has got the better of the ground game so far.
Lindsay working from the guard for now, landing some ground and pound.
Back is adopting a defensive guard.
Lindsay postures up in Back's guard and throws a big left but Back blocks it.
Lindsay loading up with the ground and pound but he's missing more than he's landing in this flurry.
If this pace continues, the referee will definitely step in and force a standup.
Lindsay with a nice head shot there.
That's two minutes gone in the round.
Lindsay lands a nice shot whilst sitting in his opponent's guard.
Lindsay scores with a decent looking elbow strike.
Back is trying to control the position but Lindsay postures up.
Back looking for a sweep. Not yet Back, not yet.
Lindsay wants to stand but Back is controlling his posture from full guard.
A big thud reverberates around the arena there as Lindsay accidentally thumps the mat. Hopefully he's not broken his hand.
That's three minutes gone in the round.

The ref stands the fighters back up, due to lack of action by Holla Back.
Lindsay swats away the attempt to clinch by Back.
Back closes the distance and clinches up, looking for a takedown. He shifts his weight and gets a nice trip into half guard.
Lindsay is working for an escape here. He's hooked one of Back's legs and he's managed to sneak out and take Back's back!

Lindsay is looking for the choke from the back position but Back is controlling his hands well.
Back wants to control his opponent's hands but Lindsay gets his hands free.
Back rolls, trying to escape but Lindsay keeps control of the position.
That's four minutes gone in the round.
Lindsay punches the canvas rather than the man.
Lindsay loading up with punches from the back mount - how long can Back hold on?
Lindsay is landing with strikes. Back can't take much more of this.
Lindsay is not going to allow Back to sit and survive in this position.
Lindsay is hanging on to Back's back as he tries to escape.
Wooooo! Give it up for these two warriors! They are putting on a show!
Back holding both Lindsay 's hands and preventing any damage.
You can see the frustration on Back's face
He knows he is in trouble unless he improves his position sooner rather than later.
And that's the end of the fight!
That was a close round. You could make an argument for either fighter but I would give it to Winfred Lindsay.
I think Back has won this one but let's see whether the judges agree with me. Over to the ring announcer for the scorecards.
Ladies and gentlemen, after 3 rounds of action, we go to the scorecards for a decision.
Judge Patrick Alders scores the fight 28:30
Judge Paul Aken scores the fight 28:30
Judge Wagner Zegers scores the fight 27:30
In favor of your winner, by unanimous decision... Holla Back!
|
|
|
|
|
|
|
|
|
|
|
|
|
|
|
|
|
|
|
|
|
|
|
| S |
C
A |
G |
S |
C
B |
G |
|
S |
C |
G |
|
energy
A | B |
|
hype
A | B |
|
pop
A | B |
|
mgr
A | B |
|
FIGHT
RATING
60% |
|
|
|
|
|
|

