|
|
PBP Commentary |
Coming up we have a super heavyweight MMA rules bout between Marco Polo (ranked 0 p4p, 0 weight class) and Freddy Steel (ranked 0 p4p, 0 weight class). Freddy Steel has the power to score a knockout today if he connects clean with Marco Polo's chin.
 |
|
 |
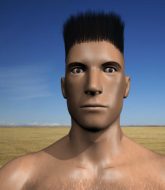
| 195 cm
33
300 lbs
19 - 16 - 0 |
|
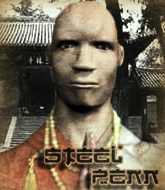
195 cm
35
282 lbs
12 - 7 - 0 |
Good wrestling
World class boxer
Insanely flexible |
|
Olympic wrestler
World class boxer
Granite chin |
|
| |
|
Ladies and gentlemen. This fight is 3 rounds, in the super heavyweight division.
Introducing the fighter to my left, fighting out of the red corner.
With a record of
19 - 16 - 0, fighting out of Hilo, Marco Polo!
And introducing the fighter to my right, fighting out of the blue corner.
With a record of
12 - 7 - 0, fighting out of Hilo, Freddy Steel!
The judges for this bout are Paul Gruel, Ryoma Takatsuka and Colin Fray.

The bell rings for round one and we are underway!
Steel throws a series of punches but Polo moves out of range.
Polo throws a body punch but Steel moves out of range.
A telegraphed right hand from Polo misses the target.
Steel tries to close the distance and clinch up but Polo swats him away and circles back towards the center.
Steel feints a jab promting Polo to slip. Steel then demonstrates his capabilities by jabbing again. Polo slips again and ducks right into an uppercut.

It looks like Marco Polo has been cut.
Steel is looking to take this fight into the clinch.
Polo digs a good body shot into Steel's ribs.
Polo blocks a head kick by Steel.
We've had a slow start to the round here - hopefully the action picks up.
Polo checks a low kick. Bone on bone - not my idea of a good time.
Polo with a nice cross.

It looks like Freddy Steel has been cut.
Polo tries a switch kick but it misses it's target.
Steel tries to close the distance and clinch but Polo swats him to one side with an open hand palm strike and circles away.
Polo swats away the attempt to clinch by Steel.

That's one minute gone in the round.
Polo dodges the punch combination from Steel.
Marco Polo seems to be the more aggressive standup fighter in this bout.
Polo wants to slow Steel down by chopping away at his legs.
Polo closes this distance looking for a takedown but Steel circles away.
Steel tries a counter takedown but it's more of a dummy move, and he uses it to push himself away.
Polo lands with a cross to side of his opponent's head.
Polo looks to land a right hand but Steel moved out of range.
Polo misses with a takedown
and Steel counters with a two punch combo.
Polo cracks Steel with a nice right hand that draws applause from the crowd.
Polo avoids the head kick by Steel.

Steel closes the distance and presses his opponent up against the cage.
Nice body punch from Polo.

That's two minutes gone in the round.
Polo tries for a takedown but Steel manages to get underhooks.
That's three failed takedown attempts in the round for Marco Polo. That's going to take a lot out of him.

Steel breaks the clinch and we're back to striking at distance.
Steel throws the kick towards the body but Polo avoids it.
Wooooo! Give it up for these two warriors! They are putting on a show!
Steel takes one on the chin but keeps coming.
Polo moves out of range of the body kick.
A jab from Polo misses.
Polo misses with an uppercut.
Steel tries a head kick but it misses.
Polo changes levels looking for a counter takedown but doesn't commit.
Polo tries a switch kick but it misses it's target.
Steel doesn't manage to clinch there - Polo circles away.
Polo keeps the fight on the outside.
Polo lands with a cross.
Polo fails with a takedown attempt from distance.

That's three minutes gone in the round.
A slapping leg kick lands for Steel.
Steel tries to clinch but Polo is having none of it.
Polo moves out of range of the body kick from Steel.
Polo was looking to counter that move with a punch but didn't quite pull the trigger.
Steel closes the distance and pushes Polo back into the cage.
Steel can't find room to land a body shot as Polo controls the action.
Polo goes for a takedown attempt but Steel pushes him away and we're back to fighting at a distance.
Polo lands with a straight right. Steel didn't see that one coming.
Polo shoots in for a takedown but doesn't get it.
Polo swings wildly with a hook that is half blocked by Steel.
Steel closes the distance and clinches.
Polo tries for a takedown but Steel manages to get underhooks.
Polo drops down looking for an ankle pick but Steel pulls his leg out and moves away.
Polo is really head hunting here, hardly looking to strike to the body at all.

That's four minutes gone in the round.
Polo looks to throw the jab but Steel is out of range.
Steel tries to clinch
and Polo counters with a stiff right hand.
Steel tries to land with a swinging hook to the body but Polo was well out of range. Poor timing from Steel.
Polo avoids the body shot from Steel.
Polo looks to score with a combo but nothing lands.
Steel tries a counter takedown but it's more of a dummy move, and he uses it to push himself away.
Wooooo! Give it up for these two warriors! They are putting on a show!
Steel doesn't manage to clinch there - Polo circles away.
An attempted straight right counter from Polo misses the target.
Steel gets to the clinch - let's see what his plan is here.
A short left from Steel.
Steel gets underhooks to prevent Polo's takedown attempt.
Steel prevents a takedown attempt there.
Steel breaks from the clinch.
Polo tries to drive through with a takedown attempt but Steel defends well and Polo ends up having to push Steel into the cage where they will battle it out in the clinch.
Freddy Steel is looking to keep the fight on the feet at all costs.
Polo thows a left - swing and a miss!
Steel unleashes a big counter combination but Polo bobs and weaves and avoids any damage.
Steel takes one to the side of the head.
And thats the end of the round the fighters go back to their corners.
A close round but Freddy Steel will probably get the nod.
Both fighters have cut men working on them during the interval.
Well, the break between rounds is over. Let's get back to the scrappin!

Polo swats away the attempt to clinch by Steel.
Marco Polo is winning the standup battle so far.
Polo lands a jab. Then a cross. Then finally a nice hook to the body. Good work there by Polo.
Polo throws a sloppy head kick and Steel moves out of range easily.
Steel throws a half hearted mid kick.
Steel pushes Polo up against the cage in a clinch.
Steel lands a nice looking hook to the body, against the cage.
Polo prevents Steel from breaking the clinch.
Polo is looking for a takedown up against the cage. Steel gets underhooks though and prevents the takedown attempt.
We are yet to see a takedown attempt from Steel in the fight. On paper you would think he is the more dominant ground fighter so let's see if these unusual tactics pay off.
Polo tries to score a body lock takedown but Steel shows good agility there to stay on his feet.
Steel is pressed up against the cage. Polo has hold of a leg and is looking to drag Steel down to the mat. Steel avoids the attempt though and has circled away. We're back to striking at a distance.
That's three failed takedown attempts in the round for Marco Polo. That's going to take a lot out of him.
We've had a slow start to the round here - hopefully the action picks up.
Steel swings for the body but Polo moves out of range.
Polo was looking to counter that move with a punch but didn't quite pull the trigger.
Steel moves into the clinch.
Steel fails to land with a short punch on the inside.
Steel breaks the clinch and we return to the middle of the mat.
Steel throws a nice looking combination but Polo bobs and weaves to avoid any damage.
Polo scores with a jab.
That's one minute gone in the round.
No luck with that takedown attempt from Polo.
Steel tries to clinch up against the cage, rushing in to close the distance. Polo manages to break the clinch and circles back to the middle of the mat.
Good exchange - Polo coming out on top.
Steel cracks Polo with a good jab.
Polo lunges at Steel with a hook that half lands and is half blocked by Steel's hand.
Steel fakes with an overhand right and moves in to clinch with Polo, pushing him back against the cage.
Polo tries to score a body lock takedown but Steel shows good agility there to stay on his feet.
Steel breaks the clinch and we return to the middle of the mat.
Polo fails miserably with a takedown attempt.
Steel connects with a body shot that sends Polo's belly button to the back.
Steel tries to clinch there but Polo circles away.
A little feinted left hand from Polo on the counter but he doesn't commit to it.
Polo throws a monster uppercut resembling something out of street fighter but it doesn't land.
That's two minutes gone in the round.
Steel drops Polo with a naaaaasty hook - Polo is in real trouble here! Steel dives in to side control and pounds out his opponent for a TKO victory! The crowd goes nuts!
Ladies and gentlemen, after 2:07 of round 2, we have a winner by way of TKO (Strikes). Freddy Steel!
Freddy Steel decided to go for the less than humble approach in his post fight interview, telling everyone how he is going to conquer the world. The crowd seemed to like it when really that sort of approach could have gone either way.
Marco Polo spoke after the fight, saying 'sorry to fans and my team .'.
|
|
|
|
|
|
|
|
|
|
|
|
|
|
|
|
|
|
|
|
|
|
|
| S |
C
A |
G |
S |
C
B |
G |
|
S |
C |
G |
|
energy
A | B |
|
hype
A | B |
|
pop
A | B |
|
mgr
A | B |
|
FIGHT
RATING
53% |
|
|
|
|
|
|
