|
|
PBP Commentary |
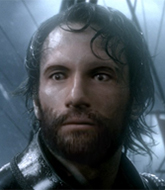
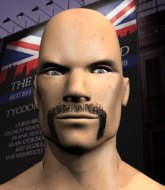
Coming up we have a welterweight MMA rules bout between Viggo Heitannan (ranked 0 p4p, 0 weight class) and Ryuuichi Toda (ranked 0 p4p, 0 weight class). Viggo Heitannan has the edge in experience - let's see if he can make that count tonight.
 |
|
 |
| 175 cm
22
175 lbs
6 - 5 - 0 |
|
177 cm
21
180 lbs
2 - 3 - 0 |
BJJ White Belt
Excellent boxer
Granite chin |
|
BJJ Blue Belt
Decent boxing
Granite chin |
|
| |
|
Ladies and gentlemen. This fight is 3 rounds, in the welterweight division.
Introducing the fighter to my left, fighting out of the red corner.
With a record of
6 - 5 - 0, fighting out of Montreal, Viggo Heitannan!
And introducing the fighter to my right, fighting out of the blue corner.
With a record of
2 - 3 - 0, fighting out of Hilo, Ryuuichi Toda!
The judges for this bout are Micheangelo Fripello, Josh West and Chris Saunders.

The bell rings for round one and we are underway!
Heitannan throws a series of punches but Toda moves out of range.
Ryuuichi Toda seems to be the more aggressive standup fighter in this bout.
Toda shoots in for a takedown. "I don't think so" says Heitannan as he avoids it easily.
Toda takes a swing at Heitannan's ribcage but misses.
Toda shoots in for a takedown but Heitannan shows good takedown defense.
A head kick misses from Heitannan.
A looping hook to the body misses from Toda. Heitannan does a little dance to reset his feet.
Toda has a takedown stuffed.
A quick step to the side and Heitannan tries to counter with a shot to the body but it doesn't connect.
Viggo Heitannan has stuffed three takedown attempts in the round now. That's going to take a lot out of Ryuuichi Toda.
Heitannan keeping a good distance there, avoiding the body shot.
Heitannan lets the fists fly and connects with a left straight followed by a right hook.

It looks like Ryuuichi Toda has been cut.
Toda throws a hook but Heitannan avoids it easily.
Toda looks to land a left hand but Heitannan moved out of range nicely.
Toda fails with a takedown attempt.
Toda throws a body shot but no joy.
Heitannan keeps the fight standing with a nice sprawl.
Heitannan moves away from the strike by Toda.
Heitannan lands a nice hook to Toda's body. Toda takes it in his stride and looks to land his own strikes.
This is a great period of action - very entertaining stuff!
Heitannan lands with a kick to the temple. Toda shrugs as if to say "is that all you've got?"
Heitannan lands with a slapping head kick.
Heitannan tries to bum rush Toda with a series of wild strikes but Toda uses good footwork to avoid the assault.

That's one minute gone in the round.
A jab from Heitannan finds it's way through Toda's defenses.
Heitannan throws a hard body shot but it just misses.
Toda throws a hook to the side of Heitannan's head but Heitannan sees it coming and ducks under it beautifully.
Toda throws an ugly left hook that misses
and Heitannan cracks him with a counter punch right on the button.
Toda lands with a straight right. Heitannan didn't see that one coming.
Toda throws a hook to the body but it doesn't connect.
Toda throws a hook but Heitannan avoids it easily.
Heitannan quickly followed up with a counter body kick but doesn't connect.
Toda throws a looping overhand right but Heitannan ducks down to avoid it.
Heitannan feinted there with a counter leg kick.
Heitannan uses good footwork to get in and out, landing a nice hook.
Toda looks to throw the jab but Heitannan is out of range.
Toda looks shocked there as he takes a right hand to the temple.
Toda goes for a double leg but Heitannan avoids the attempt and the two fighters end up clinched against the cage as Heitannan continues to drive forward.
Toda throws a hook to the body but it doesn't connect.
Heitannan looks to score with a jab to the body but Toda is just out of range.
Heitannan keeping a good distance there, avoiding the body shot.
Toda throws a body shot but no joy.
Fantastic stuff here - a very entertaining period of action, which has drawn cheers from the crowd.
Heitannan slips under a jab from Toda.
Oooooooooooh, not good. A low kick from Heitannan lands where it shouldn't have, right in the... well, you know what he did? He kicked him in the penis. He's injured, injured bad. The referee sends both fighters to their corners and Toda has 5 minutes to recover. He's OK now though... a thumbs up from Toda and we're back underway with a touch of gloves.
Toda throws a hook to the body but it doesn't connect.

That's two minutes gone in the round.
Heitannan ducks low and lands a nice hook to the body of his opponent.
Heitannan ducks down and throws a hook to the body but Toda moves away.
Toda just misses with a punch to the body.
It looked like Heitannan was looking amped, ready to throw a big counter but didn't commit.
Toda jabbing away but nothing is landing.
Heitannan uses good footwork to get in and out, landing a nice hook.
Heitannan dips to his left and cracks Toda with an uppercut!
Toda throws out a loose jab but Heitannan uses good head movement to avoid it.
Toda throws an uppercut from half a mile away. Heitannan sees it coming and avoids it easily.
Toda misses with a wild body shot.
Toda loads up on a big right hand but Heitannan slips the punch.
Heitannan swung with a counter right hand that didn't connect.
Toda shoots in looking for a takedown. Heitannan tries to sprawl out of it but Toda keeps driving through. The fighters are pinned against the cage. Heitannan manages to get underhooks and after a bit of a struggle, circles away and we're back to standing.
Heitannan uses some good footwork to avoid the body shot by Toda.

Heitannan lands a big head kick that sends Toda tumbling to the mat! Heitannan takes a step backwards and waves Toda back to his feet - he wants the finish!

Toda is rocked!
Heitannan tries to land with a swinging hook to the body but Toda was well out of range. Poor timing from Heitannan.
Heitannan scores with a shot to the body.
Toda shoots in for a takedown. He's persisting with it as Heitannan sprawls well. Heitannan wins this battle and keeps the fight standing. Toda gets slowly back to his feet.

That's three minutes gone in the round.
Horrible takedown attempt by Toda or perhaps it was just good defense by Heitannan, which made it look bad.
Heitannan throws a quick counter head kick but Toda was just out of range.
Heitannan keeping a good distance there, avoiding the body shot.
Heitannan throws a head kick that misses and slips in the process. He scrambles back to his feet and the fighters circle.
Toda looks for a takedown here. Will he get it? Heitannan is fending him off so far but Toda persists. Nope, Heitannan circles away and we're back to standing.
Heitannan jinks towards his opponent looking like he wants to counter with a mid kick but doesn't commit.
Heitannan scores with a slapping inside leg kick.
Heitannan throws a hook to the side of Toda's head but Toda sees it coming and ducks under it beautifully.
Viggo Heitannan is looking to keep the fight on the feet at all costs.
Heitannan misses the shot to the body.
Toda doesn't fully commit to the body shot counter.
A head kick misses from Heitannan.
Toda throws a leg kick but he was too far away and it doesn't land.
Heitannan uses some good footwork to avoid the body shot by Toda.
Toda uses some good footwork to avoid the body shot by Heitannan.
Heitannan misses with a head kick.
Toda shoots in with a takedown attempt and he has Heitannan pinned against the cage. Heitannan gets the underhooks and manages to circle away.
Toda shoots in for a takedown - he's clinched up with Heitannan but Heitannan pushes him off and we're back to square one.
Heitannan swings away but doesn't land with a series of punches.

That's four minutes gone in the round.
A jab lands there for Heitannan.
Toda throws a hook to the body but it doesn't connect.
Heitannan misses with a series of wild punches.
Heitannan leaves Toda with his face pressed against the mat as he sprawls beautifully, defending against a solid takedown attempt.
We've seen a great period of action over the last minute or so - credit to both fighters for going all out!
Toda takes a shot right to the liver - Bas would have been proud of that punch.
Toda shoots in for a takedown but Heitannan shows good takedown defense.
Heitannan moves out of range as Toda strikes.
Heitannan keeping a good distance there, avoiding the body shot.
Toda tries to shoot in for a takedown. He's got hold of a leg but Heitannan swivels and escapes.
Heitannan fakes high and swings low for a body shot but Toda manages to avoid it.
Nice takedown defense from Heitannan. No joy for Toda on that attempt.
Toda misses with a body shot. Nice footwork from Heitannan.
The crowd applaud the fighters' efforts here as the round comes to an end.
Toda walks forward, straight into a front kick from Heitannan.
Heitannan misses with a looping left.
Heitannan lands a nice looking body shot.
Heitannan ducks low and lands a nice hook to the body of his opponent.
And thats the end of the round the fighters go back to their corners.
Viggo Heitannan dominated that round.
The cut man is working on Ryuuichi Toda's cut.
That's time! Heitannan's corner gives him a slap on the ass as he gets ready to fight.

Toda misses with a body shot.
Toda just misses with a punch to the body.
Toda fails with a takedown attempt.
Heitannan uses some good footwork to avoid the body shot by Toda.
Viggo Heitannan is winning the standup battle so far.
Toda tries for a takedown but Heitannan sees it coming a mile off and avoids it easily.
Heitannan cracks Toda with a good jab.
Heitannan misses with a straight right.
Toda missing with a left hand there. Heitannan was out of range so wasted energy throwing that one.
Toda's hands are dropping dangerously low here and Heitannan connects clean with a right hook that sends him down to one knee! Toda scrambles back to his feet.
Toda throws an overhand right that lands on Heitannan's shoulder, as Heitannan tries to avoid the shot.
Toda moves out of range of the strikes.

Toda feints and as Heitannan raises his hands in defense, Toda changes levels and drives through with a takedown into guard.
Toda looking to pass the guard.
Heitannan wants to stand up but Toda is controlling him.
Toda advances to half guard.
Heitannan knows he needs to get back to his feet asap. He's simply no match for Toda on the ground.
Wooooo! Give it up for these two warriors! They are putting on a show!
Toda performing his best blanket impression for a moment.
Heitannan is really dominating this fight. Is there anything that Toda can do to turn this around?
The fighters are going at a pretty good pace and they're both starting to sweat now.
Heitannan is trying to maintain the position but Toda is very close to passing his half guard.
That's one minute gone in the round.

Toda is working for a kimura but Heitannan is defending it quite comfortably.
Heitannan is trying to defend against the ground and pound but Toda scores with a couple of nice shots.
Toda with a momentary lay and pray from half guard.
Heitannan on his back here. We all know that wrestlers don't like being on their back so let's see if Heitannan tries to get out of the position.
Toda landing with strikes to the body and head, softening up his opponent.
The ref warns both fighters not to hold the cage as they work up against the meshing.
Toda thows a wild elbow that connects with the canvas.
Heitannan wants to control but Toda is keeping busy.
That's two minutes gone in the round.
Heitannan is trying to stand back up but Toda is controlling him
Toda controlling the action here.
Heitannan trying to control from the bottom.
Toda sitting in half guard, looking to land shots. Heitannan defending well though.
The referee walks around the fighters to get a better view of the action. Toda lands a nice short elbow.
Toda is taking a breather. Heitannan says something to him but it's hard to make out. Perhaps he's telling him to get on with it and actually do something.
Heitannan is trying to maintain the position but Toda is very close to passing his half guard.
Heitannan is trying to stand back up but Toda is controlling him
Heitannan has hold of Toda's hands but Toda slips his arm to the side and lands an elbow.
Toda keeping composed on the top, looking to control the action.
Heitannan is trying to control but can't.
That's three minutes gone in the round.
Toda perhaps working for something from half guard, or maybe not. It looks like he's just sitting there.
Heitannan is defending against the submission attempts here by Toda.
Heitannan pushes Toda off looking to stand but Toda dives back in and keeps control.
Heitannan wants to control but Toda is keeping busy and won't allow it.
Toda throwing shots but they're hitting the canvas more than the man.
Toda is figuring out what he wants to do next.
The fighters are pressed up against the cage, both looking to find a bit of space to work.
Toda missing with some ground and pound from the half guard.
Heitannan blocking the ground and pound attempt from Toda.
Toda missing with the ground and pound from half guard.
Toda has the superior BJJ but he's also working some ground strikes into his gameplan.
Heitannan tries to get to full guard but Toda has control of the leg.
Toda is looking for a kimura but he's never going to get it from there.
Toda controlling the action here.
Toda's corner are shouting for him to control the position and he seems happy to oblige.
That's four minutes gone in the round.
Heitannan is doing well to avoid being mounted. He's controlling the position at the moment.
Heitannan blocking the ground and pound attempt from Toda.

Toda stands up from half guard... He's had enough of that ground malarky for the time being.
Toda closes the distance and clinches up with Heitannan, looking for a takedown. Toda pushes Heitannan against the cage but Heitannan circles to the side and manages to break the clinch.
Viggo Heitannan has stuffed three takedown attempts in the round now. That's going to take a lot out of Ryuuichi Toda.
Heitannan scores with a punch to the gut of his opponent.
Toda shoots in for a takedown but Heitannan shows good takedown defense.
Toda fails with a takedown attempt from distance.
Heitannan is looking to counter with head kicks.
Toda fails to land the takedown.
Toda is breathing heavily.
Toda tries to land with a swinging hook to the body but Heitannan was well out of range. Poor timing from Toda.
Heitannan throws a nice looking combination but Toda bobs and weaves to avoid any damage.
Heitannan ducks under a wild hook from Toda.
Heitannan is looking to wear down Toda with body shots, infact he's throwing more body shots than head shots at the moment.
The crowd thankful this round is nearly over.
Toda shoots in looking for a takedown. Heitannan tries to sprawl out of it but Toda keeps driving through. The fighters are pinned against the cage. Heitannan manages to get underhooks and after a bit of a struggle, circles away and we're back to standing.
Heitannan throws a nice inside leg kick.
And thats the end of the round the fighters go back to their corners.
Ryuuichi Toda showed his class in that round. I'd imagine he'll take it on all the scorecards.
The cut man is working on Ryuuichi Toda's cut.
That's time! Back to the action! This is the final round!

Heitannan stalks Toda and leaps in with a furious combination of punches. Uppercuts and crosses smash into Toda's face. Toda staggers backwards, shaken.
Toda shakes his hands off, looking to compose himself, but takes a jab to the jaw whilst he does it.
Heitannan throws out a powerful jab.
Heitannan plants his feet and lands a nice head kick!
Heitannan scores with a jab. Toda acknowledges it with a nod of the head.
Heitannan misses with a body shot.
Toda fakes high and swings low for a body shot but Heitannan manages to avoid it.
Toda shoots in for a double leg but Heitannan sprawls well. That's going to sap some energy.
Heitannan is looking to counter with a body kick.
Heitannan stuffs the takedown.
Toda keeps his opponent at a distance with a nice jab.
We've seen a great period of action over the last minute or so - credit to both fighters for going all out!
Toda shoots in but no luck this time.
Viggo Heitannan has stuffed three takedown attempts in the round now. That's going to take a lot out of Ryuuichi Toda.
Toda shoots for a takedown but Heitannan saw that one coming a mile off and avoided it easily.
Nice sprawl there from Heitannan as Toda shoots in.
Heitannan swung with a counter punch to the body but it didn't connect.
Heitannan throws a quick inside leg kick.
Heitannan scores with a kick to the body.
Toda takes a big intake of breath there - he's definitely tired.
A solid body kick from Heitannan.
Heitannan scores with a straight right hand, right through his opponent's guard.
Toda stumbles momentarily as he takes a strong leg kick from Heitannan.
Heitannan ducks right into an uppercut from Toda.
That's one minute gone in the round.
A slapping leg kick lands for Heitannan.
Heitannan punishes Toda's body with a nice straight punch.
Heitannan just misses with a punch to the body.
No luck for Toda with that takedown attempt.
Heitannan appears to be looking for a big counter.
Heitannan works the jab nicely.
Heitannan misses with a head kick.
Heitannan stalks Toda and leaps in with a furious combination of punches. Uppercuts and crosses smash into Toda's face. Toda staggers backwards, shaken.
Toda just misses with a punch to the body.
Toda changes levels and looks for a double leg takedown. Heitannan tries to avoid it but Toda manages to keep hold of a leg and drag Heitannan to the ground. Heitannan escapes though and pops straight back up to his feet.
Toda throws a loose over hand right and dives in with a double leg takedown. Heitannan tries to sprawl but it's too late and the fighters hit the mat. Toda is in Heitannan's guard.
Both fighters have adopted an aggressive gameplan on the ground!
This has been an exciting period of action!
Toda trying to control but Heitannan is working from the bottom.
Heitannan is looking to stand up but Toda isn't so interested in that idea.
Heitannan looking to control.
That's two minutes gone in the round.
Toda loading up with the ground and pound but he's missing more than he's landing in this flurry.
Toda postures up and lands a big shot to Heitannan's brow.
Toda sitting in guard, not really doing much.
Let's hope that Toda has the urge to step up the pace any second now because for the last 15 or 20 seconds he's just been holding on tight.
Heitannan is trying to keep Toda in close.
Toda controls from within his opponent's guard.

The ref stands the fighters back up due to a lack of activity.
Jab, cross, leg kick. Nice combination by Heitannan!
Heitannan misses with a low kick.
A slow jab from Toda misses its intended target.
Heitannan appears to be looking for a counter punch to the body.
That's three minutes gone in the round.
Toda tries to drive through with a takedown attempt but Heitannan defends well and Toda ends up having to push Heitannan into the cage where they will battle it out in the clinch.
Toda fails with a takedown attempt from distance.
Toda shoots in for a double leg but Heitannan sprawls well. That's going to sap some energy.
Toda shoots in for a takedown. He's persisting with it as Heitannan sprawls well. Heitannan wins this battle and keeps the fight standing. Toda gets slowly back to his feet.
Toda misses with a hook.
Heitannan misses with a few strikes there.
No luck for Toda with that takedown attempt.
Heitannan scores with a big left there. The judges will like that one.
Heitannan tries to land with a swinging hook to the body but Toda was well out of range. Poor timing from Heitannan.
Toda looks frustrated there after his takedown attempt is stuffed easily.
Heitannan attempts a low kick but it misses it's target.
Toda goes for a double leg but Heitannan avoids the attempt and the two fighters end up clinched against the cage as Heitannan continues to drive forward.
A counter left hand to the body from Heitannan misses its target.
Toda ducks down and throws a hook to the body but Heitannan moves away.
That's four minutes gone in the round.
Toda takes a body kick right on the floating rib. Ouchie.
Toda will have to do better than that with his takedown attempts.
Toda fails with a takedown attempt.
Heitannan moves into range and throws a combination. A nice jab followed by a hook to the body.
Wooooo! Give it up for these two warriors! They are putting on a show!
A combination from Heitannan does no damage.
Toda tries a counter takedown but it's more of a dummy move, and he uses it to push himself away.
Toda blocks a head kick by Heitannan.
Toda looks like he wants to counter punch here.
Heitannan misses with a jab, cross combination.
Heitannan shakes his hands off, looking to compose himself, but takes a jab to the jaw whilst he does it.
Toda fakes high and shoots in for a takedown but Heitannan avoids it really well and circles away.
Heitannan lands a nice shot that snaps Toda's head back.
And that's the end of the fight!
Viggo Heitannan showed his dominance in that final round.
I think Heitannan has won this one but let's see what the judges have to say. Over to the ring announcer for the scorecards.
Ladies and gentlemen, after 3 rounds of action, we go to the scorecards for a decision.
Judge Micheangelo Fripello scores the fight 29:28
Judge Josh West scores the fight 29:28
Judge Chris Saunders scores the fight 29:28
In favor of your winner, by unanimous decision... Viggo Heitannan!
An out of breath and clearly excited Viggo Heitannan thanked Arcticus University: London for their help and support (and free stuff they sent him).
|
|
|
|
|
|
|
|
|
|
|
|
|
|
|
|
|
|
|
|
|
|
|
| S |
C
A |
G |
S |
C
B |
G |
|
S |
C |
G |
|
energy
A | B |
|
hype
A | B |
|
pop
A | B |
|
mgr
A | B |
|
FIGHT
RATING
66% |
|
|
|
|
|
|

