|
|
PBP Commentary |
Coming up we have a middleweight MMA rules bout between Steve Bellchambers (ranked 0 p4p, 0 weight class) and Bosco Beanington (ranked 0 p4p, 0 weight class). Well, I have no idea who's going to take this one!
 |
|
 |
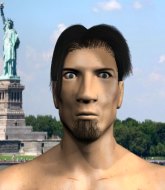
| 201 cm
25
190 lbs
1 - 1 - 0 |
|
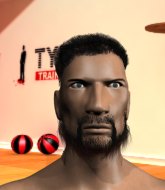
189 cm
20
185 lbs
1 - 0 - 0 |
BJJ Blue Belt
Solid boxing
Good chin |
|
BJJ Purple Belt
Decent boxing
Granite chin |
|
| |
|
Ladies and gentlemen. This fight is 3 rounds, in the middleweight division.
Introducing the fighter to my left, fighting out of the red corner.
With a record of
1 - 1 - 0, fighting out of The Island, Steve Bellchambers!
And introducing the fighter to my right, fighting out of the blue corner.
With a record of
1 - 0 - 0, fighting out of The Island, Bosco Beanington!
The judges for this bout are David Hoff, Winston Alpacca and Daniel Franklin.

The bell rings for round one and we are underway!
Bellchambers shoots in but no luck this time.
Bellchambers lunges in with an uppercut that skims his opponent's chin.
Beanington misses with a takedown
and Bellchambers counters with a right hand to the body.
Beanington doesn't succeed with the takedown
enabling Bellchambers to counter with a crisp jab.
Steve Bellchambers seems to be the more aggressive standup fighter in this bout.
Beanington shoots and misses
and Bellchambers counters with a good right hand that lands right on the jaw.
Steve Bellchambers has stuffed three takedown attempts in the round now. That's going to take a lot out of Bosco Beanington.
Beanington wants to clinch up but Bellchambers keeps it at a distance.

Bellchambers clinches up against the cage.
We've had a slow start to the round here - hopefully the action picks up.
Bellchambers keeps control of Beanington as he tries to wriggle out of the double underhooks.
Beanington wants to break the clinch but can't.

Beanington jumps guard and drags Bellchambers to the mat. He's obviously going to be looking for submissions off his back.
Bellchambers postures up to throw the ground and pound strikes but they don't connect.
Beanington wants to sweep here but Bellchambers controlling him for the moment.

That's one minute gone in the round.
Beanington being controlled here, momentarily.

Beanington looking for a guillotine here but Bellchambers defends easily.
Bellchambers missing there with some ground and pound from the guard.
The ref warns both fighters not to hold the cage as they work up against the meshing.
Bellchambers sneaks a leg through and gets to half guard. That was like a knife through butter how easily he passed Beanington's guard.
Bellchambers blocks the strikes from Beanington.
Bellchambers is just sitting in half guard, waiting for something to happen.
Bellchambers missing with the ground and pound from half guard.
Bellchambers really does look like a pencil wearing a pair of gloves. Let's hope he has a gameplan to suit that ridiculous body shape.

That's two minutes gone in the round.
The crowd are getting on the fighters' backs, as the pace has dropped off in the last minute or so.
Bellchambers missing with the ground and pound from half guard.
Beanington keeping his head moving to avoid the ground and pound.
Beanington looking for submissions from an awkward position here.
Bellchambers thumps the canvas. Not on purpose obviously - he just missed Beanington's head.
Beanington gets back to full guard.
Beanington is trying to stand up but he's not managed so far.
Bellchambers throws a big right hand that misses.
Beanington is looking for a triangle but Bellchambers pushes his legs off easily.
Beanington looking to hit a scissor sweep but Bellchambers is one step ahead there.

That's three minutes gone in the round.
Bellchambers controls the pace of the fight for a moment.
The referee is pacing around the two fighters - he looks like he's thinking about a standup.
Beanington is working an open guard here, looking to improve his position. No doubt that will leave him open to counters but at least he's being more offensive.

The ref stands the fighters back up due to a lack of activity.
Beanington is looking to take this fight into the clinch.
Beanington fakes high and swings low for a body shot but Bellchambers manages to avoid it.
Beanington fails with a takedown attempt.
Beanington is looking to take this fight into the clinch.
Bellchambers attempts a counter takedown but Beanington avoids it well and moves away.

That's four minutes gone in the round.
Neither fighter has done anything of merit for a good minute or two here and the crowd are not happy about it.
Bellchambers pulls out of a head kick attempt.
Beanington misses with a takedown attempt
and Bellchambers connects with a straight left hand counter down the middle.
Bellchambers fakes high and shoots in for a takedown but Beanington avoids it really well and circles away.
Beanington shoots for a double leg takedown but Bellchambers sprawls well. He's pushed Beanington's face into the mat and manages to get back to his feet relatively easily.
Bellchambers tries for a takedown but Beanington sees it coming a mile off and avoids it easily.
Beanington fails with the takedown
and Bellchambers counters with a lovely straight right hand!
Beanington looks winded!
Boooooooooooooooooooo!!! God, this has been a terrible round. Come on you two, sort yourselves out!
Bellchambers shoots in but no luck this time.
Beanington wants to clinch up but Bellchambers keeps it at a distance.
Bellchambers has closed the distance and engaged Beanington in a clinch.
And thats the end of the round the fighters go back to their corners.
Steve Bellchambers dominated that round.
The fighters get back to their feet, the hooter sounds and we're back to the action!

Beanington displays good takedown defense there as he swats away a double leg from Bellchambers.
Bellchambers fakes high and shoots in for a takedown but Beanington avoids it really well and circles away.
Bellchambers is using his reach advantage well here, landing the more effective single shots from range.
A punch combination from Bellchambers misses.
Bellchambers leaves Beanington with his face pressed against the mat as he sprawls beautifully, defending against a solid takedown attempt.
We've had a slow start to the round here - hopefully the action picks up.
Bellchambers fails with the takedown.
That's three failed takedown attempts in the round for Steve Bellchambers. That's going to take a lot out of him.
Beanington doesn't manage to clinch there - Bellchambers circles away.
Bellchambers shoots in looking for a double leg takedown. Beanington defends it nicely.
That's one minute gone in the round.
Bellchambers shoots in looking for a takedown but Beanington manages to keep the fight standing, pushing Bellchambers's face into the canvas for good measure before circling away.
Both fighters are absolutely exhausted here.
Beanington tries to drive through with a takedown attempt but Bellchambers defends well and Beanington ends up having to push Bellchambers into the cage where they will battle it out in the clinch.
Beanington shoots in for a takedown. "I don't think so" says Bellchambers as he avoids it easily.
Steve Bellchambers is looking to throw some combinations by the looks of things.
Beanington is looking to take this fight into the clinch.
Beanington throws a looping left and ducks down for a takedown. He's got his arms around Bellchambers's waist but Bellchambers gets an underhook and avoids the takedown by throwing Beanington off to one side.
Beanington misses with a hook. Bellchambers ducked under it nicely.
Beanington fails with a takedown attempt.
That's two minutes gone in the round.
Good exchange - Bellchambers coming out on top.
Beanington tries to close the distance and clinch up but Bellchambers swats him away and circles back towards the center.
Bellchambers swings and misses with a hook to the body.
Beanington is looking for the big counter here.
Beanington shoots in looking for a double leg takedown. Bellchambers defends it nicely.
Bellchambers throws a right and a left that Beanington avoids nicely.
Beanington tries a counter takedown but it's more of a dummy move, and he uses it to push himself away.
A jab lands there for Bellchambers.
Beanington misses with a takedown attempt
and Beanington takes a counter punch right on the button for his troubles.
Beanington throws a lazy head kick
and Bellchambers counters with a nice uppercut.
That's three minutes gone in the round.
Beanington fails with a takedown attempt.
Bellchambers forces Beanington back against the cage and clinches.
Bellchambers stalls.
Beanington tries for a takedown but Bellchambers manages to get underhooks.

Bellchambers manages to pull guard.
Bellchambers keeping moving, preventing Beanington from controlling successfully.

Bellchambers has scooted to the edge of the canvas and used the cage to get back to his feet. Beanington has stuck on his opponent and is forcing him back against the cage.
That's four minutes gone in the round.
Bellchambers lands a right uppercut that snaps the head of Beanington backwards.
Bellchambers is looking for a takedown.
Beanington trying to control the position but instead, Bellchambers has worked for underhooks and has pushed Beanington into the cage.
Bellchambers is really dominating this fight. Is there anything that Beanington can do to turn this around?
Beanington jumps guard but Bellchambers turns him against the cage and keeps the fight standing.
Beanington pulls Bellchambers into guard.
Bellchambers controls the pace of the fight for a moment.
Bellchambers postures up in Beanington's guard and throws a big left but Beanington blocks it.
The crowd thankful this round is nearly over.
Beanington is trying to keep Bellchambers in close.
Bellchambers is looking to work some ground and pound but Beanington has wrist control.
Beanington is active off his back here, looking for submissions.
And thats the end of the round the fighters go back to their corners.
Steve Bellchambers dominated that second round.
The minute break is over - no more time for sponges and pep talks - back to the action! This is the final round!

Bellchambers misses with a two punch combination.
Beanington steps in looking to clinch after the strikes miss from Bellchambers.
Beanington is looking to clinch but Bellchambers is avoiding it.
It looked like Bellchambers was trying to counter with a body shot coming off that last attack from Beanington.
Bellchambers pushes forward with a 1-2 combination that forces Beanington back to the cage. Bellchambers follows up with a solid lead hook to the liver.
Beanington tries to score a power double leg takedown but Bellchambers sees that one coming and sprawls well. That will dishearten Beanington somewhat.
Beanington leaves Bellchambers with his face pressed against the mat as he sprawls beautifully, defending against a solid takedown attempt.
We've had a slow start to the round here - hopefully the action picks up.
Bellchambers shoots in for a takedown - he's clinched up with Beanington but Beanington pushes him off and we're back to square one.
Bellchambers fakes and then throws a beautiful body shot. Beanington looks a bit winded and takes a step backwards to take a breath.
That's one minute gone in the round.
Bellchambers stuffs the takedown attempt from Beanington. Beanington gets slowly back to his feet.
Bellchambers tries to drive through with a takedown attempt but Beanington defends well and Bellchambers ends up having to push Beanington into the cage where they will battle it out in the clinch.
That's three failed takedown attempts in the round for Steve Bellchambers. That's going to take a lot out of him.
Both fighters are breathing heavily.
Beanington throws a poor cross that misses
and Bellchambers counters with a straight punch to the midsection.
Bellchambers has managed to clinch.
Beanington fails to pull guard.
Beanington tries to pull guard but Bellchambers forces him back to his feet, against the cage.
Bellchambers is using his height advantage well here, landing a good percentage of his punches.

Bellchambers breaks from the clinch.
Bellchambers shoots in for a takedown but Beanington shows good takedown defense there and keeps this one on the feet.
Beanington shoots in with a takedown attempt and he has Bellchambers pinned against the cage. Bellchambers gets the underhooks and manages to circle away.
That's two minutes gone in the round.
Beanington tries to clinch but fails miserably
and Bellchambers counters with a two punch combo.
Beanington takes a punch right to his stomach. That took the wind out of him momentarily.
Bellchambers clinches with his opponent.
Beanington is trying to break the clinch but Bellchambers has him pressed against the cage.
Bellchambers pulls guard effortlessly.
Fantastic stuff here - a very entertaining period of action, which has drawn cheers from the crowd.
Beanington is looking to stand up but Bellchambers won't let him.
Beanington wants to control from the top but Bellchambers keeps moving.
Bellchambers is working an open guard here, looking to improve his position. No doubt that will leave him open to counters but at least he's being more offensive.
That's three minutes gone in the round.
Beanington trying to control the position from guard on top but Bellchambers is wriggling around, looking for whatever he can.
Bellchambers will need to keep those long limbs tucked in whilst he's on the ground, to prevent any submissions.
Bellchambers pulls Beanington in close to prevent any damage.
Beanington looking to pass the guard.
Bellchambers keeping moving, preventing Beanington from controlling successfully.
The referee has decided to stand the fighters back up, so we'll restart on the feet.
Bellchambers clinches.
That's four minutes gone in the round.
A lull in the action here being met with boos from the crowd.
Bellchambers breaks the clinch.
Beanington wants to clinch up but Bellchambers keeps it at a distance.
Bellchambers gets a clinch.
Bellchambers pushes off and circles away, back to the middle of the mat.
Steve Bellchambers is winning the standup battle so far.
Beanington is looking to clinch but Bellchambers is avoiding it.
A head kick misses from Bellchambers.
Beanington closes the distance but Bellchambers moves to the side
and Bellchambers counters with a left to the body.
The crowd thankful this round is nearly over.
A telegraphed takedown attempt from Bellchambers is defended easily by Beanington.
And that's the end of the fight!
Steve Bellchambers showed his dominance in that final round.
Well Bellchambers has outscored his opponent in every aspect of the fight today. Only a scarily incompetent judge or two will keep him from a well deserved win... Over to the ring announcer for the scorecards.
Ladies and gentlemen, after 3 rounds of action, we go to the scorecards for a decision.
Judge David Hoff scores the fight 30:27
Judge Winston Alpacca scores the fight 30:27
Judge Daniel Franklin scores the fight 30:27
In favor of your winner, by unanimous decision... Steve Bellchambers!
|
|
|
|
|
|
|
|
|
|
|
|
|
|
|
|
|
|
|
|
|
|
|
| S |
C
A |
G |
S |
C
B |
G |
|
S |
C |
G |
|
energy
A | B |
|
hype
A | B |
|
pop
A | B |
|
mgr
A | B |
|
FIGHT
RATING
32% |
|
|
|
|
|
|
