|
|
PBP Commentary |
Coming up we have a featherweight MMA rules bout between Bucky The Badger (ranked 0 p4p, 0 weight class) and Noob Saibot (ranked 0 p4p, 0 weight class). The Badger comes to the cage accompanied by Jump Around. On his way into the cage it seems that Bucky The Badger has been attacked by a crazed fan! It looks like it might have been the just bleed guy! Luckily Bucky The Badger seems to be OK! I thought that lunatic was in prison!?
 |
|
 |
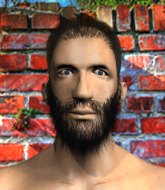
| 160 cm
39
160 lbs
38 - 20 - 5 |
|
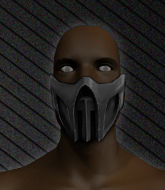
168 cm
31
145 lbs
17 - 9 - 0 |
Abu Dhabi Champ
World class boxer
Granite chin |
|
Olympic wrestler
World class boxer
Granite chin |
|
| |
|
Ladies and gentlemen. This fight is 3 rounds, in the featherweight division.
Introducing the fighter to my left, fighting out of the red corner.
With a record of
38 - 20 - 5, fighting out of New York, Bucky The Badger!
And introducing the fighter to my right, fighting out of the blue corner.
With a record of
17 - 9 - 0, fighting out of London, Noob Saibot!
The judges for this bout are Jack Bonds, and Frank Antenori.

The bell rings for round one and we are underway!
Saibot misses with a wild body shot.
The Badger scores with a leg kick.
We can't be sure of the tactics at this early stage but we have heard that Saibot has been working on his takedowns a lot in the buildup to the fight and we can only assume he's going to look to take this to the mat.
Bucky The Badger seems to be the more aggressive standup fighter in this bout.
Nice body punch from Saibot.
The Badger throws out a token jab with nothing on it.
The Badger moves into range and lands a nice leg kick.
The Badger throws a combination that misses
letting Saibot counter with a right hand.
Saibot misses with a two punch combination.
The Badger feinted there with a counter leg kick.
The Badger throws a front kick aimed at Saibot's knee but Saibot avoids it well.
Saibot doesn't fully commit to the body shot counter.
The Badger blocks a jab.

The Badger gets caught napping as Saibot dives in and scores a takedown. The Badger manages to retain guard.
Saibot throws an elbow that misses. The Badger uses the momentum to reverse the position. He's now in Saibot's guard. Nice move by The Badger!

The crowd cheering loudly, showing their appreciation for the quality fight we're seeing here.

Saibot has his foot on The Badger's thigh. He's trying to push off and get in position for a triangle, I think. The Badger works his way back into a safe position though.
Saibot working for submissions but it's allowed The Badger to get to half guard.
The Badger not landing any meaningful shots this time.
The ref warns both fighters not to hold the cage as they work up against the meshing.

That's one minute gone in the round.
Saibot looking to work for a kimura from the bottom.
The Badger trying to control the pace.
Saibot wants to get back to full guard but The Badger has passed into side control.
Saibot is looking to regain half guard here but The Badger keeps moving and retains side control.
The Badger misses with a strike but at least he's keeping busy, looking to cause some damage - that will still help him when it comes to the judges scorecards.
The Badger wants to lay and pray for a moment but Saibot keeps working.
Saibot avoids any damage from the ground and pound of The Badger.

That's two minutes gone in the round.
The crowd are showing their displeasure at the lack of action as loud boos ring out around the arena.
The Badger trying to control the position but Saibot is working away.
The Badger looking to punish the body of his opponent here but Saibot is avoiding damage well.
The Badger working the ground and pound but Saibot is defending the strikes.
Saibot is being controlled here.
Saibot is looking to reverse the position.
The Badger misses with a strike but at least he's keeping busy, looking to cause some damage - that will still help him when it comes to the judges scorecards.
The Badger is moving around in side control but his primary objective seems to be to maintain the position.
You can see the frustration on Saibot's face, being in this tough position on the bottom.
The Badger misses with the ground and pound.
The fighters are starting to perspire pretty heavily.
Saibot is positioning himself to get back to half guard.

That's three minutes gone in the round.
The Badger misses with an attempted head punch from side control.
Saibot tries to bench press The Badger off him but The Badger keeps the position.
Saibot is trying to control The Badger's posture but The Badger avoids it.
Saibot is looking for a sweep.
The Badger taking a breather here.
The Badger looking to punish the body of his opponent here but Saibot is avoiding damage well.
Saibot tries to buck The Badger off but The Badger is having none of it.
The Badger happy to just control the position for now.
Saibot can't do much from the bottom here.

That's four minutes gone in the round.
Saibot is trying to get back to half guard. He's pushing on The Badger's leg. He's managed it. Nice work.
Well, if The Badger is going to just lie there, perhaps we should talk about what we're having for dinner tonight
I'm having a ham and pineapple pizza
Yum. Can't wait.
Saibot tries to get to full guard but The Badger has control of the leg.
The crowd thankful this round is nearly over.
The Badger misses with a head shot. Saibot uses the momentum to regain guard.
And thats the end of the round the fighters go back to their corners.
That was a close round but I would say that Bucky The Badger will probably get the nod.
OK. That's time! The bell goes and we're back to the action.

Saibot connects with a right hand. The Badger shakes it off.
The Badger throws a jab but it's blocked by Saibot.
The Badger dodges the punch combination from Saibot.
The Badger fakes a couple of low kicks, before throwing one on the third attempt. It connects and Saibot has to reset his feet before getting ready to engage.
Saibot misses with a wild body shot.
Decent striking displayed by The Badger there.
The Badger throws a good cross that connects.
We've had a slow start to the round here - hopefully the action picks up.
Saibot throws a shot to the body.
Saibot does a little shimmy and throws a leg kick. The leg kick missed by a considerable margin though, making him look a little bit silly for doing the shimmy.
Noob Saibot seems to be getting the better of the standup.
Saibot misses with a hook.
The Badger lands a head shot.
Saibot lunges at The Badger with a hook that half lands and is half blocked by The Badger's hand.
That's one minute gone in the round.
The Badger misses with a leg kick
and Saibot counters with a crisp hook to the side of the head.
The Badger tries to work over Saibot's front leg with a kick but Saibot checks it.
The Badger throws a leg kick but Saibot sees it coming and checks it nicely.
A little jabbing left from Saibot on the counter but it doesn't find it's target.
Saibot avoids a lazy jab quite easily.
Saibot misses with a lunging right hand
and The Badger counters with a good right hand that lands right on the jaw.
Nice body punch from Saibot.
The crowd cheers as Saibot lands an impressive looking overhand right. The Badger doesn't seem phased though.
Saibot thows a left - swing and a miss!
Saibot walks straight into an uppercut. Luckily it didn't land flush.
Saibot throws a right hand that misses
and The Badger counters with a nice body kick.
The Badger scores with a head kick. Saibot tried to block it but didn't get his arm up in time.
The Badger misses with a looping left.
Saibot misses the shot to the body.
We've seen a great period of action over the last minute or so - credit to both fighters for going all out!
Saibot uses good footwork to get in and out, landing a nice hook.
The Badger swings away but doesn't land with a series of punches.
That's two minutes gone in the round.
A looping hook to the body misses from The Badger. Saibot does a little dance to reset his feet.
The Badger tries to close the distance and clinch up but Saibot swats him away and circles back towards the center.
Saibot misses with a hook
and The Badger counters with a crisp hook to the side of the head.
Saibot lands a head shot.
The Badger misses with a half-hearted attempt at a head kick.
A little jabbing left from Saibot on the counter but it doesn't find it's target.
The Badger throws a lazy head kick
and Saibot counters nicely by changing levels and landing a hook to the body.
Saibot shoots in for a takedown. "I don't think so" says The Badger as he avoids it easily.
Saibot scores with a sloppy punch to the body. Not much technique there but it did the business.
Saibot has used his reach advantage pretty well so far tonight.
The Badger throws a decent looking leg kick but it doesn't land clean.
Saibot lands a right hook to the body.
Saibot misses with a straight left.
Good exchange - Saibot coming out on top.
The Badger looking to throw a kick but he's pulled out of it.
The Badger throws a head kick that misses and slips in the process. He scrambles back to his feet and the fighters circle.
Saibot looked like he wanted to counter with a punch but didn't throw it.
That's three minutes gone in the round.
The Badger connects with an inside leg kick.
Saibot lands with a right hand.
The Badger is looking to take this fight into the clinch.
The Badger ducks under a wild hook from Saibot.
Saibot throws a lazy right hand but The Badger sees it coming a mile off and sidesteps it easily.
The Badger throws a sloppy head kick and Saibot moves out of range easily.
The Badger slips a jab from Saibot.
The Badger throws a big shot that misses.
The Badger misses with a body kick.
Saibot displays some good footwork, moving neatly out of range as The Badger throws out the jab.
Saibot looks to throw the jab but The Badger is out of range.
Saibot on the wrong end of a nice low kick. He's acting like it's no big deal but he doesn't want to take many more of those.
The Badger throws a wild body kick that Saibot sees coming a mile off.
The Badger misses with a head kick.
And an attempted straight right on the counter from Saibot! But no joy.
That's four minutes gone in the round.
Saibot throws an uppercut from half a mile away. The Badger sees it coming and avoids it easily.
The Badger throws a poor cross that misses
enabling Saibot to counter with a crisp jab.
The Badger takes a solid shot to the body. That one hurt him but he's trying not to show it.
Saibot throws a predictable looking body shot
and The Badger counters with a crisp hook to the side of the head.
Wooooo! Give it up for these two warriors! They are putting on a show!
The Badger throws a body kick but he wasn't in range.
The Badger listening to his corner there, landing a nice uppercut.
Saibot scores with a hook.
The Badger avoids the body shot from Saibot.
The Badger takes a jab on the nose. He smiles like he loves it and keeps coming.
Saibot checks a leg kick.
Saibot throws out a counter right but The Badger avoids it with no problem.
Saibot goes for a double leg but The Badger avoids the attempt and the two fighters end up clinched against the cage as The Badger continues to drive forward.
The Badger tries to counter by moving into the clinch but Saibot manages to circle out of the way.
The Badger takes an uppercut right on the button but keeps his composure.
Saibot moves out of range as The Badger throws a body kick.
Saibot let fly with a counter punch to the body but it didn't land.
The Badger uses some good footwork to avoid the body shot by Saibot.
The Badger tries a switch kick but it misses it's target.
And thats the end of the round the fighters go back to their corners.
A close second round but Noob Saibot will probably get the nod - 10:9.
The referee calls time. The cornermen exit stage left and we're back to business. This is the final round!

The Badger fakes high and swings low for a body shot but Saibot manages to avoid it.
Saibot throws a jab to the body, straight down the pipe. Boom. That sent The Badger stumbling backwards but he manages to regain his composure quickly.
Saibot bobs and weaves well there to avoid the strikes.
Saibot avoids a lazy jab quite easily.
The Badger avoids the body shot from Saibot.
The Badger takes a really solid shot there but just smiles back and shrugs his shoulders.
The Badger throws a body kick despite being completely out of range
and Saibot counters with a lovely shot to the body.
The Badger misses with a lunging right hand
and Saibot counters with a nice jab to the body that keeps The Badger thinking.
The Badger misses with a straight left.
Saibot fakes low and throws an overhand right that catches The Badger on the side of the head.
We've had a slow start to the round here - hopefully the action picks up.
A telegraphed right hand from The Badger misses the target.
The Badger ducks under a wild hook from Saibot.
The Badger with a nice cross.
Saibot uses good footwork to avoid the strikes from The Badger.
The Badger moves into range and lands a nice leg kick.
That's one minute gone in the round.
The Badger connects with a jab.
The Badger staying out of range there.
The Badger will need to tighten up his combinations if he doesn't want to gas himself out, swinging at thin air.
The Badger misses with a right hand
and Saibot counters with a good right hand that lands right on the jaw.
Saibot fakes low and throws an overhand right that catches The Badger on the side of the head.
A chopping leg kick lands by The Badger.
The Badger takes one on the button.
Saibot connects with a slap. Keep your fist closed son.
Saibot throws a couple of head shots and lands with the final one - a decent hook, which struck The Badger on the side of the head.
Saibot moves out of range of the body kick from The Badger.
Saibot uses good head movement to avoid the hook from The Badger.
Saibot throws out a counter right but The Badger avoids it with no problem.
Saibot takes a thudding leg kick, right into the meat of the thigh.
The Badger scores to the head and body with a nice combination!
The crowd cheering loudly, showing their appreciation for the quality fight we're seeing here.
The Badger misses with a jab, cross combination.
That's two minutes gone in the round.
A jab from The Badger misses.
Saibot tries a counter takedown but it's more of a dummy move, and he uses it to push himself away.
A jab from Saibot misses.
Saibot is looking to chop away at The Badger's legs.
Saibot lands with a nice low kick. That'll leave a bruise.
The Badger lands an overhand left. A wild punch that just about connected.
The Badger walks into a stiff left hand from Saibot.
Saibot connects with a body shot that sends The Badger's belly button to the back.
Saibot fails to land with the punch combination there - jab, cross, hook, miss, miss, miss.
Saibot's leg has a nasty welt from taking a succession of leg kicks. That must be slowing him down.
The fighters circling - Saibot throws out the jab but it was never going to land.
The Badger lifts his leg as if looking to counter with a high kick.
Saibot fakes a head shot and lands one to the body.
The Badger looks like he's developed a pretty tasty lump over his left eye. He'll need to avoid taking much more damage to that.
The Badger misses with a double jab.
The Badger pushing out the jab but it's not landing.
Saibot thows a left - swing and a miss!
Saibot misses with a takedown attempt. He shot from a bit too far out.
That's three minutes gone in the round.
The Badger misses with a head kick.
The Badger swings for the body but Saibot moves out of range.
Sloppy strikes from The Badger. Those never looked like landing.
Saibot throws a series of strikes that have The Badger backpedaling.
The Badger walks straight into a jab right on the nose. That one stung - he's blinking and trying to clear his head.
Saibot uses good head movement to avoid the hook from The Badger.
A head kick by The Badger misses
and Saibot counters with a nice uppercut.
The Badger walks into a left hand.
The Badger dips down and scores with a jab to the body.
Saibot takes an uppercut right on the jaw but it doesn't phase him.
Saibot tries to check a leg kick but that clearly hurt him.
This is a great period of action - very entertaining stuff!
The Badger tries to score with a low kick but Saibot moves his leg out of the way.
Saibot misses the shot to the body.
That's four minutes gone in the round.
Saibot shoots in for a takedown but doesn't get it.
Saibot drops down and drives through with a powerful takedown into guard.
The Badger managing to control the position.
The Badger looking to control.
Saibot landing some decent shots from guard.
Saibot missing there with some ground and pound from the guard.
The Badger working the defensive guard well to avoid strikes from Saibot.
The Badger controls Saibot momentarily but Saibot frees himself.
The Badger utilising some decent striking defenses from the guard, preventing the ground and pound.
And that's the end of the fight!
Noob Saibot comfortably won the final round on my scorecard.
Well Saibot has outworked and out performed his opponent in all aspects of the game today. He was simply too good and the decision should be no more than a formality. Over to the ring announcer for the scorecards.
Ladies and gentlemen, after 3 rounds of action, we go to the scorecards for a decision.
Judge Jack Bonds scores the fight 29:28
Judge Percy O'Donnell scores the fight 29:28
Judge Frank Antenori scores the fight 28:30
In favor of your winner, by split decision... Bucky The Badger!
An out of breath Bucky The Badger thanked his loyal fans in his post fight interview, giving them credit for his success over the course of his career.
|
|
|
|
|
|
|
|
|
|
|
|
|
|
|
|
|
|
|
|
|
|
|
| S |
C
A |
G |
S |
C
B |
G |
|
S |
C |
G |
|
energy
A | B |
|
hype
A | B |
|
pop
A | B |
|
mgr
A | B |
|
FIGHT
RATING
57% |
|
|
|
|
|
|
