|
|
PBP Commentary |
Coming up we have a welterweight MMA rules bout between Robert Hazard (ranked 0 p4p, 0 weight class) and David Black (ranked 0 p4p, 0 weight class). Both fighter's entrance songs getting the crowd jumping here.
 |
|
 |
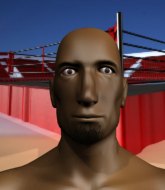
| 180 cm
21
170 lbs
4 - 2 - 0 |
|
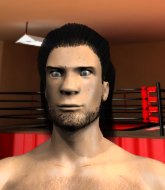
177 cm
18
180 lbs
0 - 0 - 0 |
BJJ Purple Belt
Counter striker
Experienced |
|
BJJ White Belt
Basic striking
Solid chin |
|
| |
|
Ladies and gentlemen. This fight is 3 rounds, in the welterweight division.
Introducing the fighter to my left, fighting out of the red corner.
With a record of
4 - 2 - 0, fighting out of Montreal, Robert Hazard!
And introducing the fighter to my right, fighting out of the blue corner.
With a record of
0 - 0 - 0, fighting out of Montreal, David Black!
The judges for this bout are William Peck, Yves DeLean and Trevor Gratis.

The bell rings for round one and we are underway!
Black misses with the combination.
Ooooh, nice body kick lands from Hazard. Black shrugs it off though.
Black keeps the fight on the outside.
Black throws a head kick that misses and slips in the process. He scrambles back to his feet and the fighters circle.
Black throws an uppercut from half a mile away. Hazard sees it coming and avoids it easily.
Hazard fails in his attempt to clinch.
Hazard uses good head movement to avoid the hook from Black.
Black throws a body punch but Hazard moves out of range.

Hazard closes the distance and presses his opponent up against the cage.
Black managing to block the knees to the body from Hazard.

Black breaks the clinch and we return to the middle of the mat.
Hazard shoots in for a takedown but doesn't get it.
Hazard shoots for a takedown but Black saw that one coming a mile off and avoided it easily.
We've had a slow start to the round here - hopefully the action picks up.
Black looks to throw the jab but Hazard is out of range.
Hazard doesn't manage to clinch there - Black circles away.
Black takes a nice looking leg kick right on the meat of his thigh there.
Black throws a head kick that misses.
Hazard tries to close the distance and clinch up against the cage but Black paws at him with a jab and circles away.

That's one minute gone in the round.
Hazard swats away the attempt to clinch by Black.
A nice combination there by Hazard.
Nice straight punches there by Black. You know Roy Jones Jr respects the hands of Black.
Black throws a wild combination but nothing lands.
Hazard tries to shoot in for a takedown. He's got hold of a leg but Black swivels and escapes.
That's three failed takedown attempts in the round for Robert Hazard. That's going to take a lot out of him.
Black throws a right and a left that Hazard avoids nicely.
Black throws a series of punches but Hazard avoids them all with ease.
Black is looking to clinch but Hazard is avoiding it.
Black throws a body kick despite being completely out of range
and Hazard counters with a lovely shot to the body.
Hazard throws a hook to the body but it doesn't connect.
Nice defenses there by Hazard.
Black gets a clinch.
Black manages to break the clinch.
Black circles away from the clinch attempt.
Hazard darts in and clinches Black up against the cage.

That's two minutes gone in the round.
Black is trying to break free.
Hazard trying to land knees to the body.
Hazard goes for a body shot but it's blocked.
Black breaks the clinch.
Hazard shoots in for a double leg but Black sprawls well. That's going to sap some energy.
Black throws a couple of head shots and lands with the final one - a decent hook, which struck Hazard on the side of the head.
Black closes the distance looking to clinch

and Hazard counters with a takedown into full mount! That could mean trouble for Black!
Hazard looking to ground and pound but Black is blocking nicely.
The fighters are pressed up against the cage, both looking to find a bit of space to work.
Black throwing hammer fists to the chest of Hazard. What's that going to do exactly?
Hazard looking to control but Black is working nicely, looking to advance position himself.
Hazard has been looking to land a fair amount of strikes on the ground. He might be looking to soften his opponent up in order to work for a submission.
Black trying desperately to get to his feet.
Hazard tries to control but Black wriggling away.
The ref warns both fighters not to hold the cage as they work up against the meshing.
Black is trying to escape but when you're mounted that's not too easy.

That's three minutes gone in the round.
Black tries to get back to half guard but can't.
Black looks gassed!
Black taking shots to the head.
Black swinging wildly from the bottom but he's not landing.

Hazard working to secure an arm triangle but it's not happening for him just yet.
Black wriggling around on the bottom manages to avoid the strikes thrown by Hazard.
Black is bucking up trying to escape but Hazard cracks him with another couple of good strikes.
Black wants to control but Hazard is having none of it.

That's four minutes gone in the round.
The crowd are showing their displeasure at the lack of action as loud boos ring out around the arena.
Hazard has hold of Black's left arm, perhaps looking for a submission. The two fighters tussle over control of the isolated limb and Black manages to get his arm back to his side and away from danger.
Hazard tries to control but Black wriggling away.
Black throwing punches from his back but nothing is landing.
Black tries to buck Hazard off but he can't manage it.
Hazard controlling the position easily from mount.
Black wants to hold on but Hazard pushes him away.
Hazard prevents Black from getting the reversal.
And thats the end of the round the fighters go back to their corners.
Robert Hazard dominated that round.
OK. That's time! The bell goes and we're back to the action.

Black clinches up with Hazard and pushes him back against the cage.
Hazard is trying to work out of this bad position, with his back against the cage.
Hazard goes for a takedown in the clinch but Black prevents it.
Black breaks the clinch and we're back to striking at distance.
Hazard is looking to take this fight into the clinch.
Black rushes Hazard and presses him up against the cage.
Black breaks the clinch and we return to the middle of the mat.
Black will need to tighten up his combinations if he doesn't want to gas himself out, swinging at thin air.
Black avoids the head kick by Hazard.
We've had a slow start to the round here - hopefully the action picks up.
Black pulls out of a head kick attempt.
Black throws a two punch combo that lands nicely.
Black throws a left and a right that both miss
and Hazard counters with a shoot takedown into half guard.
Both fighters are absolutely exhausted here.
Hazard is thwarting Black's attempts to control the position.
That's one minute gone in the round.
Black tries to kick Hazard off in order to stand up. Hazard Avoids the leg push though and dives into side control.
Hazard controlling the position from side mount.

Hazard decides to take the fight back to the feet.
Hazard moves in looking to clinch but Black pushes him off.
Black avoids the clinch attempt nicely.
Black swings wildly with a couple of big hooks
so Hazard counters with a double leg into guard. Good agility.
Black pushes Hazard off for just long enough to get back to his feet. Very athletic spring there.
Hazard needs to keep his hands up - Black had a free shot at his head there.
That's two minutes gone in the round.
A combination from Black does no damage.
Black throws a right high kick that is partially blocked by Hazard.
Black misses with a looping left.
Hazard throws a decent looking leg kick but it doesn't land clean.
Hazard uses some good footwork to avoid the body shot by Black.
Hazard misses with a low kick.
Black moves into range and connects with a jab.
Robert Hazard is looking to throw some combinations by the looks of things.
Jab, cross, leg kick. Nice combination by Black!
Hazard moves in looking to clinch but Black pushes him off.
Black clinches up against the cage.
Hazard looking to slow down the pace here.
Black breaks the clinch and we're back to striking at distance.
A punch combination from Black misses.
That's three minutes gone in the round.
Hazard drives through and clinches with Black against the cage.
Black breaks the clinch and we return to the middle of the mat.
Black misses with a jab and misses with a cross straight after too.
Black cracks Hazard with a good jab.
A good leg kick by Black.
Black instigates a clinch.
Black manages to break the clinch.
The fight stays on the outside here - Hazard looks like he's thinking about clinching though.
Black throws an overhand right that lands on Hazard's shoulder, as Hazard tries to avoid the shot.
Hazard tries to clinch up
and Black counters with a two punch combo.
Black is looking to clinch but Hazard is avoiding it.
That's four minutes gone in the round.
Hazard closes the distance and clinches up, looking for a takedown. He shifts his weight and gets a nice trip into half guard.
Black pushes Hazard off looking to stand but Hazard dives back in and keeps control.
Hazard is trying for a guillotine from the top but the pressure isn't in the right place so Black is just riding it out for now. Hazard eventually gives up the hold.
Black lands one or two decent shots to the body here. Although from his own half guard, he's not going to be causing too much damage.
Hazard wants to pass the guard but Black is defending well.
Hazard is keen to just control but Black is a slippery customer.
The crowd applaud the fighters efforts here as the round comes to an end.
Black wants to get back to his feet.
Black looking for submissions from an awkward position here.
And thats the end of the round the fighters go back to their corners.
That was a close second round but I would say that Robert Hazard will probably get the nod.
The minute break is over - no more time for sponges and pep talks - back to the action! This is the final round!

Hazard darts in trying to clinch
and Black counters by moving into the clinch. Good anticipation by Black.
Black is working for a takedown up against the cage. He can't get it on this occasion though.
Black drops down for a takedown but doesn't get it.
Hazard keeps control of Black as he tries to wriggle out of the double underhooks.
Black is struggling to control the position.
Hazard is struggling to control the position.
Hazard breaks the clinch.
Black might want to mix his strikes up a bit more. He's just going for head shots at the moment and that can become a bit predictable.
We've had a slow start to the round here - hopefully the action picks up.
Black tries to close the distance and clinch but Hazard swats him to one side with an open hand palm strike and circles away.
Hazard is looking to take this fight into the clinch.
Both fighters are breathing heavily.
Hazard gets a clinch.
That's one minute gone in the round.
Hazard tries to jump guard but he falls flat on his backside. Black smiles and moves away.
Black shapes like he's going to throw a leg kick but settles back down.
David Black seems to be the more aggressive standup fighter in this bout.
Hazard shoots in for a takedown and gets it. Let's see what he's got on the mat.
Hazard stands up and waves to Black to follow him.
Hazard avoids the head kick by Black.
Black throws a lazy head kick
and Hazard moves into the clinch.
Black pushes off and circles away, back to the middle of the mat.
Black stalks Hazard and leaps in with a furious combination of punches. Uppercuts and crosses smash into Hazard's face. Hazard staggers backwards, shaken.
Hazard tries to close the distance and clinch but Black swats him to one side with an open hand palm strike and circles away.
Black clinches.
That's two minutes gone in the round.
Black manages to break the clinch.
Hazard tries to close the distance and clinch up but Black swats him away and circles back towards the center.
Black throws a body kick but he was well out of range there.
Black takes a swing at Hazard's ribcage but misses.
Black scores with a nice strike.
Hazard shoots in for a takedown but doesn't get it.
No joy there for Black, who threw a few shots but didn't land.
David Black is looking to keep the fight on the feet at all costs.
This fight brought to you by 5M nutrition - it's mmmmm tasty. Nice jab by Black.
Black drives through and clinches with Hazard against the cage.
Black escapes the clinch and we're back to striking.
Black connects with a lovely right hand, straight down the pipe.
Hazard misses with a takedown attempt
and Black counters with a right hand to the body.
That's three failed takedown attempts in the round for Robert Hazard. That's going to take a lot out of him.
Hazard shoots in but doesn't get the takedown
and Black counters with a lovely straight right hand!
That's three minutes gone in the round.
Hazard avoids the head kick by Black.
Black throws a lazy head kick
and Hazard counters with a nice double leg into guard.
Hazard pushes down on Black's leg and manages to get into half guard.
Hazard decides to stand up.
Hazard misses with a takedown
and Black counters with an outside leg kick.
Hazard takes a jab on the nose there. A little bit of blood seems to be coming out. Hopefully that won't affect his breathing.
Black lands a powerful looking uppercut that connected with his opponent's jaw.
Hazard ducks under a wild hook from Black.
Hazard doesn't succeed with the takedown
and Black counters with a two punch combo.
David Black has stepped it up - he knows he needs a finish here!
That's four minutes gone in the round.
Black stuffs the takedown.
Black smiles there as he lands a nice right hand right on the button.
Black rushes Hazard and pushes him back against the cage in a clinch.
Black pushes off and circles away, back to the middle of the mat.
Hazard feints and then dives in with a takedown. That was a long way out but the feint bought him enough time to close the distance and complete the takedown. Now we'll play guard for a bit and see who can get the better of that position.
Black is trying to hold Hazard in close to prevent damage but Hazard has managed to pass into half guard.
Black really doesn't want to stay on the ground with Hazard. If he can't get it back to his feet, it's only a matter of time before he'll be tapping out.
Black has guillotine here! It looks pretty tight! Could this be all over! No, Hazard escapes and passes into side control at the same time. Nice work there by Hazard!
The crowd cheering loudly, showing their appreciation for the quality fight we're seeing here.
Black bucks up and manages to escape back to his feet!
The crowd applaud the fighters efforts here as the round comes to an end.
Hazard ducks under a wild hook from Black.
And that's the end of the fight!
Robert Hazard showed his dominance in that final round.
Well I reckon that's a shut out for Hazard, winning every round. Will the judges agree? They are the ones who matter, even if they are often depressingly incompetent. Over to the ring announcer for the scorecards.
Ladies and gentlemen, after 3 rounds of action, we go to the scorecards for a decision.
Judge William Peck scores the fight 30:27
Judge Yves DeLean scores the fight 30:27
Judge Trevor Gratis scores the fight 30:27
In favor of your winner, by unanimous decision... Robert Hazard!
|
|
|
|
|
|
|
|
|
|
|
|
|
|
|
|
|
|
|
|
|
|
|
| S |
C
A |
G |
S |
C
B |
G |
|
S |
C |
G |
|
energy
A | B |
|
hype
A | B |
|
pop
A | B |
|
mgr
A | B |
|
FIGHT
RATING
57% |
|
|
|
|
|
|

