|
|
PBP Commentary |
Coming up we have a welterweight MMA rules bout between Nick Bentner (ranked 0 p4p, 0 weight class) and Connor McGuinness (ranked 0 p4p, 0 weight class). Bentner comes into the arena with My Dick blaring out of the sound system. Well, the cameraman is lingering on a pretty young lady for a bit too long there. Keep your eyes on the prize buddy or you'll miss the fighter intros!
 |
|
 |
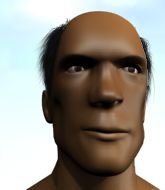
| 183 cm
34
182 lbs
12 - 7 - 0 |
|
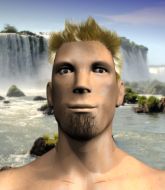
183 cm
29
185 lbs
16 - 9 - 0 |
Good wrestling
Excellent boxer
Granite chin |
|
Good wrestler
World class boxer
Granite chin |
|
| |
|
Ladies and gentlemen. This fight is 3 rounds, in the welterweight division.
Introducing the fighter to my left, fighting out of the red corner.
With a record of
12 - 7 - 0, fighting out of Los Angeles, Nick Bentner!
And introducing the fighter to my right, fighting out of the blue corner.
With a record of
16 - 9 - 0, fighting out of Los Angeles, Connor McGuinness!
The judges for this bout are Frank Antenori, Jack Bonds and Timothy Bukovac.

The bell rings for round one and we are underway!
Bentner tries to clinch but is not successful on this occasion.
McGuinness connects with a hook to the side of his opponent's head.
A jab from McGuinness misses.
Bentner appears to be looking for a counter takedown.

Bentner shoots in for a takedown from distance. He catches McGuinness napping and manages to drive through into side control!

Bentner is looking to finish here, going for an Americana. McGuinness knows the correct defense though, so he's OK.
McGuinness takes a couple of big shots there - the referee warns him that he has to defend himself better.
McGuinness is trying to improve his position.
We've had a slow start to the round here - hopefully the action picks up.
Bentner is working McGuinness over with some ground and pound from side control.
McGuinness being controlled for a moment.
McGuinness is trying to get back to half guard.
McGuinness has found himself in a tricky position here. He's been working his transitions in training so let's see if he can work his way out of it.

That's one minute gone in the round.
Bentner scoring with punches and elbows.
McGuinness is trying to stand back up. He's worked his way up against the cage but Bentner has just dragged him back down to the mat.
The ground and pound from Bentner seems to be hitting the mat more than his opponent.
Bentner throws a knee to the body but it doesn't do much damage.
McGuinness tries to get back to half guard but can't.
Bentner is pausing for a moment. What's he doing? It looks like he's clearing his nose. Oh dude! He's shot a load of snot all down McGuinness's shoulder. That is not cool.
We've been hearing that Bentner has been drilling a lot of ground and pound in training, so let's see if he get the finish.
Bentner working the head with strikes.
You can see the frustration on McGuinness's face, being in this tough position on the bottom.
McGuinness tries to improve position but can't.
McGuinness is not content to let Bentner control the position.
McGuinness can't do much from the bottom here.

That's two minutes gone in the round.
Bentner scores with punches from side control.
McGuinness is positioning himself to get back to half guard.
McGuinness is still trying to improve position.
The fighters are starting to perspire pretty heavily.
McGuinness is working to avoid the ground and pound but Bentner connects with a decent elbow.
The ref warns both fighters not to hold the cage as they work up against the meshing.
McGuinness tries to improve position but can't.
McGuinness regains half guard.
Neither fighter is being very active at the moment, with Bentner in particular looking to stall.
Bentner passes to side control.
McGuinness is sneaking out the side here. He's bucked Bentner off and has taken his back!

That's three minutes gone in the round.

McGuinness has got his arm under Bentner's chin working for the choke
has he got it? It looks pretty tight! Oh! Bentner has spun round into McGuinness's guard beautifully! Well done that man!
Bentner working from the guard for now, landing some ground and pound.
Bentner trying to control the position from guard on top but McGuinness is wriggling around, looking for whatever he can.
Bentner is pushing down on McGuinness's leg trying to pass to half guard. McGuinness is fighting to maintain full guard but Bentner has managed to sneak the leg through.
Bentner stalling.
Bentner lands with an elbow from half guard - that looked like it hurt.
Bentner has been looking to land a fair amount of strikes on the ground. He might be looking to soften his opponent up in order to work for a submission.
McGuinness trying to control here.
Bentner looks towards his corner to check for any instructions. The corner give him nothing to work with, so he cracks McGuinness with a short hammerfist. I guess that's as good as any advice he could get in this position.

That's four minutes gone in the round.
Bentner trying to control the action but McGuinness is working from the bottom.
McGuinness is looking to control Bentner's leg but it's slowly edging free. Can McGuinness avoid being mounted?
Bentner missing with the ground and pound from half guard.
McGuinness is working for an escape here. He's hooked one of Bentner's legs and he's managed to sneak out and take Bentner's back!
McGuinness struggling to keep hold of the position.
McGuinness is looking for the choke from the back position but Bentner is controlling his hands well.
Bentner grimaces as he takes a shot to the body.
The crowd cheering loudly, showing their appreciation for the quality fight we're seeing here.
McGuinness working for the choke.
McGuinness is not going to allow Bentner to sit and survive in this position.
Bentner turns into McGuinness and is now in his guard.
Bentner is taking a break and basically stalling. The referee will not allow him to do that for long.
And thats the end of the round the fighters go back to their corners.
Nick Bentner dominated that round.
That's time! Bentner's corner gives him a slap on the ass as he gets ready to fight.

Bentner on the wrong end of a vicious looking body shot.
McGuinness throws out a loose jab but Bentner uses good head movement to avoid it.
McGuinness stuffs the takedown attempt from Bentner. Bentner gets slowly back to his feet.
It seemed like McGuinness was going to counter with the hook but didn't fully commit to it.

Bentner drives through and clinches with McGuinness against the cage.
We've had a slow start to the round here - hopefully the action picks up.
Bentner has a body lock and is looking for a takedown. McGuinness is bouncing around trying to prevent the takedown and somehow he has indeed managed to stay on his feet.

McGuinness manages to break the clinch.
The fight stays on the outside here - Bentner looks like he's thinking about clinching though.
As Bentner backs off McGuinness throws a huge counter combo but Bentner manages to avoid it all.
Bentner rushes McGuinness and pushes him back against the cage in a clinch.
That's one minute gone in the round.
Bentner has dropped down and is looking to force the takedown but it's defended by McGuinness after a bit of a struggle.
That's three failed takedown attempts in the round for Nick Bentner. That's going to take a lot out of him.
Bentner tries to score a body lock takedown but McGuinness shows good agility there to stay on his feet.
McGuinness tries to circle away but Bentner has him pinned against the cage.
Bentner is really dominating this fight. Is there anything that McGuinness can do to turn this around?
McGuinness gets double underhooks to prevent a takedown attempt from Bentner.
McGuinness pushes off and circles away, back to the middle of the mat.
Bentner fails with a takedown attempt.
Bentner walks into a jab.
That's two minutes gone in the round.
McGuinness stuffs a takedown. It's all about dictating where the fight takes place and McGuinness wants it to stay on the feet.
McGuinness cracks Bentner with a hook to the jaw. Both fighters smile at eachother and high-five before getting back down to business.
Bentner has closed the distance and engaged McGuinness in a clinch.
Bentner looking for a takedown.
Bentner goes for a takedown attempt but McGuinness pushes him away and we're back to fighting at a distance.
Bentner is looking to clinch.
McGuinness tries to keep at a distance but Bentner has taken the fight into the clinch.
Bentner tries to score a body lock takedown but McGuinness shows good agility there to stay on his feet.
McGuinness is trying to break the clinch but Bentner has him pressed against the cage.

McGuinness successfully pulls guard.
That's three minutes gone in the round.
Bentner keeps in close for a moment and lands a decent shot to the side of McGuinness's head.
McGuinness trying to control the position.
McGuinness is working actively off his back, looking to secure an arm or perhaps work for a triangle.
Bentner trying to control the position from guard on top but McGuinness is wriggling around, looking for whatever he can.
McGuinness is looking for a guillotine. You can't force these things though and Bentner defends well.
McGuinness is looking for a triangle but Bentner pushes his legs off easily.
Bentner tries to free his leg and advance position but McGuinness is retaining full guard.
McGuinness looking for submissions off his back, moving his hips, looking for an opening.
That's four minutes gone in the round.
Bentner sitting in guard, not really doing much.
Bentner distracts McGuinness with his right hand and drops a big elbow with his other arm.
McGuinness looking for a guillotine here but Bentner defends easily.
Bentner is sitting in guard, working some ground and pound.
Boooooooooooooooooooo!!! God, this has been a terrible round. Come on you two, sort yourselves out!
McGuinness has his foot on Bentner's thigh. He's trying to push off and get in position for a triangle, I think. Bentner works his way back into a safe position though.
Bentner controlling from the top position.
Bentner is in close to McGuinness's body, working some short punches and elbows.
And thats the end of the round the fighters go back to their corners.
Connor McGuinness showed his class in that round. I'd imagine he'll take it on all the scorecards.
The fighters get back to their feet, the hooter sounds and we're back to the action! This is the final round!

Bentner shoots in looking for a single leg takedown. McGuinness is trying to defend but Bentner finishes it well and ends up in half guard. Let's see if he can advance position further.
Bentner with a momentary lay and pray from half guard.
McGuinness is not content to let Bentner control the position.
McGuinness wants to get back to full guard but Bentner has passed into side control.
Bentner trying to control the position but McGuinness is working away.
The fighters are pressed up against the cage, both looking to find a bit of space to work.
We've had a slow start to the round here - hopefully the action picks up.
McGuinness is sneaking out the side here. He's bucked Bentner off and has taken his back!
That's one minute gone in the round.
McGuinness is trying to stick to Bentner's back but Bentner is turning into McGuinness. He's managed to reverse the position - now he's in McGuinness's guard. Polite applause from the crowd in appreciation of some nice Jiu Jitsu by Bentner.
McGuinness controls Bentner momentarily but Bentner frees himself.
McGuinness had isolated an arm as going for a kimura. Bentner defends it easily.
Bentner works over McGuinness with some ground and pound from guard.
McGuinness working a defensive guard here.
Bentner trying to control but McGuinness is working from the bottom.
McGuinness is throwing his legs up, looking for submissions. Bentner is aware though and is defending well.
Bentner passes into half guard.
That's two minutes gone in the round.
Bentner is trying to control the action in half guard but McGuinness is working away on the bottom, looking perhaps to get back to full guard.
McGuinness tries to roll over but Bentner keeps him under control.
Bentner working McGuinness over with strikes.
Bentner is keen to just control but McGuinness is a slippery customer.
Bentner throws a strike but McGuinness avoids it easily and moves to full guard.
Bentner is looking to work some ground and pound but McGuinness has wrist control.
Bentner works a leg free and moves into half guard.
McGuinness wants to get back to full guard.
Bentner is keen to just control but McGuinness is a slippery customer.
McGuinness looking to work for a kimura from the bottom.
That's three minutes gone in the round.
The two fighters exchange a few words. I couldn't hear what they were saying but maybe it's more fun if you make it up yourself. Bentner connects with a nice short shot to McGuinness's temple.
Bentner working the head and body with strikes.
Bentner has freed up his trapped foot and advances to mount.
Bentner wants to control the pace but McGuinness is squirming around nicely.
McGuinness tries to hold on but Bentner pushes him away.
McGuinness in a bad spot here, taking shots to the head.
The crowd growing excited in anticipation of a finish here! Right on cue, Bentner cracks his opponent with a massive right hand that draws loud cheers!
McGuinness can't escape the position.
That's four minutes gone in the round.
Bentner scores with a couple of good head shots there.
McGuinness is in a horrible position here. Bentner smacks him with another shot as he tries to escape the position.
McGuinness is desperately trying to improve his position but Bentner has a good base and remains in mount.
Bentner trying to control but McGuinness is having none of it.
Bentner lands a big shot there that rocks McGuinness but he's holding on and managing to survive for now.
Wooooo! Give it up for these two warriors! They are putting on a show!
McGuinness wants to hold on but Bentner pushes him away.
Bentner lands a big shot there that rocks McGuinness but he's holding on and managing to survive for now.
Bentner controlling his opponent.
Bentner lands a shot to the body, followed up by a shot to the exposed head of his trapped opponent.
Bentner postures up and cracks his opponent a couple of times before moving back into close ground control. McGuinness looks a forlorn figure.
And that's the end of the fight!
Nick Bentner showed his dominance in that final round.
I think Bentner has won this one but let's see what the judges have to say. Over to the ring announcer for the scorecards.
Ladies and gentlemen, after 3 rounds of action, we go to the scorecards for a decision.
Judge Frank Antenori scores the fight 29:28
Judge Jack Bonds scores the fight 29:28
Judge Timothy Bukovac scores the fight 29:28
In favor of your winner, by unanimous decision... Nick Bentner!
Our winner, Nick Bentner, made sure he spent some time buttering up the crowd during his post fight interview, which will no doubt bring him a few more fans.
|
|
|
|
|
|
|
|
|
|
|
|
|
|
|
|
|
|
|
|
|
|
|
| S |
C
A |
G |
S |
C
B |
G |
|
S |
C |
G |
|
energy
A | B |
|
hype
A | B |
|
pop
A | B |
|
mgr
A | B |
|
FIGHT
RATING
41% |
|
|
|
|
|
|
