|
|
PBP Commentary |
Coming up we have a lightweight MMA rules bout between Kit Dood (ranked 0 p4p, 0 weight class) and Walter White (ranked 0 p4p, 0 weight class). White has chosen Breaking Bad as his entrance music, which hasn't gone down very well with the crowd. Over to our ring announcer for the fighter introductions!
 |
|
 |
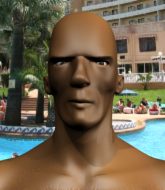
| 150 cm
25
165 lbs
1 - 0 - 0 |
|
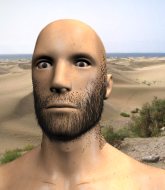
178 cm
25
158 lbs
1 - 0 - 0 |
BJJ White Belt
Brawler
Self confident |
|
BJJ White Belt
Excellent MT
Inexperienced |
|
| |
|
Ladies and gentlemen. This fight is 3 rounds, in the lightweight division.
Introducing the fighter to my left, fighting out of the red corner.
With a record of
1 - 0 - 0, fighting out of Montreal, Kit Dood!
And introducing the fighter to my right, fighting out of the blue corner.
With a record of
1 - 0 - 0, fighting out of Montreal, Walter White!
The judges for this bout are Ian Loll, Gregory Folan and Steve Smith.

The bell rings for round one and we are underway!

Dood clinches up against the cage.
Dood avoiding damage as White throws knees to the body.
Dood misses with a short punch on the inside.
Dood misses with a body punch.
An uppercut on the inside fails to land for Dood.
Dood misses with some punches.
Dood lands with a short head shot on the inside.
Dood pushes White back against the cage and unloads with a body punch.
Dood misses with a shot to the kidneys.
Dood lands with a good tight uppercut to the head.
White lands a body punch.
A head punch blocked on the inside by White.
Dood misses with a short punch on the inside.
Dood presses White against the cage and delivers a mid-strength body shot.
Dood blocking some punches.
Dood lands a nice looking hook to the body, against the cage.
A head punch on the inside from Dood fails to land.
White blocks a couple of punches on the inside.
White tries to land a shot to the body but it's blocked.
Dood gets through White's defenses to land a nice punch to the side of the head.

That's one minute gone in the round.
Dood lands a body shot.
White blocks a couple of punches on the inside.
Dood takes a knee to the side of the body.
Dood is leaning against White and scores with a nice uppercut to the body.
White looks winded!
Dood scores with an uppercut up the middle.
Dood working aggressively here.
Dood has a couple of punches blocked by White.
A right handed body shot lands from Dood.
Dood softening up his opponent with strikes, against the cage.
A shot in the inside from Dood.
White misses with a punch to the body.
Dood tries a shoulder strike but it doesn't do any damage.
Dood lands a shoulder strike that jolts his opponent's head backwards.

White is rocked!
A shot in the inside from Dood.
White is still on wobbly legs! Can Dood finish him?
White blocks a punch to the side of the head.
This has been an exciting period of action!
Dood misses with a short punch on the inside.
Dood swings away with an uppercut that misses.
Dood really is built like a bowling ball. I wonder if he'd roll if you pushed him down a hill...
White goes for a body shot but it's blocked.
An uppercut on the inside fails to land for White.
White trying to land knees to the body.
Dood works for underhooks and lands a body shot in the process.

That's two minutes gone in the round.
White blocks an uppercut.
White blocks an uppercut.
Dood swings wildly with an uppercut but White uses good head movement to avoid it.
Dood throws a head punch that misses.
Dood stays in close to his opponent and throws a right hand to the body.
Dood misses with a short punch on the inside.
White misses with some punches.
Dood working aggressively here.
White seems to have recovered his senses.
An uppercut on the inside fails to land for Dood.
Dood throws a blind hook that connects with the side of Whites head.
Dood makes some space for himself and lands an uppercut.
Dood lands a hook that snaps the head of White backwards.
White throws a punch but it's blocked by Dood.
Good body shot from Dood.
Dood misses with a punch to the body.
Dood doesn't land with the attempted body shot.
A real battle for position is taking place between these two warriors.
Dood goes for a body shot but it's blocked.
White blocks a couple of punches on the inside.
A frustrated look appears on White's face as he tries to break the clinch.

That's three minutes gone in the round.
Dood blocks a couple of punches on the inside.
Dood swings away with an uppercut that misses.
White taking a breather.
Dood lands with a short shot to the head.
An uppercut on the inside fails to land for Dood.
Dood lands with a left to the head.
White makes some space for himself and lands an uppercut.
White tries to work over Dood's body with a swooping hook but it only glances the target.
Dood tries a shoulder strike but it doesn't do any damage.
Dood misses with a hook from the clinch.
Dood can't find room to land a body shot as White controls the action.
White can't find room to land a body shot as Dood controls the action.
Dood scores with a hook to the body.
White misses the knee to the body. Nice hip positioning from Dood.
Dood working aggressively here.
Dood misses with a hook to the ribs.

That's four minutes gone in the round.
Dood struggles to land a body shot inside as White controls his hands.
Dood managing to block the knees to the body from White.

White pushes off and circles away, back to the middle of the mat.
Dood tries to clinch but White moves away
and White counters with a good right hand that lands right on the jaw.
White circles away from the clinch attempt
and White cracks him with a counter punch right on the button.
Dood doesn't react quick enough there as he takes a shot to the body.
This is a great period of action - very entertaining stuff!
Dood wants to clinch up but White keeps it at a distance.
White connects with a lovely right hand, straight down the pipe.
Dood gets in close and instigates a clinch.
Dood misses with a punch to the body.
White blocks a couple of punches on the inside.
White escapes the clinch and we're back to striking.
Dood moves to clinch but White breaks away
and White counters with a right hand to the body.
And thats the end of the round the fighters go back to their corners.
Kit Dood dominated that round.
The referee calls time. The cornermen exit stage left and we're back to business.

Dood gets cracked with a nice right hand there by White.
White takes a step towards his opponent and connects with a left hand, before circling away.
Dood tries to clinch up
and White counters with a straight punch to the midsection.
Dood gets a clinch.
White lands a nice uppercut.
An uppercut to the body lands inside from Dood.
Dood swings away with an uppercut that misses.
White blocks a body shot from Dood.
White makes some space for himself and lands an uppercut.
Dood has not gone for a single takedown so far in this fight, which seems like a very strange tactic when you consider that he has the superior wrestling and BJJ.
We've had a slow start to the round here - hopefully the action picks up.
Dood blocking some punches.
Dood misses with a shot to the kidneys.
Dood misses with some punches.
Dood tries to throw a body punch but White avoids it by throwing Dood back against the cage.
Kit Dood has scored more points in the clinch so far.
White prevents a body shot from Dood.
Dood throws a punch but it's blocked by White.
That's one minute gone in the round.
White escapes the clinch and we're back to striking.
White connects with a lovely jab that went straight through the gap between Dood's hands.
White has used his reach advantage pretty well so far tonight.
Dood tries to clinch but White moves away
and White counters with a nice uppercut.
Dood closes the distance and presses his opponent up against the cage.
Both fighters are absolutely exhausted here.
White leaning his opponent against the cage.
A head punch blocked on the inside by Dood.
White blocks a punch to the side of the head.
Dood tries a shoulder strike but it doesn't do any damage.
White working on landing some head shots here - that one got through nicely.
Dood working aggressively here.
White works on Dood's body with a couple of short punches.
White lands with a light punch inside.
White lands with a short punch from the clinch.
White blocks a couple of punches on the inside.
White lands with a light punch inside.
That's two minutes gone in the round.
Fantastic stuff here - a very entertaining period of action, which has drawn cheers from the crowd.
White's head jolts backwards as he takes an uppercut right on the button!
Dood misses with a punch on the inside.
A nice left hand lands by White.
White blocking some punches.
Dood is really dominating this fight. Is there anything that White can do to turn this around?
White's corner calls for him to break the clinch, which he does.
Dood is looking to clinch but White is avoiding it.
Dood showing good head movement there, avoiding the strikes from White.
Dood half commits to a counter takedown before pushing away, out of range.
Walter White seems to be getting the better of the standup.
Dood closes the distance looking to clinch
and White counters with a straight right hand.
Dood is looking to clinch.
White looks like he wants to counter punch here.
White circles away from the clinch attempt.
White throws out a counter right but Dood avoids it with no problem.
Kit Dood is looking to throw some combinations by the looks of things.
White connects with a crisp jab.
White jabs Dood to the body, keeping him at a distance.
Dood tries to close the distance and clinch but White swats him to one side with an open hand palm strike and circles away.
White looks like he wants to counter punch here.
That's three minutes gone in the round.
White cracks Dood with a hook to the jaw. Both fighters smile at eachother and high-five before getting back down to business.
Dood is looking to take this fight into the clinch.
A jab from White finds it's way through Dood's defenses.
Dood tries to clinch but White is having none of it.
Dood fails in his attempt to clinch.
A punch lands to the side of Dood 's head but he takes it in his stride.
White circles away from the clinch attempt.
White throws a combination but comes up with nothing but fresh air.
Dood tries to clinch but White moves away
and White counters with a lovely shot to the body.
White scores with a hook to the body. Dood takes a step back and tries to catch his breath.
Dood walks into a stiff left hand from White.
Dood walks straight into a jab right on the nose. That one stung - he's blinking and trying to clear his head.
White is using his reach advantage to land shots from outside his opponent's range.
White scores with a body shot.
That's four minutes gone in the round.
Wooooo! Give it up for these two warriors! They are putting on a show!
White cracks Dood with a hook to the jaw. Both fighters smile at eachother and high-five before getting back down to business.
White changes levels and scores with a jab to the body.
White throws a combination. Dood tries to block but a couple of punches get through.
A punch combination from White misses.
Dood takes one on the chin but seems OK.
White slips in close and lands a nice hook before moving back out of range.
Dood takes a solid shot to the body. That one hurt him but he's trying not to show it.
Good exchange - White coming out on top.
White digs a good hook to Dood's body.
White fakes a head shot and lands one to the body.
Dood takes a jab on the nose. He smiles like he loves it and keeps coming.
The crowd applaud the fighters' efforts here as the round comes to an end.
White's corner calls for a 1-2. White obliges with the 1 part as he scores the single shot and moves back out of range.
White lands with a nice body punch.
Dood is looking to clinch but White is avoiding it.
And thats the end of the round the fighters go back to their corners.
Walter White showed his class in that round. I'd imagine he'll take it on all the scorecards.
The minute break is over - no more time for sponges and pep talks - back to the action! This is the final round!

White lands a beauty of a right hand that gets the crowd cheering.
White keeps the fight on the outside.
White scores to the head and body with a nice combination!
Dood fails in his attempt to clinch.
Dood closes the distance but White moves to the side
and White counters with a quick right hand to the jaw.
Dood ducks right into an uppercut from White.
Dood gets in close and instigates a clinch.
Good body shot from White.
Dood throws a punch but it's blocked by White.
We've had a slow start to the round here - hopefully the action picks up.
A short uppercut from White.
White tries to land a shot to the body but it's blocked.
Dood goes for a body shot but it's blocked.
Dood misses with a short punch on the inside.
Dood throws a head punch that misses.
Both fighters are breathing heavily.
A body shot lands from White.
Dood looks like he's developed a pretty tasty lump over his left eye. He'll need to avoid taking much more damage to that.
That's one minute gone in the round.
Dood tries to work over White's body with a swooping hook but it only glances the target.
A hook to the body from Dood.
White swings wildly with an uppercut but Dood uses good head movement to avoid it.
Dood misses with the head strike.
Dood tries to throw a body punch but White avoids it by throwing Dood back against the cage.
White throws a punch but it's blocked by Dood.
Dood misses with a shot to the kidneys.
White breaks from the clinch.
White thuds his right hand into Dood's forehead from close range. That could be painful for both fighters.
White throws a right hand that Dood ducks under and follows up with a left that Dood also avoids with ease.
Nice shot by White.
Dood wants to clinch
enabling White to counter with a crisp jab.
Dood showing good head movement there, avoiding the strikes from White.
That's two minutes gone in the round.
Dood darts in trying to clinch
and White counters with a good right hand that lands right on the jaw.
White tests Dood's chin there with a solid looking shot.
A left lands for White.
This has been an exciting period of action!
Dood takes one to the chin there.
Dood moves to clinch but White breaks away
and White counters with a stiff right hand.
White's corner calls for a 1, 2 combination and White duly obliges.
White lands a jab to Dood's midsection.
White scores with the left hand. Dood knows he should have avoided that one.
Dood takes a shot to the nose. Hopefully that hasn't broken it.
Dood moves into range and clinches up with White.
Walter White is fighting for a decision here - he's started to take the cautious approach.
That's three minutes gone in the round.
Dood misses with a punch on the inside.
Dood swings away with an uppercut that misses.
White lands a right hand that snaps the head of Dood backwards.
Dood tries to work over White's body with a swooping hook but it only glances the target.
Dood goes for a body shot but it's blocked.
Dood misses with some punches.
White blocks an uppercut.
White makes some space for himself and lands an uppercut.
Dood tries to throw a body punch but White avoids it by throwing Dood back against the cage.
Dood misses with a short punch on the inside.
A head punch on the inside from Dood fails to land.
That's four minutes gone in the round.
White blocks a couple of punches on the inside.
White lands a shoulder strike that jolts his opponent's head backwards.
Dood doesn't land with the attempted body shot.
A short right from White on the inside.
White lands a nice looking hook to the body, against the cage.
White lands a hook to the side of the head.
White misses the knee to the body. Nice hip positioning from Dood.
A head punch blocked on the inside by White.
Dood working aggressively here.
White misses the knee to the body. Nice hip positioning from Dood.
White tries to land a knee to the body but he is off balance and Dood avoids it.
White blocks a punch to the side of the head.
Kit Dood has stepped it up - he knows he needs a finish here!
We've seen a great period of action over the last minute or so - credit to both fighters for going all out!
Dood tries to throw a body punch but White avoids it by throwing Dood back against the cage.
And that's the end of the fight!
Walter White comfortably won the final round on my scorecard.
I think White has won this one but let's see whether the judges agree with me. Over to the ring announcer for the scorecards.
Ladies and gentlemen, after 3 rounds of action, we go to the scorecards for a decision.
Judge Ian Loll scores the fight for Walter White!
Judge Gregory Folan scores the fight for Walter White!
Judge Steve Smith scores the fight for Walter White!
Walter White wins by unanimous decision!
An out of breath Walter White thanked his loyal fans in his post fight interview, giving them credit for his success over the course of his career.
|
|
|
|
|
|
|
|
|
|
|
|
|
|
|
|
|
|
|
|
|
|
|
| S |
C
A |
G |
S |
C
B |
G |
|
S |
C |
G |
|
energy
A | B |
|
hype
A | B |
|
pop
A | B |
|
mgr
A | B |
|
FIGHT
RATING
71% |
|
|
|
|
|
|
