|
|
PBP Commentary |
Coming up we have a light heavyweight MMA rules bout between Ryosuke Sato (ranked 0 p4p, 0 weight class) and Waymon Lattimore (ranked 0 p4p, 0 weight class). Lattimore has chosen Cut the Cord - Shinedown as his entrance music. On his way into the cage it seems that Ryosuke Sato has been attacked by a crazed fan! It looks like it might have been the just bleed guy! Luckily Ryosuke Sato seems to be OK! I thought that lunatic was in prison!?
 |
|
 |
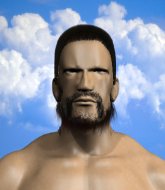
| 187 cm
30
215 lbs
11 - 4 - 0 |
|
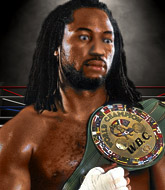
191 cm
22
212 lbs
8 - 1 - 0 |
Good wrestling
Excellent boxer
Cardio machine |
|
BJJ Blue Belt
Excellent boxer
Powerful |
|
| |
|
Ladies and gentlemen. This fight is 3 rounds, in the light heavyweight division.
Introducing the fighter to my left, fighting out of the red corner.
With a record of
11 - 4 - 0, fighting out of Las Vegas, Ryosuke Sato!
And introducing the fighter to my right, fighting out of the blue corner.
With a record of
8 - 1 - 0, fighting out of New York, Waymon Lattimore!
The judges for this bout are Yves DeLean, Elvis Blanc and Dillan Fox.

The bell rings for round one and we are underway!
Sato throws a good cross that connects.

Sato forces Lattimore back against the cage and clinches.
Sato managing to block the knees to the body from Lattimore.
Sato lands a short shot on the inside that snaps the head of Lattimore backwards.
Lattimore wants to push off and get back to the center of the mat but Sato has him pressed against the cage.
Lattimore tries to land a shot to the body but it's blocked.
Lattimore blocks an uppercut.
A right hook to the body lands for Sato.
Sato working aggressively here.
Lattimore wants to strike at distance but he can't break free of the clinch.
Sato working on landing some head shots here - that one got through nicely.
Sato softening up his opponent with strikes, against the cage.
Sato doesn't land with the attempted body shot.
Sato makes some space for himself and lands an uppercut.
Sato working on landing some head shots here - that one got through nicely.
Wooooo! Give it up for these two warriors! They are putting on a show!
Sato blocks a body shot from Lattimore.
Sato working on landing some head shots here - that one got through nicely.
Sato working on landing some head shots here - that one got through nicely.
Sato lands a right uppercut that snaps the head of Lattimore backwards.
Sato is leaning against Lattimore and scores with a nice uppercut to the body.
Lattimore trying to stall but Sato improves his position.

That's one minute gone in the round.
Lattimore is looking to score with knees to the body. Maybe he'll change it up and go body then head. Sato is defending well for now.
Lattimore is trying to break the clinch but Sato has him pressed against the cage.
A right hook to the body lands for Lattimore.
Sato tries a body shot but Lattimore blocks it.
Sato tries to land a shot to the body but it's blocked.
A head punch blocked on the inside by Lattimore.
Sato blocks a body shot from Lattimore.

Lattimore breaks from the clinch.
Sato tries to close the distance and clinch but Lattimore swats him to one side with an open hand palm strike and circles away.
Lattimore looked like he wanted to counter with a punch but didn't throw it.
Lattimore misses with a lunging right hand
and Sato counters with a crisp hook to the side of the head.
Sato moves out of range of the strikes.
Lattimore gets tackled into the cage by Sato. Sato maintains the clinch.
Sato lands a short shot on the inside that snaps the head of Lattimore backwards.
Lattimore throws a punch but it's blocked by Sato.
Sato goes for a body shot but it's blocked.
Lattimore can't find room to land a body shot as Sato controls the action.
Lattimore tries to work over Sato's body with a swooping hook but it only glances the target.
Lattimore is trying to break free.

That's two minutes gone in the round.
Lattimore tries to land a shot to the body but it's blocked.
Sato working aggressively here.
Sato scores with an uppercut up the middle.
Lattimore tries to land a shot to the body but it's blocked.
Sato misses with a punch to the body.
A quick uppercut on the inside from Sato.
The crowd cheering loudly, showing their appreciation for the quality fight we're seeing here.
A shot in the inside from Sato.
Sato working on landing some head shots here - that one got through nicely.
A body shot lands from Sato.
Sato works for underhooks and lands a body shot in the process.
Sato lands a hook to the side of the head.
Sato goes for a body shot but it's blocked.
Sato cracks Lattimore with a nice body shot.
Lattimore looks winded!
Sato lands a right uppercut that snaps the head of Lattimore backwards.
A quick uppercut on the inside from Sato.
A body shot lands from Sato.
Sato pushes Lattimore back against the cage and unloads with a body punch.
Sato lands punches inside but they're not really causing much damage.
A short right from Sato.

That's three minutes gone in the round.
Sato presses Lattimore against the cage and delivers a mid-strength body shot.
Sato lands a left hand that snaps the head of Lattimore backwards.
A short right from Sato on the inside.
A body shot lands from Sato.
Sato lands a hook that snaps the head of Lattimore backwards.
Sato digs a right hand into Lattimore's ribs. Those have got to be taking their toll on Lattimore's gas tank.
Sato gets through Lattimore's defenses to land a nice punch to the side of the head.
Sato lands a body shot in the clinch.
Sato scores with a hook to the body.
Sato lands on the inside with an uppercut.
Sato lands with a good tight uppercut to the head.
Lattimore's head jolts backwards as he takes an uppercut right on the button!
The crowd cheering loudly, showing their appreciation for the quality fight we're seeing here.
Sato presses Lattimore against the cage and delivers a mid-strength body shot.
Sato lands a body shot in the clinch.
Sato softening up his opponent with strikes, against the cage.
A left hand lands to the body for Sato.
A right handed body shot lands from Sato.
Sato scores with a nice hook to the head.
Sato lands an uppercut.

That's four minutes gone in the round.
A short right from Sato.
Sato digs a right hand into Lattimore's ribs. Those have got to be taking their toll on Lattimore's gas tank.
Sato lands a body punch in the clinch.
A head punch on the inside from Lattimore fails to land.
Sato lands on the inside with an uppercut.
Sato lands a left hand.
A short right from Sato.
Sato lands with a light punch inside.
A left hand lands to the body for Sato.
Lattimore takes a shot to the head.
Sato lands with a quick shot inside that doesn't really do much damage.

Lattimore is rocked!
Lattimore's head jolts backwards as he takes an uppercut right on the button!
Lattimore is still on wobbly legs! Can Sato finish him?
Sato lands a body punch.
Lattimore seems to have recovered his senses.
The crowd applaud the fighters' efforts here as the round comes to an end.
Sato lands a body punch in the clinch.
Lattimore's head jolts backwards as he takes an uppercut right on the button!
Sato lands with a quick shot inside that doesn't really do much damage.
The fighters are starting to perspire pretty heavily.
Sato lands a shot to the body.
An uppercut to the body lands inside from Sato.
And thats the end of the round the fighters go back to their corners.
Ryosuke Sato dominated that round.
OK. That's time! The bell goes and we're back to the action.

Sato stooping low to avoid any incoming strikes and then lunges in with an uppercut come cross that lands flush.
Sato takes the fight into the clinch.
With the fighters clinched against the cage, Sato creates a bit of distance for himself and scores with a nice uppercut.
Sato scores with a shot to the side of Lattimore's head.
Sato is leaning against Lattimore and scores with a nice uppercut to the body.
Sato is really dominating this fight. Is there anything that Lattimore can do to turn this around?
Sato lands a hook to the body. It's hard to tell if that hurt Lattimore or not.
Lattimore's head jolts backwards as he takes an uppercut right on the button!
Ryosuke Sato has scored more points in the clinch so far.
Sato lands a shot to the body.
Sato scores with a shot to the side of Lattimore's head.
Sato lands with a quick shot inside that doesn't really do much damage.
Sato scores with a shot to the side of Lattimore's head.
Fantastic stuff here - a very entertaining period of action, which has drawn cheers from the crowd.
Sato lands a body punch - he's looking to wear down Lattimore.
Sato throws a big uppercut that drops Lattimore! More strikes from Sato and the referee jumps in to stop the fight! Lattimore lies dazed against the cage as Sato celebrates with his cornermen!
Ladies and gentlemen, after 0:52 of round 2, we have a winner by way of TKO (Strikes). Ryosuke Sato!
Ryosuke Sato decided to go for the less than humble approach in his post fight interview, telling everyone how he is going to conquer the world. The crowd seemed to like it when really that sort of approach could have gone either way.
|
|
|
|
|
|
|
|
|
|
|
|
|
|
|
|
|
|
|
|
|
|
|
| S |
C
A |
G |
S |
C
B |
G |
|
S |
C |
G |
|
energy
A | B |
|
hype
A | B |
|
pop
A | B |
|
mgr
A | B |
|
FIGHT
RATING
75% |
|
|
|
|
|
|
