|
|
PBP Commentary |
Coming up we have a featherweight MMA rules bout between Jacob Whitehorse (ranked 0 p4p, 0 weight class) and Because I Can (ranked 0 p4p, 0 weight class). Whitehorse's ring entrance music is that housewives' favourite, The Builders and The Butchers - Black Dresses. Both fighters look fresh as a daisy as they make their way towards the cage.
 |
|
 |
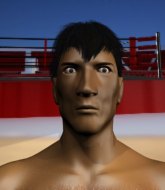
| 161 cm
26
140 lbs
13 - 2 - 2 |
|
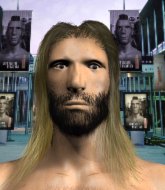
155 cm
25
145 lbs
12 - 11 - 0 |
Abu Dhabi Champ
Excellent boxer
Cardio machine |
|
Good wrestler
Excellent boxer
Granite chin |
|
| |
|
Ladies and gentlemen. This fight is 3 rounds, in the featherweight division.
Introducing the fighter to my left, fighting out of the red corner.
With a record of
13 - 2 - 2, fighting out of Los Angeles, Jacob Whitehorse!
And introducing the fighter to my right, fighting out of the blue corner.
With a record of
12 - 11 - 0, fighting out of Helsinki, Because I Can!
The judges for this bout are Roosa Järviläinen, Matti Vanhoillinen and Marco Blurström.

The bell rings for round one and we are underway!
I Can throws the left hand but Whitehorse avoids the punch easily.
I Can throws an uppercut from half a mile away. Whitehorse sees it coming and avoids it easily.
Whitehorse walks into a straight right hand from I Can.
I Can misses with a right hand
and Whitehorse cracks him with a counter punch right on the button.
I Can takes one on the button.
Whitehorse shakes his hands off, looking to compose himself, but takes a jab to the jaw whilst he does it.
I Can scores with a hook to the body. Whitehorse takes a step back and tries to catch his breath.
I Can connects with a lovely right hand, straight down the pipe.

Whitehorse is rocked!
I Can misses with a body punch

and Whitehorse counters with a nice double leg into side control. I Can won't be happy with that.
This has been an exciting period of action!
I Can sneaks back into half guard.
We've been hearing that Whitehorse has been drilling a lot of ground and pound in training, so let's see if he get the finish.
Whitehorse is nestled in close to I Can, controlling him well. He's worked in a nice elbow to the side of the head as well, for good measure.
I Can wants to improve his position but Whitehorse is controlling well.
Whitehorse works his foot free and advances to mount.

That's one minute gone in the round.
I Can holds of for dear life.
Whitehorse content just to control the position here.
Whitehorse prevents I Can from getting the reversal.
Whitehorse sitting in mount, just looking to control for the moment.
Whitehorse cracks I Can with a nasty head shot there - the crowd let out an audible gasp there, as the noise reverberated around the arena.
The crowd growing excited in anticipation of a finish here! Right on cue, Whitehorse cracks his opponent with a massive right hand that draws loud cheers!

That's two minutes gone in the round.
I Can is wriggling around trying to escape.
I Can is writhing around trying to get back to his feet.
Whitehorse is still in mount, landing shots to his trapped opponent. I Can can't stay in a position like this for much longer.
Whitehorse trying to control but I Can is having none of it.
I Can tries to reverse the position but Whitehorse maintains control.
Whitehorse unloading with bombs!
The fighters are pressed up against the cage, both looking to find a bit of space to work.
Whitehorse controlling the pace for now.
BOOM! Whitehorse connects with a massive shot to the dome!
The crowd are loving this. Great action here.
Whitehorse sitting in mount, just looking to control for the moment.
I Can wants to hold on but Whitehorse pushes him away.

That's three minutes gone in the round.
Whitehorse landing strikes from the mount.
I Can tries to lock up and control but Whitehorse gives him a forearm to the face and pushes him away.
Whitehorse raining down hammerfists from mount.
Whitehorse landing strikes from the mount and I Can is in trouble!
I Can in a bad spot here, taking shots to the head.

Whitehorse moves into side control, trying to work for a kimura. That looks painful! Will he finish!!?? No, I Can has worked his arm free - good work by I Can!
Whitehorse tries for a kimura. Not really close to a finish though.
I Can tries to improve position but can't.

That's four minutes gone in the round.
I Can is not content to let Whitehorse control the position.
I Can takes a couple of big shots there - the referee warns him that he has to defend himself better.
You can see the frustration on I Can's face, being in this tough position on the bottom.
I Can is trying to avoid being dragged into an even worse position than he's already in but Whitehorse is staying active.
Whitehorse controlling the position.
Whitehorse is looking for a kimura. He might have it! No, I Can has escaped the position, nice work there.
And thats the end of the round the fighters go back to their corners.
Jacob Whitehorse dominated that round.
The fighters' corners scream their final instructions, as the referee calls time. Here we go, back to the action!

The fight stays on the outside here - Whitehorse looks like he's thinking about clinching though.
I Can throws a monster uppercut resembling something out of street fighter but it doesn't land.
Whitehorse changes levels looking for a counter takedown but doesn't commit.
I Can throws a lazy right hand but Whitehorse sees it coming a mile off and sidesteps it easily.
I Can misses with an uppercut.
I Can catches Whitehorse with a nice straight right. He seems pissed - ooooh, it's on now! On like donkey kong!
Oh Whitehorse is still all over the place! His legs are completely gone! Will he be able to recover?!!

It looks like Jacob Whitehorse has been cut.
Because I Can seems to be the more aggressive standup fighter in this bout.
Whitehorse moves out of range as I Can strikes.
Whitehorse seems to have got his legs back now.
Whitehorse uses good footwork to avoid the strikes from I Can.
Whitehorse displays some good footwork, moving neatly out of range as I Can throws out the jab.
I Can throws a shot from downtown. Whitehorse moves away and avoids it.
Whitehorse attempts a counter takedown but I Can avoids it well and moves away.
We've had a slow start to the round here - hopefully the action picks up.
I Can misses with an uppercut. Whitehorse saw that one coming.
Whitehorse keeping his hands up high there, blocking the jab from I Can.
Whitehorse takes a body punch that cleary hurt but he's trying not to show any weakness.
Whitehorse slips a jab from I Can.
Whitehorse appears to be looking for a counter takedown.
Whitehorse is trying hard to land a takedown here. I Can sprawls well and keeps this one on the feet.
That's one minute gone in the round.
Whitehorse slips under a jab from I Can.
Whitehorse appears to be looking for a counter punch to the body.

I Can drops Whitehorse with a left and a right! Oh, Whitehorse is hurt - I Can dives into side control looking to finish!
Whitehorse can't do much from the bottom here.
Whitehorse tries to get back to half guard but can't.
Whitehorse is not content to let I Can control the position.
Whitehorse is trying to control I Can's posture but I Can avoids it.
Whitehorse tries to work a leg under to get back to half guard but I Can wriggles his own leg back out and remains in side control.
This is a great period of action - very entertaining stuff!

I Can goes for an armbar here - this could be all over! But no, Whitehorse has escaped beautifully and is now on top in side control! Oh, that's unlucky for I Can but great work by Whitehorse.
That's two minutes gone in the round.
Whitehorse creates a bit of distance and throws down some hard shots.
Whitehorse creates a bit of distance and throws down some hard shots.
Whitehorse working the body and head with strikes.
I Can prevents Whitehorse from moving into mount.
Whitehorse advances to full mount.
I Can working to try and regain half guard.
I Can is bucking up trying to escape but Whitehorse cracks him with another couple of good strikes.
Whitehorse working the ground and pound effectively.
Whitehorse working away from the top, dropping strikes.
Whitehorse wants to control but I Can has made it back to half guard. Nice work.
That's three minutes gone in the round.
Whitehorse trying to control the pace.
Whitehorse is trying to control. I Can wants to improve his position but can't escape this time.
Whitehorse throwing shots but I Can is blocking nicely.
I Can has hold of Whitehorse's hands but Whitehorse slips his arm to the side and lands an elbow.
Still in half guard, Whitehorse seems content to control.
We've been informed that I Can has been working hard on his conditioning in the buildup to the fight.
I Can looking for submissions from an awkward position here.
Whitehorse is really dominating this fight. Is there anything that I Can can do to turn this around?
Whitehorse is looking for a kimura here.
I Can tries to get to full guard but Whitehorse has control of the leg.
That's four minutes gone in the round.
The crowd are showing their displeasure at the lack of action as loud boos ring out around the arena.
Whitehorse looks towards his corner to check for any instructions. The corner give him nothing to work with, so he cracks I Can with a short hammerfist. I guess that's as good as any advice he could get in this position.
Jacob Whitehorse overall seems to be getting the better of the ground position in the fight so far.
Whitehorse is taking a breather. I Can says something to him but it's hard to make out. Perhaps he's telling him to get on with it and actually do something.
Whitehorse missing with the ground and pound from half guard.
Whitehorse working some ground and pound from close in. He's looking to maintain this position and strike for a while by the looks of things... although he'll probably advance to full mount in a minute now I've said that.
Whitehorse wants to free his trapped foot but I Can is holding on for dear life with his legs.
I Can is trying to maintain the position but Whitehorse is very close to passing his half guard.
I Can tries to get to full guard but Whitehorse has control of the leg.
And thats the end of the round the fighters go back to their corners.
A close second round but Because I Can will probably get the nod - 10:9.
The cut man is working on Jacob Whitehorse's cut.
The referee calls time. The cornermen exit stage left and we're back to business. This is the final round!

Whitehorse steps to the side to avoid the strikes from I Can.
Nice defenses there by Whitehorse.
Nice jab there from I Can.
Whitehorse slips a jab from I Can.
Whitehorse feinted with a counter takedown.
I Can takes a swing at Whitehorse's ribcage but misses.
Whitehorse half commits to a counter takedown before pushing away, out of range.
A decent looking cross lands there for I Can.
I Can drops his hands and takes a jab to the jaw for his troubles.
Whitehorse moves out of range as I Can strikes.
Whitehorse is looking to counter punch.
Whitehorse misses with a wild body shot.
I Can misses with an uppercut
enabling Whitehorse to counter with a crisp jab.
We've had a slow start to the round here - hopefully the action picks up.
I Can misses with an uppercut.
I Can misses with a body shot
and Whitehorse counters with a straight right hand.
Whitehorse misses with a body shot. Nice footwork from I Can.
I Can misses with a hook. Whitehorse ducked under it nicely.
The crowd cheering loudly, showing their appreciation for the quality fight we're seeing here.

Whitehorse has closed the distance and engaged I Can in a clinch.
That's one minute gone in the round.
I Can works on Whitehorse's body with a couple of short punches.
Whitehorse is looking to score with knees to the body. Maybe he'll change it up and go body then head. I Can is defending well for now.
I Can misses with a punch on the inside.
With the fighters up against the cage, Whitehorse throws an elbow but misses.
Whitehorse lands a shoulder strike.
I Can blocks a couple of punches on the inside.

Whitehorse escapes the clinch and we're back to striking.
Because I Can seems to be getting the better of the standup.
I Can misses with a hook. Whitehorse ducked under it nicely.
It appears Whitehorse was looking to counter with a kick there.
I Can throws a shot from downtown. Whitehorse moves away and avoids it.
Whitehorse takes a body punch but keeps moving.
I Can swings and misses with a hook to the body.
Whitehorse wants to take advantage of his opponent's missed offense by moving into the clinch.
I Can misses with an uppercut. Whitehorse saw that one coming.
That's two minutes gone in the round.
I Can throws a poor cross that misses
and Whitehorse counters with a nice double leg into guard.
Whitehorse wants to control from the top but I Can keeps moving.
Whitehorse stays in close to I Can's body and controls the position.
I Can is working the butterfly guard. He manages to land a nice scissor sweep and is now in half guard on the top. Nice move.

This has been an exciting period of action!
Whitehorse is controlling I Can's position as best he can from this difficult position.
Whitehorse is looking to control I Can's leg but it's slowly edging free. Can Whitehorse avoid being mounted?
Whitehorse controlling the position for now.
That's three minutes gone in the round.
Whitehorse makes his way to full guard. A much better position for Whitehorse.
Whitehorse seems keen to control rather than go for a submission, at least for now.
I Can scoring with some ground and pound.
I Can tries to free his leg and advance position but Whitehorse is retaining full guard.
Whitehorse is doing well to control the posture of his opponent and prevent any damage.
I Can pressing down on his opponent's thigh, looking to pass guard. Whitehorse is keeping the position for now.
That's four minutes gone in the round.
A few boos can be heard. I'm sure they will multiply if the fighters don't pick up the pace.
Whitehorse managing to control the position.
I Can wants to control from the top but Whitehorse keeps moving.
We must be close to a standup if these guys don't pick up the pace.
Whitehorse is adopting a defensive guard.

The referee has motioned to the fighters to stand back up. He just wasn't happy with the level of activity.
Whitehorse uses decent footwork to sidestep a right hand from I Can.
Whitehorse scores with a sloppy right hand. I Can should have avoided that one.
A swing and a miss from I Can.
I Can jabs Whitehorse to the body, keeping him at a distance.
I Can misses with an uppercut.
And that's the end of the fight!
I would just about give that final round to Because I Can.
I think I Can has won this one but let's see whether the judges agree with me. Over to the ring announcer for the scorecards.
Ladies and gentlemen, after 3 rounds of action, we go to the scorecards for a decision.
Judge Roosa Järviläinen scores the fight 28:29
Judge Matti Vanhoillinen scores the fight 28:29
Judge Marco Blurström scores the fight 28:29
In favor of your winner, by unanimous decision... Because I Can!
Because I Can took his opportunity to call for a title shot in his post fight interview.
|
|
|
|
|
|
|
|
|
|
|
|
|
|
|
|
|
|
|
|
|
|
|
| S |
C
A |
G |
S |
C
B |
G |
|
S |
C |
G |
|
energy
A | B |
|
hype
A | B |
|
pop
A | B |
|
mgr
A | B |
|
FIGHT
RATING
49% |
|
|
|
|
|
|
