|
|
PBP Commentary |
Coming up we have a middleweight MMA rules bout between Billy White (ranked 0 p4p, 0 weight class) and lee combline (ranked 0 p4p, 0 weight class). The atmosphere really building for this one as we go over to our ring announcer for the fighter introductions!
 |
|
 |
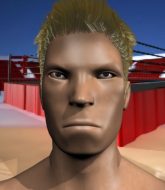
| 190 cm
22
185 lbs
2 - 0 - 0 |
|
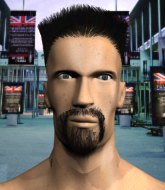
186 cm
22
190 lbs
1 - 0 - 0 |
BJJ Brown Belt
Counter striker
Good chin |
|
BJJ Blue Belt
Brawler
Tends to cut |
|
| |
|
Ladies and gentlemen. This fight is 5 rounds, for the middleweight championship of the world!
Introducing the champion to my left, fighting out of the red corner.
With a record of
2 - 0 - 0, fighting out of Montreal, Billy White!
And introducing the challenger to my right, fighting out of the blue corner.
With a record of
1 - 0 - 0, fighting out of Montreal, lee combline!
The judges for this bout are Trevor Gratis, Dillan Fox and Ian Loll.

The bell rings for round one and we are underway!
combline tries to clinch but is not successful on this occasion.
combline wants to clinch up but White keeps it at a distance.
White connects with a high kick.
combline avoids the clinch attempt nicely.
White dodges the punch combination from combline.
White showing good head movement there, avoiding the strikes from combline.
combline looks to clinch
and White counters with a three punch combo that has combline backing up. combline nods at White to acknowledge the strikes.
combline connects with a hook to the side of his opponent's head.

It looks like Billy White has been cut.

combline clinches.
White fails to pull the fight into his guard.

combline breaks the clinch and we return to the middle of the mat.
combline swings wildly with a couple of big hooks
and White counters by moving into the clinch.
White is working for a takedown up against the cage. He can't get it on this occasion though.
combline wants to break the clinch but can't.
White is trying to drag combline to the mat but combline just about manages to keep his footing. He used the cage to his advantage there.
That's three failed takedown attempts in the round for Billy White. That's going to take a lot out of him.
White prevents combline from breaking the clinch.
White tries to pull guard but can't drag his opponent to the mat. combline just stands there and leans against the cage.
White prevents combline from breaking the clinch.
combline has had enough of the clinch but White keeps him there for the moment.

That's one minute gone in the round.
White jumps guard but his hands slip and he falls flat on his back. Well, he's made himself look a right mug there, as combline walks away with a smile on his face. White gets slowly back to his feet and shakes his head.
combline closes the distance and pushes White back into the cage.
White fails to pull the fight into his guard.
White misses with some punches.
Both guys are working to get underhooks.
White looking for a takedown.
White goes for a takedown attempt but combline pushes him away and we're back to fighting at a distance.
White tries to clinch
and combline moves into the clinch.
combline prevents a takedown attempt there.
White tries for a takedown but combline manages to get underhooks.
combline wants to get back to striking at distance but White won't allow it.
White goes for a takedown attempt but combline pushes him away and we're back to fighting at a distance.
White is breathing heavily.
combline misses with a double jab

and White decides to take the opportunity to score a takedown. He's landed in combline's guard.

combline has butterfly guard. He's looking to stand up here. He pushes White off him and springs to his feet nicely. The crowd applauds.
combline wants to clinch up but White keeps it at a distance.
combline gets taken down but at least he's managed to land in guard.

That's two minutes gone in the round.

White drops back for a leg but he's not going to get it - he lets go and combline dives on top into guard.
This is a great period of action - very entertaining stuff!
White is working actively off his back, looking to secure an arm or perhaps work for a triangle.
combline avoids a guillotine attempt easily.
combline gets to his feet and steps away from his opponent.
A punch combination from combline misses.
combline misses with a few strikes there.

That's three minutes gone in the round.
combline misses with a wild combination.
combline fails to land with the punch combination there - jab, cross, hook, miss, miss, miss.
White shoots in and gets a takedown into half guard. White showed some decent athleticism there.
The ref warns both fighters not to hold the cage as they work up against the meshing.
White is looking for a kimura but combline is holding onto that half guard position, so it's hard for White to get the leverage.
White is looking for a kimura here.
White is trying for a guillotine from the top but the pressure isn't in the right place so combline is just riding it out for now. White eventually gives up the hold.

That's four minutes gone in the round.
The fighters are starting to get a bit slippery now, which will make submissions a bit more difficult.
White is working for submissions here but there's nothing on.
White is looking for an arm triangle, whilst trying to pass to side control. combline doesn't seem that keen to cooperate though. No luck this time White.
The crowd applaud the fighters efforts here as the round comes to an end.
White is looking to advance position but combline won't allow it.
And thats the end of the round the fighters go back to their corners.
That was a close round but I would say that Billy White will probably get the nod.
The cut man is working on Billy White's cut.
That's the end of the round. The referee orders the cornermen out of the cage so we can get back down to business.

Danga de danga de dang - combline scores with a four punch combination!
lee combline seems to be the more aggressive standup fighter in this bout.
combline looks to land a right hand but White moved out of range.
combline fails in his attempt to clinch.
combline tries to close the distance and clinch but White swats him to one side with an open hand palm strike and circles away.
White forces combline back against the cage and clinches.
combline is trying to break the clinch but White has him pressed against the cage.
White tries to pull guard but combline won't allow it.
White tries for a takedown but combline manages to get underhooks.
White prevents combline from breaking the clinch.
White fails to pull the fight into his guard.
That's three failed takedown attempts in the round for Billy White. That's going to take a lot out of him.
combline is trying to work out of this bad position, with his back against the cage.
combline prevents the takedown attempt.
combline wants to break free but White has control.
White tries to jump guard but he falls flat on his backside. combline smiles and moves away.
combline wants to clinch but White slips to the side
and White counters with a quick right hand to the jaw.
Both fighters are absolutely exhausted here.
White tries to clinch but combline is having none of it.
White fakes with an overhand right and moves in to clinch with combline, pushing him back against the cage.
That's one minute gone in the round.
combline is trying to work out of this bad position, with his back against the cage.
combline pushes off and circles away, back to the middle of the mat.
combline throws a left and a right that both miss
and White counters with a nice double leg into guard.
White drops back, looking for a kneebar! combline looks panicked! The fighters roll across the mat, one looking to finish, one looking to escape. combline looks to have wriggled free... Yes, he's got his leg free and he's dived into side control! Good work there from combline!
White is trying to get back to half guard.
combline decides to stand back up. combline steps back and let's White get back to his feet.
combline clinches but White breaks the clinch
and White counters with a shoot takedown. combline fights it but they end up in guard.
combline scrambles and gets back to his feet.
That's two minutes gone in the round.
Fantastic stuff here - a very entertaining period of action, which has drawn cheers from the crowd.
A punch combination from combline misses.
White avoids a punch combination nicely.
combline looks to land a body kick but White moved away.
combline misses with a jab and misses with a cross straight after too.
Billy White is looking to throw some combinations by the looks of things.
combline tries to clinch but White is having none of it.
combline tries to keep at a distance but White has taken the fight into the clinch.
White tries to break the clinch but combline is controlling the position.
combline is trying to work out of this bad position, with his back against the cage.
combline is looking to break free of the clinch but White has double underhooks.
combline prevents the takedown attempt.
combline breaks the clinch and we're back to striking at distance.
White closes the distance and presses his opponent up against the cage.
That's three minutes gone in the round.
combline wants to push off and get back to the center of the mat but White has him pressed against the cage.
combline stops a takedown attempt from White.
combline wants to push off and get back to the center of the mat but White has him pressed against the cage.
White jumps guard but combline stands there with White around his waist. White gives up and drops back to his feet. We remain in the clinch.
A battle for position here, against the cage.
combline breaks the clinch and we return to the middle of the mat.
combline misses with a straight right.
White shoots in and bounces combline off the cage to secure the takedown into guard.
White drops back, looking for a kneebar! combline looks panicked! The fighters roll across the mat, one looking to finish, one looking to escape. combline looks to have wriggled free... Yes, he's got his leg free and he's dived into side control! Good work there from combline!
White gets back to half guard.
That's four minutes gone in the round.
White looking for submissions off his back.
combline tries to stand but his arm is trapped.
White looking for submissions off his back.
The crowd applaud the fighters efforts here as the round comes to an end.
White looking for subs from the bottom but combline mounts him!
And thats the end of the round the fighters go back to their corners.
Billy White dominated that second round.
The cut man is working on Billy White's cut.
The fighters' corners scream their final instructions, as the referee calls time. Here we go, back to the action!

combline closes the distance and pushes White back into the cage.
White wants to stall.
White changes levels and goes for a takedown here. combline fights it off and pushes away nicely.
White is looking to clinch.
A big right from combline misses.
White fails miserably with a takedown attempt.
White closes the distance looking to clinch
and combline connects with a straight left hand counter down the middle.
combline clinches up with White and pushes him back against the cage.
White prevents combline from breaking the clinch.
Both fighters are breathing heavily.
combline is pressed up against the cage. White has hold of a leg and is looking to drag combline down to the mat. combline avoids the attempt though and has circled away. We're back to striking at a distance.
That's three failed takedown attempts in the round for Billy White. That's going to take a lot out of him.
That's one minute gone in the round.
combline swings away but doesn't land with a series of punches.
White wants to clinch.
combline misses with a jab, cross combination.
combline dips to his left and cracks White with an uppercut!
combline waving his hands out infront of him, looking to distract White.
combline fails to land with a series of punches.
White moves in looking to clinch but combline pushes him off.
White drives through with a really nice takedown into side control.
Billy White overall seems to be getting the better of the ground position in the fight so far.
White tries for a kimura. Not really close to a finish though.
White tries for a kimura but combline is defending well.
That's two minutes gone in the round.
White goes for an armbar here - this could be all over! But no, combline has escaped beautifully and is now on top in side control! Oh, that's unlucky for White but great work by combline.
White is looking for a sweep.
combline stands up and we're back to a striking position.
combline darts in trying to clinch
and White counters with a driving takedown into guard. Nice work there by White.
That's three minutes gone in the round.
White is holding a leg here, probably looking for an ankle lock - he drops back and goes for it! combline is in trouble! Is it all over??? No! combline has escaped and now he's on top!
White throws his legs up looking for a submission but combline uses it to pass to side control.
combline decides to stand up, so the ref orders White to his feet.
combline throws a combination that misses
and White counters into the clinch. Nicely done.
White wants a takedown but no success here.
combline is trying to work out of this bad position, with his back against the cage.
combline is trying to break the clinch but White has him pressed against the cage.
That's four minutes gone in the round.
White wants a takedown but no success here.
combline breaks the clinch.
lee combline is looking to keep the fight on the feet at all costs.
combline lunges in with swinging rights and lefts but White circles away quickly and effectively.
combline pushing out the jab but it's not landing.
White misses with a combination
and combline counters with a left and a right that stings White.
White moves into the clinch successfully.
combline pushes off and circles away, back to the middle of the mat.
combline throws a hook but White blocks it.
White dodges the punch combination from combline.
White avoids a punch combination nicely.
The fight stays on the outside here - White looks like he's thinking about clinching though.
And thats the end of the round the fighters go back to their corners.
A close third round but lee combline just about did enough to take it.
The cut man is working on Billy White's cut.
That's the end of the round. The referee orders the cornermen out of the cage so we can get back down to business.

combline closes the distance but White moves to the side
and White counters with a three punch combo that has combline backing up. combline nods at White to acknowledge the strikes.
combline tries to clinch up.
combline tries to clinch but White moves away
and White counters with a shoot takedown into half guard.
White is looking for an arm triangle, whilst trying to pass to side control. combline doesn't seem that keen to cooperate though. No luck this time White.
combline manages to escape and get back to his feet!
White tries to close the distance and clinch up against the cage but combline paws at him with a jab and circles away.
White moves away from the strike by combline.
It's got to the stage where if one of these guys blows hard enough, the other might fall over.
That's one minute gone in the round.
combline tries to clinch there but White circles away.
combline misses with the combination.
White wants to clinch up but combline keeps it at a distance.
White shoots in for a takedown! He's got it and he's managed to land in full mount! That's better than White was expecting from the takedown attempt, I'm sure!
White takes combline's back.
White is remaining active here, looking for the choke. The more discerning members of the crowd will appreciate his efforts.
White is working for the rear naked choke. He has one arm under the chin but combline has hold of the other arm. A bit of a stalemate here.
That's two minutes gone in the round.
combline preventing the rear naked choke attempt from White.
combline fending off the submission attempt from White.
White has his opponent's back and is working for the choke.
combline defending nicely against the rear naked choke attempt.
That's three minutes gone in the round.
White tightening his grip on combline, looking for the choke.
combline defending nicely against the rear naked choke attempt.
White is working hard for the rear naked choke here.
The fighters are pressed up against the cage, both looking to find a bit of space to work.
That's four minutes gone in the round.
The crowd are hurling abuse towards the fighters... You can hardly blame them though because there isn't a lot going on in the fight.
White tightening his grip on combline, looking for the choke.
combline defending nicely against the rear naked choke attempt.
combline controlling the position well but he knows he's in a bad position.
And thats the end of the round the fighters go back to their corners.
Billy White had his way with lee combline in that round.
The cut man is working on Billy White's cut.
OK. That's time! The bell goes and we're back to the action. This is the final round!

The fight stays on the outside here - White looks like he's thinking about clinching though.
combline clinches but White breaks the clinch
and White counters with a nice single leg takedown and he's in combline's guard now.
White slips nicely into half guard.
combline is trying to stand back up but White is controlling him
White is sneakily working for an arm triangle but combline sees it coming and defends easily.
White is looking for an arm triangle, whilst trying to pass to side control. combline doesn't seem that keen to cooperate though. No luck this time White.
Both of our modern day gladiators look out of it here - an gruelling 5 rounds of action taking it's toll on them, no doubt.
White has decided to stand back up but his arm is trapped. Whilst he's worrying about his arm, combline works to full guard.
That's one minute gone in the round.
White drops back looking for a heel hook - he quickly realises he's not going to get it but combline manages to dive on top of him before he can escape and now White has combline in his guard.
combline stands up and waves to White to follow him.
White circles away from the clinch attempt
and White counters by clinching up.
That's two minutes gone in the round.
combline is trying to work out of this bad position, with his back against the cage.
White jumps guard but his hands slip and he falls flat on his back. Well, he's made himself look a right mug there, as combline walks away with a smile on his face. White gets slowly back to his feet and shakes his head.
combline tries to clinch
and White counters by moving into the clinch. Good anticipation by White.
White jumps guard but his hands slip and he falls flat on his back. Well, he's made himself look a right mug there, as combline walks away with a smile on his face. White gets slowly back to his feet and shakes his head.
combline will need to tighten up his combinations if he doesn't want to gas himself out, swinging at thin air.
combline closes the distance looking to clinch
so White counters with a double leg into guard. Good agility.
White has gone for a leg lock! combline slips out almost immediately though and dives into White's guard.
Billy White is fighting for a decision here - he's started to take the cautious approach.
combline stands and steps away. White gets to his feet too and we're back to the striking game.
That's three minutes gone in the round.
White fails miserably with a takedown attempt.
That's three failed takedown attempts in the round for Billy White. That's going to take a lot out of him.
A punch combination from combline misses.
combline throws a nice looking combination but White bobs and weaves to avoid any damage.
combline looks to throw the jab but White is out of range.
White doesn't manage to clinch there - combline circles away.
combline closes the distance and clinches.
White tries to pull guard but can't drag his opponent to the mat. combline just stands there and leans against the cage.
White fails to pull guard.
combline pushes off and circles away, back to the middle of the mat.
combline circles away from the clinch attempt.
combline misses with a jab and misses with a cross straight after too.
That's four minutes gone in the round.
My god... these two guys really need to pick up the pace or everyone will leave to go get a beer.
combline fails to land with a series of punches.
White takes the fight into the clinch.
combline wants to break free. God knows he wants to breaaaak freeee.
combline is looking to break free of the clinch but White has double underhooks.
White tries to pull guard but combline won't allow it.
combline prevents a takedown attempt there.
combline breaks the clinch and we're back to striking at distance.
White uses decent footwork to sidestep a right hand from combline.
combline closes the distance but White moves to the side
and White counters by clinching up.
combline has had enough of the clinch but White keeps him there for the moment.
lee combline has stepped it up - he knows he needs a finish here!
combline is trying to break the clinch but White has him pressed against the cage.
And that's the end of the fight!
Billy White showed his dominance in that final round.
I think White has won this one but let's see what the judges have to say. Over to the ring announcer for the scorecards.
Ladies and gentlemen, after 5 rounds of action, we go to the scorecards for a decision.
Judge Trevor Gratis scores the fight 48:47
Judge Dillan Fox scores the fight 50:46
Judge Ian Loll scores the fight 49:47
In favor of your winner, by unanimous decision... Billy White!
Billy White is the new middleweight champion!
|
|
|
|
|
|
|
|
|
|
|
|
|
|
|
|
|
|
|
|
|
|
|
| S |
C
A |
G |
S |
C
B |
G |
|
S |
C |
G |
|
energy
A | B |
|
hype
A | B |
|
pop
A | B |
|
mgr
A | B |
|
FIGHT
RATING
82% |
|
|
|
|
|
|
