|
|
PBP Commentary |
Coming up we have a lightweight MMA rules bout between Edgar Mendoza (ranked 2024 p4p, 205 weight class) and Bishop Taylor (ranked 9356 p4p, 578 weight class). Mendoza's ring entrance music is that housewives' favourite, Knock Out. The key to victory for Edgar Mendoza has got to be keeping the fight on the feet.
 |
|
 |
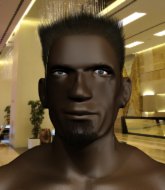
| 178 cm
29
155 lbs
12 - 5 - 1 |
|
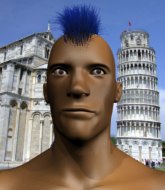
190 cm
23
168 lbs
1 - 3 - 0 |
BJJ Brown Belt
Excellent boxer
Insanely flexible |
|
Good wrestler
Decent boxing
Determined |
|
| |
|
Ladies and gentlemen. This fight is 2 rounds, for the lightweight championship of the world!
Introducing the champion to my left, fighting out of the red corner.
With a record of
12 - 5 - 1, fighting out of Tokyo, Edgar Mendoza!
And introducing the challenger to my right, fighting out of the blue corner.
With a record of
1 - 3 - 0, fighting out of Los Angeles, Bishop Taylor!
The judges for this bout are Felipe Paraventi, Luis Engracia and Seu Braga.

The bell rings for round one and we are underway!
Nice sprawl there from Taylor as Mendoza shoots in.
Mendoza looks frustrated there after his takedown attempt is stuffed easily.
Mendoza has a takedown stuffed.
Taylor changes levels for a counter takedown but doesn't follow through with his attempt.
That's three failed takedown attempts in the round for Edgar Mendoza. That's going to take a lot out of him.
Mendoza shoots in for a takedown. "I don't think so" says Taylor as he avoids it easily.
Taylor feints the counter takedown.
Taylor displays good takedown defense there as he swats away a double leg from Mendoza.
Taylor feints the counter takedown.
We've had a slow start to the round here - hopefully the action picks up.
Mendoza shoots in for a takedown but doesn't get it.
Taylor keeps the fight standing with a nice sprawl.
Taylor is definitely looking for the counter takedowns here.
Horrible takedown attempt by Mendoza or perhaps it was just good defense by Taylor, which made it look bad.

That's one minute gone in the round.
Mendoza shoots in for a takedown but Taylor shows good takedown defense.
Mendoza shoots in but Taylor avoids the takedown attempt easily.
Mendoza misses with a series of wild punches.
Mendoza misses with a few strikes there.
Taylor changes levels for a counter takedown but doesn't follow through with his attempt.
Mendoza misses with a two punch combination.
Taylor slips a jab and a cross from Mendoza.
Taylor changes levels for a counter takedown but doesn't follow through with his attempt.
Mendoza rushes in with a sloppy looking punch

and Taylor counters with a shoot takedown. Mendoza fights it but they end up in guard.
Mendoza might be looking to lock onto one of his opponent's long limbs for a submission, whilst we're on the ground.

Mendoza uses the cage to get back to his feet.

That's two minutes gone in the round.
The crowd are loving this. Great action here.
Mendoza looks for a takedown here. Will he get it? Taylor is fending him off so far but Mendoza persists. Nope, Taylor circles away and we're back to standing.
Taylor changes levels for a counter takedown but doesn't follow through with his attempt.
Taylor avoids the body shot from Mendoza.
No luck for Mendoza with that takedown attempt.
Some wild striking there from Mendoza.
Mendoza looks frustrated there after his takedown attempt is stuffed easily.
Taylor changes levels for a counter takedown but doesn't follow through with his attempt.
Taylor walks straight into a jab right on the nose. That one stung - he's blinking and trying to clear his head.
Edgar Mendoza seems to be the more aggressive standup fighter in this bout.
A really sloppy takedown attempt there from Mendoza.
Taylor tries a counter takedown but it's more of a dummy move, and he uses it to push himself away.

That's three minutes gone in the round.
Mendoza tries for a takedown but Taylor sees it coming a mile off and avoids it easily.
Nice takedown defense from Taylor. No joy for Mendoza on that attempt.
Mendoza fails to land the takedown.
Taylor is definitely looking for the counter takedowns here.
Mendoza will have to do better than that with his takedown attempts.
Mendoza throws a looping left and ducks down for a takedown. He's got his arms around Taylor's waist but Taylor gets an underhook and avoids the takedown by throwing Mendoza off to one side.
Taylor with the counter takedown but Mendoza avoids it easily.
Mendoza is breathing heavily.
Mendoza throws an uppercut from half a mile away. Taylor sees it coming and avoids it easily.
Mendoza looks for a takedown but Taylor sprawls well.
And Taylor tries to counter it with a takedown but Mendoza pushes his down on his head and steps out.
Mendoza throws a right hand that Taylor ducks under and follows up with a left that Taylor also avoids with ease.

That's four minutes gone in the round.
Mendoza misses the shot to the body.
Taylor drops down looking to force a counter takedown but Mendoza defends it well.
Taylor keeping his hands up high there, blocking the jab from Mendoza.
Taylor is definitely looking for the counter takedowns here.
Mendoza looks frustrated there after his takedown attempt is stuffed easily.
And Taylor tries to counter it with a takedown but Mendoza pushes his down on his head and steps out.
Mendoza throws the left hand but Taylor avoids the punch easily.
Mendoza fails with a takedown attempt.
Taylor drops down looking to force a counter takedown but Mendoza defends it well.

Mendoza fakes a strike and closes the distance, dragging Taylor to the ground. Mendoza is now in Taylor's guard.

That's five minutes gone in the round.
Mendoza trying to control but Taylor is working from the bottom.
Mendoza looking to control the position here, rather than advance.
Mendoza is pushing down on Taylor's leg trying to pass to half guard. Taylor is fighting to maintain full guard but Mendoza has managed to sneak the leg through.

Mendoza is working for a submission of some sort.
Taylor tries to get to full guard but Mendoza has control of the leg.

That's six minutes gone in the round.
Neither fighter has done anything of merit for a good minute or two here and the crowd are not happy about it.
Mendoza is looking for a kimura but Taylor is holding onto that half guard position, so it's hard for Mendoza to get the leverage.
Mendoza trying to control from Taylor's half guard. Taylor has other ideas though and has regained full guard.
Mendoza trying to control the position from guard on top but Taylor is wriggling around, looking for whatever he can.
Mendoza won't allow Taylor to sweep him here.
Taylor is persisting with the attempt to improve his position.
Mendoza advances to half guard.
Mendoza wants to control but Taylor is keeping him busy.
Taylor is trying to stand.
The ref warns both fighters not to hold the cage as they work up against the meshing.
Mendoza is thinking about going for an arm triangle but he can't free his leg.
We get told so often about how wrestlers don't like to be on their backs. Let's see if Taylor can do anything to dispel that myth.
Mendoza is working for a submission of some sort.

That's seven minutes gone in the round.
Mendoza is working for submissions here but there's nothing on.
Mendoza is trying to work for a kimura but Taylor is defending well.
Taylor wants to control but Mendoza is keeping busy and won't allow it.
Taylor is a painfully thin specimen of a man. You do wonder whether a good body kick would snap him clean in two.
Mendoza is thinking about going for an arm triangle but he can't free his leg.
Taylor trying to control here.

That's eight minutes gone in the round.
A few boos can be heard. I'm sure they will multiply if the fighters don't pick up the pace.
Mendoza is looking for a kimura here.
The fighters are pressed up against the cage, both looking to find a bit of space to work.
Mendoza is looking for a kimura but he's never going to get it from there.
Mendoza is looking for a kimura but Taylor is holding onto that half guard position, so it's hard for Mendoza to get the leverage.
Mendoza wants to pass to mount but Taylor is defending the position.
Taylor is looking to improve his position.
Mendoza is looking to take a break and control but Taylor is keeping him honest, looking to work from the bottom.

That's nine minutes gone in the round.
Mendoza looking for a kimura but he'll have to free his other leg if he wants to finish that. Perhaps he's just using it as a distraction technique.
Mendoza seems very keen to just sit and control from half guard but Taylor does not like that idea so much and is remaining active off his back.
The referee must be thinking about standing these guys back up.
Boooooooooooooooooooo!!! God, this has been a terrible round. Come on you two, sort yourselves out!
Taylor is trying to stand up here but Mendoza is controlling him well.

The referee has stepped in and called for a break in the action. We'll restart on the feet.
Mendoza fails to land the takedown.
And thats the end of the round the fighters go back to their corners.
That was a close round but I would say that Edgar Mendoza will probably get the nod.
That's time! Mendoza's corner gives him a slap on the ass as he gets ready to fight. And we move into the final round!

Mendoza fails to land with a series of punches.
And Taylor tries to counter it with a takedown but Mendoza pushes his down on his head and steps out.
Mendoza is looking for a takedown here. He's shot in and has managed to get it, finishing up in Taylor's half guard.
Mendoza is trying for a guillotine from the top but the pressure isn't in the right place so Taylor is just riding it out for now. Mendoza eventually gives up the hold.
Mendoza is working for a kimura but Taylor is defending it quite comfortably.
We've had a slow start to the round here - hopefully the action picks up.
Mendoza wants to advance to full mount but Taylor doesn't think that's going to happen and regains full guard instead.
Mendoza wants to pass the guard but Taylor is keeping the position.
That's one minute gone in the round.
Mendoza drops back for a leg but he's not going to get it - he lets go and Taylor dives on top into guard.

Mendoza is edging up against the cage. He's using the cage to get back to his feet. Nice work there - the fighters are clinched.
Mendoza tries for a takedown. No joy.
A short right from Taylor.
Taylor stalling the fight.
Taylor is pressed up against the cage. Mendoza has hold of a leg and is looking to drag Taylor down to the mat. Taylor avoids the attempt though and has circled away. We're back to striking at a distance.
Both fighters are absolutely exhausted here.
Horrible takedown attempt by Mendoza or perhaps it was just good defense by Taylor, which made it look bad.
That's three failed takedown attempts in the round for Edgar Mendoza. That's going to take a lot out of him.
Some wild striking there from Mendoza.
That's two minutes gone in the round.
Mendoza shoots in but no luck this time.
Mendoza looks for a takedown here. Will he get it? Taylor is fending him off so far but Mendoza persists. Nope, Taylor circles away and we're back to standing.
Taylor is definitely looking for the counter takedowns here.
Mendoza shoots in and drives through. Taylor sprawls well.
Mendoza closes this distance looking for a takedown but Taylor circles away.
Mendoza throws a right and a left that both miss.
Mendoza shoots in for a double leg but Taylor sprawls well. That's going to sap some energy.
Taylor feints the counter takedown.
Fantastic stuff here - a very entertaining period of action, which has drawn cheers from the crowd.
Mendoza misses the shot to the body.
Mendoza missing with a left hand there. Taylor was out of range so wasted energy throwing that one.
Mendoza throws a series of punches but Taylor avoids them all with ease.
Taylor is definitely looking for the counter takedowns here.
Horrible takedown attempt by Mendoza or perhaps it was just good defense by Taylor, which made it look bad.
Bishop Taylor seems to be getting the better of the standup.
That's three minutes gone in the round.
Taylor slips a jab and a cross from Mendoza.
Taylor slaps away a takedown attempt from Mendoza, before circling back to the center of the mat.
Taylor drops down looking to force a counter takedown but Mendoza defends it well.
Mendoza has a takedown stuffed.
A telegraphed takedown attempt from Mendoza is defended easily by Taylor.
And Taylor tries to counter it with a takedown but Mendoza pushes his down on his head and steps out.
Mendoza will have to do better than that with his takedown attempts.
Taylor is definitely looking for the counter takedowns here.
Mendoza lunges in with swinging rights and lefts but Taylor circles away quickly and effectively.
Taylor drops down looking to force a counter takedown but Mendoza defends it well.
That's four minutes gone in the round.
Mendoza throws a series of punches but Taylor avoids them all with ease.
No luck with that takedown attempt from Mendoza.
Taylor tries a counter takedown but it's more of a dummy move, and he uses it to push himself away.
Mendoza is really struggling to find his range with his punches. Taylor's reach advantage is clearly causing him problems.
Mendoza fails to land the takedown.
Mendoza throws a looping left and ducks down for a takedown. He's got his arms around Taylor's waist but Taylor gets an underhook and avoids the takedown by throwing Mendoza off to one side.
Taylor with the counter takedown but Mendoza avoids it easily.
Mendoza shoots in but no luck this time.
Taylor changes levels for a counter takedown but doesn't follow through with his attempt.
Mendoza throws a hook but Taylor avoids it easily.
A telegraphed takedown attempt from Mendoza is defended easily by Taylor.
And Taylor tries to counter it with a takedown but Mendoza pushes his down on his head and steps out.
That's five minutes gone in the round.
Mendoza shoots in for a takedown. "I don't think so" says Taylor as he avoids it easily.
Mendoza dives in and grabs Taylor's left leg, looking for a takedown. Taylor pushes down on Mendoza's head and hops out.
Mendoza fails with a takedown attempt.
Mendoza will need to tighten up his combinations if he doesn't want to gas himself out, swinging at thin air.
And Taylor tries to counter it with a takedown but Mendoza pushes his down on his head and steps out.
Mendoza misses with a body shot.
Mendoza throws a monster uppercut resembling something out of street fighter but it doesn't land.
Taylor tries a counter takedown but it's more of a dummy move, and he uses it to push himself away.
That's six minutes gone in the round.
Mendoza shoots in with a takedown attempt and he has Taylor pinned against the cage. Taylor gets the underhooks and manages to circle away.
Mendoza tries to shoot in for a takedown. He's got hold of a leg but Taylor swivels and escapes.
A really sloppy takedown attempt there from Mendoza.
Mendoza shoots in looking for a takedown but Taylor manages to keep the fight standing, pushing Mendoza's face into the canvas for good measure before circling away.
Mendoza dives in and grabs Taylor's left leg, looking for a takedown. Taylor pushes down on Mendoza's head and hops out.
Mendoza fails to land the takedown.
Taylor with the counter takedown but Mendoza avoids it easily.
Mendoza shoots in for a takedown - he's clinched up with Taylor but Taylor pushes him off and we're back to square one.
And Taylor tries to counter it with a takedown but Mendoza pushes his down on his head and steps out.
That's seven minutes gone in the round.
Mendoza shoots in for a takedown. He's persisting with it as Taylor sprawls well. Taylor wins this battle and keeps the fight standing. Mendoza gets slowly back to his feet.
Taylor is definitely looking for the counter takedowns here.
Mendoza shoots in with a takedown attempt and he has Taylor pinned against the cage. Taylor gets the underhooks and manages to circle away.
Mendoza will need to tighten up his combinations if he doesn't want to gas himself out, swinging at thin air.
Taylor with the counter takedown but Mendoza avoids it easily.
Mendoza darts in looking for a takedown but Taylor gets double underhooks and turns Mendoza into the cage.
That's eight minutes gone in the round.
The crowd are showing their displeasure at the lack of action as loud boos ring out around the arena.
Mendoza shoots in looking for a takedown. Taylor tries to sprawl out of it but Mendoza keeps driving through. The fighters are pinned against the cage. Taylor manages to get underhooks and after a bit of a struggle, circles away and we're back to standing.
Taylor changes levels for a counter takedown but doesn't follow through with his attempt.
Taylor bobs and weaves well there to avoid the strikes.
Mendoza fails to land the takedown.
Mendoza shoots in for a takedown. He's persisting with it as Taylor sprawls well. Taylor wins this battle and keeps the fight standing. Mendoza gets slowly back to his feet.
Taylor leaves Mendoza with his face pressed against the mat as he sprawls beautifully, defending against a solid takedown attempt.
And Taylor tries to counter it with a takedown but Mendoza pushes his down on his head and steps out.
That's nine minutes gone in the round.
Mendoza throws a hook to the side of Taylor's head but Taylor sees it coming and ducks under it beautifully.
Taylor drops down looking to force a counter takedown but Mendoza defends it well.
Mendoza scores with a one two! Taylor had his feet all tangled up there and couldn't avoid the strikes.
Bishop Taylor has stepped it up - he knows he needs a finish here!
Mendoza fakes high and swings low for a body shot but Taylor manages to avoid it.
Taylor with the counter takedown but Mendoza avoids it easily.
Mendoza will have to do better than that with his takedown attempts.
And Taylor tries to counter it with a takedown but Mendoza pushes his down on his head and steps out.
Taylor stuffs the takedown attempt from Mendoza. Mendoza gets slowly back to his feet.
Taylor changes levels for a counter takedown but doesn't follow through with his attempt.
Mendoza throws a jab but it's blocked by Taylor.
The crowd thankful this round is nearly over.
Taylor uses good head movement to avoid the hook from Mendoza.
Taylor is definitely looking for the counter takedowns here.
Edgar Mendoza is fighting for a decision here - he's started to take the cautious approach.
Mendoza shoots in for a takedown but Taylor shows good takedown defense.
Taylor feints the counter takedown.
And that's the end of the fight!
I would just about give that final round to Bishop Taylor.
I have no idea who won that fight. Let's wait and see whether the judges are as confused as me! Time for a split decision perhaps?!. Over to the ring announcer for the scorecards.
Ladies and gentlemen, after 2 rounds of action, we go to the scorecards for a decision.
Judge Felipe Paraventi scores the fight 19:19
Judge Luis Engracia scores the fight 19:19
Judge Seu Braga scores the fight 19:19
The fight is ruled a draw!
Oh dear, what a disastrous situation! The belt remains unclaimed and both fighters go home unhappy!
|
|
|
|
|
|
|
|
|
|
|
|
|
|
|
|
|
|
|
|
|
|
|
| S |
C
A |
G |
S |
C
B |
G |
|
S |
C |
G |
|
energy
A | B |
|
hype
A | B |
|
pop
A | B |
|
mgr
A | B |
|
FIGHT
RATING
30% |
|
|
|
|
|
|
