|
|
PBP Commentary |
Coming up we have a light heavyweight MMA rules bout between Billy Arseworth (ranked 4808 p4p, 532 weight class) and Soyster Nine (ranked 8405 p4p, 670 weight class). Both fighters really staring each other down here, as Soyster Nine enters the cage!
 |
|
 |
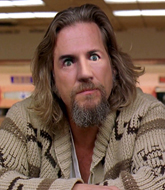
| 188 cm
18
210 lbs
3 - 1 - 0 |
|
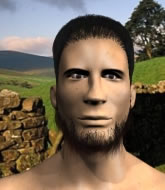
189 cm
18
210 lbs
2 - 2 - 0 |
BJJ Purple Belt
Basic striking
Self confident |
|
BJJ Blue Belt
Basic striking
Determined |
|
| |
|
Ladies and gentlemen. This fight is 3 rounds, in the light heavyweight division.
Introducing the fighter to my left, fighting out of the red corner.
With a record of
3 - 1 - 0, fighting out of New York, Billy Arseworth!
And introducing the fighter to my right, fighting out of the blue corner.
With a record of
2 - 2 - 0, fighting out of Amsterdam, Soyster Nine!
The judges for this bout are Chad Campbell, Anthony Taglia and Alyssa Summers.

The bell rings for round one and we are underway!
Nine tries to land with a swinging hook to the body but Arseworth was well out of range. Poor timing from Nine.
Arseworth seemed to be looking to counter by closing the distance.
Nine has his head snapped back a nice jab. A little nod from Nine there as he acknowledges the shot.
Nine throws the left hand but Arseworth avoids the punch easily.
Arseworth avoids the clinch attempt nicely.
Arseworth works the jab nicely.
Arseworth looks to have improved his striking defense since last time we saw him fight.

Arseworth has managed to clinch.
Nine throws a punch but it's blocked by Arseworth.
Good body shot from Arseworth.
Arseworth lands a right hand that snaps the head of Nine backwards.
Arseworth pushes Nine back against the cage and unloads with a body punch.
Arseworth lands a body punch in the clinch.
Arseworth cracks Nine with a nice body shot.
Nine looks winded!
Arseworth lands with a light punch inside.
Arseworth lands a left hand that snaps the head of Nine backwards.
The crowd are loving this. Great action here.
Nine's head jolts backwards as he takes an uppercut right on the button!
Arseworth lands with a short head shot on the inside.

Nine is rocked!

Arseworth connects with a big uppercut there that sends Nine tumbling to the ground! Arseworth follows him down into his guard.
Nine is still in real trouble! Can Arseworth finish him?

Arseworth drops back looking for a leg! Nine is in trouble here! The fighters roll with the hold and Nine manages to kick Arseworth off! Arseworth jumps back into Nine's guard.
Arseworth thinks about going for a leg but decides against it, in order to maintain the position.
Arseworth pushing down on Nine's thigh, trying to pass to half guard. He's managed it... Nice work.
Nine seems to have recovered his senses.

That's one minute gone in the round.
Arseworth is looking for a kimura but he's never going to get it from there.
Nine trying to control from the bottom.
Arseworth is working hard to pass the guard. He's done it - he's now in full mount! Trouble for Nine!
Arseworth looking to control but Nine is working nicely, looking to advance position himself.
Arseworth is working on an americana here. Ooh, that looks pretty nasty! Nope, Nine has managed to escape the submission attempt.
Arseworth looking for an armbar but decides to keep the dominant position instead.
Arseworth takes Nine's back. Could be looking for a rear naked choke here - either way, Nine is in trouble.

That's two minutes gone in the round.
Arseworth tightening his grip on Nine, looking for the choke.
Arseworth is remaining active here, looking for the choke. The more discerning members of the crowd will appreciate his efforts.
Arseworth struggling to keep hold of the position.
Arseworth is working for the rear naked choke. He has one arm under the chin but Nine has hold of the other arm. A bit of a stalemate here.
Arseworth throwing lazy shots from the back mount that aren't doing any damage.

That's three minutes gone in the round.
Nine just trying to survive but Arseworth is wriggling into a better position, looking to finish.
Arseworth is looking for the choke from the back position but Nine is controlling his hands well.
Arseworth is looking for the choke from the back position but Nine is controlling his hands well.
Arseworth looking for the RNC.
Arseworth avoiding Nine 's attempts to control his hands.
Arseworth is looking for a rear naked choke here but Nine reverses the position brilliantly into Arseworth's guard!
Arseworth looks to be working for a triangle here. Oh, it looks like he might have it! Nine has picked Arseworth up and slammed him! Arseworth can't keep hold of the triangle and Nine manages to pass to side control!
Nine controls the position.

Nine is trying to get an arm triangle but Arseworth is defending well.
Arseworth is trying to control Nine's posture but Nine avoids it.

That's four minutes gone in the round.
Arseworth is positioning himself to get back to half guard.
Arseworth is sneaking out the side here. He's bucked Nine off and has taken his back!
The crowd cheering loudly, showing their appreciation for the quality fight we're seeing here.
Arseworth is working hard for the rear naked choke here.
Arseworth looking for the choke but no joy.
Nine has his hands over his head blocking the strikes from Arseworth.
And thats the end of the round the fighters go back to their corners.
Billy Arseworth dominated that round.
That's time! Arseworth's corner gives him a slap on the ass as he gets ready to fight.

Arseworth with poor footwork there. He got himself in a bit of a tangle, enabling Nine to score with a decent uppercut.
Nine fails in his attempt to clinch.
Arseworth scores with a jab.
Arseworth lands a right hook to the body.
A telegraphed right hand from Nine misses the target.
As Nine tries to get set, Arseworth tries to push him back and clinch up but Nine manages to avoid the attempt.
Arseworth is really dominating this fight. Is there anything that Nine can do to turn this around?
Nine misses with a jab to the body
and Nine takes a counter punch right on the button for his troubles.
Nine scores with a sloppy right hand. Arseworth should have avoided that one.
Nine throws out a token jab with nothing on it.

Nine shoots in for a takedown and gets it. Let's see what he's got on the mat.
Nine drops back for a leg! It's a sloppy attempt though and Nine jumps back into guard quickly, to retain the dominant position.
Nine must be cautious of submissions here, given that his opponent has the superior Jiu Jitsu.
Arseworth looking for submissions from the bottom here. Moving his hips around, possibly looking for an armbar.
This has been an exciting period of action!
Arseworth looking for submissions from the bottom here. Moving his hips around, possibly looking for an armbar.
Billy Arseworth overall seems to be getting the better of the ground position in the fight so far.
Arseworth is active off his back here, looking for submissions.
Both fighters have adopted an aggressive gameplan on the ground!
Arseworth is looking for a triangle but Nine pushes his legs off easily.
That's one minute gone in the round.
Arseworth working for a triangle but Nine defends it easily.
Arseworth working for a triangle but Nine defends it easily.
Both fighters are absolutely exhausted here.
Arseworth is looking for a triangle but Nine pushes his legs off easily.
The ref warns both fighters not to hold the cage as they work up against the meshing.
Nine drops back looking for a leg! Arseworth is in trouble here! The fighters roll with the hold and Arseworth manages to kick Nine off! Nine jumps back into Arseworth's guard.
Arseworth is working actively off his back, looking to secure an arm or perhaps work for a triangle.
That's two minutes gone in the round.
There's not a lot going on here and the crowd are letting the fighters know they're not willing to tolerate a lack of action.
Arseworth throwing his legs up looking for a triangle.
Nine throwing strikes from guard but Arseworth blocks nicely.
Arseworth throwing his legs up looking for a triangle.
Nine avoids a guillotine attempt easily.
Arseworth escapes his hips to the side and looks to be working for an armbar. Nine gives him a little smile and shakes his head. No chance.
That's three minutes gone in the round.
Arseworth has his foot on Nine's thigh. He's trying to push off and get in position for a triangle, I think. Nine works his way back into a safe position though.
Nine trying to pass the guard but can't manage it just yet.
Arseworth working a defensive guard but Nine passes into half guard.
Arseworth avoiding damage under a succession of punches from Nine.
Nine trying to control the action but Arseworth is working from the bottom.
Arseworth looking for submissions off his back.
Arseworth on the receiving end of some nice ground and pound.
That's four minutes gone in the round.
Arseworth on the receiving end of some nice ground and pound.
Nine is trying to work for a kimura but Arseworth is defending well.
Nine is trying for a guillotine from the top but the pressure isn't in the right place so Arseworth is just riding it out for now. Nine eventually gives up the hold.
Arseworth looking to work for a kimura from the bottom.
The crowd thankful this round is nearly over.
Nine is trying to work for a kimura but Arseworth is defending well.
And thats the end of the round the fighters go back to their corners.
A close second round but Soyster Nine will probably get the nod - 10:9.
The minute break is over - no more time for sponges and pep talks - back to the action! And we move into the final round!

Nine throws a hook to the body but it doesn't connect.
Arseworth closes the distance and pushes Nine back into the cage.
Nine misses with a punch to the body.
A head punch blocked on the inside by Arseworth.
Arseworth lands with a left to the head.
Arseworth tried to land a shot to the body but connects with Nine's elbow.
Nine tries to land a shot to the body but it's blocked.
Arseworth lands a body shot.
Arseworth blocks a body shot from Nine.
Arseworth prevents a body shot from Nine.
Arseworth lands a nice shot to the body.
Nine struggles to land a body shot inside as Arseworth controls his hands.
Arseworth lands with a short shot to the head.
We've had a slow start to the round here - hopefully the action picks up.
A shot in the inside from Arseworth.
Nine takes a big intake of breath there - he's definitely tired.
Arseworth working on landing some head shots here - that one got through nicely.
Arseworth scores with a shoulder strike.
Arseworth lands with a quick shot inside that doesn't really do much damage.
Arseworth lands a right hand.
This is a great period of action - very entertaining stuff!
Arseworth lands with a short punch from the clinch.
A right hook to the body lands for Arseworth.
That's one minute gone in the round.
Arseworth drops Nine with a massive uppercut from the clinch! Oh my word, Nine is out cold! What a knockout!
Ladies and gentlemen, after 1:12 of round 3, we have a winner by way of KO (Punch). Billy Arseworth!
Billy Arseworth seemed lost for words in his post fight interview but he remembered to thank his fans and directed everyone to his website.
Soyster Nine was interviewed post fight and said 'What can I say, I was beaten by the better fighter today. See you all in two weeks. '.
|
|
|
|
|
|
|
|
|
|
|
|
|
|
|
|
|
|
|
|
|
|
|
| S |
C
A |
G |
S |
C
B |
G |
|
S |
C |
G |
|
energy
A | B |
|
hype
A | B |
|
pop
A | B |
|
mgr
A | B |
|
FIGHT
RATING
53% |
|
|
|
|
|
|
