|
|
PBP Commentary |
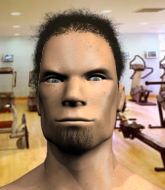
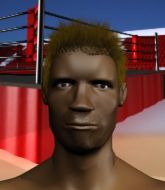
Coming up we have a bantamweight MMA rules bout between Bruce Terol (ranked 4797 p4p, 0 weight class) and Sima Haya (ranked 5919 p4p, 0 weight class). Bruce Terol has the edge in experience - let's see if he can make that count tonight.
 |
|
 |
| 165 cm
21
144 lbs
1 - 2 - 0 |
|
167 cm
20
135 lbs
0 - 0 - 0 |
BJJ Blue Belt
Excellent MT
Big heart |
|
BJJ White Belt
Excellent MT
Solid chin |
|
| |
|
Ladies and gentlemen. This fight is 3 rounds, in the bantamweight division.
Introducing the fighter to my left, fighting out of the red corner.
With a record of
1 - 2 - 0, fighting out of The Island, Bruce Terol!
And introducing the fighter to my right, fighting out of the blue corner.
With a record of
0 - 0 - 0, fighting out of The Island, Sima Haya!
The judges for this bout are David Hoff, Santiago Holmes and Daniel Franklin.

The bell rings for round one and we are underway!
Terol is trying hard to land a takedown here. Haya sprawls well and keeps this one on the feet.
Terol shoots in looking for a takedown but Haya manages to keep the fight standing, pushing Terol's face into the canvas for good measure before circling away.
Haya goes for a high kick. It partially lands.

Haya has taken the fight to the clinch.

Haya pushes off and circles away, back to the middle of the mat.

Terol closes the distance and presses his opponent up against the cage.
Terol on the defensive, avoiding the knees to the body.
Haya looking to slow down the pace here.

Terol breaks the clinch and we return to the middle of the mat.
Terol clinches up with Haya and pushes him back against the cage.
Terol lands an uppercut.
A right hand to the body from Terol.
Haya dictating the pace here, as the fighters clinch against the cage.
Terol's corner calls for him to break the clinch, which he does.
Terol gets in close and instigates a clinch.
The crowd are loving this. Great action here.
Terol manages to break the clinch.

That's one minute gone in the round.
Haya tries to close the distance and clinch but Terol swats him to one side with an open hand palm strike and circles away.
Haya doesn't manage to clinch there - Terol circles away.
Terol on the receiving end of a decent leg kick there by Haya. Haya obviously looking to wear him down.
A really sloppy takedown attempt there from Terol.
That's three failed takedown attempts in the round for Bruce Terol. That's going to take a lot out of him.
Haya instigates a clinch.
Haya is looking to score with knees to the body. Maybe he'll change it up and go body then head. Terol is defending well for now.
Haya is looking to score with knees to the body. Maybe he'll change it up and go body then head. Terol is defending well for now.
Haya wants to get back to striking at distance but Terol won't allow it.

Terol pulls Haya into guard.
Haya wants to stand but Terol has a closed guard, so he can't escape.
Haya must be cautious of submissions here, given that his opponent has the superior Jiu Jitsu.
Terol is looking to stand up but Haya isn't so interested in that idea.

Haya stands and steps away. Terol gets to his feet too and we're back to the striking game.
Haya connects nicely with a jab. Noted by the judges no doubt.

That's two minutes gone in the round.
Terol rushes Haya and pushes him back against the cage in a clinch.
Haya throws a knee to the head but misses.
Terol avoiding damage as Haya throws knees to the body.
Knees to the body from Terol.
Terol breaks the clinch and we're back to striking at distance.
Terol has a takedown stuffed.
The fans in attendance giving it up for the two fighters, who have really let it all hang out in the last minute or so!
Haya throws a head kick that connects with a bit of head and a bit of hand.
We've been told by Terol's head coaches at Cozad The Island that he's been working on his takedown defense in preparation for this fight.
Sima Haya is looking to keep the fight on the feet at all costs.
Terol looks to land a combination but Haya avoids it well.
Bruce Terol seems to be the more aggressive standup fighter in this bout.
Haya tries to clinch but Terol moves out of range.
Terol tries to counter by moving into the clinch but Haya manages to circle out of the way.
Terol tries a head kick but it misses.
Terol avoids the clinch attempt nicely.
Haya doesn't manage to clinch there - Terol circles away.
Haya closes the distance and pushes Terol back into the cage.
Haya content to slow the pace in the clinch.

That's three minutes gone in the round.
Terol pulls guard.
Terol is trying to stand up but he's not managed so far.
Haya really doesn't want to stay on the ground with Terol. If he can't get it back to his feet, it's only a matter of time before he'll be tapping out.

Terol has managed to wall walk up one of the corner posts to get back to his feet. Haya is pushing him up against the cage, looking to control the position.
Terol is breathing heavily.
Haya breaks the clinch and we're back to striking at distance.
Terol tries for a takedown but Haya sees it coming a mile off and avoids it easily.
Haya moves into the clinch.
Haya looking to throw knees to the head but Terol is blocking nicely.
Terol is trying to pull guard but being pressed up against the cage enables Haya to keep the fight standing.
Haya throws a vicious knee straight up the middle but Terol blocks it with crossed arms.
Haya lands a knee to the body.
Haya pushes off and circles away, back to the middle of the mat.
Terol will have to do better than that with his takedown attempts.

That's four minutes gone in the round.
Terol throws a combination but it was largely blocked by Haya.
Terol moves into range and clinches up with Haya.
This has been an exciting period of action!
Haya looks like he'd prefer to be striking at range right now.
Haya stalling in the clinch.
Terol avoiding damage as Haya throws knees to the body.
Terol changes levels and goes for a takedown here. Haya fights it off and pushes away nicely.
Haya tries to clinch up against the cage, rushing in to close the distance. Terol manages to break the clinch and circles back to the middle of the mat.
Haya rushes Terol and presses him up against the cage.
Terol managing to block the knees to the body from Haya.
Terol has Haya pressed up against the cage and is working for takedown. Haya manages to improve position though and keeps the fight standing.
Terol tries to pull guard but Haya forces him back to his feet, against the cage.
Haya tries a knee to the head but he's missed.
Terol breaks the clinch.
Haya takes the fight into the clinch.
And thats the end of the round the fighters go back to their corners.
A close round but Sima Haya will probably get the nod.
The fighters get back to their feet, the hooter sounds and we're back to the action!

Haya throws a quick head kick that skims the top of Terol's head.
Terol shoots for a takedown but Haya saw that one coming a mile off and avoided it easily.
Haya chopping away at his opponent's legs.
Terol goes for a double leg but Haya avoids the attempt and the two fighters end up clinched against the cage as Haya continues to drive forward.
Haya tries to close the distance and clinch but Terol swats him to one side with an open hand palm strike and circles away.
Haya moves in looking to clinch but Terol pushes him off.
Haya clinches with his opponent.
Haya pushes off and circles away, back to the middle of the mat.
Terol shoots in for a takedown - he's clinched up with Haya but Haya pushes him off and we're back to square one.
Haya steps in looking to clinch after the strikes miss from Terol.
That's three failed takedown attempts in the round for Bruce Terol. That's going to take a lot out of him.
Haya closes the distance and presses his opponent up against the cage.
Both fighters are absolutely exhausted here.
We've had a slow start to the round here - hopefully the action picks up.
Haya has had enough of the clinch and is looking to separate.
Kneeeeees! The crowd are calling for knees to the body. Haya obliges.
Terol pushes off and circles away, back to the middle of the mat.
Haya tries to clinch up.
That's one minute gone in the round.
Terol tries a head kick but it misses.
Haya moves into the clinch.
Haya lands a nice knee to the body.
Haya unloads a knee to the mid-section.
Haya with the Thai clinch. He's looking to land a big knee but he's not managed it this time.
Haya escapes the clinch and we're back to striking.
Terol shoots in looking for a takedown. Haya tries to sprawl out of it but Terol keeps driving through. The fighters are pinned against the cage. Haya manages to get underhooks and after a bit of a struggle, circles away and we're back to standing.
Terol shoots in but doesn't get the takedown
and Haya counters with a crisp hook to the side of the head.
Haya moves into the clinch.
Haya landing knees to the body. They look like they could hurt.
Sima Haya seems to be working more effectively in the clinch in the fight so far.
Haya breaks the clinch.
Haya clinches up against the cage.
Haya tries to land a knee to the head but Terol blocks with his arms.
That's two minutes gone in the round.
Haya tries a knee to the head but he's missed.
Fantastic stuff here - a very entertaining period of action, which has drawn cheers from the crowd.
Terol avoiding damage as Haya throws knees to the body.
Terol prevents Haya from breaking the clinch.
Terol taking a break, stalling in the clinch.
Haya misses with a knee to the head.
Terol escapes the clinch and we're back to striking.
The fight moves into the clinch position.
Terol breaks from the clinch.
Haya closes the distance and clinches.
Haya throws a vicious knee straight up the middle but Terol blocks it with crossed arms.
Haya looking to slow down the pace here.
Terol breaks the clinch and we're back to striking at distance.
That's three minutes gone in the round.
Haya swings wildly with a hook that is half blocked by Terol.
Terol looks for a takedown here. Will he get it? Haya is fending him off so far but Terol persists. Nope, Haya circles away and we're back to standing.
Haya stuffs the takedown attempt from Terol. Terol gets slowly back to his feet.
Haya wants to clinch.
A head kick misses from Haya.
Bruce Terol is looking to throw some combinations by the looks of things.
Haya pushes Terol up against the cage in a clinch.
Haya using the Thai plumb to throw knees but Terol has his back arched nicely, preventing the strike.
Terol tries to pull guard but Haya forces him back to his feet, against the cage.
Haya looking to stall.
Haya misses with a knee to the head.
That's four minutes gone in the round.
Terol is pushing Haya up against the cage, for a bit of lean and pray action. Action being used the in the loosest possible sense of the word.
Terol avoiding damage as Haya throws knees to the body.
Terol breaks from the clinch.
Haya pushes Terol up against the cage in a clinch.
Haya working hard to break the clinch.
Haya tries to land a knee to the body but he is off balance and Terol avoids it.
Haya tries to land a knee to the head but Terol blocks with his arms.
Haya tries a knee to the head but Terol blocks it.
Terol breaks the clinch and we're back to striking at distance.
Terol swats away the attempt to clinch by Haya.
And thats the end of the round the fighters go back to their corners.
Sima Haya showed his class in that round. I'd imagine he'll take it on all the scorecards.
That's the end of the round. The referee orders the cornermen out of the cage so we can get back down to business. This is the final round!

Haya throws a good cross that connects.
Haya tries to close the distance and clinch up but Terol swats him away and circles back towards the center.
Terol avoids the head kick by Haya.
Haya clinches with his opponent.
Haya using the Thai plumb to throw knees but Terol has his back arched nicely, preventing the strike.
Haya trying to control the position but instead, Terol has worked for underhooks and has pushed Haya into the cage.
Haya throws a knee to the head but misses.
Haya tries to land a knee to the head but misses.
We've had a slow start to the round here - hopefully the action picks up.
Haya stalling here - the referee won't stand for too much of that.
Haya takes a big intake of breath there - he's definitely tired.
Haya is looking to break free of the clinch but Terol has double underhooks.
Haya stops a takedown attempt from Terol.
That's one minute gone in the round.
Terol tries to throw a body punch but Haya avoids it by throwing Terol back against the cage.
Terol pushes off and circles away, back to the middle of the mat.
Terol will have to do better than that with his takedown attempts.
Haya gets in close and instigates a clinch.
Haya trying to land knees to the body.
Terol manages to break the clinch.
Terol pushes Haya up against the cage in a clinch.
The pace slowing considerably in the clinch, as Terol takes a break from that fighting nonsense to think about the finer things in life.
Haya wants to break free but Terol has control.
Terol struggles to land a body shot inside as Haya controls his hands.
Haya tries to land a knee to the body but he is off balance and Terol avoids it.
Terol is trying to pull guard but Haya turns him against the cage and we stay in the clinch.
That's three failed takedown attempts in the round for Bruce Terol. That's going to take a lot out of him.
Terol's corner calls for him to break the clinch, which he does.
That's two minutes gone in the round.
Terol fails miserably with a takedown attempt.
Terol lands with a nice low kick. That'll leave a bruise.
Haya throws a body kick that sends a sickening thudding noise reverberating around the arena.
Terol fails with a rather predictable takedown attempt.
Haya rushes Terol and presses him up against the cage.
Terol pushes off and circles away, back to the middle of the mat.
Haya pushes Terol up against the cage in a clinch.
This is a great period of action - very entertaining stuff!
Terol has had enough of the clinch but Haya keeps him there for the moment.
Haya is trying to break the clinch but Terol has him pressed against the cage.
Terol misses with a hook from the clinch.
Haya has had enough of the clinch and is looking to separate.
That's three minutes gone in the round.
Terol breaks the clinch and we're back to striking at distance.
Terol swats away the attempt to clinch by Haya.
It looked like Terol was looking amped, ready to throw a big counter but didn't commit.
Terol closes this distance looking for a takedown but Haya circles away.
The fight moves into the clinch position.
Haya leaning his opponent against the cage.
Terol misses with a hook from the clinch.
Haya escapes the clinch and we're back to striking.
Terol keeps the fight on the outside.
Terol swats away the attempt to clinch by Haya.
Haya fakes with an overhand right and moves in to clinch with Terol, pushing him back against the cage.
That's four minutes gone in the round.
Haya wants to break free. God knows he wants to breaaaak freeee.
Haya taking a breather.
Haya has been the more effective fighter overall so far.
Haya throws a vicious knee straight up the middle but Terol blocks it with crossed arms.
Terol's corner calls for him to break the clinch, which he does.
Haya clinches.
Haya is trying to force a seperation but Terol has the dominant position.
Haya breaks the clinch and we return to the middle of the mat.
Terol tries for a takedown but Haya sees it coming a mile off and avoids it easily.
Haya feints with a shoulder and throws a nice leg kick to Terol's calf.
The crowd thankful this round is nearly over.
Terol shoots in looking for a takedown. Haya tries to sprawl out of it but Terol keeps driving through. The fighters are pinned against the cage. Haya manages to get underhooks and after a bit of a struggle, circles away and we're back to standing.
Bruce Terol has stepped it up - he knows he needs a finish here!
Sima Haya is fighting for a decision - hopefully he's judged it right and he's actually winning the fight.
Haya has managed to clinch.
And that's the end of the fight!
Sima Haya comfortably won the final round on my scorecard.
I've got Haya winning every round here. Surely the decision will go his way and he'll pick up a well deserved decision victory. Over to the ring announcer for the scorecards.
Ladies and gentlemen, after 3 rounds of action, we go to the scorecards for a decision.
Judge David Hoff scores the fight 27:30
Judge Santiago Holmes scores the fight 27:30
Judge Daniel Franklin scores the fight 27:30
In favor of your winner, by unanimous decision... Sima Haya!
|
|
|
|
|
|
|
|
|
|
|
|
|
|
|
|
|
|
|
|
|
|
|
| S |
C
A |
G |
S |
C
B |
G |
|
S |
C |
G |
|
energy
A | B |
|
hype
A | B |
|
pop
A | B |
|
mgr
A | B |
|
FIGHT
RATING
48% |
|
|
|
|
|
|

