|
|
PBP Commentary |
Coming up we have a welterweight MMA rules bout between Yamato Take (ranked 85 p4p, 16 weight class) and Hugh Moors (ranked 157 p4p, 28 weight class). On his way into the cage it seems that Yamato Take has been attacked by a crazed fan! It looks like it might have been the just bleed guy! Luckily Yamato Take seems to be OK! I thought that lunatic was in prison!?
 |
|
 |
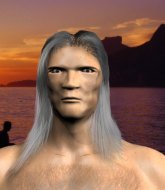
| 179 cm
35
181 lbs
18 - 1 - 0 |
|
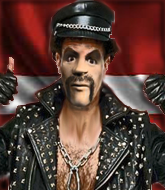
182 cm
30
175 lbs
12 - 1 - 0 |
Great wrestler
World class boxer
Insanely flexible |
|
Good wrestler
World class MT
Good gas tank |
|
| |
|
Ladies and gentlemen. This fight is 5 rounds, for the welterweight championship of the world!
Introducing the champion to my left, fighting out of the red corner.
With a record of
18 - 1 - 0, fighting out of Las Vegas, Yamato Take!
And introducing the challenger to my right, fighting out of the blue corner.
With a record of
12 - 1 - 0, fighting out of New York, Hugh Moors!
The judges for this bout are Trevor Gratis, Elvis Blanc and Dillan Fox.

The bell rings for round one and we are underway!
Take pivots as if he's going to throw a leg kick but stops half way.
The fighters circling - Moors throws out the jab but it was never going to land.
Take uses some good footwork to avoid the body shot by Moors.
Take throws a monster uppercut resembling something out of street fighter but it doesn't land.
Take ducks down and throws a hook to the body but Moors moves away.
Moors checks a leg kick.
Take scores with a slapping inside leg kick.
Moors misses with a hook. Take ducked under it nicely.
Take lands a front kick.
Take with a body punch. A glancing blow.
Moors misses with a straight right.
Take missing with a left hand there. Moors was out of range so wasted energy throwing that one.
Take throws a leg kick
and Take takes a counter punch right on the button for his troubles.
Take connects with a body shot.
Take throws a lazy uppercut
and Moors makes him pay by landing a nice hook to the body before moving out of range.
Moors ducks under an overhand right and circles away with a smile on his face.
Take looks to have improved his striking defense since last time we saw him fight.
Moors lands with a two punch combination before moving back out of range.
Wooooo! Give it up for these two warriors! They are putting on a show!
Take throws a lazy head kick
and Moors counters with a lovely straight right hand!
Moors throws a solid leg kick but Take takes the impact on his shin and smiles at Moors.
A big left from Moors misses.

That's one minute gone in the round.
Moors misses with a low kick as Take jumps back.
Take uses good footwork to avoid the strikes from Moors.
Take throwing a counter right hand but Moors manages to avoid it.
Moors goes for a spinning back kick but it misses.
Take throws an uppercut from half a mile away. Moors sees it coming and avoids it easily.
Take looks to score with a jab to the body but Moors is just out of range.
Moors follows through with a counter body kick but it doesn't land.
Boom, another hit is landed. "You're gunna get knocked out" taunts Take, as that shot connected.
Take steps to the side to avoid the strikes from Moors.
A bone on bone clash there as Take blocks the leg kick.
Jab from Take.
Moors throws a low kick but his opponent is out of range.
Yamato Take seems to be the more aggressive standup fighter in this bout.
Take misses with a lunging right hand
and Moors counters with a nice uppercut.
Moors scores with a push kick.
Moors moves out of range of the body kick.
Take throws a leg kick that misses.
Moors misses with a body kick.
Take throws out a loose jab but Moors uses good head movement to avoid it.
Take throws a jab, cross combination which is slipped
and Moors counters with an outside leg kick.
Take throws a looping overhand right but Moors ducks down to avoid it.

That's two minutes gone in the round.
Moors throws a body kick that misses.
Fantastic stuff here - a very entertaining period of action, which has drawn cheers from the crowd.
Moors takes a body punch but keeps moving.
Take waving his hands out in front of him, looking to distract Moors.

Take clinches with his opponent.
Take throws a head punch that misses.
Moors takes a shot to the head.
Moors prevents a body shot from Take.
Moors stalls.
Take misses with a punch on the inside.
Take has a couple of punches blocked by Moors.
Moors tries to throw a body punch but Take avoids it by throwing Moors back against the cage.
Moors tried to land a shot to the body but connects with Take's elbow.
A head punch on the inside from Take fails to land.
Take has a couple of punches blocked by Moors.
A head punch on the inside from Take fails to land.
A short right hand to the side of the head by Take.
Moors has a couple of punches blocked by Take.
Moors lands with a left to the head.
Moors blocks a couple of punches on the inside.
Take tries to land a knee to the body but he is off balance and Moors avoids it.
Moors tries to work over Take's body with a swooping hook but it only glances the target.

That's three minutes gone in the round.
Still in the clinch, Moors scores with a nice short uppercut.
Moors can't find room to land a body shot as Take controls the action.
Moors is working Take over against the cage.
An uppercut on the inside fails to land for Take.
Moors lands a body punch.
Take blocking some punches.
Moors tries to take the fight to the ground by pulling guard but can't manage it.
Moors tries a shoulder strike but it doesn't do any damage.
Moors lands a hook to the body. It's hard to tell if that hurt Take or not.
Moors gets through Take's defenses to land a nice punch to the side of the head.
Take lands with a right to the head.
Take tries a shoulder strike but it doesn't do any damage.
Take lands a body punch.
Moors blocks an uppercut.
Take makes some space for himself and lands an uppercut.
Take swings away with an uppercut that misses.
Moors scores with a shot to the side of Take's head.
Take takes a shot to the head.
This has been an exciting period of action!
Moors misses with a shot to the kidneys.
A head punch blocked on the inside by Moors.
Moors fails to land with a short punch on the inside.
Moors throws a punch but it's blocked by Take.

That's four minutes gone in the round.
Moors swings away with an uppercut that misses.
Take tries to work over Moors's body with a swooping hook but it only glances the target.
Take misses with a hook to the ribs.
Moors lands with a right to the head.
Nice body punch from Moors - that landed with a thud.
Moors working aggressively here.
Moors working aggressively here.
Moors throws a head punch that misses.
Moors has been looking to improve his clinch game in recent weeks. Take seems to have the measure of him in the clinch so far, so let's see if Moors can turn it around.
A short right hand to the side of the head by Moors.
Take lands with a left to the head.
Moors throws a punch but it's blocked by Take.
Take tries to land a shot to the body but it's blocked.
Moors lands a shot to the body.
Moors scores with a shot to the side of Take's head.
Moors lands a right uppercut that snaps the head of Take backwards.
Moors misses with some punches.
Nice body punch from Moors - that landed with a thud.
The crowd applaud the fighters' efforts here as the round comes to an end.
Moors lands a body punch.
Take is breathing heavily.
Nice body punch from Moors.
Take blocks a couple of punches on the inside.
Take misses with some punches.
Take blocks an uppercut.
And thats the end of the round the fighters go back to their corners.
Hugh Moors dominated that round.
OK. That's time! The bell goes and we're back to the action.

Moors connects with a slap. Keep your fist closed son.
Take throws a body kick, spinning off balance
and Moors counters with a leg kick.
Moors takes a step back and watches a body kick go sailing past his mid section.
And an attempted straight right on the counter from Moors! But no joy.
Moors jabs at Take's body.
Take takes a body punch that cleary hurt but he's trying not to show any weakness.
Take jabs Moors right on the nose. Moors blinks but takes it well.
Moors works the jab nicely.
Moors scores with a push kick.
Moors fakes a head punch and goes low to the body. Nicely done.
Moors tries to work over Take's front leg with a kick but Take checks it.
Take keeping a good distance there, avoiding the body shot.
Moors misses with a low kick.
Take throws a hook to the side of Moors's head but Moors sees it coming and ducks under it beautifully.
The crowd are loving this. Great action here.
Moors moves out of range of the body kick.
Take throws a lazy right hand but Moors sees it coming a mile off and sidesteps it easily.
Take uses decent footwork to sidestep a right hand from Moors.
Take misses with a shot to the body
and Moors counters with a stiff right hand.
Moors misses the shot to the body.
That's one minute gone in the round.
Moors lands a glancing blow to the side of Take's head.
The sound of bone on bone echoes around the arena as Take checks a leg kick.
Moors looks to land a left hand but Take moved out of range nicely.
Moors displays some good footwork, moving neatly out of range as Take throws out the jab.
Moors swings away with a counter right hand but no contact made.
Nice defenses there by Moors.
Take throws an overhand right that lands on Moors's shoulder, as Moors tries to avoid the shot.
Take misses with a leg kick.
Take attempts a low kick but it misses it's target.
Take throws a leg kick
and Take takes a counter punch right on the button for his troubles.
Moors swings wildly with a right hand that was never going to find it's target.
Moors swings wildly with a right hand that was never going to find it's target.
Take lands with a cross to side of his opponent's head.
A looping hook to the body misses from Take. Moors does a little dance to reset his feet.
Take throws a head kick that misses and slips in the process. He scrambles back to his feet and the fighters circle.
Take misses with a straight left.
Take gets in close and instigates a clinch.
Take lands a hook to the body. It's hard to tell if that hurt Moors or not.
Take misses with the head strike.
A head punch blocked on the inside by Take.
That's two minutes gone in the round.
Take lands with a right to the head.
This has been an exciting period of action!
Moors lands a left hand.
Take's head jolts backwards as he takes an uppercut right on the button!
Moors has a couple of punches blocked by Take.
Take tries a shoulder strike but it doesn't do any damage.
Moors scores with a shoulder strike.
Take takes a shot to the head.
Take misses with a punch on the inside.
Moors tries to land a shot to the body but it's blocked.
Moors lands a hook to the side of the head.
Moors can't find room to land a body shot as Take controls the action.
Moors tries to land a shot to the body but it's blocked.
Moors misses with a hook from the clinch.
Take softening up his opponent with strikes, against the cage.
Moors pushes Take back against the cage and unloads with a body punch.
Moors misses with some punches.
Moors misses with a body punch.
Moors blocks an uppercut.
Take's head jolts backwards as he takes an uppercut right on the button!
Moors works on Take's body with a couple of short punches.
Both fighters are absolutely exhausted here.
Moors is trying to pull guard but Take has him pressed against the cage.
That's three minutes gone in the round.
Moors misses with a punch on the inside.
Moors tries to land a shot to the body but it's blocked.
Moors blocking some punches.
A head punch on the inside from Moors fails to land.
Take throws a head punch that misses.
A short left from Moors.
Take can't find room to land a body shot as Moors controls the action.
Moors tries to work over Take's body with a swooping hook but it only glances the target.
Moors misses with a hook from the clinch.
Take misses with a hook from the clinch.
Take misses with a shot to the kidneys.
Take misses with some punches.
Moors digs a right hand underneath Take's ribcage. Take let out a lung full of air as it connected.
Take struggles to land a body shot inside as Moors controls his hands.
A short right from Take.
Moors lands with a quick shot inside that doesn't really do much damage.
Take misses with a shot to the kidneys.
Moors works for underhooks and lands a body shot in the process.
Moors tries a body shot but Take blocks it.
Moors throws a blind hook that connects with the side of Takes head.
Moors lands an uppercut.
That's four minutes gone in the round.
Still in the clinch, Moors scores with a nice short uppercut.
This is a great period of action - very entertaining stuff!
Take throws a punch but it's blocked by Moors.
Take misses with the head strike.
Moors has been the more effective fighter overall so far.
Moors misses with the head strike.
Moors lands a body punch in the clinch.
An uppercut on the inside fails to land for Take.
Take misses with a body punch.
Moors tries to take the fight to the ground by pulling guard but can't manage it.
A head punch on the inside from Moors fails to land.
Take lands with a good tight uppercut to the head.
Moors stays in close to his opponent and throws a right hand to the body.
Moors lands a nice shot to the body.
Moors jumps guard but Take turns him against the cage and keeps the fight standing.
Yamato Take has stuffed three takedown attempts in the round now. That's going to take a lot out of Hugh Moors.

Moors ties up his opponent against the cage and manages to drag the fight down to the ground. Moors no doubt will be looking to work submissions from his guard.

Take avoids a guillotine attempt easily.
The crowd applaud the fighters' efforts here as the round comes to an end.
Moors looking for submissions from the bottom here. Moving his hips around, possibly looking for an armbar.
And thats the end of the round the fighters go back to their corners.
Hugh Moors showed his class in that round. I'd imagine he'll take it on all the scorecards.
That's time! Back to the action!

Moors lands a nice looking body shot.
Moors avoids a lazy jab quite easily.
Moors slips under a jab from Take.
Take swings for the body but Moors moves out of range.
Take tries to score with an inside leg kick but telegraphs it and Moors is able to avoid easily.
A thudding body kick lands there by Take!
Take swings and misses with a hook to the body.
Moors is trying to avoid his opponent's strikes and get into the clinch.
Moors throws a jab when Take was well out of range.
Decent striking displayed by Moors there.
Moors throws a leg kick but Take sees it coming and moves out of range.
Take throws a shot from downtown. Moors moves away and avoids it.
We've had a slow start to the round here - hopefully the action picks up.
Take misses with a leg kick.
Take clinches.
Take blocks a punch to the side of the head.
Moors struggles to land a body shot inside as Take controls his hands.
Take's head jolts backwards as he takes an uppercut right on the button!
Take lands a shot to the body.
A right hook to the body lands for Moors.
Both fighters are breathing heavily.
That's one minute gone in the round.
Moors managing to block the knees to the body from Take.
Hugh Moors seems to be working more effectively in the clinch in the fight so far.
Take goes for a body shot but it's blocked.
Moors jumps guard.
The ref warns both fighters not to hold the cage as they work up against the meshing.
Moors trying to control the position.
Moors has a loose triangle. He'll be looking to tighten that up but Take can see exactly what he's planning and manages to posture up and free himself.
Moors working from the bottom, still in full guard. He's managed to get a loose triangle. Take doesn't seem to be doing much to defend here, obviously he feels comfortable in the position. Take manages to throw the legs off his shoulder and he's back into guard - no problem.
Moors working from the bottom, still in full guard. He's managed to get a loose triangle. Take doesn't seem to be doing much to defend here, obviously he feels comfortable in the position. Take manages to throw the legs off his shoulder and he's back into guard - no problem.
That's two minutes gone in the round.
Moors is throwing his legs up, looking for submissions. Take is aware though and is defending well.
Take is just sitting in guard, looking to avoid any submissions.
Take postures up.
Moors keeping moving, preventing Take from controlling successfully.
Take avoids a guillotine attempt easily.
That's three minutes gone in the round.
Take advances position into side control!
Take working away.
Moors might have to switch it up a bit here because his efforts to control Take haven't been going to plan, at least at the current moment in time.
Moors sneaks back into half guard.
Moors with the active half guard here but Take passes nicely into side control.
Moors sneaks a leg under to get back to half guard.
That's four minutes gone in the round.
Take prevents Moors from improving his position.
Take is taking a breather. Moors says something to him but it's hard to make out. Perhaps he's telling him to get on with it and actually do something.
Moors actively working from the bottom here.
Boooooooooooooooooooo!!! God, this has been a terrible round. Come on you two, sort yourselves out!
Neither fighter is being very active at the moment, with Take in particular looking to stall.
Moors trying to control here.

The referee has decided to stand the fighters back up, so we'll restart on the feet.
And thats the end of the round the fighters go back to their corners.
A close third round but Hugh Moors just about did enough to take it.
That's time! Take's corner gives him a slap on the ass as he gets ready to fight.

Take avoids the body shot from Moors.
Moors misses with a straight right.
Hugh Moors seems to be getting the better of the standup.
A big left from Take misses.
Good leg kick by Moors there. It's the ones that make that thud noise that hurt and that was an almighty thud.
Take lands a vicious shot with the stealth of a sniper and the strength of a viper. Are vipers that strong? I can think of lots of things that are stronger than a viper - not many rhyme with sniper though.
An inside leg kick lands from Take.
Moors blocks the body kick.
Take has his front leg slapped to the side - a nice low kick landing there from Moors.
Moors avoids the head kick by Take.
Take avoids a lazy jab quite easily.
Moors moves out of range as Take strikes.
Take scores with a push kick.
We've had a slow start to the round here - hopefully the action picks up.
Moors checks a low kick. Bone on bone - not my idea of a good time.
Moors tries to counter by closing the distance.
Take takes a solid shot to the body. That one hurt him but he's trying not to show it.
Moors throws a lazy right hand but Take sees it coming a mile off and sidesteps it easily.
Moors lands with a shot to the body.
Moors throws out a token jab with nothing on it.
That's one minute gone in the round.
The fighters circling - Moors throws out the jab but it was never going to land.
Moors swings and misses with a hook to the body.
Take just misses with a punch to the body.
Moors throws out a token jab with nothing on it.
Take throws a quick counter kick to the body but Moors avoids it.
Moors smiles there as he lands a nice right hand right on the button.
Moors drops his hands momentarily and Take takes advantage with a crisp shot to the head.
Moors feints a straight left to the body, then turns around with a flashy move and hits Takes jaw with a dramatic spinning back fist!
Moors ducks under a wild hook from Take.
Moors slips a straight right by Take.
Take cracks a nice hook into Moors's ribs.
Take lands a leg kick that knocks Moors off balance momentarily.
Take lands a body shot.
Moors uses some good footwork to avoid the body shot by Take.
Take slips a jab from Moors.
Take clinches up against the cage.
Moors digs a right hand into Take's ribs. Those have got to be taking their toll on Take's gas tank.
It's got to the stage where if one of these guys blows hard enough, the other might fall over.
A nice right hand lands inside from Take.
That's two minutes gone in the round.
The crowd are loving this. Great action here.
Moors blocking some punches.
Take lands with a light punch inside.
A short left from Take.
Moors scores with a nice hook to the head.
Take misses with a short punch on the inside.
Moors throws a head punch that misses.
Moors misses with a hook to the ribs.
Nice body punch from Moors.
Moors tries a body shot but Take blocks it.
Moors swings away with an uppercut that misses.
Moors blocks an uppercut.
Moors prevents a body shot from Take.
Take misses with a punch to the body.
Moors lands a body punch.
Moors lands an uppercut.
Moors lands a nice shot to the body.
Moors is trying to pull guard but Take has him pressed against the cage.
A nice right hand lands inside from Moors.
Moors tries to throw a body punch but Take avoids it by throwing Moors back against the cage.
That's three minutes gone in the round.
Moors scores with a nice hook to the head.
Moors blocks an uppercut.
Moors misses with a punch on the inside.
Moors makes some space for himself and lands an uppercut.
Take misses with a hook to the ribs.
Moors blocks a couple of punches on the inside.
A head punch on the inside from Take fails to land.
Take swings wildly with an uppercut but Moors uses good head movement to avoid it.
Take softening up his opponent with strikes, against the cage.
Moors tries a shoulder strike but it doesn't do any damage.
Moors misses with a punch to the body.
Moors tries to work over Take's body with a swooping hook but it only glances the target.
A right handed body shot lands from Take.
Moors fails to land with a short punch on the inside.
A body shot lands from Moors.
Moors scores with a shot to the side of Take's head.
Take pushes Moors back against the cage and lands a hook to the side of the head.
Moors lands a shoulder strike that jolts his opponent's head backwards.
Take blocks a punch to the side of the head.
That's four minutes gone in the round.
This is a great period of action - very entertaining stuff!
Moors misses with a shot to the kidneys.
Take misses with the head strike.
Moors fails to pull guard.
Take struggles to land a body shot inside as Moors controls his hands.
Moors throws a punch but it's blocked by Take.
Take misses with a shot to the kidneys.
Take blocks a punch to the side of the head.
Take tried to land a shot to the body but connects with Moors's elbow.
A shot in the inside from Moors.
Take lands a hook to the body. It's hard to tell if that hurt Moors or not.
Moors swings away with an uppercut that misses.
Moors blocking some punches.
Moors throws a head punch that misses.
A head punch blocked on the inside by Take.
A nice left hand lands by Take.
Moors tries a body shot but Take blocks it.
Take tries to land a shot to the body but it's blocked.
Take doesn't land with the attempted body shot.
Take misses with some punches.
And thats the end of the round the fighters go back to their corners.
A close fourth round but Hugh Moors will probably get the nod - 10:9.
Well, the break between rounds is over. Let's get back to the scrappin! This is the final round!

Take throws a monster uppercut resembling something out of street fighter but it doesn't land.
Take lunges at Moors with a hook that half lands and is half blocked by Moors's hand.
Take throws a leg kick but Moors moved away.
Moors wants to land a leg kick but Take is out of range.
It looked like Take wanted to counter with a hook but didn't fully commit.
Take feints and then cracks Moors's leading leg with a nice low kick. He's obviously looking to slow Moors down.
Moors throws a lazy uppercut
letting Take counter with a right hand.
Moors takes a kick to the body and keeps moving.
Moors bobs and weaves well there to avoid the strikes.
Good leg kick by Moors there. It's the ones that make that thud noise that hurt and that was an almighty thud.
Take ducks under a wild hook from Moors.
Take throws a shot from downtown. Moors moves away and avoids it.
We've had a slow start to the round here - hopefully the action picks up.
Take misses with a leg kick
and he gets countered with a snapping leg kick.
Moors takes a step back and watches a body kick go sailing past his mid section.
Moors thinks about the counter body kick.
Moors wants to land a leg kick but Take is out of range.
A nice inside leg kick there by Take. That's going to slow Moors down.
Take with a nice cross.
Ouch! a nice leg kick from Take, right into the meat.
That's one minute gone in the round.
Take has taken the fight to the clinch.
Take lands an uppercut.
Moors blocks a punch to the side of the head.
Take tries to land a shot to the body but it's blocked.
Moors swings wildly with an uppercut but Take uses good head movement to avoid it.
Moors misses with a hook to the ribs.
Moors tried to land a shot to the body but connects with Take's elbow.
Moors misses with a punch on the inside.
Moors tries to land a shot to the body but it's blocked.
Take swings away with an uppercut that misses.
Take misses with a hook from the clinch.
A head punch blocked on the inside by Moors.
Moors blocks a couple of punches on the inside.
Take struggles to land a body shot inside as Moors controls his hands.
Moors digs a right hand underneath Take's ribcage. Take let out a lung full of air as it connected.
Both of our modern day gladiators look out of it here - a gruelling 5 rounds of action taking it's toll on them, no doubt.
Take misses with the head strike.
Take lands a left hand.
Moors tries to jump guard but he falls flat on his backside. Take smiles and moves away.
That's two minutes gone in the round.
Take throws a big shot that misses.
A good leg kick by Moors.
Moors scores with a slapping inside leg kick.
Take moves into the clinch.
We've seen a great period of action over the last minute or so - credit to both fighters for going all out!
With the fighters clinched against the cage, Moors creates a bit of distance for himself and scores with a nice uppercut.
Moors misses with a hook to the ribs.
Moors throws a head punch that misses.
An uppercut to the body lands inside from Take.
Moors misses with a hook to the ribs.
Take lands a right hand that snaps the head of Moors backwards.
A head punch on the inside from Take fails to land.
A quick uppercut on the inside from Take.
Take tries a body shot but Moors blocks it.
Take struggles to land a body shot inside as Moors controls his hands.
Take blocks a couple of punches on the inside.
Take misses with the head strike.
A head punch on the inside from Take fails to land.
A short right from Moors.
With the fighters clinched against the cage, Moors creates a bit of distance for himself and scores with a nice uppercut.
That's three minutes gone in the round.
Take misses with the head strike.
Moors lands a short shot on the inside that snaps the head of Take backwards.
Take digs a right hand underneath Moors's ribcage. Moors let out a lung full of air as it connected.
A head punch blocked on the inside by Moors.
Moors misses with a body punch.
Moors pushes Take back against the cage and unloads with a body punch.
Moors blocks a punch to the side of the head.
Moors doesn't land with the attempted body shot.
Moors jumps guard.
Moors is looking for a guillotine. You can't force these things though and Take defends well.
Hugh Moors is fighting for a decision - hopefully he's judged it right and he's actually winning the fight.
Take seems content to control from guard here. He's going to have to remain active though if he doesn't want to get stood back up.
Take stands and throws Moors's legs to the side, diving into side control.
That's four minutes gone in the round.
Moors is looking to regain half guard here but Take keeps moving and retains side control.
The fighters are pressed up against the cage, both looking to find a bit of space to work.
You can see the frustration on Moors's face, being in this tough position on the bottom.
Take just content to control the position.
Moors prevents Take from moving into mount.
Moors is trying to escape the position but Take is controlling the position.
Yamato Take has stepped it up - he knows he needs a finish here!

Take is trying to get an arm triangle but Moors is defending well.
And that's the end of the fight!
Yamato Take showed his dominance in that final round.
Well Moors has outworked and out performed his opponent in all aspects of the game today. He was simply too good and the decision should be no more than a formality. Over to the ring announcer for the scorecards.
Ladies and gentlemen, after 5 rounds of action, we go to the scorecards for a decision.
Judge Trevor Gratis scores the fight 47:48
Judge Elvis Blanc scores the fight 46:49
Judge Dillan Fox scores the fight 47:49
In favor of your winner, by unanimous decision... Hugh Moors!
Hugh Moors is the new welterweight champion!
Yamato Take was interviewed post fight and said 'Good fight buddy.'.
|
|
|
|
|
|
|
|
|
|
|
|
|
|
|
|
|
|
|
|
|
|
|
| S |
C
A |
G |
S |
C
B |
G |
|
S |
C |
G |
|
energy
A | B |
|
hype
A | B |
|
pop
A | B |
|
mgr
A | B |
|
FIGHT
RATING
67% |
|
|
|
|
|
|

