|
|
PBP Commentary |
Coming up we have a heavyweight MMA rules bout between Do You Really Want To Hurt (ranked 569 p4p, 89 weight class) and Bryan Mayhem (ranked 1254 p4p, 159 weight class). The atmosphere really building for this one as we go over to our ring announcer for the fighter introductions!
 |
|
 |
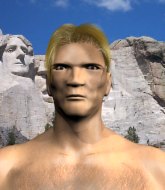
| 185 cm
26
285 lbs
9 - 3 - 0 |
|
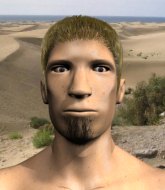
175 cm
19
243 lbs
6 - 2 - 0 |
BJJ White Belt
Excellent boxer
Cardio machine |
|
Good wrestler
Brawler
Good gas tank |
|
| |
|
Ladies and gentlemen. This fight is 3 rounds, in the heavyweight division.
Introducing the fighter to my left, fighting out of the red corner.
With a record of
9 - 3 - 0, fighting out of The Island, Do You Really Want To Hurt!
And introducing the fighter to my right, fighting out of the blue corner.
With a record of
6 - 2 - 0, fighting out of The Island, Bryan Mayhem!
The judges for this bout are Bart Greer, Peter Branson and Michael Johnstone.

The bell rings for round one and we are underway!

You Really Want To Hurt instigates a clinch.
You Really Want To Hurt can't find room to land a body shot as Mayhem controls the action.
You Really Want To Hurt prevents a body shot from Mayhem.
You Really Want To Hurt prevents a body shot from Mayhem.
Mayhem misses with a hook to the ribs.
Mayhem struggles to land a body shot inside as You Really Want To Hurt controls his hands.
Mayhem working aggressively here.
Mayhem works on You Really Want To Hurt's body with a couple of short punches.
A right hook to the body lands for Mayhem.
Mayhem fails to land with a short punch on the inside.
Mayhem lands a right hand that snaps the head of You Really Want To Hurt backwards.
Mayhem fails to land with a short punch on the inside.
We've had a slow start to the round here - hopefully the action picks up.
You Really Want To Hurt tries to stall but Mayhem uses the opportunity to gain a better position.
You Really Want To Hurt blocking some punches.
Mayhem lands with a quick shot inside that doesn't really do much damage.
Mayhem's coach down at Temp Spar Gym was telling us pre-fight that they have been working on Mayhem's balance. Obviously they view that as a key factor in the outcome of this fight.
You Really Want To Hurt blocks a couple of punches on the inside.
Mayhem misses with a punch to the body.
You Really Want To Hurt can't find room to land a body shot as Mayhem controls the action.

That's one minute gone in the round.
Mayhem has a couple of punches blocked by You Really Want To Hurt.
You Really Want To Hurt works for underhooks and lands a body shot in the process.
Mayhem doesn't land with the attempted body shot.
Mayhem goes for a body shot but it's blocked.
Mayhem presses You Really Want To Hurt against the cage and delivers a mid-strength body shot.
You Really Want To Hurt is trying to maintain a safe position but Mayhem gets an underhook and turns You Really Want To Hurt into the cage.
Mayhem misses with a punch on the inside.
You Really Want To Hurt prevents a body shot from Mayhem.
Mayhem tries a body shot but You Really Want To Hurt blocks it.
You Really Want To Hurt works on Mayhem's body with a couple of short punches.
An uppercut to the body lands inside from You Really Want To Hurt.
Mayhem tries to throw a body punch but You Really Want To Hurt avoids it by throwing Mayhem back against the cage.
You Really Want To Hurt has Mayhem pressed against the cage.
You Really Want To Hurt blocks a punch to the side of the head.

That's two minutes gone in the round.
An uppercut on the inside fails to land for Mayhem.
Mayhem misses with a punch to the body.
You Really Want To Hurt swings away with an uppercut that misses.
You Really Want To Hurt dictating the pace here, as the fighters clinch against the cage.
A short right from Mayhem on the inside.
You Really Want To Hurt cracks Mayhem with a nice body shot.
You Really Want To Hurt lands with a short shot to the head.
Mayhem misses with a short punch on the inside.
Mayhem swings wildly with an uppercut but You Really Want To Hurt uses good head movement to avoid it.
Both fighters working to control the clinch.
Mayhem lands a short shot on the inside that snaps the head of You Really Want To Hurt backwards.
Mayhem lands with a good tight uppercut to the head.
The crowd cheering loudly, showing their appreciation for the quality fight we're seeing here.
Mayhem lands a body punch.

That's three minutes gone in the round.
Mayhem misses with the head strike.
You Really Want To Hurt effectively controlling the action here.
Mayhem tried to land a shot to the body but connects with You Really Want To Hurt's elbow.
Mayhem struggles to land a body shot inside as You Really Want To Hurt controls his hands.
A battle for position here, against the cage.
You Really Want To Hurt tries to land a shot to the body but it's blocked.
An uppercut to the body lands inside from Mayhem.
A head punch on the inside from Mayhem fails to land.
You Really Want To Hurt taking a break, stalling in the clinch.
You Really Want To Hurt slows down the pace here.
You Really Want To Hurt is trying to slow down the pace of the fight but Mayhem is keeping busy.
Mayhem misses with a short punch on the inside.

That's four minutes gone in the round.
You Really Want To Hurt misses with a body punch.
Mayhem throws a punch but it's blocked by You Really Want To Hurt.
You Really Want To Hurt doesn't land with the attempted body shot.
You Really Want To Hurt stalling in the clinch but Mayhem improves position.
Mayhem misses with a body punch.
Mayhem tried to land a shot to the body but connects with You Really Want To Hurt's elbow.
You Really Want To Hurt is trying to stall.
Mayhem gets through You Really Want To Hurt's defenses to land a nice punch to the side of the head.
Mayhem lands a body punch in the clinch.
You Really Want To Hurt wants to stall.
The crowd thankful this round is nearly over.
Mayhem tries to land a shot to the body but it's blocked.
You Really Want To Hurt blocking some punches.
And thats the end of the round the fighters go back to their corners.
Bryan Mayhem dominated that round.
The cut man is working on Do You Really Want To Hurt's cut.
The fighters get back to their feet, the hooter sounds and we're back to the action!

Mayhem lands with an uppercut that bounces You Really Want To Hurt off the cage and back into range.
We are yet to see a takedown attempt from Mayhem in the fight. On paper you would think he is the more dominant ground fighter so let's see if these unusual tactics pay off.

Mayhem moves into the clinch.
You Really Want To Hurt can't find room to land a body shot as Mayhem controls the action.
A body shot lands from Mayhem.
You Really Want To Hurt can't find room to land a body shot as Mayhem controls the action.
You Really Want To Hurt blocks a couple of punches on the inside.
You Really Want To Hurt lands an uppercut.
Mayhem is leaning against You Really Want To Hurt and scores with a nice uppercut to the body.
Mayhem misses with a hook to the ribs.
Mayhem blocking some punches.
A battle for position here, against the cage.
We've had a slow start to the round here - hopefully the action picks up.
The fighters are going at a pretty good pace and they're both starting to sweat now.
You Really Want To Hurt looking to slow down the pace here.
Mayhem tries a body shot but You Really Want To Hurt blocks it.
Mayhem tries to work over You Really Want To Hurt's body with a swooping hook but it only glances the target.
That's one minute gone in the round.
Mayhem fails to land with a short punch on the inside.
Mayhem swings away with an uppercut that misses.
Bryan Mayhem seems to be working more effectively in the clinch in the fight so far.
You Really Want To Hurt can't find room to land a body shot as Mayhem controls the action.
Mayhem misses with the head strike.
Mayhem scores with a shot to the side of You Really Want To Hurt's head.
A right handed body shot lands from Mayhem.
Mayhem throws a blind hook that connects with the side of You Really Want To Hurts head.
Mayhem tries to land a shot to the body but it's blocked.
Mayhem misses with a punch to the body.
You Really Want To Hurt lands on the inside with an uppercut.
You Really Want To Hurt trying to control the position but instead, Mayhem has worked for underhooks and has pushed You Really Want To Hurt into the cage.
Mayhem can't find room to land a body shot as You Really Want To Hurt controls the action.
You Really Want To Hurt lands a body punch.
A body shot lands from Mayhem.
Both fighters are absolutely exhausted here.
That's two minutes gone in the round.
Mayhem lands a left hand.
A right hook to the body lands for Mayhem.
The step up in weight doesn't seem to be a problem for Mayhem. He's performing admirably here against the bigger man.
Mayhem lands a hook that snaps the head of You Really Want To Hurt backwards.
Mayhem lands a body punch in the clinch.
A short uppercut from Mayhem.
We've seen a great period of action over the last minute or so - credit to both fighters for going all out!
Mayhem working on landing some head shots here - that one got through nicely.
Mayhem lands an uppercut.
Mayhem tries a shoulder strike but it doesn't do any damage.
Mayhem fails to land with a short punch on the inside.
Mayhem working aggressively here.
Mayhem misses with a short punch on the inside.
Mayhem is working You Really Want To Hurt over against the cage.
Mayhem tried to land a shot to the body but connects with You Really Want To Hurt's elbow.
Mayhem tries to land a shot to the body but it's blocked.
The referee is keeping an eye on You Really Want To Hurt - much more stalling and he will separate the fighters.
That's three minutes gone in the round.
You Really Want To Hurt doesn't land with the attempted body shot.
Nice body punch from Mayhem.
You Really Want To Hurt misses with a hook from the clinch.
You Really Want To Hurt trying to stall but Mayhem improves his position.
Mayhem has been the more effective fighter overall so far.
You Really Want To Hurt tries to work over Mayhem's body with a swooping hook but it only glances the target.
Mayhem swings away with an uppercut that misses.
You Really Want To Hurt slowing the pace effectively.
Mayhem gets through You Really Want To Hurt's defenses to land a nice punch to the side of the head.
Mayhem tried to land a shot to the body but connects with You Really Want To Hurt's elbow.
An uppercut on the inside fails to land for You Really Want To Hurt.
You Really Want To Hurt blocks an uppercut.
Mayhem can't find room to land a body shot as You Really Want To Hurt controls the action.
Mayhem fails to land with a short punch on the inside.
Mayhem misses with a hook to the ribs.
That's four minutes gone in the round.
Mayhem lands with a left to the head.
Mayhem tries to throw a body punch but You Really Want To Hurt avoids it by throwing Mayhem back against the cage.
A nice left hand lands by Mayhem.
You Really Want To Hurt wants to stall.
Good anti-grappling being displayed by Mayhem as You Really Want To Hurt tries to tie him up.
Mayhem struggles to land a body shot inside as You Really Want To Hurt controls his hands.
Mayhem swings away with an uppercut that misses.
Mayhem fails to land with a short punch on the inside.
Mayhem lands a body punch in the clinch.
You Really Want To Hurt prevents a body shot from Mayhem.
Mayhem misses with a punch to the body.
Mayhem scores with a hook to the body.
You Really Want To Hurt tries a shoulder strike but it doesn't do any damage.
And thats the end of the round the fighters go back to their corners.
Bryan Mayhem showed his class in that round. I'd imagine he'll take it on all the scorecards.
The cut man is working on Do You Really Want To Hurt's cut.
That's time! Back to the action! This is the final round!

Mayhem moves into the clinch.
Mayhem struggles to land a body shot inside as You Really Want To Hurt controls his hands.
A short right hand to the side of the head by Mayhem.
Mayhem tries a shoulder strike but it doesn't do any damage.
You Really Want To Hurt is trying to slow down the pace in the clinch, to catch his breath.
Mayhem tries a shoulder strike but it doesn't do any damage.
Mayhem doesn't land with the attempted body shot.
Mayhem misses with a punch to the body.
Mayhem throws a head punch that misses.
Mayhem working aggressively here.
We've had a slow start to the round here - hopefully the action picks up.
Mayhem lands a nice shot to the body.
Both fighters are breathing heavily.
Mayhem has a couple of punches blocked by You Really Want To Hurt.
Mayhem doesn't land with the attempted body shot.
Mayhem doesn't land with the attempted body shot.
A short right hand to the side of the head by Mayhem.
That's one minute gone in the round.
You Really Want To Hurt lands with a short shot to the head.
Nice body punch from Mayhem - that landed with a thud.
You Really Want To Hurt is trying to maintain a safe position but Mayhem gets an underhook and turns You Really Want To Hurt into the cage.
Mayhem can't find room to land a body shot as You Really Want To Hurt controls the action.
Mayhem misses with a shot to the kidneys.
Mayhem lands with a short shot to the head.
Mayhem tries to throw a body punch but You Really Want To Hurt avoids it by throwing Mayhem back against the cage.
Mayhem lands a right uppercut that snaps the head of You Really Want To Hurt backwards.
You Really Want To Hurt misses with a body punch.
Mayhem lands a left hand.
Mayhem struggles to land a body shot inside as You Really Want To Hurt controls his hands.
Mayhem misses with a hook to the ribs.
You Really Want To Hurt can't find room to land a body shot as Mayhem controls the action.
Mayhem goes for a body shot but it's blocked.
Mayhem lands with a short head shot on the inside.
That's two minutes gone in the round.
Mayhem goes for a body shot but it's blocked.
You Really Want To Hurt content to slow the pace in the clinch.
A short right hand to the side of the head by Mayhem.
Mayhem lands an uppercut.
Mayhem can't find room to land a body shot as You Really Want To Hurt controls the action.
Mayhem misses with some punches.
The crowd are loving this. Great action here.
A head punch on the inside from You Really Want To Hurt fails to land.
You Really Want To Hurt blocks a body shot from Mayhem.
Mayhem misses with a hook to the ribs.
An uppercut to the body lands inside from You Really Want To Hurt.
Mayhem struggles to land a body shot inside as You Really Want To Hurt controls his hands.
Mayhem misses with a hook to the ribs.
Mayhem struggles to land a body shot inside as You Really Want To Hurt controls his hands.
Mayhem throws a punch but it's blocked by You Really Want To Hurt.
A nice right hand lands inside from Mayhem.
That's three minutes gone in the round.
You Really Want To Hurt leaning against his opponent.
A right handed body shot lands from You Really Want To Hurt.
You Really Want To Hurt tries to work over Mayhem's body with a swooping hook but it only glances the target.
You Really Want To Hurt lands a right hand.
Mayhem tries to land a shot to the body but it's blocked.
You Really Want To Hurt is working hard here but doesn't seem to be able to control effectively, up against the cage.
You Really Want To Hurt is looking to control Mayhem's arms but Mayhem gets an underhook and turns him. Now You Really Want To Hurt has his back to the cage.
Mayhem digs a right hand into You Really Want To Hurt's ribs. Those have got to be taking their toll on You Really Want To Hurt's gas tank.
Mayhem tries a shoulder strike but it doesn't do any damage.
Mayhem lands a body punch.
Mayhem can't find room to land a body shot as You Really Want To Hurt controls the action.
Mayhem lands with a short punch from the clinch.
Mayhem misses with a hook from the clinch.
That's four minutes gone in the round.
Mayhem misses with a shot to the kidneys.
Mayhem lands a left hand that snaps the head of You Really Want To Hurt backwards.
Mayhem misses with a body punch.
You Really Want To Hurt is trying to stall.
Mayhem lands a nice uppercut.
Mayhem working on landing some head shots here - that one got through nicely.
Mayhem misses with some punches.
You Really Want To Hurt takes a shot to the head.
An uppercut on the inside fails to land for Mayhem.
This has been an exciting period of action!
Mayhem swings away with an uppercut that misses.
Mayhem working aggressively here.
Mayhem pushes You Really Want To Hurt back against the cage and lands a hook to the side of the head.

Do You Really Want To Hurt's cut is getting worse.
You Really Want To Hurt tries a body shot but Mayhem blocks it.
Do You Really Want To Hurt has stepped it up - he knows he needs a finish here!
Mayhem tries a body shot but You Really Want To Hurt blocks it.
And that's the end of the fight!
Bryan Mayhem comfortably won the final round on my scorecard.
Well Mayhem has outworked and out performed his opponent in all aspects of the game today. He was simply too good and the decision should be no more than a formality. Over to the ring announcer for the scorecards.
Ladies and gentlemen, after 3 rounds of action, we go to the scorecards for a decision.
Judge Bart Greer scores the fight 27:30
Judge Peter Branson scores the fight 27:30
Judge Michael Johnstone scores the fight 27:30
In favor of your winner, by unanimous decision... Bryan Mayhem!
A relieved looking Bryan Mayhem thanked the fans for their support and gave the usual line about them being amazing. They seemed to believe that he actually meant it.
|
|
|
|
|
|
|
|
|
|
|
|
|
|
|
|
|
|
|
|
|
|
|
| S |
C
A |
G |
S |
C
B |
G |
|
S |
C |
G |
|
energy
A | B |
|
hype
A | B |
|
pop
A | B |
|
mgr
A | B |
|
FIGHT
RATING
43% |
|
|
|
|
|
|

