 |
LEGENDS 4: Carnage PBP Commentary |
Undercard bout
|
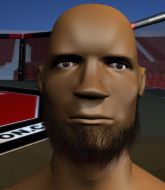
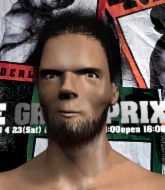
Coming up we have a welterweight MMA rules bout between Paulo Alves (ranked 0 p4p, 0 weight class) and Alberto Rossi (ranked 0 p4p, 0 weight class). The crowd giving both fighters a great reception on their way into the arena. That's good to see.
 |
|
 |
| 178 cm
21
180 lbs
2 - 0 - 0 |
|
176 cm
18
177 lbs
0 - 0 - 0 |
BJJ Brown Belt
Brawler
Self confident |
|
BJJ Blue Belt
Counter striker
Solid chin |
|
| |
|
Ladies and gentlemen. This fight is 3 rounds, in the welterweight division.
Introducing the fighter to my left, fighting out of the red corner.
With a record of
2 - 0 - 0, fighting out of Tokyo, Paulo Alves!
And introducing the fighter to my right, fighting out of the blue corner.
With a record of
0 - 0 - 0, fighting out of Tokyo, Alberto Rossi!
The judges for this bout are Yasuomi Hirokawa, Kenichi Hosakawa and Taro Takaoka.

The bell rings for round one and we are underway!
Alves misses with a takedown attempt. He shot from a bit too far out.
Rossi keeps the fight standing with a nice sprawl.
Alves tries to clinch up.

Rossi closes the distance and clinches.

Rossi jumps guard.
Rossi looking to control.
Rossi looking to sweep here. No luck so far.

Rossi working from the bottom, still in full guard. He's managed to get a loose triangle. Alves doesn't seem to be doing much to defend here, obviously he feels comfortable in the position. Alves manages to throw the legs off his shoulder and he's back into guard - no problem.
Alves trying to control but Rossi is working from the bottom.
Rossi really doesn't want to stay on the ground with Alves. If he can't get it back to his feet, it's only a matter of time before he'll be tapping out.
We've had a slow start to the round here - hopefully the action picks up.
Alves is really struggling to control Rossi but he's trying to hold on to the position.

That's one minute gone in the round.
Rossi looking to control.

The referee has ruled that neither fighter is active enough on the ground and has stood them back up.
Alves shoots in but no luck this time.
That's three failed takedown attempts in the round for Paulo Alves. That's going to take a lot out of him.
Rossi feints and then dives in with a takedown. That was a long way out but the feint bought him enough time to close the distance and complete the takedown. Now we'll play guard for a bit and see who can get the better of that position.
Rossi stands up and looks to throw the legs aside to pass to side control. Alves swivels though and keeps the full guard.
Rossi is trying to land a reversal but Alves doesn't like that idea too much. He pushed the legs to the side and dives into side control. He's managed to grab a loose arm triangle. Alves is tightening it up though! This could be trouble for Rossi! Rossi trying desperately to escape but he's gone limp! He's out! Wooooorld class Brazilian Jiu Jitsu from Alves!
Ladies and gentlemen, after 1:45 of round 1, we have a winner by way of Submission (Arm Triangle). Paulo Alves!
|
|
|
|
|
|
|
|
|
|
|
|
|
|
|
|
|
|
|
|
|
|
|
| S |
C
A |
G |
S |
C
B |
G |
|
S |
C |
G |
|
energy
A | B |
|
hype
A | B |
|
pop
A | B |
|
mgr
A | B |
|
FIGHT
RATING
39% |
|
|
|
|
|
|
|
Undercard bout
|
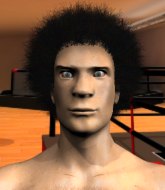
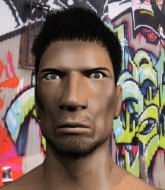
Coming up we have a light heavyweight MMA rules bout between Ace Portgas (ranked 0 p4p, 0 weight class) and Kenichi Uzomaki (ranked 0 p4p, 0 weight class). Kenichi Uzomaki has the better chin. Will he look to stand and bang today?
 |
|
 |
| 188 cm
22
210 lbs
4 - 2 - 0 |
|
190 cm
18
215 lbs
2 - 0 - 0 |
Good takedowns
Brawler
Very quick |
|
BJJ Purple Belt
Basic striking
Granite chin |
|
| |
|
Ladies and gentlemen. This fight is 3 rounds, in the light heavyweight division.
Introducing the fighter to my left, fighting out of the red corner.
With a record of
4 - 2 - 0, fighting out of Tokyo, Ace Portgas!
And introducing the fighter to my right, fighting out of the blue corner.
With a record of
2 - 0 - 0, fighting out of Tokyo, Kenichi Uzomaki!
The judges for this bout are Ren Mimura, Taro Takaoka and Shigeki Sano.
The bell rings for round one and we are underway!
Uzomaki shoots in looking for a takedown. Portgas tries to sprawl out of it but Uzomaki keeps driving through. The fighters are pinned against the ropes. Portgas manages to get underhooks and after a bit of a struggle, circles away and we're back to standing.
Portgas drives through with a takedown into guard.
Portgas trying to control the position from guard on top but Uzomaki is wriggling around, looking for whatever he can.
Portgas has gone for a leg lock! Uzomaki slips out almost immediately though and dives into Portgas's guard.
Portgas looking to sweep here. No luck so far.
Uzomaki trying to control but Portgas is working from the bottom.
Uzomaki avoids a guillotine attempt easily.
Uzomaki trying to control the position from guard on top but Portgas is wriggling around, looking for whatever he can.
Uzomaki forces his way into half guard.
Uzomaki wants to work for an arm triangle but Portgas is really keeping half guard well and defending the submission attempt.
Portgas is looking for a sweep. Uzomaki is wise to his cunning plan and keeps the top position.
That's one minute gone in the round.
Portgas is working hard here to advance position.
Portgas gets back to full guard.
Portgas lands a beautiful switch and he's in full mount! That could spell trouble for Uzomaki!
Uzomaki working to try and regain half guard.
Portgas looking for an armbar but decides to keep the dominant position instead.
The fighters are starting to get a bit slippery now, which will make submissions a bit more difficult.
Uzomaki working to try and regain half guard.
Uzomaki looks gassed!
Portgas is dominating on the ground here - he's now on his opponent's back, looking to sink in the hooks. Uzomaki is in real trouble.

That's two minutes gone in the round.
Uzomaki trying to control but not successfully.
Portgas has both hooks in and is working for a choke. Uzomaki is in real trouble here. Portgas gets an arm under the chin and tightens the submission attempt... is this the end? Yes, Uzomaki is tapping out! Portgas wins by rear naked choke!
Ladies and gentlemen, after 2:26 of round 1, we have a winner by way of Submission (RNC). Ace Portgas!
|
|
|
|
|
|
|
|
|
|
|
|
|
|
|
|
|
|
|
|
|
|
|
| S |
C
A |
G |
S |
C
B |
G |
|
S |
C |
G |
|
energy
A | B |
|
hype
A | B |
|
pop
A | B |
|
mgr
A | B |
|
FIGHT
RATING
56% |
|
|
|
|
|
|
|
Co-main event
|
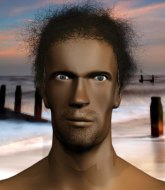
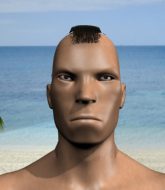
Coming up we have a lightweight MMA rules bout between Jay Smith (ranked 0 p4p, 0 weight class) and Osamu Kawajiri (ranked 0 p4p, 0 weight class). Over to our ring announcer for the fighter introductions!
 |
|
 |
| 185 cm
18
162 lbs
2 - 1 - 0 |
|
171 cm
20
161 lbs
1 - 1 - 0 |
Good wrestling
Brawler
Cuts easily |
|
BJJ Blue Belt
Basic striking
Likes ground |
|
| |
|
Ladies and gentlemen. This fight is 3 rounds, in the lightweight division.
Introducing the fighter to my left, fighting out of the red corner.
With a record of
2 - 1 - 0, fighting out of Tokyo, Jay Smith!
And introducing the fighter to my right, fighting out of the blue corner.
With a record of
1 - 1 - 0, fighting out of Tokyo, Osamu Kawajiri!
The judges for this bout are Shirou Masuda, Taro Takaoka and Sosuke Kotani.
The bell rings for round one and we are underway!
Smith stumbles momentarily as he takes a strong leg kick from Kawajiri.
Smith fails miserably with a takedown attempt.
Smith fakes with an overhand right and moves in to clinch with Kawajiri, pushing him back against the ropes.
Smith tries to jump guard but he falls flat on his backside. Kawajiri smiles and moves away.
Kawajiri avoids a kick to the body.
Kawajiri scores to the head and body with a nice combination!

It looks like Jay Smith has been cut.
Kawajiri gets his takedown attempt stuffed easily
and Smith counters by moving into the clinch.
Smith jumps guard but Kawajiri stands there with Smith around his waist. Smith gives up and drops back to his feet. We remain in the clinch.
That's three failed takedown attempts in the round for Jay Smith. That's going to take a lot out of him.
Smith missing with knees to the body.
Kawajiri lands with a good tight uppercut to the head.
Smith is trying to work for a single leg takedown but Kawajiri pulls him back up using the underhooks.
Kawajiri blocks the elbow strike.
Kawajiri wants to get back to striking at distance but Smith won't allow it.

Kawajiri escapes the clinch and we're back to striking.
Kawajiri closes the distance and lands a one-two.

Smith is rocked!
Ooooh, nice body kick lands from Kawajiri. Smith shrugs it off though.
No joy there for Kawajiri, who threw a few shots but didn't land.
That's one minute gone in the round.
Smith fails to land the takedown.
No joy there for Kawajiri, who threw a few shots but didn't land.
Smith rushes forward with a series of wild hooks but Kawajiri moves out of range and avoids them all easily.
Nice takedown defense from Smith. No joy for Kawajiri on that attempt.
Kawajiri stuffs the takedown.
Kawajiri throws a sloppy head kick and Smith moves out of range easily.
Kawajiri misses with a head kick.
Kawajiri scores with a three punch combo!
Smith looking for a takedown here - he's got it.
The fighters are trapped in the ropes so we're going to have a reposition here. The ref calls for a break and repositions the fighters in the center of the ring.
Smith is breathing heavily.
Smith won't allow Kawajiri to get back to his feet.
Smith is looking to stand up but Kawajiri won't let him.
That's two minutes gone in the round.
Kawajiri looking for a sweep. Not yet Kawajiri, not yet.
Smith will need to keep those long limbs tucked in whilst he's on the ground, to prevent any submissions.
Smith stops Kawajiri from standing up.
Kawajiri tries to land a sweep but no joy.
Smith has decided he wants to stand but the closed guard of Kawajiri is proving hard to escape from.
Kawajiri being controlled here, momentarily.
Well, the referee has seen enough. Neither fighter is active enough on the ground so he's stood them back up.
Smith fails with a takedown attempt from distance.

That's three minutes gone in the round.
Kawajiri looks for a takedown. He's got it. We're now in half guard.
Smith wants to control but Kawajiri is keeping busy and won't allow it.
Smith is looking to improve his position.
Smith trying to hold on to Kawajiri's head to control him but Kawajiri postures up.
Kawajiri missing with some ground and pound from the half guard.

That's four minutes gone in the round.
Kawajiri is working hard to pass the guard. He's done it - he's now in full mount! Trouble for Smith!
Smith keeping his composure momentarily, calmly looking to get back to half guard.
Smith on his back here. We all know that wrestlers don't like being on their back so let's see if Smith tries to get out of the position.
Kawajiri with shots to the head and body - Smith looks very uncomfortable down there.
Kawajiri looking to ground and pound his opponent to a finish here.
Kawajiri has his opponent pinned against the ropes, landing some nasty ground and pound that is really making a bit of a mess out of Smith's face.
Kawajiri can't quite control the action as he would like just now, as Smith is looking to escape.
The crowd applaud the fighters efforts here as the round comes to an end.
Kawajiri landing shots from mount.
And thats the end of the round the fighters go back to their corners.
Osamu Kawajiri dominated that round.
The cut man is working on Jay Smith's cut.
Well, the break between rounds is over. Let's get back to the scrappin!

Smith stuffs the takedown attempt from Kawajiri. Kawajiri gets slowly back to his feet.
Smith shoots in but Kawajiri avoids the takedown attempt easily.
Jay Smith is looking to throw some combinations by the looks of things.
Kawajiri scores with a three punch combo!
Kawajiri misses with a few strikes there.
Kawajiri misses with a takedown attempt. He shot from a bit too far out.
Smith circles away from the clinch attempt
and Smith counters with a shoot takedown into half guard.
Smith looking to pass the half guard. Not this time.
Both fighters are absolutely exhausted here.
Kawajiri is trying to get back to full guard.
That's one minute gone in the round.

Kawajiri kicks Smith off and gets back to his feet.
Kawajiri shoots in for a takedown but doesn't get it.
Jay Smith has stuffed three takedown attempts in the round now. That's going to take a lot out of Osamu Kawajiri.
Smith fakes with an overhand right and moves in to clinch with Kawajiri, pushing him back against the ropes.
Smith is trying to break free.
Smith gets underhooks to prevent Kawajiri's takedown attempt.
Smith tries to break the clinch but Kawajiri is controlling the position.
Kawajiri wants to break free. God knows he wants to breaaaak freeee.
Kawajiri breaks the clinch.
Smith scores with a takedown into Kawajiri's guard.
Smith wants to pass the guard but Kawajiri is keeping the position.
Kawajiri is working an open guard here, looking to improve his position. No doubt that will leave him open to counters but at least he's being more offensive.
That's two minutes gone in the round.
Kawajiri throwing strikes off his back to little effect.
Smith forces his way into half guard.
Kawajiri is refusing to be controlled, as Smith sits in half guard.
Kawajiri is looking for a sweep. Smith is wise to his cunning plan and keeps the top position.
That's three minutes gone in the round.
Smith seems very keen to just sit and control from half guard but Kawajiri does not like that idea so much and is remaining active off his back.
The referee decides to stand the fighters back up.
Kawajiri misses with a half-hearted attempt at a head kick.
Kawajiri tries to grapple but his opponent circles
and Smith counters with a takedown into full mount! That could mean trouble for Kawajiri!
Smith can't quite control the action as he would like just now, as Kawajiri is looking to escape.
Kawajiri bucks up and manages to get a nice reversal! He's in guard on the top - nicely done!
That's four minutes gone in the round.
Smith is trying to control the position from the bottom.
The fighters are tangled up in the ropes here. We might need a restart if the fighters can't break free themselves.
Kawajiri preventing the sweep.
Smith is looking to get back to his feet but can't, whilst Kawajiri is controlling him.
And thats the end of the round the fighters go back to their corners.
Jay Smith dominated that second round.
The cut man is working on Jay Smith's cut.
The fighters get back to their feet, the hooter sounds and we're back to the action! This is the final round!

Kawajiri tries to clinch there but Smith circles away.
Kawajiri blocks a head kick by Smith.
Kawajiri displays some good footwork, moving neatly out of range as Smith throws out the jab.
Smith looks for a takedown here. Will he get it? Kawajiri is fending him off so far but Smith persists. Nope, Kawajiri circles away and we're back to standing.
Osamu Kawajiri seems to be the more aggressive standup fighter in this bout.
Smith takes one on the button.
Smith scores a takedown into full mount!
Smith landing strikes from the mount.
Smith wants to control but Kawajiri has made it back to half guard. Nice work.
Jay Smith overall seems to be getting the better of the ground position in the fight so far.
Smith is tying to control. Kawajiri wants to improve his position but can't escape this time.
That's one minute gone in the round.
Kawajiri gets back to full guard.
Smith is taking a break and basically stalling. The referee will not allow him to do that for long.
Smith stands up from Kawajiri's guard - Smith perhaps looking for a knockout.
Kawajiri looks to score with a combo but nothing lands.
Kawajiri moves out of range as Smith throws a body kick.
No luck for Smith with that takedown attempt.
Smith drives through with a really nice takedown into side control.
That's two minutes gone in the round.
Smith tries to stand but Kawajiri is controlling his head.
Both fighters are breathing heavily.
Kawajiri manages to get one leg in to regain half guard.
Smith prevents Kawajiri from standing back up.
Smith wants to stand up but Kawajiri manages to regain full guard.
Smith has to be careful here, sitting in the guard of a superior BJJ player.
Kawajiri is working the butterfly guard. He manages to land a nice scissor sweep and is now in half guard on the top. Nice move.
That's three minutes gone in the round.
Kawajiri decides he's had enough of the ground and stands up.
Smith blocks the body kick.
Kawajiri scores with a one two! Smith had his feet all tangled up there and couldn't avoid the strikes.
A kick lands to the mid section there for Kawajiri.
Kawajiri throws a series of strikes that have Smith backpedaling.
Smith shoots in for a takedown but doesn't get it.
That's three failed takedown attempts in the round for Jay Smith. That's going to take a lot out of him.
Smith showing good head movement there, avoiding the strikes from Kawajiri.
Smith fails with a takedown attempt from distance.
Kawajiri lands a pitter patter jab to the forehead of his opponent.
That's four minutes gone in the round.
Kawajiri misses with a double jab.
Smith has managed to clinch.
Smith's corner are urging him to control the action in the clinch for a moment, rather than mount any serious offense. I'm sure the crowd appreciate those instructions... not.
Smith wants to strike at distance but he can't break free of the clinch.
Smith jumps into guard, dragging Kawajiri to the mat.
Smith working from the bottom, still in full guard. He's managed to get a loose triangle. Kawajiri doesn't seem to be doing much to defend here, obviously he feels comfortable in the position. Kawajiri manages to throw the legs off his shoulder and he's back into guard - no problem.
Kawajiri trying to control the position from guard on top but Smith is wriggling around, looking for whatever he can.
Smith not looking particularly offensive just at the moment.
And that's the end of the fight!
That was a close round. You could make an argument for either fighter but I would give it to Jay Smith.
I think Smith has won this one but let's see what the judges have to say. Over to the ring announcer for the scorecards.
Ladies and gentlemen, after 3 rounds of action, we go to the scorecards for a decision.
Judge Shirou Masuda scores the fight 29:29
Judge Taro Takaoka scores the fight 29:28
Judge Sosuke Kotani scores the fight 28:29
The fight is ruled a draw!
|
|
|
|
|
|
|
|
|
|
|
|
|
|
|
|
|
|
|
|
|
|
|
| S |
C
A |
G |
S |
C
B |
G |
|
S |
C |
G |
|
energy
A | B |
|
hype
A | B |
|
pop
A | B |
|
mgr
A | B |
|
FIGHT
RATING
63% |
|
|
|
|
|
|
|
Main event
|
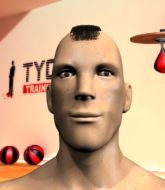
Coming up we have a featherweight MMA rules bout between Jake Jacobson (ranked 0 p4p, 0 weight class) and Jonny Satomi (ranked 0 p4p, 0 weight class). These two fighters really are very evenly matched on the feet - it will be fascinating to see who can assert themselves in that aspect of the fight.
 |
|
 |
| 188 cm
22
150 lbs
4 - 4 - 0 |
|
164 cm
18
152 lbs
0 - 1 - 0 |
BJJ Blue Belt
Good knees
Experienced |
|
BJJ Blue Belt
Brawler
Granite chin |
|
| |
|
Ladies and gentlemen. This fight is 3 rounds, for the featherweight championship of the world!
Introducing the champion to my left, fighting out of the red corner.
With a record of
4 - 4 - 0, fighting out of Tokyo, Jake Jacobson!
And introducing the challenger to my right, fighting out of the blue corner.
With a record of
0 - 1 - 0, fighting out of Tokyo, Jonny Satomi!
The judges for this bout are Yukihiro Yamamoto, Ren Mimura and Shigeki Fujiwara.
The bell rings for round one and we are underway!
Jacobson closes the distance and clinches up with Satomi, looking for a takedown. Jacobson pushes Satomi against the ropes but Satomi circles to the side and manages to break the clinch.
Jacobson ducks low and lands a nice hook to the body of his opponent.
Jacobson gets caught flat footed, as Satomi shoots in with a quick takedown into guard.
Jacobson controls Satomi momentarily but Satomi frees himself.
Satomi trying to control but Jacobson is working from the bottom.
Jacobson is working from a closed guard but he's struggling to control his opponent.
Jacobson manages to sweep nicely, so he's now on top. Satomi manages to get himself to full guard.
Jacobson trying to land body shots but he keeps hitting the mat.
Jacobson working some strikes from top position.
Jacobson throws a big right hand that misses.
Satomi not looking particularly offensive just at the moment.
Jacobson really does look like a pencil wearing a pair of gloves. Let's hope he has a gameplan to suit that ridiculous body shape.
Jacobson throws a big right hand that misses.
Jacobson stands up and looks to throw the legs aside to pass to side control. Satomi swivels though and keeps the full guard.
That's one minute gone in the round.
Jacobson drops back for a leg but he's not going to get it - he lets go and Satomi dives on top into guard.
Satomi must be cautious of submissions here, given that his opponent has the superior Jiu Jitsu.
Jacobson is looking to get back to his feet but can't, whilst Satomi is controlling him.
Jacobson working for a triangle but Satomi defends it easily.
Jacobson keeping moving, preventing Satomi from controlling successfully.
Jacobson has his foot on Satomi's thigh. He's trying to push off and get in position for a triangle, I think. Satomi works his way back into a safe position though.
Jacobson is breathing heavily.
Jacobson wants to sweep here but Satomi controlling him for the moment.
Satomi not doing a lot at the moment. He'll have to show some more aggression or the fight will get stood up.
That's two minutes gone in the round.
Jacobson wants to sweep but no luck.
Jacobson is working hard here to advance position.
Jacobson trying to control the position.
Satomi wants to control from the top but Jacobson keeps moving.
Satomi connects with a couple of short punches.
Jacobson thows some rabbit punches from the bottom but they don't do any damage.
It looks like we're going to have a standup here. Neither fight is doing enough on the ground.
A slapping leg kick lands for Jacobson.
Jacobson plants his feet and lands a nice head kick!
Horrible takedown by Satomi or perhaps it was just good defense by Jacobson which made him look bad.
Jacobson misses with a jab, cross combination.
That's three minutes gone in the round.
Satomi shoots in for a takedown and gets it.
Jacobson is staying active underneath Satomi, who seems content to just control the action from this position.
Jacobson tries to get to full guard but Satomi has control of the leg.
Jacobson trying to control but Satomi postures up.
Jacobson punching from the bottom.
The fighters are tangled up in the ropes here. We might need a restart if the fighters can't break free themselves.
Jacobson gets back to full guard.
Jacobson escapes his hips to the side and looks to be working for an armbar. Satomi gives him a little smile and shakes his head. No chance.
Jacobson looking to hit a scissor sweep but Satomi is one step ahead there.
That's four minutes gone in the round.
Jacobson lands a beautiful switch and he's in full mount! That could spell trouble for Satomi!
Jacobson thowing strikes but they're hitting the gloves, not doing any damage.
Jacobson landing strikes from the mount.
Jacobson is still in mount, landing shots to his trapped opponent. Satomi can't stay in a position like this for much longer.
The crowd applaud the fighters efforts here as the round comes to an end.
Jacobson looking for an armbar but decides to keep the dominant position instead.
This has been an exciting period of action!
Jacobson looking to ground and pound his opponent to a finish here.
And thats the end of the round the fighters go back to their corners.
Jake Jacobson dominated that round.
OK. That's time! The bell goes and we're back to the action.
Nice combo by Jacobson! Oh, that's hurt him - Satomi falls to the canvas and Jacobson follows him into side control.
Satomi is rocked!
It looks like Jonny Satomi has been cut.
Satomi wants to control but Jacobson postures up.
Satomi is still in real trouble! Can Jacobson finish him?
Jacobson tries for a kimura. Not really close to a finish though.
Satomi is trying to escape and get back to his feet.
Satomi seems to have recovered his senses.
Jacobson thinks about going for a far side armbar but bails out and retains the dominant position instead.
Satomi prevents Jacobson from improving position.
Jake Jacobson overall seems to be getting the better of the ground position in the fight so far.
Satomi is positioning himself to get back to half guard.
Jacobson working away.
That's one minute gone in the round.
Satomi is looking to reverse the position.
Jacobson goes for an armbar! This could be all over! Wait, no, Satomi rolls with the submission and now he's on top in Jacobson's guard! Nice work there by Satomi!
Jacobson looking to hit a scissor sweep but Satomi is one step ahead there.
The fighters are trapped in the ropes so we're going to have a reposition here. The ref calls for a break and repositions the fighters in the center of the ring.
Both fighters are absolutely exhausted here.
Satomi trying to control the position from guard on top but Jacobson is wriggling around, looking for whatever he can.
Jacobson looking for submissions from the bottom but instead Satomi passes into half guard.
Satomi has freed up his trapped foot and advances to mount.
That's two minutes gone in the round.
A lull in the action here being met with boos from the crowd.
Jacobson is desperately trying to get back to half guard.
Jacobson wants to hold on but Satomi pushes him away.
Jacobson tries to reverse the position but Satomi maintains control.
Satomi is working close to his opponent, looking to work a submission by the looks of things. Oh, he's managed to get a guillotine from mount as his opponent reached up! That looks tiiiiight! Will he tap? YES, he's tapped! Impressive submission by Satomi!
Ladies and gentlemen, after 2:53 of round 2, we have a winner by way of Submission (Guillotine). Jonny Satomi!
Jonny Satomi is the new featherweight champion!
|
|
|
|
|
|
|
|
|
|
|
|
|
|
|
|
|
|
|
|
|
|
|
| S |
C
A |
G |
S |
C
B |
G |
|
S |
C |
G |
|
energy
A | B |
|
hype
A | B |
|
pop
A | B |
|
mgr
A | B |
|
FIGHT
RATING
75% |
|
|
|
|
|
|
|
|
|
|
