 |
QFC Tournament 406 Round 2 PBP Commentary |
Undercard bout
|
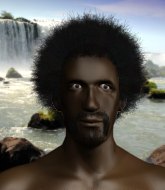
Coming up we have a light heavyweight MMA rules bout between Under Dog The Beast (ranked 0 p4p, 0 weight class) and Nich DiMa (ranked 0 p4p, 0 weight class). Rumors backstage are that the fighters have been paid to keep it standing but we know that would never happen in MMA!
 |
|
 |
| 175 cm
18
195 lbs
1 - 0 - 0 |
|
193 cm
22
215 lbs
1 - 0 - 0 |
BJJ Blue Belt
Brawler
Granite chin |
|
BJJ White Belt
Excellent MT
Heavy handed |
|
| |
|
Ladies and gentlemen. This fight is 3 rounds, in the light heavyweight division.
Introducing the fighter to my left, fighting out of the red corner.
With a record of
1 - 0 - 0, fighting out of Los Angeles, Under Dog The Beast!
And introducing the fighter to my right, fighting out of the blue corner.
With a record of
1 - 0 - 0, fighting out of Los Angeles, Nich DiMa!
The judges for this bout are Don Winkell, Jack Bonds and Frank Antenori.

The bell rings for round one and we are underway!
DiMa misses with a jab, cross combination.
The Beast could do with losing a few pounds - he looks very soft around the mid section, to put it politely.
DiMa lands a straight punch to the body, keeping The Beast at a distance.
DiMa throws a nice looking combination but The Beast bobs and weaves to avoid any damage.
DiMa scores with a sloppy punch to the body. Not much technique there but it did the business.

DiMa gets caught napping as The Beast dives in and scores a takedown. DiMa manages to retain guard.
The Beast is frustrating his opponent with some stalling tactics from top position.
The Beast has controlled the position for a good 20 seconds, which will no doubt be starting to frustrate his opponent.
The Beast trying to control the position from guard on top but DiMa is wriggling around, looking for whatever he can.

Under Dog The Beast has forced the referee to step in and bring the fight back to the feet.
The Beast takes a jab on the nose there. A little bit of blood seems to be coming out. Hopefully that won't affect his breathing.

That's one minute gone in the round.
DiMa throws a nice hook to the body that draws an oooh from the crowd.
The Beast scores with a nice takedown into half guard. Let's see what he's got on the ground.

DiMa manages to create a bit of space in order to work his way back to his feet. The Beast keeps hold of his opponent and drives him back against the cage.
DiMa tries to break the clinch but The Beast is controlling the position.
DiMa throws a punch but it's blocked by The Beast.
DiMa is trying to break free.
DiMa wants to strike at distance but he can't break free of the clinch.
DiMa misses with a hook from the clinch.
The Beast is working on a single leg takedown against the cage. DiMa can't fight it off and eventually The Beast manages to take the fight to the floor. DiMa looks annoyed but at least he's managed to land in guard.
DiMa really doesn't want to stay on the ground with The Beast. If he can't get it back to his feet, it's only a matter of time before he'll be tapping out.
The Beast working in close now, lands a nice elbow to the side of DiMa's head.

That's two minutes gone in the round.
The crowd cheering loudly, showing their appreciation for the quality fight we're seeing here.
The Beast is pushing down on DiMa's leg trying to pass to half guard. DiMa is fighting to maintain full guard but The Beast has managed to sneak the leg through.
DiMa is trying to stand up here but The Beast is controlling him well.

The Beast postures up and decides to stand up, from the half guard. The ref calls for DiMa to stand up.
The Beast shoots in for a takedown and gets it.

The Beast looking for a kimura but he'll have to free his other leg if he wants to finish that. Perhaps he's just using it as a distraction technique.
The Beast passes to full mount!

That's three minutes gone in the round.
DiMa has given up his back, trying to stand up. Not clever.
The Beast looking for the choke from the back.
DiMa looking to stop the rear naked choke attempt by controlling the hands.
The Beast biding his time, looking for the opening.
DiMa looking to stop the rear naked choke attempt by controlling the hands.
DiMa looks winded!

That's four minutes gone in the round.
The Beast just keeping the dominant position. He can't wait too long though, otherwise the referee will stand them back up.
DiMa is trying to get back to his feet but he's not managed it yet.
You know, I was talking to some of our celebrities at ringside tonight and they were split right down the middle on who was going to win this fight.
As the round comes to an end the crowd are showing their appreciation for a great round of action.
The Beast punches DiMa on the ear.
And that�s the end of the round � the fighters go back to their corners.
Under Dog The Beast dominated that round.
That's the end of the round. The referee orders the cornermen out of the cage so we can get back down to business.

DiMa scores with a sloppy right hand. The Beast should have avoided that one.
The Beast throws the overhand right but ducks down into a quick takedown attempt. DiMa was covering up waiting for the punch and The Beast finishes the takedown easily into guard.
The Beast gets to his feet - DiMa follows without any prompting.
DiMa lunges in with swinging rights and lefts but The Beast circles away quickly and effectively.
The Beast missing with a left hand there. DiMa was out of range so wasted energy throwing that one.
The Beast drives through with a takedown into DiMa's guard. Let's see what he can do from the top position.
The Beast wants to control from the top but DiMa keeps moving.
The Beast prevents DiMa from getting back to his feet.
The Beast throws an elbow that misses. DiMa uses the momentum to reverse the position. He's now in The Beast's guard. Nice move by DiMa!
That's one minute gone in the round.
DiMa stands up from The Beast's guard - DiMa perhaps looking for a knockout.
DiMa scores with a jab to the body.
The Beast throws a looping left and ducks down for a takedown. He's got his arms around DiMa's waist but DiMa gets an underhook and avoids the takedown by throwing The Beast off to one side.
DiMa cracks a nice hook into The Beast's ribs.
DiMa connects with a body shot that sends The Beast's belly button to the back.

The Beast closes the distance and clinches.
The Beast jumps into guard, dragging DiMa to the mat.
DiMa would like to get this fight back to the feet but can't get free from the closed guard.
The Beast looking to sweep here. No luck so far.
That's two minutes gone in the round.
The Beast looking to control.
The Beast lands with a heel strike from the guard.
The Beast is trying to control the position from the bottom.
DiMa is looking to stand up but The Beast won't let him.
DiMa must be cautious of submissions here, given that his opponent has the superior Jiu Jitsu.
The Beast lands a decent shot there.
DiMa wants to stand but The Beast is controlling his posture from full guard.
DiMa is breathing heavily.
The fans in attendance giving it up for the two fighters, who have really let it all hang out in the last minute or so!
There's a bit of a scramble here and now The Beast is on top in guard.
DiMa is looking to get back to his feet but can't, whilst The Beast is controlling him.
The Beast advances to half guard.
That's three minutes gone in the round.
The Beast is trying to work for a kimura but DiMa is defending well.
The Beast landing with strikes to the body and head, softening up his opponent.
The Beast performing his best blanket impression for a moment.
DiMa is trying to escape back to his feet but The Beast uses the scramble to pass into side control.
That's four minutes gone in the round.
The Beast decides to stand back up.
The Beast closes the distance and looks for a trip takedown... aaaand he's got it - The Beast lands in his opponent's guard.
The Beast connects with a couple of short punches.
The Beast scores with a decent looking elbow strike.
The crowd cheering loudly, showing their appreciation for the quality fight we're seeing here.
DiMa can't do much from the bottom at the moment, as The Beast controls the pace.
As the round comes to an end the crowd are showing their appreciation for a great round of action.
DiMa has momentary wrist control but The Beast slips an elbow through the middle.
And that�s the end of the round � the fighters go back to their corners.
Under Dog The Beast dominated that second round.
OK. That's time! The bell goes and we're back to the action. This is the final round!

DiMa fakes and then throws a beautiful body shot. The Beast looks a bit winded and takes a step backwards to take a breath.
The fight moves into the clinch position.
DiMa wants to strike at distance but he can't break free of the clinch.
The Beast has moved round to his opponent's back and is looking for a suplex! Oh snap! He's tossed DiMa clear over his head and slammed him to the mat!
DiMa is displaying good submission defense - not really looking in danger of submitting to the rear naked choke at the moment. That could change in an instant of course if The Beast gets his way!
The Beast is persistently looking for the submission but DiMa is defending it well.
The Beast tries to keep control of the position but DiMa is staying busy.
That's one minute gone in the round.
The Beast biding his time, controlling DiMa.
DiMa wants to get back to his feet.
The fighters are pressed up against the cage, both looking to find a bit of space to work.
The Beast lands with a nice looking elbow that stuns DiMa.
The Beast trying to secure his dominant position for a moment - making sure DiMa doesn't escape.
The ref warns both fighters not to hold the cage as they work up against the meshing.
DiMa defends a rear naked choke attempt by controlling one of The Beast's arms.
That's two minutes gone in the round.
DiMa wants to get back to his feet.
It really doesn't seem like the step up in weight is hurting The Beast here at all. He's more than holding his own against the bigger man.
The Beast just keeping the dominant position. He can't wait too long though, otherwise the referee will stand them back up.
DiMa defending nicely against the rear naked choke attempt.
DiMa looking to stop the rear naked choke attempt by controlling the hands.
That's three minutes gone in the round.
The Beast missing with strikes from the back.
DiMa has the hand control, trying to stop the rear naked choke.
The Beast somehow managing to miss with a strike from the back.
The Beast is working for the choke. I would put my money on him to finish from this position. He's rolled onto his back and has dragged DiMa with him. DiMa is trying to defend but The Beast has an arm under the chin now! DiMa grimaces and is forced to tap out!
Ladies and gentlemen, after 3:43 of round 3, we have a winner by way of Submission (RNC). Under Dog The Beast!
|
|
|
|
|
|
|
|
|
|
|
|
|
|
|
|
|
|
|
|
|
|
|
| S |
C
A |
G |
S |
C
B |
G |
|
S |
C |
G |
|
energy
A | B |
|
hype
A | B |
|
pop
A | B |
|
mgr
A | B |
|
FIGHT
RATING
55% |
|
|
|
|
|
|
|
Undercard bout
|
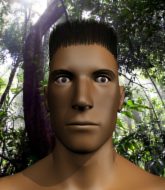
Coming up we have a light heavyweight MMA rules bout between Ceaser Too Tat (ranked 0 p4p, 0 weight class) and Chris Zyb (ranked 0 p4p, 0 weight class). Chris Zyb will no doubt be trying to keep this one on the feet, where he has a distinct advantage.
 |
|
 |
| 195 cm
20
217 lbs
1 - 0 - 0 |
|
178 cm
20
150 lbs
1 - 0 - 0 |
BJJ Purple Belt
Brawler
KO power |
|
BJJ Blue Belt
Brawler
Solid chin |
|
| |
|
Ladies and gentlemen. This fight is 3 rounds, in the light heavyweight division.
Introducing the fighter to my left, fighting out of the red corner.
With a record of
1 - 0 - 0, fighting out of Los Angeles, Ceaser Too Tat!
And introducing the fighter to my right, fighting out of the blue corner.
With a record of
1 - 0 - 0, fighting out of Los Angeles, Chris Zyb!
The judges for this bout are Don Winkell, and Jack Bonds.
The bell rings for round one and we are underway!
Too Tat throws a head kick but Zyb moves out of range.
Too Tat closes the distance and clinches up, looking for a takedown. He shifts his weight and gets a nice trip into half guard.
Zyb is looking for a sweep. Too Tat is wise to his cunning plan and keeps the top position.
Too Tat missing with some ground and pound from the half guard.
Zyb is looking to improve his position.
Too Tat content to sit in half guard and control for a moment.
Zyb wants to get back to his feet.
Too Tat not landing any meaningful shots this time.
Too Tat missing with the ground and pound from half guard.
That's one minute gone in the round.
Too Tat is just sitting in half guard, waiting for something to happen.
The ref stands the fighters back up. Ceaser Too Tat wasn't doing enough on the ground.
Zyb looking to throw a kick but he's pulled out of it.
Too Tat throws a loose over hand right and dives in with a double leg takedown. Zyb tries to sprawl but it's too late and the fighters hit the mat. Too Tat is in Zyb's guard.
Zyb working a defensive guard here.
Too Tat throws a big elbow that misses.
Too Tat advances position into side control!
That's two minutes gone in the round.
Too Tat stands up and we're back to a striking position.
Too Tat uses good footwork to avoid the strikes from Zyb.
Too Tat shoots in and gets a takedown into Zyb's guard.
The fans in attendance giving it up for the two fighters, who have really let it all hang out in the last minute or so!
Too Tat throwing strikes but missing.
Too Tat trying to pass the guard but can't manage it just yet.
Zyb is working an open guard so Too Tat takes the opportunity to get back to his feet.
Too Tat takes one to the chin there.
Nice takedown defense from Zyb. No joy for Too Tat on that attempt.
That's three minutes gone in the round.
Too Tat takes a step back and watches a body kick go sailing past his mid section.
Too Tat looks to land a body kick but Zyb moved away.
A nice leg kick lands there from Zyb.
Zyb misses with a jab and misses with a cross straight after too.
Zyb scores with a straight right hand, right through his opponent's guard.
Too Tat throws the overhand right but ducks down into a quick takedown attempt. Zyb was covering up waiting for the punch and Too Tat finishes the takedown easily into guard.
Too Tat is breathing heavily.
Zyb wants to control but Too Tat passes easily into half guard.
Too Tat seems content to maintain position for now, rather than mounting any offense.
The ref warns both fighters not to hold the cage as they work up against the meshing.
That's four minutes gone in the round.
Zyb wants to get back to full guard.
Too Tat blocks the strikes from Zyb.
The fighters are pressed up against the cage, both looking to find a bit of space to work.
The fighters are starting to perspire pretty heavily.
Zyb keeping his head moving to avoid the ground and pound.
Too Tat seems very keen to just sit and control from half guard but Zyb does not like that idea so much and is remaining active off his back.
The crowd are loving this. Great action here.
As the round comes to an end the crowd are showing their appreciation for a great round of action.
Too Tat working some ground and pound from close in. He's looking to maintain this position and strike for a while by the looks of things... although he'll probably advance to full mount in a minute now I've said that.
Zyb avoiding damage under a succession of punches from Too Tat.
Too Tat will need to keep those long limbs tucked in whilst he's on the ground, to prevent any submissions.
Too Tat is sneakily working for an arm triangle but Zyb sees it coming and defends easily.
And that�s the end of the round � the fighters go back to their corners.
Ceaser Too Tat dominated that round.
OK. That's time! The bell goes and we're back to the action.
Zyb throws a body kick despite being completely out of range
and Too Tat counters with a nice single leg takedown and he's in Zyb's guard now.
Zyb has control of Too Tat's left arm, preventing Too Tat from doing any damage.
Zyb keeping moving, preventing Too Tat from controlling successfully.
Too Tat prevents Zyb from getting back to his feet.
Zyb working a defensive guard here.
Too Tat's corner is telling him to maintain position.
The ref stands the fighters back up. Ceaser Too Tat wasn't doing enough on the ground.
Zyb pulls out of a head kick attempt.
Too Tat moves into the clinch successfully.
That's one minute gone in the round.

Too Tat breaks the clinch and we're back to striking at distance.
Too Tat looks frustrated there after his takedown attempt is stuffed easily.
Zyb keeps the fight standing with a nice sprawl.
Zyb throws a head kick but Too Tat moves out of range.
Zyb misses with an attempted mid kick.
Zyb misses with a looping right.
Too Tat stumbles momentarily as he takes a strong leg kick from Zyb.
Zyb throws a wild combination but nothing lands.
Like a baseball bat into the meat of his leg there - nice leg kick by Zyb.
A bone on bone clash there as Too Tat blocks the leg kick.
Zyb tries to score with a leg kick but it misses it's target.
That's two minutes gone in the round.
A slapping leg kick lands for Zyb.
Too Tat closes the distance and pushes Zyb back into the cage.
Too Tat drops to a knee looking for a takedown but Zyb gets the underhooks and prevents it.
That's three failed takedown attempts in the round for Ceaser Too Tat. That's going to take a lot out of him.
Both fighters are absolutely exhausted here.
Zyb wants to break the clinch but can't.
Too Tat is struggling to control the position.
Too Tat tries to pull guard but Zyb holds him up against the cage and eventually Too Tat drops back down to his feet.
Too Tat tries to pull guard but can't drag his opponent to the mat. Zyb just stands there and leans against the cage.
This is a great period of action - very entertaining stuff!
Too Tat tries to pull guard but Zyb won't allow it.
That's three minutes gone in the round.
Zyb trying to land knees to the body.

Zyb breaks the clinch and we return to the middle of the mat.
Ceaser Too Tat is looking to throw some combinations by the looks of things.
Zyb is moving around nicely and scores here with a single head shot.
Zyb misses with a body kick.
An inside leg kick lands from Zyb.
Zyb with a jab.
Zyb misses with a body kick.
Too Tat moves out of range of the body kick from Zyb.
Too Tat goes for a spinning back kick but it misses.
Zyb goes for a spinning back kick but it misses.
Zyb turns his hip over beautifully as he lands a nice leg kick.
Zyb looking to throw a kick but he's pulled out of it.
Zyb works his jab well there, keeping his opponent at a distance.
That's four minutes gone in the round.
Zyb tries a head kick but it misses.
Zyb ducks low and lands a nice hook to the body of his opponent.
Wooooo! Give it up for these two warriors! They are putting on a show!
Zyb scores with a leg kick.
Zyb misses with an attempted mid kick.
Zyb avoids the head kick by Too Tat.
A solid leg kick lands there for Zyb.
Too Tat throws a head kick but Zyb moves out of range.
Too Tat is hobbling a little on that front leg after taking quite a few leg kicks so far in this fight.
Crunch! Zyb slams his shin into Too Tat's torso.
Zyb scores with a kick to the midsection.
Zyb scores to the head and body with a nice combination!
As the round comes to an end the crowd are showing their appreciation for a great round of action.
Ooooh, nice body kick lands from Zyb. Too Tat shrugs it off though.
A nice leg kick lands there from Zyb.
Too Tat walks forward, straight into a front kick from Zyb.
And that�s the end of the round � the fighters go back to their corners.
Chris Zyb showed his class in that round. I'd imagine he'll take it on all the scorecards.
The minute break is over - no more time for sponges and pep talks - back to the action! This is the final round!
A right-left combo lands from Zyb.
Too Tat throws a sloppy head kick and Zyb moves out of range easily.
Too Tat has his front leg slapped to the side - a nice low kick landing there from Zyb.
Zyb lands a powerful looking uppercut that connected with his opponent's jaw.
Too Tat gets a takedown into half guard.
Too Tat has been looking to land a fair amount of strikes on the ground. He might be looking to soften his opponent up in order to work for a submission.
Zyb is trying to control but can't.
Too Tat is trying to control the action in half guard but Zyb is working away on the bottom, looking perhaps to get back to full guard.
Both fighters are breathing heavily.
Zyb wants to get back to full guard.
That's one minute gone in the round.
Too Tat wants to lay and pray for a moment but Zyb keeps working.
The referee is asking the fighters to pick up the pace.
The referee decides to stand the fighters back up, due to lack of activity on the part of Ceaser Too Tat.
Zyb throws a body kick that digs right into the meat.
Zyb showing good head movement there, avoiding the strikes from Too Tat.
Zyb tries to shoot in for a takedown. He's got hold of a leg but Too Tat swivels and escapes.
Zyb misses with a head kick.
Too Tat misses with a kick to the body.
Too Tat shoots in for a takedown! He's got it and he's managed to land in side control! That's better than Too Tat was expecting from the takedown attempt, I'm sure!
Zyb is looking to reverse the position.
That's two minutes gone in the round.
Too Tat is maintaining the dominant position - no doubt Zyb will start to get frustrated soon if he's not already.
Too Tat throws a knee to the body but it doesn't do much damage.
Zyb prevents Too Tat from improving position.
Zyb is looking to reverse the position.
Too Tat trying to control the position but Zyb is working away.
That's three minutes gone in the round.
Too Tat takes a little break here. Zyb wants to take advantage but he is being controlled well.
The referee decides to stand the fighters back up, due to lack of activity on the part of Ceaser Too Tat.
Zyb lands with a straight right. Too Tat didn't see that one coming.
Too Tat moves out of range as Zyb throws a body kick.
Too Tat tries to close the distance and clinch up against the cage but Zyb paws at him with a jab and circles away.
Too Tat throws a looping left and ducks down for a takedown. He's got his arms around Zyb's waist but Zyb gets an underhook and avoids the takedown by throwing Too Tat off to one side.
Zyb lands a high kick!
Zyb looks to score with a combo but nothing lands.
Zyb lands a leg kick that knocks Too Tat off balance momentarily.
Zyb does a little shimmy and throws a leg kick. The leg kick missed by a considerable margin though, making him look a little bit silly for doing the shimmy.
That's four minutes gone in the round.
Zyb shoots in for a takedown. "I don't think so" says Too Tat as he avoids it easily.
Too Tat is looking to land body kicks.
Too Tat shoots in and scores a nice double leg takedown into half guard.
Too Tat decides to stand and escape the position.
The fans in attendance giving it up for the two fighters, who have really let it all hang out in the last minute or so!
Too Tat tries to close the distance and clinch up but Zyb swats him away and circles back towards the center.
As the round comes to an end the crowd are showing their appreciation for a great round of action.
Zyb throws a right and a left that Too Tat avoids nicely.
Too Tat fails in his attempt to clinch.
That's a knee to de groin and it's over and out! Too Tat crumples to the ground after an illegal strike from Zyb - the referee stops the clock and Too Tat gets 5 minutes to recover from that one. "I'm sorry" says Zyb. Too Tat manages to get back to his feet and the fight resumes.
And that's the end of the fight!
That was a close round. You could make an argument for either fighter but I would give it to Ceaser Too Tat.
I think Too Tat has won this one but let's see what the judges have to say. Over to the ring announcer for the scorecards.
Ladies and gentlemen, after 3 rounds of action, we go to the scorecards for a decision.
Judge Don Winkell scores the fight for Ceaser Too Tat!
Judge Percy O'Donnell scores the fight for Ceaser Too Tat!
Judge Jack Bonds scores the fight for Chris Zyb!
Ceaser Too Tat wins by split decision!
|
|
|
|
|
|
|
|
|
|
|
|
|
|
|
|
|
|
|
|
|
|
|
| S |
C
A |
G |
S |
C
B |
G |
|
S |
C |
G |
|
energy
A | B |
|
hype
A | B |
|
pop
A | B |
|
mgr
A | B |
|
FIGHT
RATING
64% |
|
|
|
|
|
|
|
Co-main event
|
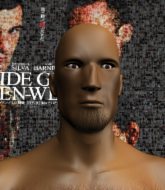
Coming up we have a light heavyweight MMA rules bout between Josh Wofford (ranked 0 p4p, 0 weight class) and Sean Asap (ranked 0 p4p, 0 weight class). Josh Wofford has the better chin. Will he look to stand and bang today?
 |
|
 |
| 177 cm
22
155 lbs
1 - 0 - 0 |
|
188 cm
22
209 lbs
1 - 0 - 0 |
BJJ Blue Belt
Brawler
Intelligent |
|
BJJ White Belt
Decent boxing
Powerful |
|
| |
|
Ladies and gentlemen. This fight is 3 rounds, in the light heavyweight division.
Introducing the fighter to my left, fighting out of the red corner.
With a record of
1 - 0 - 0, fighting out of Los Angeles, Josh Wofford!
And introducing the fighter to my right, fighting out of the blue corner.
With a record of
1 - 0 - 0, fighting out of Los Angeles, Sean Asap!
The judges for this bout are Don Winkell, Frank Antenori and Jack Bonds.
The bell rings for round one and we are underway!

Asap darts in and clinches Wofford up against the cage.
Asap is stalling here. The referee will be looking to step in if he doesn't pick up the pace.
Asap lands with a short punch from the clinch.
Wofford tries to break the clinch but Asap is controlling the position.
Asap effectively controlling the action here.

Asap drops Wofford onto one knee with a big uppercut from the clinch! Wofford is propped up by the cage and works his way back to his feet!

Wofford is rocked!
The fans in attendance giving it up for the two fighters, who have really let it all hang out in the last minute or so!
Asap creates some distance for himselfand unleashes a massive uppercut that sends Wofford's eyes rolling into the back of his head! Wofford drops to his knees and Asap pours it on with more strikes until the referee steps in to end the bout!
Ladies and gentlemen, after 0:36 of round 1, we have a winner by way of TKO (Strikes). Sean Asap!
An out of breath Sean Asap thanked his loyal fans in his post fight interview, giving them credit for his success over the course of his career.
|
|
|
|
|
|
|
|
|
|
|
|
|
|
|
|
|
|
|
|
|
|
|
| S |
C
A |
G |
S |
C
B |
G |
|
S |
C |
G |
|
energy
A | B |
|
hype
A | B |
|
pop
A | B |
|
mgr
A | B |
|
FIGHT
RATING
100% |
|
|
|
|
|
|
|
Main event
|
Coming up we have a light heavyweight MMA rules bout between Lal Umkenga (ranked 0 p4p, 0 weight class) and Jason Klein (ranked 0 p4p, 0 weight class). Jason Klein is the more experienced fighter, so let's see if that makes a difference tonight.
 |
|
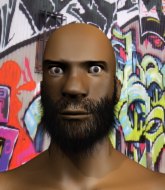 |
| 190 cm
22
212 lbs
1 - 0 - 0 |
|
193 cm
22
210 lbs
1 - 0 - 0 |
Good takedowns
Brawler
Big heart |
|
Good takedowns
Counter fighter
Tends to cut |
|
| |
|
Ladies and gentlemen. This fight is 3 rounds, in the light heavyweight division.
Introducing the fighter to my left, fighting out of the red corner.
With a record of
1 - 0 - 0, fighting out of Los Angeles, Lal Umkenga!
And introducing the fighter to my right, fighting out of the blue corner.
With a record of
1 - 0 - 0, fighting out of Los Angeles, Jason Klein!
The judges for this bout are Jack Bonds, Don Winkell and Frank Antenori.
The bell rings for round one and we are underway!
Umkenga fails with the takedown

and Klein counters with a nice double leg into side control. Umkenga won't be happy with that.
Umkenga is not content to let Klein control the position.
Umkenga is trying to escape and get back to his feet.
Klein is staying tight to Umkenga's torso, preventing him from escaping.
Umkenga is trying to buck Klein off.
Klein advances to mount.

Klein looking to secure an arm triangle but Umkenga defends it well.
Klein lands with some vicious ground and pound - can Umkenga hang on?
We've seen a great period of action over the last minute or so - credit to both fighters for going all out!
Umkenga really trying hard to get back to half guard here.
That's one minute gone in the round.
Klein is in full mount, looking to secure a guillotine but Umkenga is surviving well by controlling Klein's body position as best he can.
The ref warns both fighters not to hold the cage as they work up against the meshing.
Umkenga is trying desperately to improve position.
Klein takes a little breather and maintains the position. The referee will be looking for him to stay active from such a dominant position though.
Klein landing punches.
Umkenga working to try and regain half guard.
Both fighters really going for it on the ground here!
Klein pausing momentarily but resumes with a couple of decent strikes that do a bit of damage.
Umkenga is trying to stand up.
Klein with the ground and pound from mount.
This has been an exciting period of action!
Klein wants to finish this one by submission but Umkenga is holding onto his waist, trying to prevent any attacks from Klein.
Umkenga is working to get back to half guard.
That's two minutes gone in the round.
Klein is in full mount, looking to secure a guillotine but Umkenga is surviving well by controlling Klein's body position as best he can.
Umkenga is trying to stand up.
Klein trying to control but Umkenga is having none of it.
Klein has the superior BJJ but he's also working some ground strikes into his gameplan.
Klein is landing with some decent strikes but Umkenga is trying to advance his position so the referee is letting the fight continue.
Umkenga squirming around on the bottom, looking to escape.
Umkenga is breathing heavily.
Umkenga is looking to improve his position but Klein isn't that keen on the idea.
Umkenga is trying to reverse the position but instead Klein has taken his back - oops!
Watch the back of the head! Comes the shout from the referee towards Klein.
Klein is looking for the choke from the back position but Umkenga is controlling his hands well.
Klein is controlling his opponent, waiting for an opportunity to finish.
That's three minutes gone in the round.
Umkenga fending off the submission attempt from Klein.
Umkenga is defending well here and trying to improve his position.
Klein softening up his opponent with strikes here.
Klein wants to control but Umkenga is keeping busy.
Umkenga breaks Klein's hooks off and manages to turn into his guard.
Klein working the defensive guard well to avoid strikes from Umkenga.
Klein bucks up whilst keeping hold of a body lock, managing to reverse the position. Now he's in top in Umkenga's guard.
This has been an exciting period of action!
Klein passes easily into side control. Nice work.
Klein working the ground and pound from side control.
Klein wants to control but Umkenga is keeping him busy.
That's four minutes gone in the round.
Klein works to advance to full mount. Umkenga defends for a few seconds but eventually he succumbs.
Klein is in full mount, looking to secure a guillotine but Umkenga is surviving well by controlling Klein's body position as best he can.
Umkenga keeping his composure momentarily, calmly looking to get back to half guard.
Umkenga is controlling an arm, preventing Klein from taking his back. Although keeping him in mount is no better to be honest.
Klein putting on the heat here with some good ground and pound!
Umkenga is trying to escape the mount.
The crowd are going absolutely nuts as the round comes to an end - what a fantastic round of action!
Klein pausing momentarily but resumes with a couple of decent strikes that do a bit of damage.
And that�s the end of the round � the fighters go back to their corners.
Jason Klein dominated that round.
The corners get their ten second warning. Both fighters stand from their stools and stare eachother down, ready to get back to the action.
Umkenga with a poor takedown
and Klein counters with a single leg into guard. Umkenga didn't expect that.
Klein trying to control the position from guard on top but Umkenga is wriggling around, looking for whatever he can.
Umkenga is throwing his legs up, looking for submissions. Klein is aware though and is defending well.
Klein scores with a decent looking elbow strike.
Umkenga has managed to work for a loose triangle. I think Klein should be able to defend this one pretty easily though. Oh, Umkenga has tightened it up now! Klein should have reacted faster there - he's in big trouble and yes, he's tapped out! This one is all over!
Ladies and gentlemen, after 0:46 of round 2, we have a winner by way of Submission (Triangle). Lal Umkenga!
|
|
|
|
|
|
|
|
|
|
|
|
|
|
|
|
|
|
|
|
|
|
|
| S |
C
A |
G |
S |
C
B |
G |
|
S |
C |
G |
|
energy
A | B |
|
hype
A | B |
|
pop
A | B |
|
mgr
A | B |
|
FIGHT
RATING
100% |
|
|
|
|
|
|
|
|
|
|
