|
TWGC 37 (155lbs, D1): Los Angeles Qualifier - Round 2 PBP Commentary |
Co-main event
|
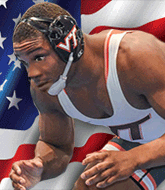
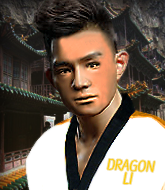
This TWGC bout is 1 fifteen minute round in the lightweight division. Introducing today's competitors. In the red corner, competing out of Montreal, with a TWGC record of 12 wins and 7 losses; Jackson Ramirez! And in the blue corner, fighting out of Las Vegas, with a TWGC record of 8 wins and 8 losses; Dragon Li Chai!
The judges for this bout are Don Winkell, Frank Antenori and Percy O'Donnell.
The fighters connect hands in the middle of the mat and we are under way.
Chai shoots in looking for a takedown but Ramirez manages to keep the fight standing, pushing Chai's face into the canvas for good measure before circling away.
Ramirez feinted with a counter takedown.#TD#
Ramirez feints and as Chai raises his hands in defense, Ramirez changes levels and drives through with a takedown into guard. Score +2 for takedown into guard / half guard: Ramirez (2) vs (0) Chai
Ramirez wants to control from the top but Chai keeps moving.
Chai is controlling Ramirez's posture.
Ramirez wants to pass the guard but Chai is keeping the position.
Chai is trying to keep Ramirez in close.
We've had a slow start to the round here - hopefully the action picks up.#SUB2#
Chai looking for submissions off his back, moving his hips, looking for an opening.
Chai keeping moving, preventing Ramirez from controlling successfully.
Chai controls Ramirez momentarily but Ramirez frees himself. #T1#
Chai being controlled here, momentarily.
Chai working a defensive guard here.
Ramirez trying to control but Chai is working from the bottom.
Chai pulls Ramirez in close to prevent any damage. #T2#
Chai is trying to control the position from the bottom.
Ramirez trying to control the position from guard on top but Chai is wriggling around, looking for whatever he can. #SUB2#
Chai is working actively off his back, looking to secure an arm or perhaps work for a triangle.
Ramirez is in a tricky position. We've heard reports from his gym mates at Canucks Combat Club that he's been drilling escapes, so let's see if he can get back to his feet.
Chai looking for a sweep. Not yet Chai, not yet.
Ramirez controlling from the guard. I say controlling but really, he's stalling. #T3#
Ramirez trying to control the position from guard on top but Chai is wriggling around, looking for whatever he can.
Chai has a closed guard, preventing anything of note from happening. Perhaps he's looking to stall.
Ramirez sitting in guard, not really doing much. #SUB2#
Chai looking for submissions from the bottom here. Moving his hips around, possibly looking for an armbar.
Chai is adopting a defensive guard.
The fighters are pressed up against the cage, both looking to find a bit of space to work.#T4#
Ramirez's corner is telling him to maintain position.
Ramirez passes Chai's right leg, so he's now in half guard.
Ramirez seems very keen to just sit and control from half guard but Chai does not like that idea so much and is remaining active off his back.
Ramirez perhaps working for something from half guard, or maybe not. It looks like he's just sitting there. #SUB#
Ramirez is looking for a kimura but he's never going to get it from there.
Ramirez trying to control the action but Chai is working from the bottom.
Ramirez trying to mount his opponent but Chai defends it. #T5##SUB2#
Chai looking for submissions off his back.
Ramirez wants to pass to mount but Chai is defending the position. #SUB2#
Chai looking to work for a kimura from the bottom.
Chai is staying active underneath Ramirez, who seems content to just control the action from this position.
Ramirez content to sit in half guard and control for a moment. #T6##SUB#
Ramirez is looking for a kimura. It's going to be difficult to finish that from half guard though and Chai defends it well.
Chai trying to hold on to Ramirez's head to control him but Ramirez postures up.
The fighters are battling for position here. Chai manages to regain full guard. Nice work.
Chai is working from a closed guard but he's struggling to control his opponent.
Ramirez trying to pass the guard but can't manage it just yet.
Chai is trying to control the position from the bottom.
#T7#
Chai keeping moving, preventing Ramirez from controlling successfully.
Chai wants to control here, rather than go for any submissions from the bottom. At least for now.
Chai is trying to control the position from the bottom.
Ramirez trying to control the position from guard on top but Chai is wriggling around, looking for whatever he can. #T8##SUB2#
Chai looking for submissions from the bottom but instead Ramirez passes into half guard.
Chai gets back to full guard.
Ramirez controls from within his opponent's guard.
Chai is trying to control the position from the bottom.
#T9#
Ramirez stays in close to Chai's body and controls the position.
Ramirez wants to control from the top but Chai keeps moving.
Ramirez pressing down on his opponent's thigh, looking to pass guard. Chai is keeping the position for now.
Ramirez trying to control but Chai is working from the bottom.
Ramirez postures up.
#T10#
Ramirez looking to pass the guard.
Chai trying to keep a closed guard but Ramirez is proving a slippery customer.
Chai keeping full guard, as Ramirez tries to pass.
Ramirez won't allow Chai to sweep him here.
Chai keeping moving, preventing Ramirez from controlling successfully.
Ramirez stands up and looks to throw the legs aside to pass to side control. Chai swivels though and keeps the full guard. #T11#
Chai tries to land a sweep but no joy.
Chai working a defensive guard but Ramirez manages to pass into side control anyway.
Score +3 for passing guard: Ramirez (5) vs (0) Chai
Chai tries to bench press Ramirez off him but Ramirez keeps the position.
Ramirez trying to control the action but Chai is working from the bottom.
Chai is positioning himself to get back to half guard. #T12#
A bit of a lull in the action. I'm sure it will pick up again soon... even if the ref has to physically pick them up and put them back on their feet. #SUB#
Ramirez wants to work for a kimura but he's foiled early by Chai, who protects the arm well.
The ref warns both fighters not to hold the cage as they work up against the meshing.#SUB#
Ramirez swings around for an armbar but Chai sees it coming a mile off and turns beautifully into Ramirez's guard. Score +2 for sweep to guard / half guard: Ramirez (5) vs (2) Chai
Chai passes Ramirez's left leg - he's now in half guard.
My spies in Rollins Fitness inform me that Chai has been getting involved in the gym's BJJ sparring sessions. Let's see whether that pays dividends!
Ramirez tries to roll over but Chai keeps him under control.
Ramirez manages to get to full guard.
#T13##SUB#
Ramirez had isolated an arm as going for a kimura. Chai defends it easily.
Chai tries to free his leg and advance position but Ramirez is retaining full guard.
Ramirez keeping moving, preventing Chai from controlling successfully. #SUB#
Ramirez had isolated an arm as going for a kimura. Chai defends it easily.
Chai slows down the pace of the fight for a moment. He'll need to remain active if he doesn't want to see the fight stood back up. #T14#
Chai preventing the sweep.
Chai trying to control the position from guard on top but Ramirez is wriggling around, looking for whatever he can.
Chai won't allow Ramirez to sweep him here.
Ramirez controlling the position.
Chai wants to pass the guard but Ramirez is keeping the position.
Boooooooooooooooooooo!!! God, this has been a terrible round. Come on you two, sort yourselves out!
Ramirez trying to control the position.
And that's the end of the fight!
Ramirez takes the fight on points by 5 to 2.
Jackson Ramirez made sure to mention his sponsor, PWNAGE Elite - $25 Tees in his post fight interview. |
|
|
|
Main event
|
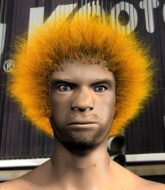
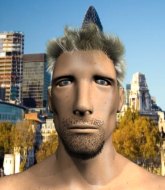
This TWGC bout is 1 fifteen minute round in the lightweight division. Introducing today's competitors. In the red corner, competing out of Los Angeles, with a TWGC record of 1 wins and 0 losses; Conor Larkin! And in the blue corner, fighting out of Montreal, with a TWGC record of 9 wins and 4 losses; Rene Neri!
The judges for this bout are Percy O'Donnell, Don Winkell and Timothy Bukovac.
Let's get this grappling contest under way! Who will be victorious?
Larkin shoots in for a takedown. He's persisting with it as Neri sprawls well. Neri wins this battle and keeps the fight standing. Larkin gets slowly back to his feet.
Larkin has been talking about how he's improved his wrestling in the run up to the fight so let's see if that's enough to sway the balance.#TD#
Larkin dives in and scores a takedown into Neri's guard. Score +2 for takedown into guard / half guard: Larkin (2) vs (0) Neri#SUB2#
Neri is looking for a triangle here but Larkin uses the submission attempt to pass into side control.
Score +3 for passing guard: Larkin (5) vs (0) Neri
The ref warns both fighters not to hold the cage as they work up against the meshing.
Larkin working away.
We've had a slow start to the round here - hopefully the action picks up.
Neri is trying to avoid being dragged into an even worse position than he's already in but Larkin is staying active.
Neri tries to bench press Larkin off him but Larkin keeps the position. #T1#
Neri is still trying to improve position.
Larkin controlling from side mount.
Neri has found himself in a tricky position here. He's been working his transitions in training so let's see if he can work his way out of it.
Larkin trying to control the position but Neri is working away. #T2#
Larkin taking a breather here.
Neri prevents Larkin from moving into mount.
A lull in the action here.
Larkin working away.
Larkin controlling the position from side mount. #T3#
Neri can't do much from the bottom here.
Neri is sneaking out the side here. He's bucked Larkin off and has taken his back! Score +4 for clean sweep to past guard: Larkin (5) vs (4) Neri
The fighters are starting to get a bit slippery now, which will make submissions a bit more difficult.
Larkin can't escape the position.
Neri looking to hold on to the position here but Larkin rolls and ends up regaining guard.
Larkin bucks up whilst keeping hold of a body lock, managing to reverse the position. Now he's in top in Neri's guard. Score +2 for sweep to guard / half guard: Larkin (7) vs (4) Neri
Neri wants to control but instead he gets his guard passed and Larkin is now in half guard. #T4#
Larkin looks over to his corner - he wants some instructions but his corner are not responding.
Neri wants to improve his position but Larkin is controlling well.
Larkin content to control rather than advance.
Neri keeping control of the leg, stopping his opponent passing to mount.
Neri wants to control but Larkin passes into side.
Score +3 for passing guard: Larkin (10) vs (4) Neri#T5#
Neri is trying to get back to half guard.
A bit of a lull in the action. I'm sure it will pick up again soon... even if the ref has to physically pick them up and put them back on their feet.
Neri tries to get back to half guard but can't.
Neri trying to remain calm as Larkin controls from the top position.#T6#
Neri manages to land a sweep and he's now on top! Lovely Jiu Jitsu! Score +2 for sweep to guard / half guard: Larkin (10) vs (6) Neri
Larkin is looking to improve his position.
#SUB#
Larkin looking for submissions from an awkward position here.
Larkin wants to control but Neri is keeping busy.
Neri uses his free foot to push down on Larkin's thigh. Eventually he works his other foot free and he's advanced to mount - this is trouble for Larkin. Score +3 for passing guard: Larkin (10) vs (9) Neri
Neri can't quite control the action as he would like just now, as Larkin is looking to escape.
Larkin keeping his composure momentarily, calmly looking to get back to half guard.
#T7#
Larkin is writhing around trying to get back to his feet.
Larkin is looking to improve his position but Neri isn't that keen on the idea.
Neri controlling the position easily from mount.
Neri trying to control but he's not successful this time. #T8#
Larkin tries to lock up and control but Neri gives him a forearm to the face and pushes him away.
Neri trying to control but he's not successful this time.
Larkin is working to get back to half guard.
Larkin gets back to half guard.
Larkin wants to control but Neri is keeping busy.
#SUB#
Larkin looking for submissions from an awkward position here.
Larkin gets back to full guard.
Larkin will need to keep those long limbs tucked in whilst he's on the ground, to prevent any submissions.#T9#
Neri wants to control from the top but Larkin keeps moving. #SUB#
Neri avoids a guillotine attempt easily.
Larkin is working from a closed guard but he's struggling to control his opponent.
Neri stands up and looks to throw the legs aside to pass to side control. Larkin swivels though and keeps the full guard.
Neri must be cautious of submissions here, given that his opponent has the superior Jiu Jitsu.
Larkin wants to control but instead he gets his guard passed and Neri is now in half guard. #T10#
Neri works his foot free and advances to mount. Score +3 for passing guard: Larkin (10) vs (12) Neri#SUB2#
Neri is looking to secure an arm. He's managed it! He's pivoting for an armbar - that looks tight! But Larkin has managed to get out of it and now he's in a dominant position. Nice work from Larkin! Score +2 for sweep to guard / half guard: Larkin (12) vs (12) Neri
Neri wants to improve his position but instead Larkin has moved into half guard.
Larkin is working hard to pass the guard. He's done it - he's now in full mount! Trouble for Neri! Score +3 for passing guard: Larkin (15) vs (12) Neri#T11#
Neri is desperately trying to get back to half guard.
Neri sneaks a leg back under and regains half guard and is working straight away to try and get back to guard. He hasn't managed just yet though.
Larkin is looking for the mount but instead finds himself back in full guard.
Larkin is stalling in the full guard. #T12#
Larkin wants to control from the top but Neri keeps moving.
Larkin sitting in guard, not really doing much.
Neri lands a beautiful sweep and he's now moved into his opponent's guard. Score +2 for sweep to guard / half guard: Larkin (15) vs (14) Neri#T13#
Neri wants to control from the top but Larkin keeps moving.
Neri slips effortlessly into side control - very nice. Score +3 for passing guard: Larkin (15) vs (17) Neri
Neri trying to control the position but Larkin is working away.
Larkin is moving his hips around well on the bottom and has managed to get back to half guard.#T14#
Larkin wants to get back to full guard.
Neri wants to control but Larkin is keeping him busy.
The fighters are pressed up against the cage, both looking to find a bit of space to work.
Larkin moves into full guard.
Neri trying to move into half guard but instead Larkin has managed to sweep! Score +2 for sweep to guard / half guard: Larkin (17) vs (17) Neri
Larkin won't allow Neri to sweep him here.
Boooooooooooooooooooo!!! God, this has been a terrible round. Come on you two, sort yourselves out!
Larkin wants to pass the guard but Neri is keeping the position.
Neri working a defensive guard but Larkin manages to pass into side control anyway.
Score +3 for passing guard: Larkin (20) vs (17) Neri
And that's the end of the fight!
Larkin takes the fight on points by 20 to 17.
A very excited looking Conor Larkin made sure he remembered to thank all the fans both in the arena and on the internet. He said all the coolest people spend all day on MMA websites, which got a big reaction. |
|
|
|
|
|
|