|
|
PBP Commentary |
Coming up we have a welterweight MMA rules bout between Marc Anthony (ranked 351 p4p, 706 weight class) and Hax Molloway (ranked 53 p4p, 106 weight class). Both fighter's entrance songs getting the crowd jumping here.
 |
|
 |
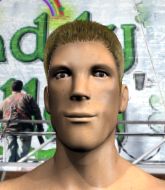
| 185 cm
28
182
10 - 1 - 0 |
|
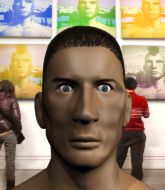
185 cm
22
184
12 - 6 - 0 |
BJJ Blue Belt
Solid boxing
Cardio machine |
|
BJJ Brown Belt
Dangerous knees
Granite chin |
|
| |
|
Ladies and gentlemen. This fight is 5 rounds, for the welterweight championship of the world!
Introducing the champion to my left, fighting out of the red corner.
With a record of 10 - 1 - 0, fighting out of Las Vegas, Marc Anthony!
And introducing the challenger to my right, fighting out of the blue corner.
With a record of 12 - 6 - 0, fighting out of Las Vegas, Hax Molloway!
The judges for this bout are William Peck, Yves DeLean and Elvis Blanc.

The bell rings for round one and we are underway!
The bell rings for round one and we are underway!
Anthony throws a lazy right hand but Molloway sees it coming a mile off and sidesteps it easily.
A nice inside leg kick there by Anthony. That's going to slow Molloway down.
Molloway tries to clinch there but Anthony circles away.
Anthony misses with a jab, cross combination.
Anthony throws a monster uppercut resembling something out of street fighter but it doesn't land.
Molloway tries to clinch but Anthony moves out of range.
Molloway throws a body punch but Anthony moves out of range.
Molloway bobs and weaves well there to avoid the strikes.
Anthony sets himself, and Molloway steps forward looking for the clinch! Anthony avoids it this time.
Molloway tries to clinch but Anthony moves out of range.

Anthony gets a clinch.
Molloway connects with a knee to the head.
Molloway blocks a knee to the body. He'll have a nicely bruised forearm in the morning.
Molloway using the Thai plumb to throw knees but Anthony has his back arched nicely, preventing the strike.
Molloway with an attempt at a knee that misses.
Molloway trying to land knees to the body.

Anthony escapes the clinch and we're back to striking.
Anthony throws a leg kick but Molloway moved away.
Hax Molloway seems to be the more aggressive standup fighter in this bout.
Molloway tries to clinch up against the cage, rushing in to close the distance. Anthony manages to break the clinch and circles back to the middle of the mat.
Wow, both these guys are really going for it!
Molloway displays some good footwork, moving neatly out of range as Anthony throws out the jab.
Anthony moves into range and clinches up with Molloway.

That's one minute gone in the round.
Molloway with the Thai clinch, lands a knee to the head.
Molloway is looking to score with knees to the body. Maybe he'll change it up and go body then head. Anthony is defending well for now.
Molloway prevents a body shot from Anthony.
An uppercut on the inside fails to land for Anthony.
Anthony goes for a body shot but it's blocked.
Molloway missing with knees to the body.
Molloway tries to land a knee to the head but Anthony blocks with his arms.
Molloway misses with a knee strike.
Anthony lands a right uppercut that snaps the head of Molloway backwards.
Molloway throws a vicious knee straight up the middle but Anthony blocks it with crossed arms.
Molloway is looking for a takedown up against the cage. Anthony gets underhooks though and prevents the takedown attempt.
Molloway blocks an uppercut.
A quick uppercut on the inside from Anthony.

Molloway has picked Anthony up - he's going for a ride! Molloway dumps his opponent to the mat with a thud and settles into half guard.
The fans in attendance giving it up for the two fighters, who have really let it all hang out in the last minute or so!

Molloway is trying a forearm choke� I don't think that's going to do much at this level of the game.
Anthony wants to get back to full guard.

That's two minutes gone in the round.
Anthony works his way to full guard. Good work.
Molloway trying to control the position from guard on top but Anthony is wriggling around, looking for whatever he can.
Molloway's corner is telling him to maintain position.
Molloway trying to control but Anthony is working from the bottom.
Molloway tries to free his leg and advance position but Anthony is retaining full guard.
Molloway thinks about going for a leg but decides against it, in order to maintain the position.
The ref warns both fighters not to hold the cage as they work up against the meshing.
Molloway passes into half guard.
Molloway is trying to work for a kimura but Anthony is defending well.

That's three minutes gone in the round.
Anthony gets back to full guard.
Molloway is looking to pass into half guard but Anthony pushes him away with his feet and jumps on top - now Anthony is in guard.

Molloway manages to sweep nicely, so he's now on top. Anthony manages to get himself to full guard.

There's a bit of a scramble here and now Anthony is on top in guard.
Molloway bucks up whilst keeping hold of a body lock, managing to reverse the position. Now he's in top in Anthony's guard.
Anthony trying to control the position here.
Anthony is trying to hold Molloway in close to prevent damage but Molloway has managed to pass into half guard.

That's four minutes gone in the round.
Anthony controlling the position for now.
Anthony wants to improve his position but Molloway is controlling well.
Molloway is looking to advance position but Anthony won't allow it.
Anthony tries to roll over but Molloway keeps him under control.
Anthony is staying active underneath Molloway, who seems content to just control the action from this position.
Molloway is looking for a kimura but Anthony is holding onto that half guard position, so it's hard for Molloway to get the leverage.
Molloway works his way into side control.
Molloway wants to lay and pray for a moment but Anthony keeps working.
And that�s the end of the round � the fighters go back to their corners.
That was a close round but I would say that Marc Anthony will probably get the nod.
The fighters' corners scream their final instructions, as the referee calls time. Here we go, back to the action!

Anthony misses with a looping right.
Molloway scores with a reasonable looking shot to the body. Anthony doesn't seem bothered though.
We've been told by Anthony's head coaches at Genesis that he's been working on his takedown defense in preparation for this fight.
Molloway shoots in looking for a takedown. Anthony tries to sprawl out of it but Molloway keeps driving through. The fighters are pinned against the cage. Anthony manages to get underhooks and after a bit of a struggle, circles away and we're back to standing.
Anthony misses with a jab and misses with a cross straight after too.
Molloway throws out a leg kick but Anthony moves out of range and Molloway only half commits.

Molloway pushes Anthony up against the cage in a clinch.
Molloway lands a knee to the body.
Anthony is trying to break the clinch but Molloway is controlling him.
An uppercut on the inside fails to land for Anthony.
Anthony prevents the takedown attempt.
Anthony swings wildly with an uppercut but Molloway uses good head movement to avoid it.
We've had a slow start to the round here - hopefully the action picks up.
Molloway with the Thai clinch, lands a knee to the head.
Molloway is trying to wear down his opponent with knees to the body.
Anthony looking to stall.
Anthony misses with a punch to the body.
That's one minute gone in the round.
Molloway throws an elbow but it's blocked.
Anthony manages to break the clinch.
Molloway fakes high and swings low for a body shot but Anthony manages to avoid it.
The fight moves into the clinch position.
Anthony stalling against the cage.
Molloway tries to land knees in the clinch but Anthony avoids the damage to the body.
Molloway is looking to score with knees to the body. Maybe he'll change it up and go body then head. Anthony is defending well for now.
Anthony scores with an uppercut up the middle.
Good anti-grappling being displayed by Molloway as Anthony tries to tie him up.
Molloway missing with knees to the body.
Molloway tries a knee to the head but Anthony blocks it.
Anthony misses with a hook to the ribs.
Molloway with a knee to the head.
That's two minutes gone in the round.
Anthony avoiding damage.
Anthony tries to circle away but Molloway has him pinned against the cage.
Molloway using the Thai clinch to land knees to the body.
Anthony works on Molloway's body with a couple of short punches.
Molloway is breathing heavily.
Anthony tries to throw a body punch but Molloway avoids it by throwing Anthony back against the cage.
A short right hand to the side of the head by Anthony.
With the fighters clinched against the cage, Anthony creates a bit of distance for himself and scores with a nice uppercut.
We've seen a great period of action over the last minute or so - credit to both fighters for going all out!
Anthony avoiding damage as Molloway throws knees to the body.
Anthony on the defensive, avoiding the knees to the body.
A nice left hand lands by Anthony.
Molloway tries to land knees in the clinch but Anthony avoids the damage to the body.
Anthony misses with some punches.
Anthony tries to stall but Molloway uses the opportunity to gain a better position.
Molloway throws a knee to the head but misses.
Molloway doesn't land with the attempted body shot.
Molloway is working for a takedown up against the cage. He can't get it on this occasion though.
Marc Anthony has stuffed three takedown attempts in the round now. That's going to take a lot out of Hax Molloway.
Anthony escapes the clinch and we're back to striking.
That's three minutes gone in the round.
Anthony looks to throw the jab but Molloway is out of range.
Anthony looks to land a left hand but Molloway moved out of range nicely.
Molloway avoids the body shot from Anthony.
Marc Anthony is looking to keep the fight on the feet at all costs.
Anthony misses with a body shot. Nice footwork from Molloway.
Molloway steps in looking to clinch after the strikes miss from Anthony.
Molloway avoids a punch combination nicely.
Molloway takes a swing at Anthony's ribcage but misses.
Anthony loads up on a big right hand but Molloway slips the punch.
Anthony sets himself, and Molloway steps forward looking for the clinch! Anthony avoids it this time.
Anthony lands a jab, followed by a cross and another cross, as Molloway backs up against the cage.
Molloway misses with a low kick.
Anthony throws a jab to the body, straight down the pipe. Boom. That sent Molloway stumbling backwards but he manages to regain his composure quickly.
Anthony takes a step towards his opponent and connects with a left hand, before circling away.
Molloway misses with a head kick.
Anthony appears to be looking for a big counter.
Anthony tries to land with a swinging hook to the body but Molloway was well out of range. Poor timing from Anthony.
Molloway tries to clinch but Anthony moves away
and Anthony counters with a good right hand that lands right on the jaw.
Fantastic stuff here - a very entertaining period of action, which has drawn cheers from the crowd.
Molloway ducks down and throws a hook to the body.
Anthony takes a body punch that cleary hurt but he's trying not to show any weakness.
That's four minutes gone in the round.
Molloway staying out of range there.
Anthony is the aggressor but that punch slipped nicely by Molloway.
Molloway throws a head kick but Anthony moves out of range.
Anthony swung with a counter right hand that didn't connect.
A jab from Anthony misses.
Molloway tries to land with a swinging hook to the body but Anthony was well out of range. Poor timing from Molloway.
Molloway waving his hands out in front of him, looking to distract Anthony.
Anthony looks to throw the jab but Molloway is out of range.
Anthony looks to score with a jab to the body but Molloway is just out of range.
Molloway throws a solid leg kick but Anthony takes the impact on his shin and smiles at Molloway.
Marc Anthony is winning the standup battle so far.
The fight stays on the outside here - Molloway looks like he's thinking about clinching though.
Molloway tries to clinch up.
Anthony slips a jab from Molloway.
Anthony closes the distance and clinches.
Molloway tries to land knees in the clinch but Anthony avoids the damage to the body.
A head punch blocked on the inside by Molloway.
And that�s the end of the round � the fighters go back to their corners.
Marc Anthony dominated that second round.
The fighters get back to their feet, the hooter sounds and we're back to the action!

Anthony misses the jab.
Oooooooooooh, not good. A low kick from Anthony lands where it shouldn't have, right in the... well, you know what he did? He kicked him in the penis. He's injured, injured bad. The referee sends both fighters to their corners and Molloway has 5 minutes to recover. He's OK now though... a thumbs up from Molloway and we're back underway with a touch of gloves.
Anthony shapes like he's going to throw a leg kick but settles back down.
Molloway lands a head kick. Anthony smiles back at him and beckons him forward.
Molloway is looking to chop away at Anthony's legs.
Anthony throws a nice looking combination but Molloway bobs and weaves to avoid any damage.
Molloway moves into the clinch.
Anthony's corner calls for him to break the clinch, which he does.
Molloway swings and misses with a hook to the body.
Molloway misses with a wild body shot.
Molloway moves into range and clinches up with Anthony.
A nice right hand lands inside from Anthony.
We've had a slow start to the round here - hopefully the action picks up.
Anthony wants to break free. God knows he wants to breaaaak freeee.
Anthony lands a nice uppercut.
Hax Molloway seems to be working more effectively in the clinch in the fight so far.
Molloway connects with a nasty looking knee right to Anthony's face.

It looks like Marc Anthony has been cut.
The crowd cheering loudly, showing their appreciation for the quality fight we're seeing here.
Anthony is trying to break free.
Molloway misses with a knee to the head.
Anthony is looking to break free of the clinch but Molloway has double underhooks.
That's one minute gone in the round.
Anthony lands a short shot on the inside that snaps the head of Molloway backwards.
Anthony escapes the clinch and we're back to striking.
Molloway looks to score with a jab to the body but Anthony is just out of range.
Anthony dips down and scores with a jab to the body.
A head kick from Molloway lands but Anthony takes it in his stride.
Molloway takes a big intake of breath there - he's definitely tired.
Molloway dodges the punch combination from Anthony.
Anthony waving his hands out in front of him, looking to distract Molloway.
Molloway tries to clinch up but Anthony circles away and keeps his distance.
Anthony has Molloway up against the cage in a clinch.
Anthony lands with a left to the head.
Molloway tries to stall but Anthony uses the opportunity to gain a better position.
Molloway using the Thai clinch to land knees to the body.
A knee to the head by Molloway.
We've seen a great period of action over the last minute or so - credit to both fighters for going all out!
Anthony scores with a hook to the body.
That's two minutes gone in the round.
Anthony misses with some punches.
Anthony tries to break the clinch but Molloway is controlling the position.
Kneeeeees! The crowd are calling for knees to the body. Molloway obliges.
Anthony misses with a punch on the inside.
A short right from Anthony.
Molloway tries a knee to the head but he's missed.
Anthony scores with a nice hook to the head.
Anthony blocks a knee to the body. He'll have a nicely bruised forearm in the morning.
Anthony digs a right hand underneath Molloway's ribcage. Molloway let out a lung full of air as it connected.
Molloway blocking some punches.
Molloway with an attempt at a knee that misses.
Anthony lands a hook that snaps the head of Molloway backwards.
Anthony tries to circle away but Molloway has him pinned against the cage.
Anthony blocks a knee to the body. He'll have a nicely bruised forearm in the morning.
Anthony misses with a punch to the body.
Anthony swings wildly with an uppercut but Molloway uses good head movement to avoid it.
That's three minutes gone in the round.
Molloway tries to land a knee to the head but misses.
Anthony tries to work over Molloway's body with a swooping hook but it only glances the target.
Anthony breaks the clinch and we return to the middle of the mat.
Anthony has managed to clinch.
Anthony blocks a knee to the body. He'll have a nicely bruised forearm in the morning.
Molloway with an attempt at a knee that misses.
Anthony breaks from the clinch.
Anthony misses with a double jab.
Anthony digs a good hook to Molloway's body.
Molloway takes a shot to the nose. Hopefully that hasn't broken it.
Nice straight punches there by Anthony. You know Roy Jones Jr respects the hands of Anthony.
Molloway throws a chopping leg kick but Anthony manages to avoid taking any serious damage.
Anthony closes the distance and pushes Molloway back into the cage.
Anthony wants to break the clinch but can't.
Anthony tries to break the clinch but Molloway is controlling the position.
Anthony lands with a light punch inside.
That's four minutes gone in the round.
Anthony taking a breather.
Anthony is trying to push Molloway away but Molloway has him pressed against the cage, so he's going nowhere.
Molloway fails to land with a short punch on the inside.
The crowd cheering loudly, showing their appreciation for the quality fight we're seeing here.
Molloway throws a vicious knee straight up the middle but Anthony blocks it with crossed arms.
A short left from Anthony.
Anthony throws a head punch that misses.
Molloway putting his Muay Thai to good use. He has Anthony in a tight clinch and is doing some damage with knees to the body.
Anthony lands with a left to the head.
Molloway using the Thai plumb to throw knees but Anthony has his back arched nicely, preventing the strike.
Anthony swings away with an uppercut that misses.
Anthony lands a body punch - he's looking to wear down Molloway.
Anthony scores with a shoulder strike.
Anthony tries to circle away but Molloway has him pinned against the cage.
Molloway throws a vicious knee straight up the middle but Anthony blocks it with crossed arms.
Anthony breaks from the clinch.
Anthony misses with a jab, cross combination.
Anthony sets himself, and Molloway steps forward looking for the clinch! Anthony avoids it this time.
And that�s the end of the round � the fighters go back to their corners.
Marc Anthony clearly takes that round.
The cut man is working on Marc Anthony's cut.
The fighters get back to their feet, the hooter sounds and we're back to the action!

Molloway doesn't manage to clinch there - Anthony circles away.
Molloway blocks the body kick.
Anthony throws a hook to the side of Molloway's head but Molloway sees it coming and ducks under it beautifully.
Molloway takes a jab on the nose there. A little bit of blood seems to be coming out. Hopefully that won't affect his breathing.
Molloway throws a leg kick but he was too far away and it doesn't land.
Anthony looks to land a left hand but Molloway moved out of range nicely.
You can follow us on Twitter at...Ooooooh Molloway got wobbled bad by a big combination! Anthony presses forward with punches and knees until Molloway stumbles to the ground! The ref watches Molloway closely before deciding to step in and end the fight!
Ladies and gentlemen, after 0:28 of round 4, we have a winner by way of TKO (Strikes). Marc Anthony!
Marc Anthony retains his welterweight title!
|
|
|
|
|
|
|
|
|
|
|
|
|
|
|
|
|
|
|
|
|
|
|
| S |
C
A |
G |
S |
C
B |
G |
|
S |
C |
G |
|
energy
A | B |
|
hype
A | B |
|
pop
A | B |
|
mgr
A | B |
|
FIGHT
RATING
59% |
|
|
|
|
|
|
