|
|
PBP Commentary |
Coming up we have a lightweight MMA rules bout between Kai Yamaguchi (ranked 469 p4p, 619 weight class) and Hugh Honey (ranked 57 p4p, 71 weight class). Chooooooooon! I think Yamaguchi might be my favorite fighter, now he's come out to Yama Yama. The crowd seem to be enjoying Honey's choice of entrance music: Higher Love. These two fighters really are very evenly matched on the feet - it will be fascinating to see who can assert themselves in that aspect of the fight.
 |
|
 |
| 176 cm
39
157
40 - 14 - 1 |
|
180 cm
35
162
25 - 9 - 1 |
Great wrestler
World class boxer
Insanely flexible |
|
Good wrestler
World class MT
Granite chin |
|
| |
|
Ladies and gentlemen. This fight is 3 rounds, in the lightweight division.
Introducing the fighter to my left, fighting out of the red corner.
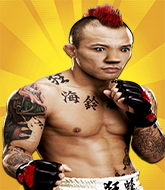
With a record of 40 - 14 - 1, fighting out of Sydney, Kai Yamaguchi!
And introducing the fighter to my right, fighting out of the blue corner.
With a record of 25 - 9 - 1, fighting out of Las Vegas, Hugh Honey!
The judges for this bout are Jack Bonds, Percy O'Donnell and Timothy Bukovac.

The bell rings for round one and we are underway!
The bell rings for round one and we are underway!
Honey throws a hook to the side of Yamaguchi's head but Yamaguchi sees it coming and ducks under it beautifully.
Honey looks more muscular than last time we saw him. He must have been on the weights.
Honey throws a jab to the body, straight down the pipe. Boom. That sent Yamaguchi stumbling backwards but he manages to regain his composure quickly.
Honey misses with a leg kick.
Honey tries to land with a swinging hook to the body but Yamaguchi was well out of range. Poor timing from Honey.
Honey misses with a wild body shot.
Yamaguchi appears to be looking for a counter takedown.
Honey ducks down and throws a hook to the body but Yamaguchi moves away.
Hugh Honey seems to be the more aggressive standup fighter in this bout.
Honey swings and misses with a hook to the body.
Yamaguchi moves out of range as Honey strikes.
Yamaguchi feinted with a counter takedown.
Honey misses with a jab, cross combination.
We've had a slow start to the round here - hopefully the action picks up.
Honey just misses with a punch to the body.
Honey throws a combination but comes up with nothing but fresh air.
Yamaguchi changes levels looking for a counter takedown but doesn't commit.
Yamaguchi displays some good footwork, moving neatly out of range as Honey throws out the jab.
Yamaguchi drops down looking for a counter takedown but Honey sprawls and moves away.
Honey scores with a shot to the body.

That's one minute gone in the round.
Honey throws a body punch but Yamaguchi moves out of range.
Yamaguchi half commits to a counter takedown before pushing away, out of range.
Sloppy strikes from Honey. Those never looked like landing.
Yamaguchi feinted with a counter takedown.
Yamaguchi slips under a jab.
Yamaguchi attempts a counter takedown but Honey avoids it well and moves away.
A jab from Honey misses.
Yamaguchi tries to counter with a takedown but Honey is quick to defend against it.
Honey lands a glancing blow to the side of Yamaguchi's head.
Honey thows a left - swing and a miss!
The fighters circling - Honey throws out the jab but it was never going to land.
Honey thuds a left hand into Yamaguchi's body.
Nice body kick from Honey.
A slow jab from Honey misses its intended target.
Yamaguchi keeping his hands up high there, blocking the jab from Honey.
Yamaguchi changes levels looking for a counter takedown but doesn't commit.
Honey looks to land a right hand but Yamaguchi moved out of range.

That's two minutes gone in the round.
Honey misses with a wild combination.
Yamaguchi checks a leg kick nicely.
Yamaguchi attempts a counter takedown but Honey avoids it well and moves away.
A jab from Honey misses.
Yamaguchi tries to counter with a takedown but Honey is quick to defend against it.
Honey jabbing away but nothing is landing.
Honey scores with a punch to the head.
The fans in attendance giving it up for the two fighters, who have really let it all hang out in the last minute or so!
A looping hook to the body misses from Honey. Yamaguchi does a little dance to reset his feet.
Yamaguchi uses good head movement to avoid the hook from Honey.
Yamaguchi avoids the body shot from Honey.
Yamaguchi drops down looking for a counter takedown but Honey sprawls and moves away.
Honey throws an overhand right that lands on Yamaguchi's shoulder, as Yamaguchi tries to avoid the shot.
Yamaguchi feinted with a counter takedown.
Honey throws out a loose jab but Yamaguchi uses good head movement to avoid it.
Yamaguchi tries to counter with a takedown but Honey is quick to defend against it.
Honey fails to land with the punch combination there - jab, cross, hook, miss, miss, miss.

That's three minutes gone in the round.
Honey loads up on a big right hand but Yamaguchi slips the punch.
Yamaguchi drops down looking for a counter takedown but Honey sprawls and moves away.
Honey looks to land a right hand but Yamaguchi moved out of range.
Honey throws a shot to the body.
Yamaguchi takes a head kick and shrugs it off.
Honey lands a leg kick and bounces back out of range.
Honey throws a lazy right hand but Yamaguchi sees it coming a mile off and sidesteps it easily.
A looping hook to the body misses from Honey. Yamaguchi does a little dance to reset his feet.
Honey throws an overhand right that lands on Yamaguchi's shoulder, as Yamaguchi tries to avoid the shot.
Yamaguchi appears to be looking for a counter takedown.
Decent striking displayed by Honey there.
Hugh Honey is looking to keep the fight on the feet at all costs.
Honey lands with a cross.
Honey thows a left - swing and a miss!
Honey misses with a body shot.
Yamaguchi changes levels looking for a counter takedown but doesn't commit.

That's four minutes gone in the round.
Yamaguchi moves away from the strike by Honey.
A big left from Honey misses.
Honey misses with an uppercut.
Yamaguchi attempts a counter takedown but Honey avoids it well and moves away.
Honey misses with an uppercut

and Yamaguchi counters with a single leg into guard. Honey didn't expect that.
Fantastic stuff here - a very entertaining period of action, which has drawn cheers from the crowd.
Yamaguchi postures up.

Yamaguchi gets to his feet and steps away from his opponent.
Yamaguchi's hands are dropping dangerously low here and Honey connects clean with a right hook that sends him down to one knee! Yamaguchi scrambles back to his feet.
Honey waving his hands out in front of him, looking to distract Yamaguchi.
Yamaguchi drops down looking for a counter takedown but Honey sprawls and moves away.
Yamaguchi slips under a jab from Honey.
Honey misses with an uppercut
and Yamaguchi counters with a takedown into side control! That could mean trouble for Honey!
And that�s the end of the round � the fighters go back to their corners.
Hugh Honey dominated that round.
That's time! Back to the action!

Yamaguchi checks a low kick from Honey.
Honey tries to bum rush Yamaguchi with a series of wild strikes but Yamaguchi uses good footwork to avoid the assault.
Honey loads up on a big right hand but Yamaguchi slips the punch.
Nice defenses there by Yamaguchi.
Honey slips in close and lands a nice hook before moving back out of range.
A clash of legs there as Yamaguchi blocks the low kick.
Yamaguchi feinted with a counter takedown.
Honey misses the jab.
Honey pushing out the jab but it's not landing.
Yamaguchi changes levels looking for a counter takedown but doesn't commit.
We've had a slow start to the round here - hopefully the action picks up.
Yamaguchi avoids the body shot from Honey.
Yamaguchi attempts a counter takedown but Honey avoids it well and moves away.
Yamaguchi moves out of range as Honey strikes.
Yamaguchi feinted with a counter takedown.
Honey misses with a looping left.
Honey misses with a series of wild punches.
Yamaguchi drops down looking for a counter takedown but Honey sprawls and moves away.
That's one minute gone in the round.
Good leg kick by Honey.
Honey swings for the body but Yamaguchi moves out of range.
Honey swings wildly with a right hand that was never going to find it's target.
Honey throws a looping overhand right but Yamaguchi ducks down to avoid it.
Yamaguchi attempts a counter takedown but Honey avoids it well and moves away.
Yamaguchi takes a shot to the body in his stride.
Honey pushing out the jab but it's not landing.
Yamaguchi ducks under an overhand right and circles away with a smile on his face.
Yamaguchi changes levels looking for a counter takedown but doesn't commit.
Yamaguchi defending well as Honey loads up on a big left hand.
Yamaguchi half commits to a counter takedown before pushing away, out of range.
Yamaguchi blocks a jab.
Yamaguchi attempts a counter takedown but Honey avoids it well and moves away.
Honey pushing out the jab but it's not landing.
Yamaguchi drops down looking for a counter takedown but Honey sprawls and moves away.
That's two minutes gone in the round.
Honey throws a hook to the side of Yamaguchi's head but Yamaguchi sees it coming and ducks under it beautifully.
Yamaguchi half commits to a counter takedown before pushing away, out of range.
Honey lands a beauty of a right hand that gets the crowd cheering.
Honey just misses with a punch to the body.
Honey thows a left - swing and a miss!
Yamaguchi attempts a counter takedown but Honey avoids it well and moves away.
Honey thows a left - swing and a miss!
Yamaguchi appears to be looking for a counter takedown.
Honey throws a wild combination but nothing lands.
Yamaguchi changes levels looking for a counter takedown but doesn't commit.
Honey connects with a good right hand that stumbles Yamaguchi. Yamaguchi circles away out of range and recomposes himself.
Yamaguchi keeping a good distance there, avoiding the body shot.
Yamaguchi drops down looking for a counter takedown but Honey sprawls and moves away.
Honey misses with the combination.
Yamaguchi appears to be looking for a counter takedown.
Kai Yamaguchi is looking to throw some combinations by the looks of things.
We've seen a great period of action over the last minute or so - credit to both fighters for going all out!
Honey thows a left - swing and a miss!
Honey throws a right hand that Yamaguchi ducks under and follows up with a left that Yamaguchi also avoids with ease.
That's three minutes gone in the round.
Yamaguchi uses some good footwork to avoid the body shot by Honey.
Yamaguchi changes levels looking for a counter takedown but doesn't commit.
Honey looks to throw the jab but Yamaguchi is out of range.
Honey has been the more effective fighter overall so far.
Yamaguchi takes a jab right on the nose. That must have hurt but he shrugs his shoulders and looks to return the favor.
Honey jabs Yamaguchi to the body, keeping him at a distance.
Honey throws a hook but Yamaguchi avoids it easily.
Yamaguchi feinted with a counter takedown.
Honey lands with an uppercut that bounces Yamaguchi off the cage and back into range.
A jab from Honey misses.
Honey scores with a jab. Yamaguchi acknowledges it with a nod of the head.
A punch lands to the side of Yamaguchi 's head but he takes it in his stride.
Yamaguchi takes one on the button.
Honey thows a left - swing and a miss!
That's four minutes gone in the round.
A slow jab from Honey misses its intended target.
Yamaguchi feinted with a counter takedown.
Honey misses with a hook.
Yamaguchi tries to counter with a takedown but Honey is quick to defend against it.
Yamaguchi takes an uppercut right on the button but keeps his composure.
The crowd cheering loudly, showing their appreciation for the quality fight we're seeing here.
Honey falls off balance throwing a combination
and Yamaguchi counters with a nice double leg into guard.
Yamaguchi gets to his feet. Honey looking to butt scoot but the ref puts an end to that. On your feet son!
Honey throws a body punch but Yamaguchi moves out of range.
The fighters circling - Honey throws out the jab but it was never going to land.
Honey misses with a body shot.
Yamaguchi half commits to a counter takedown before pushing away, out of range.
Nice defenses there by Yamaguchi.
Yamaguchi feinted with a counter takedown.
Honey throws a body punch but Yamaguchi moves out of range.
Yamaguchi changes levels looking for a counter takedown but doesn't commit.
And that�s the end of the round � the fighters go back to their corners.
Hugh Honey showed his class in that round. I'd imagine he'll take it on all the scorecards.
That's the end of the interval. I'm sure that seemed a lot quicker than a minute for our two fighters! Back to the action. The crowd applaud as we get ready to start the final round!

Honey swings for the body but Yamaguchi moves out of range.
Honey waving his hands out in front of him, looking to distract Yamaguchi.
Yamaguchi attempts a counter takedown but Honey avoids it well and moves away.
Honey swings and misses with a hook to the body.
Yamaguchi steps to the side to avoid the strikes from Honey.
Honey is the aggressor but that punch slipped nicely by Yamaguchi.
Honey throws a right and a left that Yamaguchi avoids nicely.
Honey fakes high and swings low for a body shot but Yamaguchi manages to avoid it.
Honey is looking to chop away at Yamaguchi's legs.
We've had a slow start to the round here - hopefully the action picks up.
Yamaguchi avoids a lazy jab quite easily.
Yamaguchi attempts a counter takedown but Honey avoids it well and moves away.
A telegraphed right hand from Honey misses the target.
Yamaguchi attempts a counter takedown but Honey avoids it well and moves away.
Honey misses with a jab, cross combination.
Yamaguchi attempts a counter takedown but Honey avoids it well and moves away.
Yamaguchi uses some good footwork to avoid the body shot by Honey.
That's one minute gone in the round.
Honey misses with an uppercut. Yamaguchi saw that one coming.
Yamaguchi half commits to a counter takedown before pushing away, out of range.
Honey misses with a body shot. Nice footwork from Yamaguchi.
Yamaguchi drops down looking for a counter takedown but Honey sprawls and moves away.
Honey misses with a body shot. Nice footwork from Yamaguchi.
Yamaguchi appears to be looking for a counter takedown.
Yamaguchi takes a punch right to his stomach. That took the wind out of him momentarily.
Hugh Honey seems to be getting the better of the standup.
Honey throws a body shot but no joy.
Honey throws an uppercut from half a mile away. Yamaguchi sees it coming and avoids it easily.
Yamaguchi feinted with a counter takedown.
Honey scores with a shot to the body.
Honey pushing out the jab but it's not landing.
Yamaguchi feinted with a counter takedown.
Honey throws a body punch but Yamaguchi moves out of range.
Honey throws a big shot that misses.
Yamaguchi feinted with a counter takedown.
Honey tries to land with a swinging hook to the body but Yamaguchi was well out of range. Poor timing from Honey.
Yamaguchi feinted with a counter takedown.
Honey looks to land a left hand but Yamaguchi moved out of range nicely.
That's two minutes gone in the round.
Yamaguchi showing good head movement there, avoiding the strikes from Honey.
Yamaguchi attempts a counter takedown but Honey avoids it well and moves away.
Honey throws a hook to the body but it doesn't connect.
Honey just misses with a punch to the body.
Yamaguchi changes levels looking for a counter takedown but doesn't commit.
Yamaguchi slips a jab from Honey.
Yamaguchi drops down looking for a counter takedown but Honey sprawls and moves away.
Yamaguchi on the wrong end of a nice hook.
Honey looks to land a left hand but Yamaguchi moved out of range nicely.
Yamaguchi changes levels looking for a counter takedown but doesn't commit.
Yamaguchi blocks a jab.
Yamaguchi half commits to a counter takedown before pushing away, out of range.
Honey lands a jab to Yamaguchi's midsection.
Yamaguchi ducks under a wild hook from Honey.
Yamaguchi appears to be looking for a counter takedown.
We've seen a great period of action over the last minute or so - credit to both fighters for going all out!
Yamaguchi doesn't react quick enough there as he takes a shot to the body.
That's three minutes gone in the round.
Yamaguchi uses some good footwork to avoid the body shot by Honey.
Yamaguchi drops down looking for a counter takedown but Honey sprawls and moves away.
Honey looks to land a right hand but Yamaguchi moved out of range.
Honey throws a hook to the body but it doesn't connect.
Yamaguchi changes levels looking for a counter takedown but doesn't commit.
Honey misses with a hook. Yamaguchi ducked under it nicely.
Yamaguchi drops down looking for a counter takedown but Honey sprawls and moves away.
Honey lands with a nice combination. Yamaguchi backs away looking to recover.
Honey throws an uppercut from half a mile away. Yamaguchi sees it coming and avoids it easily.
Yamaguchi changes levels looking for a counter takedown but doesn't commit.
Hugh Honey is fighting for a decision - hopefully he's judged it right and he's actually winning the fight.
Honey thows a left - swing and a miss!
Honey misses with a series of wild punches.
Yamaguchi drops down looking for a counter takedown but Honey sprawls and moves away.
Honey throws a body shot but no joy.
The fighters are starting to get sweaty, which will make takedowns a bit more tricky.
Yamaguchi takes a shot to the nose. Hopefully that hasn't broken it.
That's four minutes gone in the round.
Yamaguchi checks a low kick from Honey.
Yamaguchi half commits to a counter takedown before pushing away, out of range.
A jab from Honey misses.
Honey misses with a half-hearted attempt at a head kick.
Yamaguchi attempts a counter takedown but Honey avoids it well and moves away.
Yamaguchi keeping his hands up high there, blocking the jab from Honey.
Yamaguchi changes levels looking for a counter takedown but doesn't commit.
A looping hook to the body misses from Honey. Yamaguchi does a little dance to reset his feet.
Honey with a nice cross.
Honey tries to land with a swinging hook to the body but Yamaguchi was well out of range. Poor timing from Honey.
Yamaguchi staying out of range there.
Yamaguchi feinted with a counter takedown.
Honey connects with a good right hand that stumbles Yamaguchi. Yamaguchi circles away out of range and recomposes himself.
This has been an exciting period of action!
Yamaguchi uses good head movement to avoid the hook from Honey.
Yamaguchi tries to counter with a takedown but Honey is quick to defend against it.
Yamaguchi checks the leg kick nicely there.
Yamaguchi drops down looking for a counter takedown but Honey sprawls and moves away.
Kai Yamaguchi has stepped it up - he knows he needs a finish here!
Honey swings for the body but Yamaguchi moves out of range.
Yamaguchi appears to be looking for a counter takedown.
And that's the end of the fight!
Hugh Honey comfortably won the final round on my scorecard.
I've got Honey winning every round here. Surely the decision will go his way and he'll pick up a well deserved decision victory. Over to the ring announcer for the scorecards.
Ladies and gentlemen, after 3 rounds of action, we go to the scorecards for a decision.
Judge Jack Bonds scores the fight 25:30
Judge Percy O'Donnell scores the fight 26:30
Judge Timothy Bukovac scores the fight 26:30
In favor of your winner, by unanimous decision... Hugh Honey!
Hugh Honey tried to hype himself up post fight but didn't word it too well and it ended up with him sounding like a bit of a tool.
|
|
|
|
|
|
|
|
|
|
|
|
|
|
|
|
|
|
|
|
|
|
|
| S |
C
A |
G |
S |
C
B |
G |
|
S |
C |
G |
|
energy
A | B |
|
hype
A | B |
|
pop
A | B |
|
mgr
A | B |
|
FIGHT
RATING
49% |
|
|
|
|
|
|
