|
|
PBP Commentary |
Coming up we have a heavyweight MMA rules bout between Monte Zuma (ranked 728 p4p, 976 weight class) and Mawi Da Oxlade (ranked 88 p4p, 114 weight class). This should be fireworks!
 |
|
 |
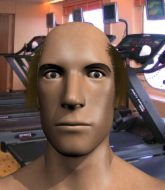
| 190 cm
44
255
40 - 24 - 0 |
|
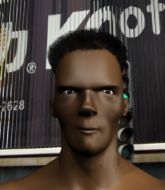
203 cm
29
265
15 - 9 - 0 |
Abu Dhabi Champ
Lethal high kicks
Very quick |
|
Good wrestler
World class MT
Good gas tank |
|
| |
|
Ladies and gentlemen. This fight is 3 rounds, in the heavyweight division.
Introducing the fighter to my left, fighting out of the red corner.
With a record of 40 - 24 - 0, fighting out of Hilo, Monte Zuma!
And introducing the fighter to my right, fighting out of the blue corner.
With a record of 15 - 9 - 0, fighting out of Helsinki, Mawi Da Oxlade!
The judges for this bout are Donald Grub, Paul Tew and Daniel Bishop.

The bell rings for round one and we are underway!

Zuma drops down and drives through with a powerful takedown into guard.
Zuma trying to control the position from guard on top but Da Oxlade is wriggling around, looking for whatever he can.
Da Oxlade keeping full guard, as Zuma tries to pass.
Zuma sitting in guard, not really doing much.
Da Oxlade managing to control the position.
The ref warns both fighters not to hold the cage as they work up against the meshing.
Zuma tries to free his leg and advance position but Da Oxlade is retaining full guard.
We've had a slow start to the round here - hopefully the action picks up.
Zuma trying to control but Da Oxlade is working from the bottom.
Zuma is pushing down on Da Oxlade's leg trying to pass to half guard. Da Oxlade is fighting to maintain full guard but Zuma has managed to sneak the leg through.

That's one minute gone in the round.
Zuma trying to control the pace.
Zuma wants to free his trapped foot but Da Oxlade is holding on for dear life with his legs.
Zuma content to sit in half guard and control for a moment.
The fighters are pressed up against the cage, both looking to find a bit of space to work.

That's two minutes gone in the round.
A few boos can be heard. I'm sure they will multiply if the fighters don't pick up the pace.
Zuma is trying to control. Da Oxlade wants to improve his position but can't escape this time.

Zuma looking for a kimura but he'll have to free his other leg if he wants to finish that. Perhaps he's just using it as a distraction technique.
Zuma performing his best blanket impression for a moment.

The referee has motioned to the fighters to stand back up.
Da Oxlade misses with a looping right.
Zuma has a takedown stuffed.
It seemed like Da Oxlade was going to counter with the hook but didn't fully commit to it.
Zuma fails with the takedown.

That's three minutes gone in the round.
Zuma closes the distance, clinches up and gets a nice trip takedown into side control. Very smooth.
Zuma is looking to take a break and control but Da Oxlade is keeping him honest, looking to work from the bottom.
The referee tells the fighters to keep busy.
Zuma's ground tactics aren't going to win him many fans. Let's hope he's got fireworks for us if he gets back to his feet because he's not doing much on the ground.
Da Oxlade is looking for a sweep.
Da Oxlade struggling a bit here.
Zuma looking for an arm triangle but it's way too loose to do anything.
Da Oxlade is positioning himself to get back to half guard.

That's four minutes gone in the round.
Zuma is looking to take a break and control but Da Oxlade is keeping him honest, looking to work from the bottom.
Zuma wants to work for a kimura but he's foiled early by Da Oxlade, who protects the arm well.
Zuma is looking to take a break and control but Da Oxlade is keeping him honest, looking to work from the bottom.
Boooooooooooooooooooo!!! God, this has been a terrible round. Come on you two, sort yourselves out!
And that is the end of the round. The fighters go back to their corners.
Monte Zuma dominated that round.
Well, the break between rounds is over. Let's get back to the scrappin!

Da Oxlade gets caught on his heels momentarily as he allows Zuma to score an easy takedown into full guard.
Zuma passes Da Oxlade's left leg - he's now in half guard.
Da Oxlade is trying to get back to full guard.
Da Oxlade is positioning himself well to prevent Zuma advancing to mount.
Zuma wants to pass to mount but Da Oxlade is defending the position.
We've had a slow start to the round here - hopefully the action picks up.
Zuma is trying a forearm choke� I don't think that's going to do much at this level of the game.
Zuma is sneakily working for an arm triangle but Da Oxlade sees it coming and defends easily.
That's one minute gone in the round.
Zuma slows the pace down in half guard.
Da Oxlade tries to get to full guard but Zuma has control of the leg.
Zuma is really dominating this fight. Is there anything that Da Oxlade can do to turn this around?
Still in half guard, Zuma seems content to control.
Zuma trying to control from half guard but Da Oxlade is working away.
Zuma is looking for submissions but instead, Da Oxlade has regained full guard.
Zuma tries to free his leg and advance position but Da Oxlade is retaining full guard.
That's two minutes gone in the round.
The crowd are showing their displeasure at the lack of action as loud boos ring out around the arena.
Zuma is intent on slowing down the pace of the fight, simply looking to control.
Zuma advances to half guard.
Da Oxlade is refusing to be controlled, as Zuma sits in half guard.
Zuma is just content to waste time from the top position. Da Oxlade takes advantage of the situation and regains full guard.
Zuma tries to free his leg and advance position but Da Oxlade is retaining full guard.
Zuma trying to control the position from guard on top but Da Oxlade is wriggling around, looking for whatever he can.
Zuma slows down the pace of the fight for a moment. He'll need to remain active if he doesn't want to see the fight stood back up.
Zuma forces his way into half guard.
Zuma wants to free his trapped foot but Da Oxlade is holding on for dear life with his legs.
That's three minutes gone in the round.
Zuma wants to advance to full mount but Da Oxlade doesn't think that's going to happen and regains full guard instead.
Zuma might be looking to lock onto one of his opponent's long limbs for a submission, whilst we're on the ground.
A real slowdown in the pace of the fight for a moment, as Da Oxlade holds on and takes a little breather.
Da Oxlade is continuing to stall.
Zuma pressing down on his opponent's thigh, looking to pass guard. Da Oxlade is keeping the position for now.
Zuma trying to control but Da Oxlade is working from the bottom.
Zuma pressing down on his opponent's thigh, looking to pass guard. Da Oxlade is keeping the position for now.
That's four minutes gone in the round.
A lull in the action here being met with boos from the crowd.
Da Oxlade wants to control here, rather than go for any submissions from the bottom. At least for now.
Da Oxlade is working an open guard here, looking to improve his position. No doubt that will leave him open to counters but at least he's being more offensive.
Zuma wants to control from the top but Da Oxlade keeps moving.
The referee has motioned to the fighters to stand back up.
Zuma looking to shoot here. He's gone for it and he's landed a takedown into side control! Oh, that's bad for Da Oxlade!
Zuma content to control the pace. The referee will try and keep them active though.
Zuma seems to have a rather negative gameplan on the ground. He seems keen to just score the takedown and hold down Da Oxlade for as long as he can get away with.
Boooooooooooooooooooo!!! God, this has been a terrible round. Come on you two, sort yourselves out!
Zuma working hard here to secure a kimura but he's not really in the right position for it.
Zuma trying to control the action but Da Oxlade is working from the bottom.
And that is the end of the round. The fighters go back to their corners.
Monte Zuma dominated that second round.
The referee calls time. The cornermen exit stage left and we're back to business. This is the final round!

Zuma shoots in with a takedown attempt and he has Da Oxlade pinned against the cage. Da Oxlade gets the underhooks and manages to circle away.
Zuma misses with a takedown attempt
and Da Oxlade counters with a straight right hand.

It looks like Monte Zuma has been cut.
Zuma shoots in but doesn't get the takedown
and Da Oxlade counters with a lovely straight right hand!
That's three failed takedown attempts in the round for Monte Zuma. That's going to take a lot out of him.
Da Oxlade feints with a left and delivers a massive head kick! Zuma collapses like a ragdoll! Game over!
Ladies and gentlemen, after 0:29 of round 3, we have a winner by way of KO (Head Kick). Mawi Da Oxlade!
Our winner, Mawi Da Oxlade, made sure he spent some time buttering up the crowd during his post fight interview, which will no doubt bring him a few more fans.
|
|
|
|
|
|
|
|
|
|
|
|
|
|
|
|
|
|
|
|
|
|
|
| S |
C
A |
G |
S |
C
B |
G |
|
S |
C |
G |
|
energy
A | B |
|
hype
A | B |
|
pop
A | B |
|
mgr
A | B |
|
FIGHT
RATING
27% |
|
|
|
|
|
|
