|
|
PBP Commentary |
Coming up we have a middleweight MMA rules bout between Kona Uluwehi (ranked 3073 p4p, 5696 weight class) and Thomas O Malley (ranked 417 p4p, 595 weight class). Thomas O Malley has the eye of the tiger tonight.
 |
|
 |
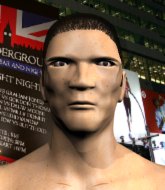
| 189 cm
26
185
7 - 5 - 0 |
|
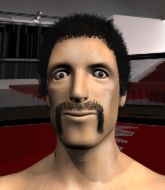
200 cm
20
180
1 - 2 - 0 |
BJJ White Belt
Excellent MT
Granite chin |
|
BJJ Blue Belt
Counter fighter
Very confident |
|
| |
|
Ladies and gentlemen. This fight is 3 rounds, in the middleweight division.
Introducing the fighter to my left, fighting out of the red corner.
With a record of 7 - 5 - 0, fighting out of New York, Kona Uluwehi!
And introducing the fighter to my right, fighting out of the blue corner.
With a record of 1 - 2 - 0, fighting out of London, Thomas O Malley!
The judges for this bout are Winston Howard, Chris Dean and Eliza Hachem.

The bell rings for round one and we are underway!
O Malley pulls out of a head kick attempt.
It looked like Uluwehi was looking amped, ready to throw a big counter but didn't commit.
Jeez, both these guys look absolutely knackered already, that's not a good sign!
Uluwehi tries to bum rush O Malley with a series of wild strikes but O Malley uses good footwork to avoid the assault.
Uluwehi throws a series of punches but O Malley avoids them all with ease.
O Malley shoots in for a takedown. He's persisting with it as Uluwehi sprawls well. Uluwehi wins this battle and keeps the fight standing. O Malley gets slowly back to his feet.
Uluwehi appears to be looking for a big counter.
Uluwehi misses with a series of wild punches.
We've had a slow start to the round here - hopefully the action picks up.
O Malley is pinned up against the cage taking some big shots here. The referee is looking closely deciding whether he should stop the fight.
Uluwehi fails to land with a series of punches.

That's one minute gone in the round.
Uluwehi fails to land with the punch combination there - jab, cross, hook, miss, miss, miss.
Uluwehi lands a jab followed by a nice looking cross.
O Malley defending well as Uluwehi loads up on a big left hand.
Kona Uluwehi is looking to keep the fight on the feet at all costs.
O Malley wants to clinch
and Uluwehi counters with a crisp hook to the side of the head.
O Malley's coach down at London MMA (Public Gym) was telling us pre-fight that they have been working on O Malley's balance. Obviously they view that as a key factor in the outcome of this fight.
O Malley tries to clinch up.
Uluwehi tries to bum rush O Malley with a series of wild strikes but O Malley uses good footwork to avoid the assault.
O Malley misses with a wild combination.
A head kick misses from O Malley.

That's two minutes gone in the round.
O Malley closes the distance and takes a jab right on the nose as he does so.
Uluwehi throws a right and a left that O Malley avoids nicely.
Uluwehi misses with a jab and misses with a cross straight after too.
O Malley is loading up here, looking for a big counter of his own.
A jab lands there for Uluwehi.
The crowd are loving this. Great action here.
Uluwehi rushes forward with a series of wild hooks but O Malley moves out of range and avoids them all easily.
Uluwehi misses with a jab, cross combination.
The fighters circling - Uluwehi throws out the jab but it was never going to land.
Uluwehi looks to have improved his striking defense since last time we saw him fight.
Uluwehi misses with a double jab.
Uluwehi misses with a double jab.
Uluwehi misses with a double jab.

That's three minutes gone in the round.
Uluwehi thows a left - swing and a miss!
O Malley throws a head kick but Uluwehi moves out of range.
Uluwehi moves into range and throws a combination. A nice jab followed by a hook to the body.
Kona Uluwehi seems to be the more aggressive standup fighter in this bout.
O Malley gets cracked there but stands up to it.
Uluwehi fails to land with a series of punches.
O Malley changes levels for a counter takedown but doesn't follow through with his attempt.
O Malley tries to close the distance and clinch up against the cage but Uluwehi paws at him with a jab and circles away.
Uluwehi avoids a kick to the body.
Uluwehi appears to be looking for a big counter.
A punch combination from Uluwehi misses.
Uluwehi swings away but doesn't land with a series of punches.
O Malley throws a counter combo.
Uluwehi thuds his right hand into O Malley's forehead from close range. That could be painful for both fighters.

That's four minutes gone in the round.
A combination from O Malley does no damage.
O Malley is a painfully thin specimen of a man. You do wonder whether a good body kick would snap him clean in two.
O Malley showing good head movement there, avoiding the strikes from Uluwehi.
Uluwehi misses with a series of wild punches.
O Malley tries a switch kick but it misses it's target.
We've seen a great period of action over the last minute or so - credit to both fighters for going all out!
Uluwehi with a nice cross.
Uluwehi pushes forward with a 1-2 combination that forces O Malley back to the cage. Uluwehi follows up with a solid lead hook to the liver.
Uluwehi looks to score with a combo but nothing lands.
O Malley dodges the punch combination from Uluwehi.
O Malley throws a big counter head kick but Uluwehi avoids it with no problem.
And that is the end of the round. The fighters go back to their corners.
Kona Uluwehi dominated that round.
The minute break is over - no more time for sponges and pep talks - back to the action!

Uluwehi looks to land a right hand but O Malley moved out of range.
Uluwehi misses with a jab and misses with a cross straight after too.
O Malley shoots for a double leg takedown but Uluwehi sprawls well. He's pushed O Malley's face into the mat and manages to get back to his feet relatively easily.
O Malley tries to close the distance and clinch up against the cage but Uluwehi paws at him with a jab and circles away.
Uluwehi swung with a counter right hand that didn't connect.
Uluwehi will need to tighten up his combinations if he doesn't want to gas himself out, swinging at thin air.
Uluwehi fails to land with a series of punches.
We've had a slow start to the round here - hopefully the action picks up.
O Malley shoots in for a takedown but doesn't get it.
Uluwehi swung with a counter right hand that didn't connect.
O Malley shoots in for a takedown but doesn't get it.
Kona Uluwehi has stuffed three takedown attempts in the round now. That's going to take a lot out of Thomas O Malley.
Uluwehi throws a right and a left that both miss.
As Uluwehi backs off O Malley throws a huge counter combo but Uluwehi manages to avoid it all.
That's one minute gone in the round.
O Malley shoots in but no luck this time.
Both fighters are absolutely exhausted here.
Uluwehi misses with the combination.
O Malley wants to clinch up but Uluwehi keeps it at a distance.
Uluwehi misses with a two punch combination.
O Malley throws a big counter head kick but Uluwehi avoids it with no problem.
Uluwehi misses with a two punch combination.
Uluwehi throws a series of punches but O Malley avoids them all with ease.
O Malley throws the kick towards the body but Uluwehi avoids it.
Uluwehi throws a combination but it was largely blocked by O Malley.
O Malley tries to land a front kick but Uluwehi steps back. That was a bit too telegraphed.
That's two minutes gone in the round.
O Malley tries for a takedown but Uluwehi sees it coming a mile off and avoids it easily.
Uluwehi cracks O Malley with a nice right hand that draws applause from the crowd.
O Malley pulls out of a head kick attempt.
Uluwehi scores to the head and body with a nice combination!
O Malley tries a head kick but it misses.
Uluwehi seem to be loading up, looking for a big counter.
O Malley throws out a leg kick but Uluwehi moves out of range and O Malley only half commits.
Uluwehi is really head hunting here, hardly looking to strike to the body at all.
Uluwehi misses with a two punch combination.
The fans in attendance giving it up for the two fighters, who have really let it all hang out in the last minute or so!
No joy there for Uluwehi, who threw a few shots but didn't land.
Kona Uluwehi is looking to throw some combinations by the looks of things.
Uluwehi throws a jab but it's blocked by O Malley.
Uluwehi misses with a jab and misses with a cross straight after too.
Despite the aggression on O Malley's face he doesn't fully commit to the counter.
That's three minutes gone in the round.
Uluwehi misses with a few strikes there.
Uluwehi misses with a jab, cross combination.
Uluwehi avoids the head kick by O Malley.
Uluwehi throws a combination but it was largely blocked by O Malley.
O Malley tries a counter takedown but it's more of a dummy move, and he uses it to push himself away.
Uluwehi throws a right and a left that both miss.
Kona Uluwehi is winning the standup battle so far.
O Malley tries to clinch but Uluwehi is having none of it.
Uluwehi takes a head kick and keeps coming.
Uluwehi misses with a series of wild punches.
Uluwehi throws a jab, cross combination which is slipped
and O Malley counters with a one-two to the body.
That's four minutes gone in the round.
O Malley scores to the head and body with a nice combination!
O Malley slips a jab and a cross from Uluwehi.
Fantastic stuff here - a very entertaining period of action, which has drawn cheers from the crowd.
O Malley tries a switch kick but it misses it's target.
Uluwehi went nuts there looking for a big combo counter but none of the flurry connected.
Uluwehi lunges at O Malley with a hook that half lands and is half blocked by O Malley's hand.
Sloppy strikes from Uluwehi. Those never looked like landing.
Uluwehi lands a jab-cross combination.
Uluwehi moves into range and throws a combination. A nice jab followed by a hook to the body.
Uluwehi throws a combination but it was largely blocked by O Malley.
O Malley appeared to try and counter that last move with a leg kick.
Uluwehi swinging wildly here.
O Malley throws a counter combo.
And that is the end of the round. The fighters go back to their corners.
Kona Uluwehi dominated that second round.
The corners get their ten second warning. Both fighters stand from their stools and stare each other down, ready to get back to the action. This is the final round!

O Malley tries to close the distance and clinch up but Uluwehi swats him away and circles back towards the center.
O Malley tries a head kick but it misses.
Uluwehi throws a right and a left that both miss.
Uluwehi misses with a wild combination.
Sloppy strikes from Uluwehi. Those never looked like landing.
O Malley misses with a two punch combination.
We've had a slow start to the round here - hopefully the action picks up.
Uluwehi tries to bum rush O Malley with a series of wild strikes but O Malley uses good footwork to avoid the assault.
Uluwehi misses with a double jab.
Uluwehi avoids the clinch attempt nicely.
Both fighters are breathing heavily.
That's one minute gone in the round.
Uluwehi lands a jab-cross combination.
O Malley avoids a punch combination nicely.
O Malley takes an uppercut right on the button but keeps his composure.
Uluwehi looks to score with a combo but nothing lands.
Uluwehi will need to tighten up his combinations if he doesn't want to gas himself out, swinging at thin air.
Uluwehi throws a series of punches but O Malley avoids them all with ease.
O Malley showing good head movement there, avoiding the strikes from Uluwehi.
O Malley with the counter takedown but Uluwehi avoids it easily.
That's two minutes gone in the round.
Uluwehi looks to score with a combo but nothing lands.
Uluwehi misses with a jab, cross combination.
O Malley looks to land a combination but Uluwehi avoids it well.
Uluwehi misses with a series of wild punches.
O Malley tries to clinch up but Uluwehi circles away and keeps his distance.
Uluwehi misses with a jab and misses with a cross straight after too.
Uluwehi is really dominating this fight. Is there anything that O Malley can do to turn this around?
Wooooo! Give it up for these two warriors! They are putting on a show!
Uluwehi misses with a two punch combination.
O Malley tries to clinch but Uluwehi moves out of range.
A little feinted left hand from Uluwehi on the counter but he doesn't commit to it.
That's three minutes gone in the round.
O Malley with a lazy takedown attempt
and O Malley takes a counter punch right on the button for his troubles.
Uluwehi throws a nice looking combination but O Malley bobs and weaves to avoid any damage.
Uluwehi misses with a double jab

and O Malley counters by moving into the clinch. Good anticipation by O Malley.
Uluwehi dictating the pace here, as the fighters clinch against the cage.
Uluwehi working on landing some head shots here - that one got through nicely.

Uluwehi breaks the clinch.
O Malley takes a punch to the jaw and another one to the bread basket.
O Malley lands a head kick!
That's four minutes gone in the round.
O Malley slips a jab and a cross from Uluwehi.
O Malley lands with a kick to the temple. Uluwehi shrugs as if to say "is that all you've got?"
O Malley throws a head kick that misses.
Wooooo! Give it up for these two warriors! They are putting on a show!
O Malley drops his hands momentarily and Uluwehi takes advantage with a crisp shot to the head.
O Malley fails with a takedown attempt from distance.
Uluwehi throws a series of punches but O Malley moves out of range.
Thomas O Malley has stepped it up - he knows he needs a finish here!
Uluwehi throws a nice looking combination but O Malley bobs and weaves to avoid any damage.
Uluwehi misses with a series of wild punches.
Despite the aggression on O Malley's face he doesn't fully commit to the counter.
And that's the end of the fight!
Kona Uluwehi showed his dominance in that final round.
Well Uluwehi has outscored his opponent in every aspect of the fight today. Only a scarily incompetent judge or two will keep him from a well deserved win... Over to the ring announcer for the scorecards.
Ladies and gentlemen, after 3 rounds of action, we go to the scorecards for a decision.
Judge Winston Howard scores the fight 30:27
Judge Chris Dean scores the fight 30:27
Judge Eliza Hachem scores the fight 30:27
In favor of your winner, by unanimous decision... Kona Uluwehi!
|
|
|
|
|
|
|
|
|
|
|
|
|
|
|
|
|
|
|
|
|
|
|
| S |
C
A |
G |
S |
C
B |
G |
|
S |
C |
G |
|
energy
A | B |
|
hype
A | B |
|
pop
A | B |
|
mgr
A | B |
|
FIGHT
RATING
49% |
|
|
|
|
|
|
