|
|
PBP Commentary |
Coming up we have a heavyweight MMA rules bout between Sonne Suavaki (ranked 3747 p4p, 5342 weight class) and Abdul The Hammer (ranked 0 p4p, 0 weight class). The Hammer has a pretty significant injury - he really shouldn't be fighting right now but he's a warrior and he's here none the less! Abdul The Hammer has the better chin. Will he look to stand and bang today?
 |
|
 |
| 174 cm
25
260
0 - 1 - 0 |
|
207 cm
25
250
0 - 1 - 0 |
BJJ Blue Belt
Basic striking
Prefers standup |
|
BJJ White Belt
Decent boxing
Heavy handed |
|
| |
|
Ladies and gentlemen. This fight is 3 rounds, in the heavyweight division.
Introducing the fighter to my left, fighting out of the red corner.
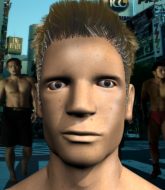
With a record of 0 - 1 - 0, fighting out of The Island, Sonne Suavaki!
And introducing the fighter to my right, fighting out of the blue corner.
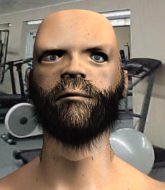
With a record of 0 - 1 - 0, fighting out of The Island, Abdul The Hammer!
The judges for this bout are Bart Greer, Peter Branson and Winston Alpacca.

The bell rings for round one and we are underway!
The Hammer throws a push kick but Suavaki slaps the foot to one side.
The Hammer looks winded!
The Hammer shoots in for a takedown. He's persisting with it as Suavaki sprawls well. Suavaki wins this battle and keeps the fight standing. The Hammer gets slowly back to his feet.
The Hammer keeping a good distance there, avoiding the body shot.
The Hammer throws a combination that misses
and The Hammer takes a counter punch right on the button for his troubles.
The Hammer has his head slapped from side to side by a 3 punch combination. That must have hurt him.

Suavaki has managed to clinch.
Suavaki really is a fat lump.
Suavaki is leaning against The Hammer and scores with a nice uppercut to the body.
A shot in the inside from Suavaki.

Suavaki's corner calls for him to break the clinch, which he does.
Abdul The Hammer seems to be the more aggressive standup fighter in this bout.
Suavaki throws a right hand that The Hammer ducks under and follows up with a left that The Hammer also avoids with ease.
Suavaki gets a clinch.
Suavaki's corner calls for him to break the clinch, which he does.
We've seen a great period of action over the last minute or so - credit to both fighters for going all out!
Suavaki closes the distance and presses his opponent up against the cage.
A hook to the body from Suavaki.
Suavaki escapes the clinch and we're back to striking.
Suavaki clinches up with The Hammer and pushes him back against the cage.
A short right hand to the side of the head by Suavaki.

That's one minute gone in the round.
Suavaki digs a right hand underneath The Hammer's ribcage. The Hammer let out a lung full of air as it connected.
Suavaki escapes the clinch and we're back to striking.
A left and a right from Suavaki both land. Nice combination.
Suavaki misses with a series of wild punches.
Sonne Suavaki is looking to keep the fight on the feet at all costs.
Suavaki has closed the distance and engaged The Hammer in a clinch.
Suavaki's corner calls for him to break the clinch, which he does.
Suavaki misses with a two punch combination.
The Hammer keeping a good distance there, avoiding the body shot.
Suavaki moves into range and clinches up with The Hammer.
The Hammer fails to pull the fight into his guard.
A short right hand to the side of the head by Suavaki.
Suavaki can't break the clinch.
Suavaki throws a hook to the body. More of an arm punch but it's all scoring with the judges.
Suavaki scores with a shoulder strike.
The crowd are loving this. Great action here.
Suavaki working on landing some head shots here - that one got through nicely.

That's two minutes gone in the round.
Suavaki lands with a good tight uppercut to the head.
A short body shot lands from Suavaki as the two fighters clinch.
A right hand to the body from Suavaki.
Suavaki working on landing some head shots here - that one got through nicely.
The Hammer takes a shot to the head.
Suavaki lands a hook that snaps the head of The Hammer backwards.
Suavaki breaks the clinch and we're back to striking at distance.
Suavaki lands a body shot.
Suavaki closes the distance and clinches.
Suavaki working on landing some head shots here - that one got through nicely.
Suavaki pushes The Hammer back against the cage and lands a hook to the side of the head.
Suavaki's corner calls for him to break the clinch, which he does.
A left and a right from Suavaki both land. Nice combination.
Suavaki gets to the clinch - let's see what his plan is here.

The Hammer breaks the clinch and we're back to striking at distance.
Suavaki has taken the fight to the clinch.
Suavaki breaks the clinch and we're back to striking at distance.

That's three minutes gone in the round.
Suavaki closes the distance and presses his opponent up against the cage.
Suavaki breaks the clinch.
The Hammer avoids a punch combination nicely.
Suavaki clinches with his opponent.
Suavaki lands a nice looking hook to the body, against the cage.
Suavaki breaks the clinch and we return to the middle of the mat.
Suavaki closes the distance and clinches.
Suavaki lands a body punch.
Good body shot from Suavaki.
Suavaki lands with a light punch inside.
Suavaki lands a body punch - he's looking to wear down The Hammer.
Suavaki lands a shoulder strike.
Suavaki breaks the clinch and we return to the middle of the mat.
Suavaki clinches up against the cage.
Wooooo! Give it up for these two warriors! They are putting on a show!
A short right from Suavaki.

That's four minutes gone in the round.
Suavaki escapes the clinch and we're back to striking.
Suavaki misses with a series of wild punches.
Suavaki rushes forward with a series of wild hooks but The Hammer moves out of range and avoids them all easily.
Suavaki gets a clinch.
Suavaki's corner calls for him to break the clinch, which he does.
The Hammer keeping a good distance there, avoiding the body shot.
A punch combination from Suavaki misses.
Suavaki ducks down and throws a hook to the body but The Hammer moves away.
Suavaki has closed the distance and engaged The Hammer in a clinch.
A left hand lands to the body for Suavaki.
Suavaki breaks the clinch.
The crowd applaud the fighters' efforts here as the round comes to an end.
Suavaki lands three nice shots there - that looked like it hurt!
Suavaki misses with a two punch combination.
The Hammer tries to keep at a distance but Suavaki has taken the fight into the clinch.
Suavaki breaks the clinch.
And that is the end of the round. The fighters go back to their corners.
Sonne Suavaki dominated that round.
That's time! Back to the action!

Suavaki has taken the fight to the clinch.
Suavaki breaks from the clinch.
The Hammer bobs and weaves well there to avoid the strikes.
Suavaki is really dominating this fight. Is there anything that The Hammer can do to turn this around?
The Hammer dives in for a single leg takedown but Suavaki sprawls and the fighters end up clinched against the cage.
Suavaki gets to the clinch - let's see what his plan is here.
Suavaki lands a right uppercut that snaps the head of The Hammer backwards.
Suavaki breaks the clinch and we return to the middle of the mat.
The Hammer misses with a double jab.
Suavaki moves into the clinch.
Suavaki breaks the clinch.
Suavaki closes the distance and clinches.
Suavaki lands a hook to the side of the head.
Suavaki's corner calls for him to break the clinch, which he does.
Suavaki pushes The Hammer up against the cage in a clinch.
The crowd are loving this. Great action here.
Suavaki breaks the clinch and we're back to striking at distance.
The Hammer is breathing heavily.
Suavaki has The Hammer up against the cage in a clinch.
Suavaki breaks from the clinch.
Sonne Suavaki is winning the standup battle so far.
That's one minute gone in the round.
Suavaki moves into range and throws a lovely three punch combination.
Suavaki will need to tighten up his combinations if he doesn't want to gas himself out, swinging at thin air.
Suavaki is looking to wear down The Hammer with body shots, infact he's throwing more body shots than head shots at the moment.
Suavaki forces The Hammer back against the cage and clinches.
Suavaki pushes off and circles away, back to the middle of the mat.
The Hammer shoots in looking for a takedown. Suavaki tries to sprawl out of it but The Hammer keeps driving through. The fighters are pinned against the cage. Suavaki manages to get underhooks and after a bit of a struggle, circles away and we're back to standing.
Suavaki tries to clinch but is not successful on this occasion.
The Hammer takes an uppercut right on the button but keeps his composure.

Oooooh!!! Suavaki has knocked The Hammer down with a huge combo! Suavaki steps away and waves a wobbly The Hammer back to his feet! This one might not go much longer!

The Hammer is rocked!
Wooooo! Give it up for these two warriors! They are putting on a show!
It's a brutal combination of punches from Suavaki! The Hammer is backing up but he can't get away as Suavaki lands with one final shot to the jaw that drops The Hammer and ends the fight. Great knockout.
Ladies and gentlemen, after 1:55 of round 2, we have a winner by way of TKO (Punches). Sonne Suavaki!
|
|
|
|
|
|
|
|
|
|
|
|
|
|
|
|
|
|
|
|
|
|
|
| S |
C
A |
G |
S |
C
B |
G |
|
S |
C |
G |
|
energy
A | B |
|
hype
A | B |
|
pop
A | B |
|
mgr
A | B |
|
FIGHT
RATING
77% |
|
|
|
|
|
|
