|
|
PBP Commentary |
Coming up we have a light heavyweight MMA rules bout between Exum Dema (ranked 4144 p4p, 4143 weight class) and Richarlison II (ranked 0 p4p, 0 weight class). We have two fighters making their debuts here, so let's see who comes out of this one with their first professional victory.
 |
|
 |
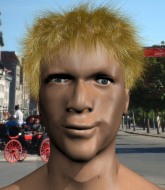
| 196 cm
18
219
0 - 0 - 0 |
|
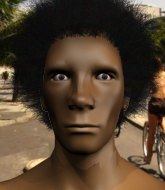
193 cm
19
218
0 - 0 - 0 |
Good wrestling
Basic striking
Big heart |
|
BJJ Blue Belt
Brawler
Tends to cut |
|
| |
|
Ladies and gentlemen. This fight is 3 rounds, in the light heavyweight division.
Introducing the fighter to my left, fighting out of the red corner.
With a record of 0 - 0 - 0, fighting out of Sydney, Exum Dema!
And introducing the fighter to my right, fighting out of the blue corner.
With a record of 0 - 0 - 0, fighting out of Rio de Janeiro, Richarlison II!
The judges for this bout are Francis DeMontford, Ron Honeybunn and Topper Green.

The bell rings for round one and we are underway!
Dema misses with a straight left.
II shoots for a double leg takedown but Dema sprawls well. He's pushed II's face into the mat and manages to get back to his feet relatively easily.
II throws a low kick but Dema moves out of range easily.
Dema misses with a wild combination.
Dema misses with a looping left.
II takes a jab on the nose there. A little bit of blood seems to be coming out. Hopefully that won't affect his breathing.
II uses good footwork to avoid the strikes from Dema.
II shoots in and drives through. Dema sprawls well.
An attempted straight right counter from Dema misses the target.
Dema cracks II with a nice right hand that draws applause from the crowd.
We've had a slow start to the round here - hopefully the action picks up.
II uses good footwork to avoid the strikes from Dema.
Dema scores with a straight right hand, right through his opponent's guard.
Dema misses with an uppercut
and II counters with a two punch combo.
II shoots in for a takedown but Dema shows good takedown defense.
Exum Dema has stuffed three takedown attempts in the round now. That's going to take a lot out of Richarlison II.
This has been an exciting period of action!
A low kick from II misses
and Dema counters with a lovely shot to the body.

That's one minute gone in the round.
Dema misses with a straight right.
II drops down looking to force a counter takedown but Dema defends it well.
Dema lands with a cross to side of his opponent's head.
Dema throws a body shot but no joy.
II feints the counter takedown.
Dema misses with an uppercut.
II bobs and weaves and throws out a fast jab that snaps Dema's head backwards.
II shoots in looking for a double leg takedown. Dema defends it nicely.
II shoots in for a takedown but Dema shows good takedown defense there and keeps this one on the feet.
Dema works his jab well there, keeping his opponent at a distance.
Dema throws a shot from downtown. II moves away and avoids it.
II shoots and misses
and Dema counters with a two punch combo.
II slips under a jab.

That's two minutes gone in the round.
Dema checks a low kick from II.
Dema is looking to counter punch.
Dema is really head hunting here, hardly looking to strike to the body at all.
II shoots in for a double leg but Dema sprawls well. That's going to sap some energy.
II looks winded!
Dema stuffs the takedown attempt from II. II gets slowly back to his feet.
Wooooo! Give it up for these two warriors! They are putting on a show!
II steps to the side to avoid the strikes from Dema.
II fails with a rather predictable takedown attempt.
Sloppy strikes from Dema. Those never looked like landing.
Dema sets himself, and II steps forward looking for the clinch! Dema avoids it this time.
Dema waving his hands out in front of him, looking to distract II.
Dema misses with an uppercut. II saw that one coming.
Dema throws a nice looking combination but II bobs and weaves to avoid any damage.
Dema lands with a nice body punch.
II misses with an uppercut.

That's three minutes gone in the round.
II just misses with a punch to the body.
II looks frustrated there after his takedown attempt is stuffed easily.
Dema is looking to counter punch.
Dema misses the jab.
II swings away with a counter right hand but no contact made.
Dema throws out a loose jab but II uses good head movement to avoid it.
II bobs and weaves well there to avoid the strikes.
Dema looks to land a left hand but II moved out of range nicely.
Dema is the aggressor but that punch slipped nicely by II.
A big left from Dema misses.
Nice shot by Dema.
II shoots in for a takedown but Dema shows good takedown defense there and keeps this one on the feet.
Dema throws the left hand but II avoids the punch easily.
II is trying to avoid his opponent's strikes and get into the clinch.
Dema throws a jab but it's blocked by II.
II drops down looking to force a counter takedown but Dema defends it well.

That's four minutes gone in the round.
Dema throws a body shot but no joy.
Dema sets himself, and II steps forward looking for the clinch! Dema avoids it this time.
Dema circles away from the clinch attempt.
It looked like Dema wanted to counter with a hook but didn't fully commit.
No joy there for Dema, who threw a few shots but didn't land.
Dema lands with a hook. II tried to avoid it but it clipped the top of his head.
Dema throws a looping overhand right but II ducks down to avoid it.
Dema throws a jab, cross combination which is slipped

and II counters into the clinch. Nicely done.
II wants to take the fight to the mat but Dema manages to get underhooks and keep the fight in the clinch.
II keeps control of Dema as he tries to wriggle out of the double underhooks.
Dema is trying to push II away but II has him pressed against the cage, so he's going nowhere.
Dema wants to push off and get back to the center of the mat but II has him pressed against the cage.
Dema looks like he'd prefer to be striking at range right now.
II prevents Dema from breaking the clinch.

Dema breaks the clinch and we're back to striking at distance.
This is a great period of action - very entertaining stuff!
Dema getting the better of the striking in that exchange.
And that is the end of the round. The fighters go back to their corners.
Exum Dema dominated that round.
That's the end of the round. The referee orders the cornermen out of the cage so we can get back down to business.

The fighters circling - Dema throws out the jab but it was never going to land.
II misses with a head kick.
Dema takes a really solid shot there but just smiles back and shrugs his shoulders.
Dema circles away from the clinch attempt.
Dema loads up on a big right hand but II slips the punch.
II tries to move into range but Dema moves to the side and lands with a nice right hand.
Dema misses with a jab and misses with a cross straight after too.
Nice takedown defense from Dema. No joy for II on that attempt.
II fails with a takedown attempt from distance.
We've had a slow start to the round here - hopefully the action picks up.
II wants to clinch.
II fails with the takedown
enabling Dema to counter with a crisp jab.
Exum Dema has stuffed three takedown attempts in the round now. That's going to take a lot out of Richarlison II.
II is breathing heavily.
That's one minute gone in the round.
II tries to clinch but is not successful on this occasion.
Dema throwing a counter right hand but II manages to avoid it.
Dema jabs. That one connects to the head of his opponent.
A swing and a miss from II.
II misses with a wild combination.
II moves out of range as Dema strikes.
II ducks right into an uppercut from Dema.
Dema throws an uppercut from half a mile away. II sees it coming and avoids it easily.
Exum Dema is winning the standup battle so far.
Dema throws out a token jab with nothing on it.
Richarlison II is looking to throw some combinations by the looks of things.
II bobs and weaves well there to avoid the strikes.
Dema looks to land a right hand but II moved out of range.
Dema throws the left hand but II avoids the punch easily.
That's two minutes gone in the round.
Dema throws an overhand right that lands on II's shoulder, as II tries to avoid the shot.
II is looking for the big counter here.
A big right from Dema misses.
Dema throws a one two combo.
Dema throws a big shot that misses.
II misses with a kick to the body
and Dema counters with a quick right hand to the jaw.
The crowd are loving this. Great action here.
Dema misses the shot to the body.
As Dema backs off II throws a huge counter combo but Dema manages to avoid it all.
Dema waving his hands out in front of him, looking to distract II.
It seemed like II was going to counter with the hook but didn't fully commit to it.
II shoots in but doesn't get the takedown
and Dema counters with a good right hand that lands right on the jaw.
II tries to clinch there but Dema circles away.
Dema looks to throw the jab but II is out of range.
II shoots in for a takedown - he's clinched up with Dema but Dema pushes him off and we're back to square one.
That's three minutes gone in the round.
Dema connects with a body shot that sends II's belly button to the back.
II gets cracked there but stands up to it.
II gets off balance looking for a body kick
and Dema counters with a crisp hook to the side of the head.
II fakes high and shoots in for a takedown but Dema avoids it really well and circles away.
Dema throws an uppercut from half a mile away. II sees it coming and avoids it easily.
II slips a jab from Dema.
Dema looks to land a right hand but II moved out of range.
II tries to counter with a clinch but Dema shakes him off and moves away.
II moves to clinch but Dema breaks away
and Dema counters with a nice uppercut.
Dema tries to land with a swinging hook to the body but II was well out of range. Poor timing from Dema.
That's four minutes gone in the round.
Dema swings wildly with a right hand that was never going to find it's target.
Dema is really dominating this fight. Is there anything that II can do to turn this around?
Dema throws a jab but it's blocked by II.
II moves out of range as Dema strikes.
Dema misses with a wild combination.
II tries to counter by closing the distance.
Nice takedown defense from Dema. No joy for II on that attempt.
It looked like Dema wanted to counter with a hook but didn't fully commit.
Dema misses with a looping left.
Dema throws a nice hook to the body that draws an oooh from the crowd.
Fantastic stuff here - a very entertaining period of action, which has drawn cheers from the crowd.
Some wild striking there from Dema.
II shoots in for a takedown. "I don't think so" says Dema as he avoids it easily.
II ducks under a wild hook from Dema.
And that is the end of the round. The fighters go back to their corners.
Exum Dema dominated that second round.
OK. That's time! The bell goes and we're back to the action. This is the final round!

Dema lands with a cross.
II ducks under a wild hook from Dema.
Dema swats away the attempt to clinch by II.
No luck with that takedown attempt from II.
II throws a head kick that misses and slips in the process. He scrambles back to his feet and the fighters circle.
Dema misses with an uppercut. II saw that one coming.
II uses good footwork to avoid the strikes from Dema.
We've had a slow start to the round here - hopefully the action picks up.
Dema throws a poor cross that misses
and II counters with a crisp hook to the side of the head.
II shoots in looking for a double leg takedown. Dema defends it nicely.
II takes a big intake of breath there - he's definitely tired.
That's one minute gone in the round.
Dema throws a hook but II avoids it easily.
II throws a sloppy head kick
and Dema counters with a straight right hand.
Dema misses with an uppercut.
II avoids a lazy jab quite easily.
II tries to clinch but Dema is having none of it.
II has his takedown stuffed
and Dema counters with a nice uppercut.
Exum Dema has stuffed three takedown attempts in the round now. That's going to take a lot out of Richarlison II.
Dema throws a jab but it's blocked by II.
Dema throws a one two combo.
Dema throws a right hand that II ducks under and follows up with a left that II also avoids with ease.
Dema scores with a sloppy right hand. II should have avoided that one.
Dema just misses with a punch to the body.
II displays some good footwork, moving neatly out of range as Dema throws out the jab.
That's two minutes gone in the round.
Dema throws a hard body shot but it just misses.
Dema takes a swing at II's ribcage but misses.
A slow jab from Dema misses its intended target.
Dema looks to throw the jab but II is out of range.
II is loading up here, looking for a big counter of his own.
Fantastic stuff here - a very entertaining period of action, which has drawn cheers from the crowd.
Dema misses with a looping right.
Dema takes a swing at II's ribcage but misses.
II shoots in for a takedown. "I don't think so" says Dema as he avoids it easily.
II is trying desperately to land a takedown but Dema is having absolutely none of it. This is turning into a bit of a nightmare for II.
Dema misses with a hook. II ducked under it nicely.
Dema lands with a hook. II tried to avoid it but it clipped the top of his head.
Dema misses with an uppercut. II saw that one coming.
II was about to counter that last move with a leg kick but changes his mind.
Dema throws a looping overhand right but II ducks down to avoid it.
II lets it all go there with a big combo counter but none of the punches connected.
II uses decent footwork to sidestep a right hand from Dema.
That's three minutes gone in the round.
II avoids a lazy jab quite easily.
Dema misses with an uppercut
and II counters with a straight punch to the midsection.
Dema looks to land a left hand but II moved out of range nicely.
II unleashes a big counter combination but Dema bobs and weaves and avoids any damage.
II slips a straight right by Dema.
II has a pretty nasty looking mouse under his right eye.
A telegraphed right hand from Dema misses the target.
II slips under a jab from Dema.
II tries a counter takedown but it's more of a dummy move, and he uses it to push himself away.
Exum Dema is looking to keep the fight on the feet at all costs.
Dema throws a big shot that misses.
II pulls out of a head kick attempt.
Dema throws an uppercut from half a mile away. II sees it coming and avoids it easily.
II dives in and grabs Dema's left leg, looking for a takedown. Dema pushes down on II's head and hops out.
As II looks to move away, Dema throws a big counter combo but II just gets out of the way.
II takes a shot to the nose. Hopefully that hasn't broken it.
That's four minutes gone in the round.
II shoots in for a takedown but Dema shows good takedown defense.
Dema was looking to counter that move with a punch but didn't quite pull the trigger.
Dema throws out a loose jab but II uses good head movement to avoid it.
II steps to the side to avoid the strikes from Dema.
Dema stalks II and leaps in with a furious combination of punches. Uppercuts and crosses smash into II's face. II staggers backwards, shaken.
The fighters circling - Dema throws out the jab but it was never going to land.
Some wild striking there from Dema.
Wooooo! Give it up for these two warriors! They are putting on a show!
Dema is the aggressor but that punch slipped nicely by II.
II avoids a lazy jab quite easily.
II misses with a takedown attempt. He shot from a bit too far out.
Richarlison II has stepped it up - he knows he needs a finish here!
Dema waving his hands out in front of him, looking to distract II.
And that's the end of the fight!
Exum Dema showed his dominance in that final round.
Well I reckon that's a shut out for Dema, winning every round. Will the judges agree? They are the ones who matter, even if they are often depressingly incompetent. Over to the ring announcer for the scorecards.
Ladies and gentlemen, after 3 rounds of action, we go to the scorecards for a decision.
Judge Francis DeMontford scores the fight 30:26
Judge Ron Honeybunn scores the fight 30:25
Judge Topper Green scores the fight 30:27
In favor of your winner, by unanimous decision... Exum Dema!
|
|
|
|
|
|
|
|
|
|
|
|
|
|
|
|
|
|
|
|
|
|
|
| S |
C
A |
G |
S |
C
B |
G |
|
S |
C |
G |
|
energy
A | B |
|
hype
A | B |
|
pop
A | B |
|
mgr
A | B |
|
FIGHT
RATING
49% |
|
|
|
|
|
|

