|
|
PBP Commentary |
Coming up we have a welterweight MMA rules bout between Charles Traynor (ranked 836 p4p, 925 weight class) and Kohinata Minoru Ii (ranked 111 p4p, 125 weight class). Traynor comes into the arena with Crazy Train by Ozzy Osbourne blaring out of the sound system. I don't know about you partner, but I'm pumped for this one!
 |
|
 |
| 182 cm
25
170
13 - 8 - 0 |
|
185 cm
40
186
32 - 15 - 0 |
Good wrestling
World class MT
Insanely flexible |
|
Good wrestler
Excellent MT
Granite chin |
|
| |
|
Ladies and gentlemen. This fight is 3 rounds, in the welterweight division.
Introducing the fighter to my left, fighting out of the red corner.
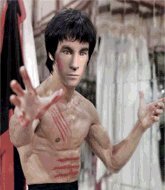
With a record of 13 - 8 - 0, fighting out of Montreal, Charles Traynor!
And introducing the fighter to my right, fighting out of the blue corner.
With a record of 32 - 15 - 0, fighting out of Tokyo, Kohinata Minoru Ii!
The judges for this bout are Ren Mimura, Taro Takaoka and Yukihiro Shimada.

The bell rings for round one and we are underway!
Traynor scores with a jab to the body.
Traynor lands with a shot to the body.

Minoru Ii moves into the clinch.
Minoru Ii blocks an elbow strike.
Traynor looks to throw an elbow but misses.
Minoru Ii avoids a wild elbow strike from Traynor.
Minoru Ii manages to get underhooks and slows down the pace for a moment.
Minoru Ii is clearly stalling here... Pick up the pace son.
Traynor pushes off and fires off an elbow that misses, before clinching up again, against the cage.
We've had a slow start to the round here - hopefully the action picks up.
Traynor tries to work over Minoru Ii's body with a swooping hook but it only glances the target.
Minoru Ii wants to strike at distance but he can't break free of the clinch.

Minoru Ii pushes off and circles away, back to the middle of the mat.
Traynor throws a series of punches but Minoru Ii moves out of range.
Traynor lands a slapping body shot.
Minoru Ii tries to clinch but Traynor moves out of range.

That's one minute gone in the round.
Minoru Ii misses with a body shot.
Minoru Ii ducks under a wild hook from Traynor.
Minoru Ii is definitely looking for the counter takedowns here.
Minoru Ii shoots in for a takedown - he's clinched up with Traynor but Traynor pushes him off and we're back to square one.
Traynor definitely looks more muscular than last time we saw him fight.
A jab from Traynor misses.
Minoru Ii lets it all go there with a big combo counter but none of the punches connected.
Traynor punishes Minoru Ii's body with a nice straight punch.
Minoru Ii looks shocked there as he takes a right hand to the temple.
Minoru Ii closes the distance and clinches up with Traynor, looking for a takedown. Minoru Ii pushes Traynor against the cage but Traynor circles to the side and manages to break the clinch.
Charles Traynor is looking to keep the fight on the feet at all costs.
Traynor throws a right hand that Minoru Ii ducks under and follows up with a left that Minoru Ii also avoids with ease.
Charles Traynor seems to be the more aggressive standup fighter in this bout.
Minoru Ii throws a body kick but he wasn't in range.
A big right from Traynor misses.
Traynor moving in and out of range nicely, whilst landing the scoring shot.
Minoru Ii's hands are dropping dangerously low here and Traynor connects clean with a right hook that sends him down to one knee! Minoru Ii scrambles back to his feet.
Traynor lands with an uppercut that bounces Minoru Ii off the cage and back into range.
The crowd cheering loudly, showing their appreciation for the quality fight we're seeing here.
Traynor misses with a few strikes there.

That's two minutes gone in the round.
Traynor throws a nice looking combination but Minoru Ii bobs and weaves to avoid any damage.

Traynor drives through and clinches with Minoru Ii against the cage.
Minoru Ii takes a shot to the head.
Traynor misses with a hook to the ribs.
Minoru Ii blocks an elbow strike.
Minoru Ii tries to pull guard but Traynor won't allow it.
Minoru Ii has been looking to improve his clinch game in recent weeks. Traynor seems to have the measure of him in the clinch so far, so let's see if Minoru Ii can turn it around.
Charles Traynor has stuffed three takedown attempts in the round now. That's going to take a lot out of Kohinata Minoru Ii.
With the fighters up against the cage, Traynor throws an elbow but misses.

Traynor's corner calls for him to break the clinch, which he does.
Traynor throws a jab to the body, straight down the pipe. Boom. That sent Minoru Ii stumbling backwards but he manages to regain his composure quickly.
Minoru Ii closes the distance and clinches up with Traynor, looking for a takedown. Minoru Ii pushes Traynor against the cage but Traynor circles to the side and manages to break the clinch.
A left lands for Traynor.
Minoru Ii moves in looking to clinch but Traynor pushes him off.
Traynor has managed to clinch.
Nice elbow from Traynor.
Minoru Ii looking for a takedown.
Traynor misses with a hook from the clinch.

That's three minutes gone in the round.
Traynor lands an elbow inside that Minoru Ii shrugs off.
Traynor prevents the takedown attempt.
A head punch on the inside from Minoru Ii fails to land.
Traynor comes over the top with an elbow. That landed flush.
Traynor escapes the clinch and we're back to striking.
Minoru Ii scores to the head and body with a nice combination!
Minoru Ii moves out of range as Traynor strikes.
Traynor avoids the clinch attempt nicely.
Minoru Ii fails to land the takedown.
Traynor throws a body shot but no joy.
Traynor fakes a jab and then connects with a hook.
Traynor fakes with an overhand right and moves in to clinch with Minoru Ii, pushing him back against the cage.
Minoru Ii tries to pull guard but Traynor holds him up against the cage and eventually Minoru Ii drops back down to his feet.
Minoru Ii is trying to drag Traynor to the mat but Traynor just about manages to keep his footing. He used the cage to his advantage there.

That's four minutes gone in the round.
Traynor breaks the clinch.
Fantastic stuff here - a very entertaining period of action, which has drawn cheers from the crowd.
Traynor throws a combination that misses
and Minoru Ii counters with a left and a right that stings Traynor.
Traynor fakes high and swings low for a body shot but Minoru Ii manages to avoid it.
Traynor misses with a shot to the body
and Minoru Ii counters with a shot to the ribs. That looked like it hurt.
Minoru Ii shoots in but no luck this time.
A cross from Traynor lands.
Traynor throws a jab when Minoru Ii was well out of range.
Some wild striking there from Traynor.
Traynor misses with a jab, cross combination.
Minoru Ii looks for a takedown but Traynor sprawls well.
Traynor takes a swing at Minoru Ii's ribcage but misses.
And that is the end of the round. The fighters go back to their corners.
Charles Traynor dominated that round.
The fighters' corners scream their final instructions, as the referee calls time. Here we go, back to the action!

Minoru Ii uses good head movement to avoid the hook from Traynor.
Minoru Ii with a lazy takedown attempt
letting Traynor counter with a right hand.
Minoru Ii dives in and grabs Traynor's left leg, looking for a takedown. Traynor pushes down on Minoru Ii's head and hops out.
Traynor gets a clinch.
Traynor misses with a body punch.
Traynor throws a blind hook that connects with the side of Minoru Iis head.
Traynor is really dominating this fight. Is there anything that Minoru Ii can do to turn this around?
Minoru Ii is trying to work out of this bad position, with his back against the cage.
Minoru Ii is trying to pull guard but being pressed up against the cage enables Traynor to keep the fight standing.
Charles Traynor has stuffed three takedown attempts in the round now. That's going to take a lot out of Kohinata Minoru Ii.
Traynor gets an overhook and lands an elbow to the side of the head.
Minoru Ii takes an elbow to the temple.
A short body shot lands from Traynor as the two fighters clinch.
We've had a slow start to the round here - hopefully the action picks up.
Traynor lands a nice uppercut.
Traynor breaks from the clinch.
Minoru Ii's hands are dropping dangerously low here and Traynor connects clean with a right hook that sends him down to one knee! Minoru Ii scrambles back to his feet.
The fans in attendance giving it up for the two fighters, who have really let it all hang out in the last minute or so!
Traynor displaying good standup as he scores with a three punch combination.
Traynor rushes Minoru Ii and presses him up against the cage.
That's one minute gone in the round.
Traynor breaks the clinch and we're back to striking at distance.
Traynor uses decent footwork to sidestep a right hand from Minoru Ii.
Minoru Ii shoots in for a takedown but Traynor shows good takedown defense.
Traynor comes forward and lands a shot to the body, then darts back out of range.
Minoru Ii is breathing heavily.
Traynor rushes Minoru Ii and presses him up against the cage.
With the fighters clinched against the cage, Traynor creates a bit of distance for himself and scores with a nice uppercut.
Traynor lands a hook to the body. It's hard to tell if that hurt Minoru Ii or not.
Traynor lands a nice uppercut.
An uppercut to the body lands inside from Traynor.
Traynor looks to throw an elbow but misses.
Traynor presses Minoru Ii against the cage and delivers a mid-strength body shot.
With the fighters clinched against the cage, Traynor creates a bit of distance for himself and scores with a nice uppercut.
Traynor lands a glancing elbow in the clinch.
Traynor breaks the clinch.
Wooooo! Give it up for these two warriors! They are putting on a show!
Traynor throws a series of punches but Minoru Ii avoids them all with ease.
Minoru Ii walks straight into an uppercut. Luckily it didn't land flush.
That's two minutes gone in the round.
Minoru Ii shoots and misses
and Traynor counters with a lovely shot to the body.
Minoru Ii takes a jab right on the nose. That must have hurt but he shrugs his shoulders and looks to return the favor.
A swing and a miss from Traynor.
Traynor throws a combination but it was largely blocked by Minoru Ii.
A punch combination from Traynor misses.
The fighters are starting to get sweaty, which will make takedowns a bit more tricky.
Traynor throws the left hand but Minoru Ii avoids the punch easily.
Traynor connects with a left and a right that sees a clearly hurt Minoru Ii covering up! Traynor comes in with a big uppercut and Minoru Ii goes doooown! He's slumped up against the cage, eyes staring blankly into space.
Ladies and gentlemen, after 2:34 of round 2, we have a winner by way of KO (Strikes). Charles Traynor!
A relieved looking Charles Traynor thanked the fans for their support and gave the usual line about them being amazing. They seemed to believe that he actually meant it.
|
|
|
|
|
|
|
|
|
|
|
|
|
|
|
|
|
|
|
|
|
|
|
| S |
C
A |
G |
S |
C
B |
G |
|
S |
C |
G |
|
energy
A | B |
|
hype
A | B |
|
pop
A | B |
|
mgr
A | B |
|
FIGHT
RATING
69% |
|
|
|
|
|
|
