|
|
PBP Commentary |
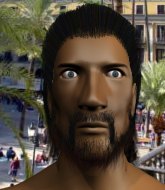
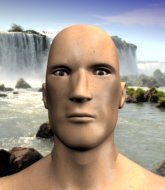
Coming up we have a middleweight MMA rules bout between Anthony Kawells (ranked 0 p4p, 0 weight class) and John Mayhem (ranked 0 p4p, 0 weight class). These two fighters really are very evenly matched on the feet - it will be fascinating to see who can assert themselves in that aspect of the fight.
 |
|
 |
| 183 cm
23
185 lbs
4 - 3 - 0 |
|
185 cm
22
198 lbs
4 - 3 - 0 |
BJJ Blue Belt
Solid Muay Thai
Experienced |
|
BJJ Blue Belt
Decent boxing
Determined |
|
| |
|
Ladies and gentlemen. This fight is 3 rounds, in the middleweight division.
Introducing the fighter to my left, fighting out of the red corner.
With a record of
4 - 3 - 0, fighting out of Las Vegas, Anthony Kawells!
And introducing the fighter to my right, fighting out of the blue corner.
With a record of
4 - 3 - 0, fighting out of Las Vegas, John Mayhem!
The judges for this bout are Chris Downing, Alan Glass and Tiny Johnson.

The bell rings for round one and we are underway!
Mayhem tries for a takedown but Kawells sees it coming a mile off and avoids it easily.
Mayhem changes levels and looks for a double leg takedown. Kawells tries to avoid it but Mayhem manages to keep hold of a leg and drag Kawells to the ground. Kawells escapes though and pops straight back up to his feet.
Mayhem avoids the clinch attempt nicely.
Mayhem throws out a loose jab but Kawells uses good head movement to avoid it.
Mayhem fails with a takedown attempt.
Anthony Kawells has stuffed three takedown attempts in the round now. That's going to take a lot out of John Mayhem.
Mayhem lands a really nice looking cross but Kawells seems unphased.
Kawells looking to take his opponent's legs away with the low kicks.
Kawells wants to clinch.
Mayhem lands a powerful looking uppercut that connected with his opponent's jaw.
Kawells tries a switch kick but it misses it's target.

Kawells gets to the clinch - let's see what his plan is here.
Kawells has hold of a leg and is looking for a trip takedown. Mayhem avoids it nicely though and we remain in the clinch.
Mayhem is looking to break free of the clinch but Kawells has double underhooks.
Kawells looking to throw knees to the head but Mayhem is blocking nicely.
Kawells prevents a takedown attempt there.
Mayhem is working for a takedown up against the cage. He can't get it on this occasion though.
Mayhem is trying to drag Kawells to the mat but Kawells just about manages to keep his footing. He used the cage to his advantage there.
Mayhem tries for a takedown but Kawells manages to get underhooks.
Mayhem looks gassed!

That's one minute gone in the round.
Mayhem tries for a takedown. No joy.
Kawells with a knee to the head.
Kawells gets underhooks to prevent Mayhem's takedown attempt.
Still in the clinch, Kawells scores with a nice short uppercut.
Kawells prevents a takedown attempt there.
Kawells slows down the pace here.
Kawells connects with a nasty looking knee right to Mayhem's face.
Kawells connects with a nasty looking knee right to Mayhem's face.
Kawells has Mayhem pressed against the cage.
Kawells putting his Muay Thai to good use. He has Mayhem in a tight clinch and is doing some damage with knees to the body.
Kawells prevents the takedown attempt.
Kawells connects with a knee to the head.

Kawells breaks from the clinch.
Kawells forces Mayhem back against the cage and clinches.
Kawells lands a knee to the head there! That was nasty!

Kawells pulls guard successfully.
Mayhem stands up and looks to throw the legs aside to pass to side control. Kawells swivels though and keeps the full guard.
The fighters are pressed up against the cage, both looking to find a bit of space to work.
Kawells wants to stand but Mayhem is controlling the position.
The ref warns both fighters not to hold the cage as they work up against the meshing.

That's two minutes gone in the round.

Mayhem decides to stand up and beckons his opponent to follow.
Kawells thows a body kick. Mayhem tries to catch it but that hurt him.
Mayhem changes levels and looks for a double leg takedown. Kawells tries to avoid it but Mayhem manages to keep hold of a leg and drag Kawells to the ground. Kawells escapes though and pops straight back up to his feet.
Kawells rushes Mayhem and pushes him back against the cage in a clinch.
Knees to the body from Kawells.
Kawells looking to stall.
Mayhem is trying to trip Kawells. He has hold of a leg but Kawells is hopping around, keeping his balance for the moment. Mayhem persists though and gets the takedown into guard.
We've seen a great period of action over the last minute or so - credit to both fighters for going all out!
Mayhem is fighting to break Kawells's control of his arms but Kawells is doing a good job of controlling the position at the moment.
Mayhem stands up from guard. Let's bang!
A big left from Mayhem misses.
Kawells defends well against a solid takedown attempt from Mayhem.
Mayhem circles away from the clinch attempt.

That's three minutes gone in the round.
Mayhem scores a takedown into full mount!

Mayhem swings around for an armbar but it's a sloppy attempt and Kawells is now in Mayhem's guard. A big mistake from Mayhem there, giving up the dominant position!
Mayhem had isolated an arm as going for an omaplata. Kawells is defending the submission well but is in a very vulnerable position. Mayhem Is leaning forward trying to finish the omaplata but decides to abandon it, and take Kawells's back instead.
Mayhem wants to control but Kawells is keeping busy.
Mayhem is working for the rear naked choke. He has one arm under the chin but Kawells has hold of the other arm. A bit of a stalemate here.
The fighters are starting to get a bit slippery now, which will make submissions a bit more difficult.
Kawells manages to reverse the position and now he's in Mayhem's guard. Nice work there by Kawells.

That's four minutes gone in the round.
Kawells wants to stand but Mayhem has a closed guard, so he can't escape.
Kawells pressing down on his opponent's thigh, looking to pass guard. Mayhem is keeping the position for now.
Kawells stays in close to Mayhem's body and controls the position.
The crowd applaud the fighters efforts here as the round comes to an end.

Well, the referee has seen enough. Neither fighter is active enough on the ground so he's stood them back up.
Mayhem swinging wilding here.
And that�s the end of the round � the fighters go back to their corners.
That was a close round but I would say that Anthony Kawells will probably get the nod.
The minute break is over - no more time for sponges and pep talks - back to the action!

Mayhem misses with a few strikes there.
A really sloppy takedown attempt there from Mayhem.
Donk. Mayhem catches Kawells right on the button with a cross.
Mayhem misses with an uppercut.
Kawells avoids a lazy jab quite easily.
Kawells wants to clinch up but Mayhem keeps it at a distance.
Mayhem's corner calls for a 1,2 combination and Mayhem duly obliges.
Mayhem keeps the fight on the outside.
Mayhem dips down and scores with a jab to the body.
Mayhem lands with an overhand left.
Both fighters are absolutely exhausted here.
Horrible takedown by Mayhem or perhaps it was just good defense by Kawells which made him look bad.
Mayhem swats away the attempt to clinch by Kawells.
That's one minute gone in the round.
Kawells displays some good footwork, moving neatly out of range as Mayhem throws out the jab.
Kawells tries to clinch but Mayhem moves out of range.
Kawells keeps the fight standing with a nice sprawl.
Anthony Kawells has stuffed three takedown attempts in the round now. That's going to take a lot out of John Mayhem.
Kawells tries to clinch up.
Mayhem throws a jab but it's blocked by Kawells.
Mayhem will have to do better than that with his takedown attempts.
Kawells tries to clinch up.
Mayhem throws an overhand right that lands on Kawells's shoulder, as Kawells tries to avoid the shot.
Kawells tries to close the distance and clinch up but Mayhem swats him away and circles back towards the center.
Kawells tries to clinch up but Mayhem circles away and keeps his distance.
Anthony Kawells is looking to throw some combinations by the looks of things.
Kawells is looking to clinch but Mayhem is avoiding it.
Kawells tries to clinch but Mayhem is having none of it.
That's two minutes gone in the round.
There's not a lot going on here and the crowd are letting the fighters know they're not willing to tolerate a lack of action.
Mayhem throws a jab when Kawells was well out of range.
Mayhem closes this distance looking for a takedown but Kawells circles away.
Mayhem keeps the fight on the outside.
Kawells darts in and clinches Mayhem up against the cage.
Kawells with the Thai clinch, lands a knee to the head.
Kawells scores with a knee to the head.
Kawells's corner calls for him to break the clinch, which he does.
Like a baseball bat into the meat of his leg there - nice leg kick by Kawells.
Kawells lands with a nice body kick.
Kawells fails with a takedown attempt.
John Mayhem seems to be the more aggressive standup fighter in this bout.
No joy there for Mayhem, who threw a few shots but didn't land.
Mayhem might want to mix his strikes up a bit more. He's just going for head shots at the moment and that can become a bit predictable.
Kawells tries to clinch up.
Kawells staying out of range there.
Decent striking displayed by Mayhem there.
That's three minutes gone in the round.
Kawells moves in looking to clinch but Mayhem pushes him off.
Mayhem slips in close and lands a nice hook before moving back out of range.
Mayhem keeps the fight on the outside.
Mayhem rushes forward with a series of wild hooks but Kawells moves out of range and avoids them all easily.
Kawells tries to clinch up but Mayhem circles away and keeps his distance.
Kawells closes the distance, clinches up and gets a nice trip takedown into side control. Very smooth.
Mayhem parries the strikes from Kawells easily there. Kawells is wary of posturing up too much because it might enable Mayhem to escape.
Kawells is staying tight to Mayhem's torso, preventing him from escaping.
Mayhem is not content to let Kawells control the position.
Kawells swings around for an armbar but Mayhem sees it coming a mile off and turns beautifully into Kawells's guard.
That's four minutes gone in the round.
Kawells wants to get back to his feet but Mayhem is in a dominant position and won't allow it.
Kawells is working actively off his back, looking to secure an arm or perhaps work for a triangle.
Mayhem is in close to Kawells's body, working some short punches and elbows.
Mayhem must be cautious of submissions here, given that his opponent has the superior Jiu Jitsu.
Mayhem decides to stand up and beckons his opponent to follow.
Kawells is looking to clinch.
Kawells wants to clinch.
And that�s the end of the round � the fighters go back to their corners.
A close second round but John Mayhem will probably get the nod - 10:9.
OK. That's time! The bell goes and we're back to the action. The crowd applaud as we get ready to start the final round!

Mayhem scores with a punch to the gut of his opponent.
Mayhem lands the left hand.
Mayhem misses with a two punch combination.
Mayhem shoots in with a lovely double leg takedown. Kawells manages to land in full guard to minimise the damage.
Mayhem gets to his feet and steps away from his opponent.
Kawells wants to clinch up but Mayhem keeps it at a distance.
Kawells doesn't manage to clinch there - Mayhem circles away.
Kawells on the wrong end of a vicious looking body shot.
Mayhem misses with a jab, cross combination.
Mayhem misses with the combination.
Both fighters are breathing heavily.
Kawells moves into range and clinches up with Mayhem.
That's one minute gone in the round.
Kawells lands an elbow just above Mayhem 's eye.
Mayhem drops down for a takedown but doesn't get it.
Knees in the clinch landing for Kawells.
Kawells taking a breather.
Mayhem goes for a takedown attempt but Kawells pushes him away and we're back to fighting at a distance.
Kawells fails with an attempt to clinch.
A really sloppy takedown attempt there from Mayhem.
Anthony Kawells has stuffed three takedown attempts in the round now. That's going to take a lot out of John Mayhem.
Kawells is looking to clinch but Mayhem is avoiding it.
Mayhem fails with a takedown attempt.
Mayhem circles away from the clinch attempt.
That's two minutes gone in the round.
The crowd are getting on the fighters' backs, as the pace has dropped off in the last minute or so.
Kawells closes the distance and clinches.
Mayhem wants a takedown.
Kawells lands a nice knee to the body.
Kawells manages to break the clinch.
Mayhem shoots for a takedown but Kawells saw that one coming a mile off and avoided it easily.
Mayhem throws a series of punches but Kawells moves out of range.
Kawells closes the distance and clinches up with Mayhem, looking for a takedown. Kawells pushes Mayhem against the cage but Mayhem circles to the side and manages to break the clinch.
Kawells wants to clinch.
Mayhem shoots in for a takedown and gets it. Oh and he's advanced to full mount straight away.
Both fighters really going for it on the ground here!
Kawells wants to try and get back to his feet.
Mayhem get's back to his feet.
Kawells takes a body punch but keeps moving.
Mayhem thows a body shot but no joy.
That's three minutes gone in the round.
Mayhem misses with a double jab.
Mayhem rushes forward with a series of wild hooks but Kawells moves out of range and avoids them all easily.
John Mayhem seems to be getting the better of the standup.
Kawells uses some good footwork to avoid the body shot by Mayhem.
Kawells shoots in for a double leg but Mayhem sprawls well. That's going to sap some energy.
Mayhem lunges at Kawells with a hook that half lands and is half blocked by Kawells's hand.
Mayhem throws a series of punches but Kawells moves out of range.
Kawells avoids the body shot from Mayhem.
Kawells tries to clinch but is not successful on this occasion.
The fight stays on the outside here - Kawells looks like he's thinking about clinching though.
Mayhem shoots in looking for a takedown. Kawells tries to sprawl out of it but Mayhem keeps driving through. The fighters are pinned against the cage. Kawells manages to get underhooks and after a bit of a struggle, circles away and we're back to standing.
Mayhem throws a hard body shot but it just misses.
That's four minutes gone in the round.
The crowd are showing their displeasure at the lack of action as loud boos ring out around the arena.
Kawells steps to the side to avoid the strikes from Mayhem.
Kawells uses good footwork to avoid the strikes from Mayhem.
Kawells wants to clinch up but Mayhem keeps it at a distance.
Mayhem throws a right hand that Kawells ducks under and follows up with a left that Kawells also avoids with ease.
A good leg kick by Kawells.
Kawells connects with a solid leg kick.
Kawells tries to close the distance and clinch up against the cage but Mayhem paws at him with a jab and circles away.
Mayhem shoots in for a takedown. He's persisting with it as Kawells sprawls well. Kawells wins this battle and keeps the fight standing. Mayhem gets slowly back to his feet.
Kawells clinches up against the cage.
Kawells is trying to slow down the pace in the clinch, to catch his breath.
Mayhem takes a knee right on the jaw!
Mayhem has a body lock and is looking for a takedown. Kawells is bouncing around trying to prevent the takedown and somehow he has indeed managed to stay on his feet.
And that's the end of the fight!
John Mayhem comfortably won the final round on my scorecard.
I think Mayhem has won this one but let's see whether the judges agree with me. Over to the ring announcer for the scorecards.
Ladies and gentlemen, after 3 rounds of action, we go to the scorecards for a decision.
Judge Chris Downing scores the fight 28:30
Judge Alan Glass scores the fight 28:30
Judge Tiny Johnson scores the fight 28:29
In favor of your winner, by unanimous decision... John Mayhem!
|
|
|
|
|
|
|
|
|
|
|
|
|
|
|
|
|
|
|
|
|
|
|
| S |
C
A |
G |
S |
C
B |
G |
|
S |
C |
G |
|
energy
A | B |
|
hype
A | B |
|
pop
A | B |
|
mgr
A | B |
|
FIGHT
RATING
62% |
|
|
|
|
|
|
