|
|
PBP Commentary |
Coming up we have a middleweight MMA rules bout between Jonny Bridge (ranked 0 p4p, 0 weight class) and Simon Saez (ranked 0 p4p, 0 weight class). Saez has chosen Lifer as his entrance music. Both fighters look fresh as a daisy as they make their way towards the cage.
 |
|
 |
| 188 cm
23
192 lbs
4 - 1 - 0 |
|
191 cm
22
185 lbs
5 - 2 - 0 |
BJJ Blue Belt
Counter striker
Prefers standup |
|
BJJ Blue Belt
Solid Muay Thai
Determined |
|
| |
|
Ladies and gentlemen. This fight is 3 rounds, in the middleweight division.
Introducing the fighter to my left, fighting out of the red corner.
With a record of
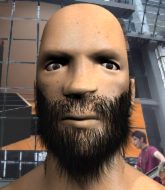
4 - 1 - 0, fighting out of Las Vegas, Jonny Bridge!
And introducing the fighter to my right, fighting out of the blue corner.
With a record of
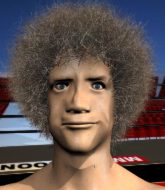
5 - 2 - 0, fighting out of Las Vegas, Simon Saez!
The judges for this bout are Chris Downing, Alan Glass and Cecil Peabody.

The bell rings for round one and we are underway!
Saez misses with a takedown attempt. He shot from a bit too far out.
Bridge throws a right hand that Saez ducks under and follows up with a left that Saez also avoids with ease.
Some wild striking there from Bridge.
Saez shoots for a double leg takedown but Bridge sprawls well. He's pushed Saez's face into the mat and manages to get back to his feet relatively easily.

Saez has closed the distance and engaged Bridge in a clinch.
The is referee keeping an eye on Saez - much more stalling and he will separate the fighters.

Saez manages to pull guard.

Saez looking for a guillotine here but Bridge defends easily.
Saez controls Bridge momentarily but Bridge frees himself.
Bridge stays in close to Saez's body and controls the position.
Saez wants to get back to his feet but Bridge is in a dominant position and won't allow it.

That's one minute gone in the round.

Bridge stands up from guard. Let's bang!
Bridge lands a nice shot to the body.
A combination from Bridge does no damage.
Bridge displaying good standup as he scores with a three punch combination.
Jonny Bridge is looking to keep the fight on the feet at all costs.
Bridge tests Saez's chin there with a solid looking shot.
Saez tries to clinch up.
Bridge lands a jab to Saez's midsection.
Saez looks gassed!
The crowd are loving this. Great action here.
Bridge throws a right high kick that is partially blocked by Saez.

Saez is rocked!
Saez tries to close the distance and clinch up but Bridge swats him away and circles back towards the center.
The fight stays on the outside here - Saez looks like he's thinking about clinching though.
Saez tries to close the distance and clinch up but Bridge swats him away and circles back towards the center.
Saez throws a sloppy head kick and Bridge moves out of range easily.

That's two minutes gone in the round.
Saez misses with a takedown attempt - Bridge sprawls well and throws a nice strike on the way out which just misses.
Jonny Bridge has stuffed three takedown attempts in the round now. That's going to take a lot out of Simon Saez.
Both fighters circling a little - Bridge finishes the exchange with a kick to the body.
Saez takes a jab right on the kisser.
Bridge stuffs the takedown.
Saez tries to clinch up.
Some wild striking there from Bridge.
Saez tries to close the distance and clinch up but Bridge swats him away and circles back towards the center.
Saez wants to clinch.
A punch combination from Bridge misses.
Bridge just misses with a punch to the body.
Bridge avoids the clinch attempt nicely.
A head kick from Saez lands but Bridge takes it in his stride.
Saez tries to clinch but Bridge is having none of it.

That's three minutes gone in the round.
Saez wants to clinch.
Bridge keeps the fight on the outside.
Bridge connects with a body shot.
A head kick by Bridge misses
and Saez counters with a lovely straight right hand!
Saez moves in looking to clinch but Bridge pushes him off.
Saez doesn't manage to clinch there - Bridge circles away.
Saez tries to close the distance and clinch but Bridge swats him to one side with an open hand palm strike and circles away.
Bridge lands with a nice combination. Saez backs away looking to recover.
Saez tries to clinch but Bridge is having none of it.
Saez moves into range and clinches up with Bridge.
Saez managing to block the knees to the body from Bridge.
Bridge wants to break free but Saez has control.
A shot in the inside from Saez.

Saez escapes the clinch and we're back to striking.
Saez tries to clinch but is not successful on this occasion.
Saez looks for a takedown. He's got it. We're now in half guard.

That's four minutes gone in the round.
Bridge wants to improve his position but Saez is controlling well.
Saez wants to pass the guard but Bridge is defending well.
Bridge is trying to maintain the position but Saez is very close to passing his half guard.
Bridge controlling the position well.
Bridge punching from the bottom.
As the round comes to an end the crowd are showing their appreciation for a great round of action.
Bridge moves his hips nicely and gets into full guard.
The ref warns both fighters not to hold the cage as they work up against the meshing.
Bridge can't keep his opponent in guard - Saez advances to half guard, no doubt looking to mount.
And that�s the end of the round � the fighters go back to their corners.
Jonny Bridge dominated that round.
That's the end of the interval. I'm sure that seemed a lot quicker than a minute for our two fighters! Back to the action.

The fight stays on the outside here - Saez looks like he's thinking about clinching though.
Saez avoids a punch combination nicely.
A head kick from Saez lands but Bridge takes it in his stride.
Bridge lands with a two punch combination before moving back out of range.
Bridge lands a left and a right that sends Saez crashing to the canvas! Bridge dives into mount looking to finish!
Saez is still in real trouble! Can Bridge finish him?
Saez is looking to improve his position but Bridge isn't that keen on the idea.
Saez is persisting with the attempt to improve his position.
Bridge takes a little breather and maintains the position. The referee will be looking for him to stay active from such a dominant position though.
Saez seems to have recovered his senses.
Saez tries to hold on but Bridge pushes him away.
Saez is trying to escape the mount.
Saez is breathing heavily.
That's one minute gone in the round.
Bridge takes a little breather and maintains the position. The referee will be looking for him to stay active from such a dominant position though.
Saez is desperately trying to get back to half guard.
Bridge tucks in and makes sure he doesn't lose the dominant position.
Saez tries to hold on but Bridge pushes him away.
Saez keeping his composure momentarily, calmly looking to get back to half guard.
That's two minutes gone in the round.
The crowd are hurling abuse towards the fighters... You can hardly blame them though because there isn't a lot going on in the fight.
Bridge sitting in mount, just looking to control for the moment.
Saez keeping his composure momentarily, calmly looking to get back to half guard.
Bridge content just to control the position here.
That's three minutes gone in the round.
Saez is writhing around trying to get back to his feet.
Bridge sitting in mount, just looking to control for the moment.
Saez tries to lock up and control but Bridge gives him a forearm to the face and pushes him away.
Saez wants to get back to his feet.
Saez is trying to escape the mount.
The fighters are pressed up against the cage, both looking to find a bit of space to work.
Bridge sitting in mount, just looking to control for the moment.
That's four minutes gone in the round.
A lull in the action here being met with boos from the crowd.
Saez is trying to escape the mount.
Bridge takes a little breather and maintains the position. The referee will be looking for him to stay active from such a dominant position though.
Saez working to try and regain half guard.
Bridge takes a little breather and maintains the position. The referee will be looking for him to stay active from such a dominant position though.
And that�s the end of the round � the fighters go back to their corners.
Jonny Bridge dominated that second round.
The fighters get back to their feet, the hooter sounds and we're back to the action! Let's hear some noise people - this is the final round!

Saez is looking to clinch but Bridge is avoiding it.
Bridge circles away from the clinch attempt.
Saez moves in looking to clinch but Bridge pushes him off.
Horrible takedown by Saez or perhaps it was just good defense by Bridge which made him look bad.
Simon Saez seems to be the more aggressive standup fighter in this bout.
Bridge takes a head kick and shrugs it off.
Saez tries to clinch but Bridge is having none of it.
Saez wants to clinch.
Saez tries to shoot in for a takedown. He's got hold of a leg but Bridge swivels and escapes.
We've had a slow start to the round here - hopefully the action picks up.
Bridge with a hook.
Saez takes a big intake of breath there - he's definitely tired.
Bridge moves into range and connects with a jab.
Saez is looking to clinch but Bridge is avoiding it.
Bridge misses with a double jab
and Saez counters with a big head kick but Bridge shrugs it off.
Bridge lands a jab followed by a nice looking cross.
That's one minute gone in the round.
Saez throws a sloppy head kick and Bridge moves out of range easily.
A lazy body kick from Bridge
and Saez counters with a nice double leg into side control. Bridge won't be happy with that.
Saez tries for a kimura. Not really close to a finish though.
Bridge bucks up and manages to escape back to his feet!
Saez is looking to clinch but Bridge is avoiding it.
Saez is looking to clinch but Bridge is avoiding it.
Bridge scores with a leg kick.
Saez tries to clinch but is not successful on this occasion.
Saez shoots in but no luck this time.
Jonny Bridge has stuffed three takedown attempts in the round now. That's going to take a lot out of Simon Saez.
Saez pulls out of a head kick attempt.
A low kick from Bridge is predictable there
and Saez counters with a body kick.
That's two minutes gone in the round.
Saez lands a head kick!
Saez looks for a takedown but Bridge sprawls well.
Saez shoots in for a takedown. "Ole!" shouts Bridge as he jumps to the side.
Saez checks a low kick. Bone on bone - not my idea of a good time.
Saez tries to clinch but Bridge is having none of it.
Saez tries to close the distance and clinch up but Bridge swats him away and circles back towards the center.
Saez avoids a punch combination nicely.
Saez shoots in with a takedown attempt and he has Bridge pinned against the cage. Bridge gets the underhooks and manages to circle away.
Saez looks shocked there as he takes a right hand to the temple.
Nice sprawl there from Bridge as Saez shoots in.
Good shot there by Bridge.
That's three minutes gone in the round.
Bridge explodes with a nice body kick and back out of range. Nice work.
Bridge looking to throw a kick but he's pulled out of it.
Bridge lands a head kick. Saez smiles back at him and beckons him forward.
Bridge lands with a nice body punch.
Some wild striking there from Bridge.
Bridge throws a hard body shot but it just misses.
Saez tries to clinch there but Bridge circles away.
Saez tries to clinch but Bridge moves out of range.
Saez tries to clinch there but Bridge circles away.
Saez shoots in but no luck this time.
Saez plants his feet and lands a nice head kick!
Saez feints and as Bridge raises his hands in defense, Saez changes levels and drives through with a takedown into guard.
Bridge keeping full guard, as Saez tries to pass.
Saez in full guard, throwing the ground and pound. No damage this time.
That's four minutes gone in the round.
Saez has decided he wants to stand but the closed guard of Bridge is proving hard to escape from.
Saez gets to his feet and steps away from his opponent.
Bridge lands a with a good body shot.
Saez lands a head kick. Bridge smiles back at him and beckons him forward.
Bridge is looking to wear down Saez with body shots, infact he's throwing more body shots than head shots at the moment.
Saez connects with a good right hand that stumbles Bridge. Bridge circles away out of range and recomposes himself.
Bridge avoids the clinch attempt nicely.
Saez fails in his attempt to clinch.
Simon Saez has stepped it up - he knows he needs a finish here!
Bridge lands a nice looking body kick.
Bridge blocks a head kick by Saez.
Bridge lets the fists fly and connects with a left straight followed by a right hook.
Saez shoots in for a takedown. "Ole!" shouts Bridge as he jumps to the side.
The crowd applaud the fighters efforts here as the round comes to an end.
Decent striking displayed by Bridge there.
Saez moving in and out of range nicely, whilst landing the scoring shot.
Saez moves into the clinch.
We've seen a great period of action over the last minute or so - credit to both fighters for leaving it all in the cage!
Saez lands a nice elbow.
And that's the end of the fight!
I would just about give that final round to Simon Saez.
I think Bridge has won this one but let's see what the judges have to say. Over to the ring announcer for the scorecards.
Ladies and gentlemen, after 3 rounds of action, we go to the scorecards for a decision.
Judge Chris Downing scores the fight 29:28
Judge Alan Glass scores the fight 30:27
Judge Cecil Peabody scores the fight 29:28
In favor of your winner, by unanimous decision... Jonny Bridge!
|
|
|
|
|
|
|
|
|
|
|
|
|
|
|
|
|
|
|
|
|
|
|
| S |
C
A |
G |
S |
C
B |
G |
|
S |
C |
G |
|
energy
A | B |
|
hype
A | B |
|
pop
A | B |
|
mgr
A | B |
|
FIGHT
RATING
74% |
|
|
|
|
|
|
