|
|
PBP Commentary |
Coming up we have a bantamweight MMA rules bout between Sneek a Mouse Marley (ranked 0 p4p, 0 weight class) and Master Yoda (ranked 0 p4p, 0 weight class). Yoda has chosen Star Wars Theme as his entrance music. Man, I cannot wait for this one!
 |
|
 |
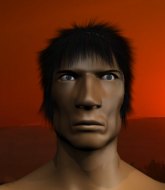
| 150 cm
24
138 lbs
8 - 5 - 0 |
|
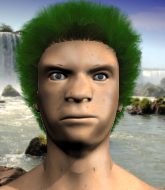
170 cm
20
145 lbs
6 - 3 - 0 |
BJJ Brown Belt
Basic striking
Good chin |
|
BJJ Purple Belt
Decent boxing
Powerful |
|
| |
|
Ladies and gentlemen. This fight is 3 rounds, in the bantamweight division.
Introducing the fighter to my left, fighting out of the red corner.
With a record of
8 - 5 - 0, fighting out of Las Vegas, Sneek a Mouse Marley!
And introducing the fighter to my right, fighting out of the blue corner.
With a record of
6 - 3 - 0, fighting out of Hilo, Master Yoda!
The judges for this bout are , and .

The bell rings for round one and we are underway!
Marley drops his hands momentarily and Yoda takes advantage with a crisp shot to the head.
Marley tries to shoot in for a takedown. He's got hold of a leg but Yoda swivels and escapes.
Yoda misses with an uppercut. Marley saw that one coming.
Nice takedown defense from Yoda. No joy for Marley on that attempt.
Marley throws a looping left and ducks down for a takedown. He's got his arms around Yoda's waist but Yoda gets an underhook and avoids the takedown by throwing Marley off to one side.
That's three failed takedown attempts in the round for Sneek a Mouse Marley. That's going to take a lot out of him.
Marley misses with a takedown attempt - Yoda sprawls well and throws a nice strike on the way out which just misses.
Marley shoots in looking for a takedown. Yoda tries to sprawl out of it but Marley keeps driving through. The fighters are pinned against the cage. Yoda manages to get underhooks and after a bit of a struggle, circles away and we're back to standing.
Yoda throws a jab to the body, straight down the pipe. Boom. That sent Marley stumbling backwards but he manages to regain his composure quickly.
Marley fails with a takedown attempt from distance.
Yoda scores with a nice head shot.

Yoda gets a clinch.
Yoda lands a shoulder strike.
Yoda stays in close to his opponent and throws a right hand to the body.
Yoda working on landing some head shots here - that one got through nicely.
Yoda lands with a good tight uppercut to the head.
Yoda lands a right hand.

That's one minute gone in the round.
Yoda working some nice short punches in the clinch.
The referee calls for Yoda to work.
Yoda gets double underhooks to prevent a takedown attempt from Marley.
Yoda lands with a short punch from the clinch.
Yoda prevents a takedown attempt there.
Marley has a body lock and is looking for a takedown. Yoda is bouncing around trying to prevent the takedown and somehow he has indeed managed to stay on his feet.
Yoda scores with a shot to the side of Marley's head.

Yoda has double underhooks and is working for a body lock takedown. He's got it. The fighters land in half guard but Marley regains guard immediately.
Yoda lands a couple of decent looking shots.
Yoda not doing a lot at the moment. He'll have to show some more aggression or the fight will get stood up.

Marley working for a triangle but Yoda defends it easily.
Yoda throwing elbows and punches but not connecting, as Marley works some decent striking defense from the bottom.

That's two minutes gone in the round.
Marley can't do much from the bottom at the moment, as Yoda controls the pace.
Yoda thows a big elbow that misses.
Yoda preventing the sweep.
Marley is working from a closed guard but he's struggling to control his opponent.
Yoda in full guard, throwing the ground and pound. No damage this time.
Yoda is just sitting in guard, looking to avoid any submissions.
Let's hope that Yoda has the urge to step up the pace any second now because for the last 15 or 20 seconds he's just been holding on tight.

That's three minutes gone in the round.
Yoda loading up with the ground and pound but he's missing more than he's landing in this flurry.
Yoda stands up and looks to throw the legs aside to pass to side control. Marley swivels though and keeps the full guard.

Neither fighter is doing enough for the referee's liking and he's decided to stand them back up.
Marley looks to land a combination but Yoda avoids it well.
Yoda uses decent footwork to sidestep a right hand from Marley.
Yoda slaps away a takedown attempt from Marley, before circling back to the center of the mat.
Marley will have to do better than that with his takedown attempts.
Yoda gets taken down but at least he's managed to land in guard.
The fighters are pressed up against the cage, both looking to find a bit of space to work.
Yoda has his hands on Marley's head, controlling the position.

That's four minutes gone in the round.
The fighters are starting to perspire pretty heavily.
Marley slips effortlessly into side control - very nice.
Marley in side control, throwing shots but Yoda defends.
Yoda is trying to get back to half guard.
And thats the end of the round the fighters go back to their corners.
Master Yoda dominated that round.
OK. That's time! The bell goes and we're back to the action.

Marley throws a two punch combo that lands nicely.
Marley takes a shot right to the bread basket.
Yoda rushes Marley and pushes him back against the cage in a clinch.

Yoda's corner calls for him to break the clinch, which he does.
Yoda closes the distance and pushes Marley back into the cage.
Yoda scores with a shoulder strike.
Marley takes a shot to the head.
Yoda throws a punch but it's blocked by Marley.
An uppercut to the body lands inside from Yoda.
Yoda working aggressively here.
A short uppercut from Yoda.
Marley is looking for a takedown up against the cage. Yoda gets underhooks though and prevents the takedown attempt.
Marley tries to take the fight to the ground by pulling guard but can't manage it.
Yoda lands a right hand.
Yoda scores with a nice hook to the head.
A bit of stalling here from Yoda.
Yoda is trying to trip Marley. He has hold of a leg but Marley is hopping around, keeping his balance for the moment. Yoda persists though and gets the takedown into guard.
That's one minute gone in the round.
Yoda lands a couple of digs.
Yoda throws a big right hand that misses.
Yoda wants to get up but he can't break Marley's closed guard. He needs to be careful trying to break the legs open, as he's open to submissions here.
Marley working for a triangle but Yoda defends it easily.
Yoda trying to control the position from guard on top but Marley is wriggling around, looking for whatever he can.
Marley controls Yoda momentarily but Yoda frees himself.
Marley has a loose triangle. He'll be looking to tighten that up but Yoda can see exactly what he's planning and manages to posture up and free himself.
That's two minutes gone in the round.
Well. There's a bit of a lull in the action here and the crowd are starting to get restless.
Marley is working actively off his back, looking to secure an arm or perhaps work for a triangle.
Marley is working an open guard here, looking to improve his position. No doubt that will leave him open to counters but at least he's being more offensive.
Marley working from the bottom, still in full guard. He's managed to get a loose triangle. Yoda doesn't seem to be doing much to defend here, obviously he feels comfortable in the position. Yoda manages to throw the legs off his shoulder and he's back into guard - no problem.
The ref warns both fighters not to hold the cage as they work up against the meshing.
Both fighters are absolutely exhausted here.
Marley has a loose triangle. He'll be looking to tighten that up but Yoda can see exactly what he's planning and manages to posture up and free himself.
That's three minutes gone in the round.
Yoda works a leg free and moves into half guard.
Marley looking to work for a kimura from the bottom.
Yoda is keeping good posture, landing some ground and pound.
Yoda wants to control but Marley is keeping him busy.
Yoda tries to pass the half guard into mount. Marley knows what he's doing though and prevents the attempt.
Yoda is controlling the pace.
Yoda is trying to control the action in half guard but Marley is working away on the bottom, looking perhaps to get back to full guard.
That's four minutes gone in the round.
The crowd are hurling abuse towards the fighters... You can hardly blame them though because there isn't a lot going on in the fight.
Marley is looking to sinch up a guillotine here but Yoda pulls his head out easily.
Yoda missing with the ground and pound from half guard.
Neither fighter is doing enough for the referee's liking and he's decided to stand them back up.
Marley listening to his corner there, landing a nice uppercut.
Yoda connects with a jab.
Yoda misses with a jab and misses with a cross straight after too.
Yoda misses with an uppercut. Marley saw that one coming.
Yoda slips a straight right by Marley.
Marley moves out of range as Yoda strikes.
Marley throws and low kick but Yoda moves out of range easily.
And thats the end of the round the fighters go back to their corners.
Master Yoda showed his class in that round. I'd imagine he'll take it on all the scorecards.
The fighters get back to their feet, the hooter sounds and we're back to the action! This is the final round!

Marley shoots for a takedown but Yoda saw that one coming a mile off and avoided it easily.
Marley showing good head movement there, avoiding the strikes from Yoda.
Yoda darts in and clinches Marley up against the cage.
A short left from Yoda.
Yoda throws a blind hook that connects with the side of Marleys head.
Yoda gets double underhooks and manages to take the fight to the ground.
Marley throwing his legs up looking for a triangle.
Yoda got a little sloppy there for a moment and Marley has worked his way into a loose triangle - can he finish it?! No, Yoda has managed to get both his arms back between Marley's legs - danger averted.
Marley keeping moving, preventing Yoda from controlling successfully.
Marley looking for submissions off his back, moving his hips, looking for an opening.
Both fighters are breathing heavily.
That's one minute gone in the round.
Marley working for a triangle but Yoda defends it easily.

Yoda stands and steps away. Marley gets to his feet too and we're back to the striking game.
Sneek a Mouse Marley is looking to throw some combinations by the looks of things.
Marley tries to move into range but Yoda moves to the side and lands with a nice right hand.
Sneek a Mouse Marley seems to be the more aggressive standup fighter in this bout.
Marley fails with a takedown attempt.
Yoda feints and then dives in with a takedown. That was a long way out but the feint bought him enough time to close the distance and complete the takedown. Now we'll play guard for a bit and see who can get the better of that position.
Yoda slows down the pace of the fight for a moment. He'll need to remain active if he doesn't want to see the fight stood back up.
Marley is working actively off his back, looking to secure an arm or perhaps work for a triangle.
Sneek a Mouse Marley has stepped it up - he knows he needs a finish here!
That's two minutes gone in the round.
Yoda stands up and looks to throw the legs aside to pass to side control. Marley swivels though and keeps the full guard.
Yoda stays in close to Marley's body and controls the position.
Marley might be looking to lock onto one of his opponent's long limbs for a submission, whilst we're on the ground.
Yoda lands a couple of digs.
That's three minutes gone in the round.
Marley is active off his back here, looking for submissions.
Marley had isolated an arm as going for a kimura. Yoda defends it easily.
Master Yoda is fighting for a decision here - he's started to take the cautious approach.
Yoda trying to control but Marley is working from the bottom.
Marley is working from a closed guard but he's struggling to control his opponent.
Marley being controlled here, momentarily.
That's four minutes gone in the round.
The crowd are hurling abuse towards the fighters... You can hardly blame them though because there isn't a lot going on in the fight.
Marley not looking particularly offensive just at the moment.
Marley throwing his legs up looking for a triangle.
Marley looking for a guillotine here but Yoda defends easily.
Yoda content to stall in guard here.
And that's the end of the fight!
Master Yoda comfortably won the final round on my scorecard.
Well Yoda has outworked and out performed his opponent in all aspects of the game today. He was simply too good and the decision should be no more than a formality. Over to the ring announcer for the scorecards.
Ladies and gentlemen, after 3 rounds of action, we go to the scorecards for a decision.
Judge Andi Peters scores the fight 27:30
Judge Gordon Ramsey scores the fight 27:30
Judge Frank Skinner scores the fight 27:30
In favor of your winner, by unanimous decision... Master Yoda!
|
|
|
|
|
|
|
|
|
|
|
|
|
|
|
|
|
|
|
|
|
|
|
| S |
C
A |
G |
S |
C
B |
G |
|
S |
C |
G |
|
energy
A | B |
|
hype
A | B |
|
pop
A | B |
|
mgr
A | B |
|
FIGHT
RATING
47% |
|
|
|
|
|
|

