|
|
PBP Commentary |
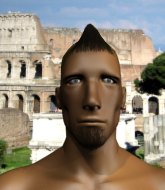
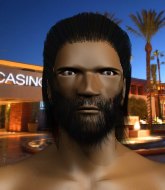
Coming up we have a lightweight MMA rules bout between Devon Abercrombie (ranked 0 p4p, 0 weight class) and Ricky Byrd (ranked 0 p4p, 0 weight class). We have two fighters making their debuts here, so let's see who comes out of this one with their first professional victory.
 |
|
 |
| 180 cm
18
167 lbs
0 - 0 - 0 |
|
179 cm
25
162 lbs
0 - 0 - 0 |
BJJ White Belt
Excellent boxer
Very strong |
|
BJJ Purple Belt
Decent boxing
Intelligent |
|
| |
|
Ladies and gentlemen. This fight is 3 rounds, in the lightweight division.
Introducing the fighter to my left, fighting out of the red corner.
With a record of
0 - 0 - 0, fighting out of New York, Devon Abercrombie!
And introducing the fighter to my right, fighting out of the blue corner.
With a record of
0 - 0 - 0, fighting out of New York, Ricky Byrd!
The judges for this bout are David Schapiro, Bruno Lombardi and Alyssa Summers.

The bell rings for round one and we are underway!

Abercrombie drives through with a really nice takedown into side control.

Byrd explodes and escapes back to his feet! Nice escape there!
Abercrombie shoots in but no luck this time.
Abercrombie blocks a head kick by Byrd.
Abercrombie tries to clinch but is not successful on this occasion.
Byrd throws a head kick that misses.
Abercrombie wants to clinch.
Abercrombie tries to close the distance and clinch up against the cage but Byrd paws at him with a jab and circles away.
Byrd pulls out of a head kick attempt.
Abercrombie avoids the head kick by Byrd.
The fighters circling - Byrd throws out the jab but it was never going to land.
Byrd throws a head kick that misses.
Abercrombie scores with a spinning back kick!
Byrd looks gassed!
Byrd tries a switch kick but it misses it's target.
Abercrombie fails with a takedown attempt from distance.
Abercrombie shoots in but Byrd avoids the takedown attempt easily.
That's three failed takedown attempts in the round for Devon Abercrombie. That's going to take a lot out of him.
Abercrombie blocks a head kick by Byrd.

That's one minute gone in the round.
Abercrombie looks for a takedown. He's got it. We're now in half guard.
The ref warns both fighters not to hold the cage as they work up against the meshing.
Abercrombie missing with the ground and pound from half guard.
Abercrombie not throwing his punches with enough precision this time.
Byrd manages to escape and get back to his feet!
Byrd throws a head kick that misses and slips in the process. He scrambles back to his feet and the fighters circle.
No luck for Abercrombie with that takedown attempt.
Abercrombie closes the distance and looks for a trip takedown... aaaand he's got it - Abercrombie lands in his opponent's guard.
Byrd keeping moving, preventing Abercrombie from controlling successfully.
Abercrombie lands a nice shot whilst sitting in his opponent's guard.
Abercrombie is looking to work some ground and pound but Byrd has wrist control.

That's two minutes gone in the round.
Byrd wants to stand but Abercrombie is controlling the position.
Abercrombie controls from within his opponent's guard.
Abercrombie trying to control but Byrd is working from the bottom.

The referee has ruled that neither fighter is active enough on the ground and has stood them back up.
Byrd throws an overhand right that lands on Abercrombie's shoulder, as Abercrombie tries to avoid the shot.
Byrd tries a head kick but it misses.
Abercrombie doesn't manage to clinch there - Byrd circles away.
Byrd avoids the clinch attempt nicely.
No joy there for Byrd, who threw a few shots but didn't land.
Excellent takedown into side control there by Abercrombie.
Byrd is working hard to escape and get back to his feet. After a battle for position, Abercrombie asserts his dominance and retains side control.

That's three minutes gone in the round.
Abercrombie wants to lay and pray for a moment but Byrd keeps working.
Byrd wants to escape from the position here - easier said than done!
The strikes coming from Abercrombie are missing the target in this wave of attacks.
Byrd wants to escape from the position here - easier said than done!

That's four minutes gone in the round.
Neither fighter has done anything of merit for a good minute or two here and the crowd are not happy about it.
It looks like we're going to have a standup here. Neither fighter is doing enough on the ground.
Abercrombie fails with a takedown attempt.
Byrd keeps the fight on the outside.
Byrd avoids the head kick by Abercrombie.
Abercrombie shoots in for a takedown but doesn't get it.
Byrd stuffs a takedown. It's all about dictating where the fight takes place and Byrd wants it to stay on the feet.
Byrd tries a head kick but it misses.
Abercrombie shoots in with a takedown attempt and he has Byrd pinned against the cage. Byrd gets the underhooks and manages to circle away.
Ricky Byrd is looking to keep the fight on the feet at all costs.
Byrd pulls out of a head kick attempt.
Abercrombie blocks a head kick by Byrd.
Abercrombie lands a jab, followed by a cross and another cross, as Byrd backs up against the cage.
Byrd misses with a half-hearted attempt at a head kick.
And that�s the end of the round � the fighters go back to their corners.
Devon Abercrombie dominated that round.
The minute break is over - no more time for sponges and pep talks - back to the action!

Abercrombie wants to clinch.
Byrd throws a sloppy head kick
and Abercrombie counters with a shot to the ribs. That looked like it hurt.
Byrd throws a head kick but Abercrombie moves out of range.
Byrd throws a lazy head kick
and Abercrombie counters with a driving takedown into guard. Nice work there by Abercrombie.
Byrd is looking to get back to his feet but can't, whilst Abercrombie is controlling him.
Abercrombie wants to pass the guard but Byrd is keeping the position.
Byrd manages to escape and get back to his feet.
Both fighters are absolutely exhausted here.
Abercrombie fails with a takedown attempt.
Byrd throws a head kick that misses
and Abercrombie counters with a nice body shot.
Ricky Byrd seems to be the more aggressive standup fighter in this bout.
Abercrombie fails in his attempt to clinch.
Byrd pulls out of a head kick attempt.
Byrd throws a hook to the side of Abercrombie's head but Abercrombie sees it coming and ducks under it beautifully.
That's one minute gone in the round.
Abercrombie closes the distance and clinches up, looking for a takedown. He shifts his weight and gets a nice trip into half guard.
Byrd kicks Abercrombie off and gets back to his feet.
Byrd goes for a spinning back kick but it misses.
Byrd circles away from the clinch attempt.
A telegraphed takedown attempt from Abercrombie is defended easily by Byrd.
Byrd throws a sloppy head kick and Abercrombie moves out of range easily.
A head kick misses from Byrd.
Byrd throws an uppercut from half a mile away. Abercrombie sees it coming and avoids it easily.
We are yet to see a takedown attempt from Byrd in the fight. On paper you would think he is the more dominant ground fighter so let's see if these unusual tactics pay off.
Abercrombie gets the takedown into side control.
Byrd is putting a lot of effort into getting back to his feet here.
Byrd bucks up and manages to escape back to his feet!
Abercrombie avoids the head kick by Byrd.
That's two minutes gone in the round.
Abercrombie tries to clinch up.
Byrd throws a head kick that connects with a bit of head and a bit of hand.
Byrd throws a body kick that misses.
Abercrombie shoots in and gets a takedown into half guard. Abercrombie showed some decent athleticism there.
Byrd makes some distance and scrambles quickly back to his feet. Nice work!
The fans in attendance giving it up for the two fighters, who have really let it all hang out in the last minute or so!
Byrd swats away the attempt to clinch by Abercrombie.
Byrd goes for a high kick. It partially lands.
Byrd stuffs the takedown.
That's three failed takedown attempts in the round for Devon Abercrombie. That's going to take a lot out of him.
Nice jab there from Byrd.
Byrd tries a switch kick but it misses it's target.
Abercrombie shoots in for a takedown but Byrd shows good takedown defense there and keeps this one on the feet.
Byrd throws a head kick that misses.
That's three minutes gone in the round.
Abercrombie bobs and weaves well there to avoid the strikes.
Byrd throws a head kick that misses and slips in the process. He scrambles back to his feet and the fighters circle.
Abercrombie throws a front kick that sends Byrd stumbling back into the cage.
Nice takedown defense from Byrd. No joy for Abercrombie on that attempt.
Byrd pulls out of a head kick attempt.
Byrd throws a head kick that misses.
Abercrombie closes the distance and scores a nice trip takedown into half guard. Byrd did well to prevent Abercrombie getting side control.
Byrd kicks Abercrombie off and gets back to his feet.
Abercrombie shoots in with a takedown attempt and he has Byrd pinned against the cage. Byrd gets the underhooks and manages to circle away.
Byrd throws a lazy head kick
and Abercrombie counters with a two punch combo.
Byrd throws a quick head kick that skims the top of Abercrombie's head.
Abercrombie tries to close the distance and clinch but Byrd swats him to one side with an open hand palm strike and circles away.
Byrd displays good takedown defense there as he swats away a double leg from Abercrombie.
Byrd misses with a head kick.
Byrd misses with a half-hearted attempt at a head kick.
That's four minutes gone in the round.
Byrd avoids a low kick by using good footwork.
Abercrombie shoots in and scores a nice double leg takedown into half guard.
Byrd is trying to stand.
Byrd has one foot on Abercrombie's thigh - he pushes off and manages to get back to his feet.
Abercrombie shoots in and gets a takedown into half guard. Abercrombie showed some decent athleticism there.
This has been an exciting period of action!
Byrd pushes Abercrombie off looking to stand but Abercrombie dives back in and keeps control.
Byrd pushes Abercrombie off and gets back to his feet.
As the round comes to an end the crowd are showing their appreciation for a great round of action.
Byrd throws a head kick that misses
and Abercrombie counters with a good right hand that lands right on the jaw.
Devon Abercrombie is looking to throw some combinations by the looks of things.
Byrd throws a sloppy head kick
and Abercrombie counters with a shoot takedown into half guard.
Byrd manages to escape and get back to his feet!
And that�s the end of the round � the fighters go back to their corners.
Devon Abercrombie dominated that second round.
The referee calls time. The cornermen exit stage left and we're back to business. This is the final round!

Byrd tries a head kick but it misses.
Abercrombie lands with a nice body punch.
Abercrombie drives through with a takedown into guard.
Byrd wants to stand up but Abercrombie is controlling him.
Byrd kicks Abercrombie off and gets to his feet.
Byrd throws a head kick but Abercrombie moves out of range.
Abercrombie tries for a takedown but Byrd sees it coming a mile off and avoids it easily.
Abercrombie uses good head movement to avoid the hook from Byrd.
Byrd missing with a left hand there. Abercrombie was out of range so wasted energy throwing that one.
Abercrombie looks frustrated there after his takedown attempt is stuffed easily.
Byrd throws a head kick that misses and slips in the process. He scrambles back to his feet and the fighters circle.
Abercrombie closes the distance, clinches up and gets a nice trip takedown into side control. Very smooth.
Byrd wants to get back to his feet but Abercrombie drags him back down.
Byrd explodes and escapes back to his feet! Nice escape there!
Both fighters are breathing heavily.
That's one minute gone in the round.
Byrd throws a head kick that misses and slips in the process. He scrambles back to his feet and the fighters circle.
Byrd throws a sloppy head kick
and Abercrombie connects with a straight left hand counter down the middle.
Byrd does a little shimmy and throws a leg kick. The leg kick missed by a considerable margin though, making him look a little bit silly for doing the shimmy.
Abercrombie is looking to clinch but Byrd is avoiding it.
Byrd throws a body kick but he wasn't in range.
A combination from Byrd does no damage.
Abercrombie with a nice looking leg kick. You could hear that one land in a back row.
Byrd avoids the clinch attempt nicely.
Abercrombie goes for a spinning back kick but it misses.
Byrd throws a head kick that misses.
Abercrombie shoots in for a takedown. He's persisting with it as Byrd sprawls well. Byrd wins this battle and keeps the fight standing. Abercrombie gets slowly back to his feet.
That's three failed takedown attempts in the round for Devon Abercrombie. That's going to take a lot out of him.
Abercrombie throws the left hand but Byrd avoids the punch easily.
Abercrombie avoids the head kick by Byrd.
Abercrombie blocks a head kick by Byrd.
That's two minutes gone in the round.
Well. There's a bit of a lull in the action here and the crowd are starting to get restless.
Byrd takes a shot right to the liver - Bas would have been proud of that punch.
Abercrombie looks frustrated there after his takedown attempt is stuffed easily.
Byrd avoids the head kick by Abercrombie.
Byrd throws a head kick that misses.
Abercrombie avoids the head kick by Byrd.
Abercrombie delivers a nice body kick.
Byrd is looking to land body kicks.
Abercrombie is looking to clinch.
Abercrombie blocks a head kick by Byrd.
Abercrombie shoots in looking for a single leg takedown. Byrd is trying to defend but Abercrombie finishes it well and ends up in half guard. Let's see if he can advance position further.
Byrd manages to escape and get back to his feet!
Byrd misses with a half-hearted attempt at a head kick.
Abercrombie wants to clinch.
That's three minutes gone in the round.
Abercrombie misses with a takedown attempt. He shot from a bit too far out.
Byrd throws a sloppy head kick and Abercrombie moves out of range easily.
Abercrombie shoots in for a takedown - he's clinched up with Byrd but Byrd pushes him off and we're back to square one.
Byrd tries a switch kick but it misses it's target.
Byrd throws a big shot that misses.
Abercrombie shoots in and scores a nice double leg takedown into half guard.
Abercrombie wants to control but Byrd is keeping him busy.
Byrd makes some distance and scrambles quickly back to his feet. Nice work!
Abercrombie throws the overhand right but ducks down into a quick takedown attempt. Byrd was covering up waiting for the punch and Abercrombie finishes the takedown easily into guard.
Byrd wants to stand but Abercrombie is controlling the position.
That's four minutes gone in the round.
Byrd has his feet on Abercrombie's hips. He pushes off and gets to his feet. Nice work.
A head kick by Byrd misses
and Abercrombie counters with a driving takedown into guard. Nice work there by Abercrombie.
The crowd cheering loudly, showing their appreciation for the quality fight we're seeing here.
Byrd has butterfly guard. He's looking to stand up here. He pushes Abercrombie off him and springs to his feet nicely. The crowd applauds.
Byrd swats away the attempt to clinch by Abercrombie.
Byrd throws a lazy head kick
and Abercrombie counters nicely by changing levels and landing a hook to the body.
A head kick misses from Byrd.
The crowd applaud the fighters efforts here as the round comes to an end.
Abercrombie sizes up Byrd with a pawing jab and scores with a straight right down the middle.
Abercrombie has a takedown stuffed.
Byrd throws a head kick but Abercrombie moves out of range.
And that's the end of the fight!
Devon Abercrombie showed his dominance in that final round.
Well Abercrombie has outscored his opponent in every aspect of the fight today. Only a scarily incompetent judge or two will keep him from a well deserved win... Over to the ring announcer for the scorecards.
Ladies and gentlemen, after 3 rounds of action, we go to the scorecards for a decision.
Judge David Schapiro scores the fight 30:27
Judge Bruno Lombardi scores the fight 30:27
Judge Alyssa Summers scores the fight 30:27
In favor of your winner, by unanimous decision... Devon Abercrombie!
|
|
|
|
|
|
|
|
|
|
|
|
|
|
|
|
|
|
|
|
|
|
|
| S |
C
A |
G |
S |
C
B |
G |
|
S |
C |
G |
|
energy
A | B |
|
hype
A | B |
|
pop
A | B |
|
mgr
A | B |
|
FIGHT
RATING
80% |
|
|
|
|
|
|
