|
|
PBP Commentary |
Coming up we have a lightweight MMA rules bout between Monkey D Luffy (ranked 0 p4p, 0 weight class) and Ricky Byrd (ranked 0 p4p, 0 weight class). Ricky Byrd will no doubt be trying to keep this one on the feet, where he has a distinct advantage.
 |
|
 |
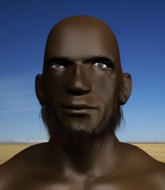
| 183 cm
20
162 lbs
1 - 2 - 0 |
|
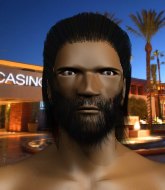
179 cm
25
162 lbs
2 - 3 - 0 |
BJJ White Belt
Basic striking
Good in bed |
|
BJJ Purple Belt
Decent boxing
Knockout power |
|
| |
|
Ladies and gentlemen. This fight is 3 rounds, in the lightweight division.
Introducing the fighter to my left, fighting out of the red corner.
With a record of
1 - 2 - 0, fighting out of New York, Monkey D Luffy!
And introducing the fighter to my right, fighting out of the blue corner.
With a record of
2 - 3 - 0, fighting out of New York, Ricky Byrd!
The judges for this bout are Jorge Garcia, Bruno Lombardi and Reed Andrews.

The bell rings for round one and we are underway!
A combination from Byrd does no damage.
D Luffy rushes forward with a series of wild hooks but Byrd moves out of range and avoids them all easily.
Byrd fails with a rather predictable takedown attempt.
D Luffy tries to clinch there but Byrd circles away.
D Luffy throws a series of punches but Byrd avoids them all with ease.
Byrd connects with a jab.
Byrd misses with the combination.
Byrd throws a head kick that misses and slips in the process. He scrambles back to his feet and the fighters circle.
No joy there for Byrd, who threw a few shots but didn't land.
D Luffy misses with a double jab
and Byrd connects with a straight left hand counter down the middle.
We've had a slow start to the round here - hopefully the action picks up.
Byrd throws a looping left and ducks down for a takedown. He's got his arms around D Luffy's waist but D Luffy gets an underhook and avoids the takedown by throwing Byrd off to one side.
Byrd checks the leg kick.
Byrd looking to throw a kick but he's pulled out of it.
D Luffy pivots, looking for a leg kick but Byrd is out of range and D Luffy settles back down.
Some wild striking there from D Luffy.

That's one minute gone in the round.
D Luffy misses with a series of wild punches.
Byrd throws a head kick that misses and slips in the process. He scrambles back to his feet and the fighters circle.
Byrd throws a leg kick that misses.
D Luffy fails to land with a series of punches.
Byrd looking to land some kicks to the body here.
D Luffy throws a series of punches but Byrd avoids them all with ease.
Byrd misses with a jab, cross combination.
Byrd throws a decent looking leg kick but it doesn't land clean.
Byrd misses with a wild combination.
D Luffy throws a right and a left that Byrd avoids nicely.
Monkey D Luffy is looking to keep the fight on the feet at all costs.
Byrd blocks a leg kick.
Byrd slips a jab and a cross from D Luffy.

That's two minutes gone in the round.
The crowd are getting on the fighters' backs, as the pace has dropped off in the last minute or so.
Byrd connects with a hook to the side of his opponent's head.

D Luffy moves into the clinch.
Byrd drops to a knee looking for a takedown but D Luffy gets the underhooks and prevents it.
Monkey D Luffy has stuffed three takedown attempts in the round now. That's going to take a lot out of Ricky Byrd.

D Luffy breaks the clinch and we're back to striking at distance.
Byrd misses with a takedown attempt. He shot from a bit too far out.
Byrd will need to tighten up his combinations if he doesn't want to gas himself out, swinging at thin air.
D Luffy moves into the clinch.
Byrd wants a takedown.
D Luffy manages to break the clinch.
Byrd shoots for a takedown but D Luffy saw that one coming a mile off and avoided it easily.
Some bone on bone action there as Byrd checks a low kick. Luckily it wasn't a particularly hard one.

That's three minutes gone in the round.
D Luffy wants to clinch up but Byrd keeps it at a distance.
Byrd ducks down and throws a hook to the body.
Byrd throws a head kick that misses and slips in the process. He scrambles back to his feet and the fighters circle.
D Luffy lands three nice shots there - that looked like it hurt!
Byrd tries a switch kick but it misses it's target.
Nice takedown defense from D Luffy. No joy for Byrd on that attempt.
This fight brought to you by 5M nutrition - it's mmmmm tasty. Nice jab by D Luffy.
Byrd throws a right and a left that both miss.
D Luffy throws a nice looking combination but Byrd bobs and weaves to avoid any damage.
D Luffy closes the distance and clinches.

D Luffy manages to pull guard. Let's see whether he can land a sub off his back.
D Luffy pulls Byrd in close to his closed guard and prevents Byrd from doing any damage or advancing position.
D Luffy knows he needs to get back to his feet asap. He's simply no match for Byrd on the ground.
Byrd trying to control but D Luffy is working from the bottom.

That's four minutes gone in the round.
D Luffy is trying to keep Byrd in close.
D Luffy seems keen to control rather than go for a submission, at least for now.
Byrd trying to control the position from guard on top but D Luffy is wriggling around, looking for whatever he can.
Byrd is in a good position here but he's just trying to control... And he's not even managing to do that successfully.
The crowd thankful this round is nearly over.
D Luffy controls Byrd momentarily but Byrd frees himself.
And that�s the end of the round � the fighters go back to their corners.
Monkey D Luffy dominated that round.
The corners get their ten second warning. Both fighters stand from their stools and stare eachother down, ready to get back to the action.

D Luffy pulls out of a head kick attempt.
D Luffy tries to clinch up but Byrd circles away and keeps his distance.
D Luffy has taken the fight to the clinch.
D Luffy is looking for a takedown up against the cage. Byrd gets underhooks though and prevents the takedown attempt.
D Luffy's corner calls for him to break the clinch, which he does.
Byrd connects with a high kick.
Byrd takes a jab on the nose. He smiles like he loves it and keeps coming.
Byrd throws a leg kick
and D Luffy counters into the clinch. Nicely done.
D Luffy breaks the clinch and we're back to striking at distance.
D Luffy throws a combination that misses
and Byrd counters with a three punch combination, finished off with a leg kick. Nice work.
Byrd avoids the clinch attempt nicely.
Byrd throws a sloppy head kick and D Luffy moves out of range easily.
Byrd lands with a two punch combination before moving back out of range.
D Luffy throws a low kick but his opponent is out of range.
That's one minute gone in the round.
D Luffy has Byrd up against the cage in a clinch.
D Luffy prevents Byrd from breaking the clinch.
Byrd wants to break the clinch but can't.
D Luffy gets control of Byrd's arms and successfully pulls guard. D Luffy will no doubt be looking for submissions off his back.
Byrd trying to control but D Luffy is working from the bottom.
Byrd controls the pace of the fight for a moment.
Byrd slips effortlessly into side control - very nice.
The fighters are pressed up against the cage, both looking to find a bit of space to work.
Byrd trying to control the position but D Luffy is working away.
Byrd working away.
That's two minutes gone in the round.
D Luffy tries to work a leg under to get back to half guard but Byrd wriggles his own leg back out and remains in side control.
D Luffy wants to control but Byrd postures up.
D Luffy tries to buck Byrd off but Byrd is having none of it.
Both fighters are absolutely exhausted here.
Byrd advances to full mount.
D Luffy can't escape the position.

Byrd looking for an armbar but decides to keep the dominant position instead.
Byrd controlling his opponent.
That's three minutes gone in the round.
Byrd can't quite control the action as he would like just now, as D Luffy is looking to escape.
Byrd might have to switch it up a bit here because his efforts to control D Luffy kaven't been going to plan, at least at the current moment in time.
Byrd thowing shots but they're missing.
That's four minutes gone in the round.
There's not a lot going on here and the crowd are letting the fighters know they're not willing to tolerate a lack of action.
Byrd is going oldschool here, as he tries to force D Luffy to tap using a forearm choke. This isn't 1993 though, so D Luffy shrugs it off.
D Luffy tries to hold on but Byrd pushes him away.
Byrd looking to control but D Luffy is working nicely, looking to advance position himself.
D Luffy keeping his composure momentarily, calmly looking to get back to half guard.
The crowd thankful this round is nearly over.
D Luffy is working hard here to advance position.
And that�s the end of the round � the fighters go back to their corners.
Ricky Byrd showed his class in that round. I'd imagine he'll take it on all the scorecards.
The minute break is over - no more time for sponges and pep talks - back to the action! Ladies and gentlemen, this is the final round!

D Luffy is pinned up against the cage taking some big shots here. The referee is looking closely deciding whether he should stop the fight.
Byrd fails to land with a series of punches.
D Luffy pulls out of a head kick attempt.
D Luffy fails with an attempt to clinch.
D Luffy falls off balance throwing a combination
and Byrd counters with a series of strikes. D Luffy will be more careful next time no doubt.
D Luffy checks a leg kick.
Byrd lands a two punch combo.
D Luffy throws a combination that misses
and Byrd counters with a straight right hand.
Byrd throws a leg kick but he was too far away and it doesn't land.
D Luffy lands a jab to Byrd's midsection.
Byrd misses with a series of wild punches.
D Luffy throws a sloppy head kick
and Byrd counters with a two punch combo.
That's one minute gone in the round.
D Luffy is on the wrong end of a nice combination from Byrd.
Byrd throws a hard body shot but it just misses.
D Luffy avoids a punch combination nicely.
Byrd shoots and misses
and D Luffy counters with a thumping low kick.
D Luffy tries a switch kick but it misses it's target.
Monkey D Luffy is looking to throw some combinations by the looks of things.
Byrd misses with a head kick.
Byrd throws a head kick that misses
and D Luffy counters with a big head kick but Byrd shrugs it off.
Byrd takes a punch to the jaw and another one to the bread basket.
Byrd avoids the head kick by D Luffy.
Both fighters are breathing heavily.
D Luffy looks to score with a combo but nothing lands.
A shot to the body from D Luffy misses
and Byrd counters with a left and a right that stings D Luffy.
D Luffy lands a nice leg kick that just misses Byrd's sensitive parts.
Byrd chopping away at his opponent's legs.
Byrd blocks a head kick by D Luffy.
That's two minutes gone in the round.
Byrd scores with a nice right hand.
Byrd throws a body kick but he was well out of range there.
D Luffy walks forward and throws out a flicking leg kick. Byrd checks it nicely though, as he moves to the side.
Byrd throws a series of punches but D Luffy moves out of range.
Byrd throws a wild body kick that D Luffy sees coming a mile off.
Byrd throws a series of punches but D Luffy moves out of range.
D Luffy clinches but Byrd breaks the clinch
and Byrd makes him pay by landing a nice hook to the body before moving out of range.
Byrd fails to land with a series of punches.
Byrd misses with a two punch combination.
Monkey D Luffy seems to be the more aggressive standup fighter in this bout.
Byrd throws a lazy head kick
and D Luffy counters with a series of strikes. Byrd will be more careful next time no doubt.
A right-left combo lands from Byrd.
D Luffy lands with a nice combination. Byrd backs away looking to recover.
That's three minutes gone in the round.
D Luffy throws a body punch but Byrd moves out of range.
Byrd misses with a jab and misses with a cross straight after too.
Byrd throws a series of punches but D Luffy moves out of range.
Byrd lands with a shot to the body.
Byrd misses with an attempted mid kick.
Byrd throws a body punch but D Luffy moves out of range.
Byrd throws a sloppy head kick and D Luffy moves out of range easily.
Byrd looks to score with a combo but nothing lands.
D Luffy throws out a leg kick but Byrd moves out of range and D Luffy only half commits.
Byrd throws a head kick that misses.
D Luffy falls off balance throwing a combination
and Byrd counters with a lovely straight right hand!
D Luffy throws a quick head kick that skims the top of Byrd's head.
That's four minutes gone in the round.
Neither fighter has done anything of merit for a good minute or two here and the crowd are not happy about it.
Byrd scores with a one two! D Luffy had his feet all tangled up there and couldn't avoid the strikes.
Byrd displaying good standup as he scores with a three punch combination.
Byrd misses with a double jab.
D Luffy misses with a combination
and Byrd counters with a lovely shot to the body.
D Luffy blocks a head kick by Byrd.
Some wild striking there from Byrd.
D Luffy falls off balance throwing a combination
and Byrd counters with a nice body shot.
Byrd scores with a nice strike.
Byrd throws a nice looking combination but D Luffy bobs and weaves to avoid any damage.
D Luffy fakes low and throws an overhand right that catches Byrd on the side of the head.
D Luffy looks to score with a combo but nothing lands.
Byrd throws a lazy head kick
and D Luffy counters with a nice body shot.
And that's the end of the fight!
Ricky Byrd comfortably won the final round on my scorecard.
I think Byrd has won this one but let's see whether the judges agree with me. Over to the ring announcer for the scorecards.
Ladies and gentlemen, after 3 rounds of action, we go to the scorecards for a decision.
Judge Jorge Garcia scores the fight 28:29
Judge Bruno Lombardi scores the fight 28:29
Judge Reed Andrews scores the fight 28:29
In favor of your winner, by unanimous decision... Ricky Byrd!
|
|
|
|
|
|
|
|
|
|
|
|
|
|
|
|
|
|
|
|
|
|
|
| S |
C
A |
G |
S |
C
B |
G |
|
S |
C |
G |
|
energy
A | B |
|
hype
A | B |
|
pop
A | B |
|
mgr
A | B |
|
FIGHT
RATING
32% |
|
|
|
|
|
|
