|
|
PBP Commentary |
Coming up we have a lightweight MMA rules bout between Peter Piper (ranked 0 p4p, 0 weight class) and Piston Honda (ranked 0 p4p, 0 weight class). Piston Honda has the better chin. Will he look to stand and bang today?
 |
|
 |
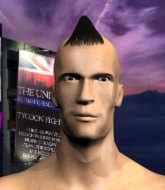
| 168 cm
24
163 lbs
11 - 6 - 0 |
|
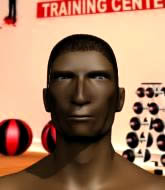
176 cm
25
162 lbs
10 - 7 - 0 |
Powerful takedowns
Solid boxing
Very quick |
|
BJJ Purple Belt
Good kicks
Determined |
|
| |
|
Ladies and gentlemen. This fight is 3 rounds, in the lightweight division.
Introducing the fighter to my left, fighting out of the red corner.
With a record of
11 - 6 - 0, fighting out of Las Vegas, Peter Piper!
And introducing the fighter to my right, fighting out of the blue corner.
With a record of
10 - 7 - 0, fighting out of Las Vegas, Piston Honda!
The judges for this bout are Daniel Franklin, Robert Twigg and Chris Downing.

The bell rings for round one and we are underway!
Piper scores with a sloppy punch to the body. Not much technique there but it did the business.
Honda throws the kick towards the body but Piper avoids it.
Honda throws a low kick but his opponent is out of range.
Honda tries to clinch up but Piper circles away and keeps his distance.
Honda wants to clinch
and Piper connects with a straight left hand counter down the middle.
Donk. Piper catches Honda right on the button with a cross.
Honda is looking to clinch but Piper is avoiding it.
Honda keeps the fight standing with a nice sprawl.
Honda changes levels and looks for a double leg takedown. Piper tries to avoid it but Honda manages to keep hold of a leg and drag Piper to the ground. Piper escapes though and pops straight back up to his feet.
Honda throws a head kick that misses and slips in the process. He scrambles back to his feet and the fighters circle.
Honda tries to clinch up but Piper circles away and keeps his distance.
No luck with that takedown attempt from Piper.
Honda throws a leg kick but Piper sees it coming and moves out of range.
Honda darts in trying to clinch
and Piper counters with an inside leg kick.

That's one minute gone in the round.
Piper fakes high and swings low for a body shot but Honda manages to avoid it.
Honda tries to clinch but Piper moves away
and Piper counters with a nice body shot.
Piper scores with a jab to the body.
Piper swings for the body but Honda moves out of range.
Honda uses some good footwork to avoid the body shot by Piper.
Piper gets his takedown attempt stuffed easily
and Piper takes a counter punch right on the button for his troubles.
That's three failed takedown attempts in the round for Peter Piper. That's going to take a lot out of him.
Piper swings for the body but Honda moves out of range.
Honda shoots in for a takedown but doesn't get it.
Honda takes a solid shot to the body. That one hurt him but he's trying not to show it.
Piper blocks the body kick.
Piper blocks the body kick.
Piper swings and misses with a shot to the body

and Honda counters into the clinch. Nicely done.
Honda is trying to slow down the pace of the fight but Piper is keeping busy.

Honda's corner calls for him to break the clinch, which he does.
Piper swings for the body but Honda moves out of range.

That's two minutes gone in the round.
Honda wants to clinch.

Piper shoots in looking for a single leg takedown. Honda is trying to defend but Piper finishes it well and ends up in half guard. Let's see if he can advance position further.

Honda is defending against the submission attempts here by Piper.
Honda keeping his head moving to avoid the ground and pound.
Honda is staying active underneath Piper, who seems content to just control the action from this position.
Piper is working hard to pass the guard. He's done it - he's now in full mount! Trouble for Honda!
Piper thowing strikes but they're hitting the gloves, not doing any damage.
Piper is in full mount, looking to secure a guillotine but Honda is surviving well by controlling Piper's body position as best he can.
Piper won't let Honda get back to his feet... He wants to keep the fight where it is for now.
Piper is looking to secure an arm. He's managed it! He's pivoting for an armbar - that looks tight! But Honda has managed to get out of it and now he's in a dominant position. Nice work from Honda!
The fighters are pressed up against the cage, both looking to find a bit of space to work.

That's three minutes gone in the round.
Piper is trying to control the position but Honda postures up.
Honda has decided he wants to stand but the closed guard of Piper is proving hard to escape from.
Piper has been looking to land a fair amount of strikes on the ground. He might be looking to soften his opponent up in order to work for a submission.
Piper is throwing his legs up, looking for submissions. Honda is aware though and is defending well.
Piper had isolated an arm as going for a kimura. Honda defends it easily.
Piper manages to sweep nicely, so he's now on top. Honda manages to get himself to full guard.

Honda is edging up against the cage. He's using the cage to get back to his feet. Nice work there - the fighters are clinched.
Nice body punch from Honda - that landed with a thud.
Honda misses the knee to the body. Nice hip positioning from Piper.
Honda misses with a punch to the body.

That's four minutes gone in the round.
Piper is pushing Honda up against the cage, for a bit of lean and pray action. Action being used the in the loosest possible sense of the word.
Piper gets a trip takedown into half guard.
Piper tries to pass to full mount but Honda defends it.
Piper is trying a forearm choke� I don't think that's going to do much at this level of the game.
The fighters are going at a pretty good pace and they're both starting to sweat now.
Neither fighter is being very active at the moment, with Piper in particular looking to stall.
The ref warns both fighters not to hold the cage as they work up against the meshing.
Piper wants to lay and pray for a moment but Honda keeps working.
Honda is trying to stand back up but Piper is controlling him
Piper is looking for a kimura but Honda is holding onto that half guard position, so it's hard for Piper to get the leverage.
Piper moves nicely into side control.
And that�s the end of the round � the fighters go back to their corners.
Peter Piper dominated that round.
That's time! Back to the action!

Piper misses with a body shot. Nice footwork from Honda.
Piper throws a sloppy body shot
and Honda counters with a leg kick that reverborates around the arena.
Honda tries to close the distance and clinch up but Piper swats him away and circles back towards the center.
Oooooooooooh, not good. A low kick from Honda lands where it shouldn't have, right in the... well, you know what he did? He kicked him in the penis. He's injured, injured bad. The referee sends both fighters to their corners and Piper has 5 minutes to recover. He's OK now though... a thumbs up from Piper and we're back underway with a touch of gloves.
Honda tries a low kick but Piper avoids it.
Peter Piper seems to be the more aggressive standup fighter in this bout.
Piper misses with a wild body shot.
Piper looking for a takedown here - he's got it.
Piper wants to control from the top but Honda keeps moving.
Honda keeping full guard, as Piper tries to pass.
Piper throwing elbows and punches but not connecting, as Honda works some decent striking defense from the bottom.
Honda keeping full guard, as Piper tries to pass.
Piper trying to control but Honda is working from the bottom.
That's one minute gone in the round.
Piper throwing strikes but missing.
Honda pushes Piper off and scrambles back to his feet.
Piper throws a nice hook to the body that draws an oooh from the crowd.
Honda avoids the body shot from Piper.
Honda tries to land a front kick but Piper steps back. That was a bit too telegraphed.
Piper is looking to wear down Honda with body shots, infact he's throwing more body shots than head shots at the moment.
Honda misses with a low kick as Piper jumps back.
Piper lands a right hook to the body.
Piper misses with a body shot.
Piper misses with a jab to the body
and Honda counters with a stiff right hand.
Piper throws a decent looking leg kick but it doesn't land clean.
Honda uses some good footwork to avoid the body shot by Piper.
Piper throws a nice looking combination but Honda bobs and weaves to avoid any damage.
Honda has his head slapped from side to side by a 3 punch combination. That must have hurt him.
That's two minutes gone in the round.
Piper misses with a telegraphed body shot
and Honda counters with a good low kick that Piper was not able to check.
Piper shoots in for a takedown but doesn't get it.
Piper looks to land a left hand but Honda moved out of range nicely.
Piper takes a swing at Honda's ribcage but misses.
Honda throws a wild body kick that Piper sees coming a mile off.
Piper fakes a head shot and lands one to the body.
Honda throws a leg kick
and Piper makes him pay by landing a nice hook to the body before moving out of range.
Honda gets a clinch.
Piper lands a shoulder strike.
Piper prevents Honda from breaking the clinch.
Piper breaks the clinch.
Honda has taken the fight to the clinch.
Piper breaks from the clinch.
Honda uses some good footwork to avoid the body shot by Piper.
Piper fails miserably with a takedown attempt.
Piper misses with a jab to the body
and he gets countered with a snapping leg kick.
That's three minutes gone in the round.
Honda misses with a low kick.
Piper throws a right and a left that Honda avoids nicely.
Honda throws a solid leg kick but Piper takes the impact on his shin and smiles at Honda.
Piper shoots in and bounces Honda off the cage to secure the takedown into guard.
Piper works a leg free and moves into half guard.
Piper is looking for a kimura here.
Honda is staying active underneath Piper, who seems content to just control the action from this position.
Piper wants to free his trapped foot but Honda is holding on for dear life with his legs.
Honda looks like he's trying to stand up.
Piper takes advantage of the dominant position to land a couple of big hammer fists.
That's four minutes gone in the round.
Piper looking for a kimura but he'll have to free his other leg if he wants to finish that. Perhaps he's just using it as a distraction technique.
Honda is trying to stand.
Honda is breathing heavily.
Piper works his way into full mount!
Piper looking to control but Honda is working nicely, looking to advance position himself.
Piper jumps to side control looking for an arm triangle but Honda manages to avoid the submission attempt.
Honda throws his opponent off and manages to get back to his feet! Nicely done!
Honda keeping a good distance there, avoiding the body shot.
And that�s the end of the round � the fighters go back to their corners.
Peter Piper dominated that second round.
The fighters get back to their feet, the hooter sounds and we're back to the action! This is the final round!

Piper throws a body punch but Honda moves out of range.
Honda fakes a jab and scores with a low kick.
Piper shoots for a double leg takedown but Honda sprawls well. He's pushed Piper's face into the mat and manages to get back to his feet relatively easily.
Piper shoots for a takedown but Honda saw that one coming a mile off and avoided it easily.
Honda tries to score with an inside leg kick but telegraphs it and Piper is able to avoid easily.
Piper takes a swing at Honda's ribcage but misses.
Honda takes one on the button.
Piper shoots in for a takedown! He's got it and he's managed to land in full mount! That's better than Piper was expecting from the takedown attempt, I'm sure!
Both fighters really going for it on the ground here!
Honda tries to buck Piper off but he can't manage it.
Piper is working for a guillotine from mount but Honda frees his head quite easily.
Honda is trying to stand.
Honda takes a big intake of breath there - he's definitely tired.
Piper thuds his fist into the canvas! Oooouch!
Piper looking for an armbar but decides to keep the dominant position instead.
That's one minute gone in the round.
Piper is working for a guillotine from mount but Honda frees his head quite easily.
Honda wants to use the cage to get back to his feet here.
Honda is squirming around, avoiding Piper's attempts to control the action.
Honda has given up his back here. Will Piper look for the submission or keep pounding away?
Honda is staying cool under pressure, defending well against the rear naked choke attempt from his opponent.
Honda is trying to stand back up.
Piper working for the choke.
That's two minutes gone in the round.
Honda showing good submission defense here.
The crowd hopeful of a finish here - Piper's supporters are on their feet, screaming for him to go for the rear naked choke.
Piper struggling to land strikes to the head as Honda covers up.
Piper missing with strikes from the back.
Piper lands strikes to the head.
Honda avoids the strikes from Piper.
Piper has his hand under the chin of his opponent looking for the choke. He's nearly got it! This one could be all over! But no, Honda has freed his hand and lives to survive another� well, another couple of seconds at least!
Honda is in a world of trouble here. He's outmatched on the ground here and he'd better get Piper off his back sharpish unless he wants to be submitted.
Honda holding both Piper 's hands and preventing any damage.
Piper is working really hard to secure the rear naked choke. Honda defends successfully for a significant amount of time. Both fighters are looking very determined.
That's three minutes gone in the round.
Piper is working the ground and pound here and the referee is taking a close look at Honda. He must escape soon or this one will be stopped.
Honda trying to get back to his feet but Piper is in full control for now.
The crowd hopeful of a finish here - Piper's supporters are on their feet, screaming for him to go for the rear naked choke.
Honda looking to stop the rear naked choke attempt by controlling the hands.
Peter Piper overall seems to be getting the better of the ground position in the fight so far.
Honda is staying cool under pressure, defending well against the rear naked choke attempt from his opponent.
Piper looking for the RNC.
Honda preventing the rear naked choke attempt from Piper.
That's four minutes gone in the round.
Piper is looking cool and calm here, just waiting for a good opportunity to attack and finish the fight from this dominant position.
Honda is trying to stand back up.
Piper is landing with strikes from the back.
Piston Honda has stepped it up - he knows he needs a finish here!
Piper controlling the position well here. Honda rolled but Piper kept the hooks locked in and stayed in the dominant position.
The crowd applaud the fighters efforts here as the round comes to an end.
Honda has the hand control, trying to stop the rear naked choke.
Piper tightening his grip on Honda, looking for the choke.
And that's the end of the fight!
Peter Piper showed his dominance in that final round.
Well I reckon that's a shut out for Piper, winning every round. Will the judges agree? They are the ones who matter, even if they are often depressingly incompetent. Over to the ring announcer for the scorecards.
Ladies and gentlemen, after 3 rounds of action, we go to the scorecards for a decision.
Judge Daniel Franklin scores the fight for Peter Piper!
Judge Robert Twigg scores the fight for Peter Piper!
Judge Chris Downing scores the fight for Peter Piper!
Peter Piper wins by unanimous decision!
|
|
|
|
|
|
|
|
|
|
|
|
|
|
|
|
|
|
|
|
|
|
|
| S |
C
A |
G |
S |
C
B |
G |
|
S |
C |
G |
|
energy
A | B |
|
hype
A | B |
|
pop
A | B |
|
mgr
A | B |
|
FIGHT
RATING
43% |
|
|
|
|
|
|

