|
|
PBP Commentary |
Coming up we have a welterweight MMA rules bout between Patrick Reid (ranked 0 p4p, 0 weight class) and Keon Cash (ranked 0 p4p, 0 weight class). Cash is bouncing up and down as he enters the arena, backed by Unsung. This should be fireworks!
 |
|
 |
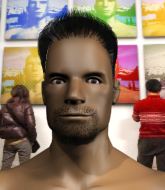
| 170 cm
18
175 lbs
2 - 5 - 0 |
|
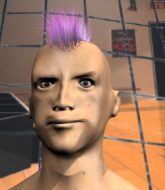
188 cm
20
170 lbs
2 - 3 - 0 |
BJJ Purple Belt
Basic striking
Experienced |
|
BJJ Blue Belt
Brawler
Knockout power |
|
| |
|
Ladies and gentlemen. This fight is 3 rounds, in the welterweight division.
Introducing the fighter to my left, fighting out of the red corner.
With a record of
2 - 5 - 0, fighting out of Montreal, Patrick Reid!
And introducing the fighter to my right, fighting out of the blue corner.
With a record of
2 - 3 - 0, fighting out of Montreal, Keon Cash!
The judges for this bout are Ian Loll, Robert Douchet and Gregory Folan.

The bell rings for round one and we are underway!
Cash throws a lazy right hand but Reid sees it coming a mile off and sidesteps it easily.

Cash moves into the clinch successfully.
Reid has Cash pressed up against the cage and is working for takedown. Cash manages to improve position though and keeps the fight standing.

Cash breaks the clinch and we're back to striking at distance.
Reid shoots for a takedown but Cash saw that one coming a mile off and avoided it easily.
Cash shoots in for a takedown but Reid shows good takedown defense.
Cash doesn't manage to clinch there - Reid circles away.
Cash with a lazy takedown attempt

and Reid counters with a takedown into side control.

Reid stands up and we're back to a striking position.
Reid shoots for a takedown but Cash saw that one coming a mile off and avoided it easily.
That's three failed takedown attempts in the round for Patrick Reid. That's going to take a lot out of him.
Reid shoots in for a takedown but Cash shows good takedown defense.
Cash tries to keep at a distance but Reid has taken the fight into the clinch.
Reid is trying to slow down the pace of the fight but Cash is keeping busy.
Cash escapes the clinch and we're back to striking.
Cash scores a trip takedown into side control. Nice.
Fantastic stuff here - a very entertaining period of action, which has drawn cheers from the crowd.
Cash wants to control but Reid is keeping him busy.
Reid takes a big shot right to the temple there but he's taken it well.

Cash tries for an arm triangle. That looks pretty tight to me. Is this one over!?! Possibly, maybe, no Cash has let go of the choke. Obviously it wasn't as tight as we thought!
Reid gets one leg under and gets the fight to half guard.

That's one minute gone in the round.
Cash decides to stand and escape the position.
Reid shoots in for a double leg but Cash sprawls well. That's going to sap some energy.
Reid fails with the takedown
and Cash counters into the clinch. Nicely done.
Reid throws a vicious knee straight up the middle but Cash blocks it with crossed arms.
Reid is breathing heavily.
Reid content to slow the pace in the clinch.
Reid could do with loosing a few pounds - he looks very soft around the mid section, to put it politely.
Cash stops a takedown attempt from Reid.
Cash breaks the clinch and we're back to striking at distance.
Reid shoots in for a takedown but doesn't get it.
Cash darts in and clinches Reid up against the cage.
Cash lands a body shot in the clinch.
Cash breaks from the clinch.
Cash drives through and clinches with Reid against the cage.
Cash breaks the clinch and we return to the middle of the mat.
Nice takedown defense from Cash. No joy for Reid on that attempt.
Cash decides to change it up a bit and drives through with a nice takedown into half guard.
Cash with a momentary lay and pray from half guard.
Reid tries to roll over but Cash keeps him under control.

That's two minutes gone in the round.
Reid regains full guard. Nicely done.
Reid scrambles and gets back to his feet.
Reid doesn't succeed with the takedown
and Cash counters into the clinch. Nicely done.
Cash misses the knee to the body. Nice hip positioning from Reid.
Cash manages to break the clinch.
We've seen a great period of action over the last minute or so - credit to both fighters for leaving it all in the cage!
Reid scores a trip takedown into side control. Nice.
Reid is looking to take a break and control but Cash is keeping him honest, looking to work from the bottom.
The fighters are pressed up against the cage, both looking to find a bit of space to work.
Reid looking for an arm triangle but it's way too loose to do anything.
Reid tries for an arm triangle. That looks pretty tight to me. Is this one over!?! Possibly, maybe, no Reid has let go of the choke. Obviously it wasn't as tight as we thought!

That's three minutes gone in the round.
Reid trying to control the action but Cash is working from the bottom.
Cash pushes Reid away and creates a bit of space to escape. He's almost out here... but no, Reid gets a good hold of his legs and remains firmly in side control.
Reid tries to move into full mount but can't pass Cash's legs.
You can see the frustration on Cash's face, being in this tough position on the bottom.
Cash prevents Reid from improving position.
Cash is trying to control Reid's posture but Reid avoids it.
Cash is looking to reverse the position.

Neither fighter is doing enough for the referee's liking and he's decided to stand them back up.
Horrible takedown by Reid or perhaps it was just good defense by Cash which made him look bad.

That's four minutes gone in the round.
Neither fighter has done anything of merit for a good minute or two here and the crowd are not happy about it.
Reid shoots for a takedown but Cash saw that one coming a mile off and avoided it easily.
Reid fails with a takedown attempt.
Cash drives through and clinches with Reid against the cage.
Knees to the body from Cash.
Cash escapes the clinch and we're back to striking.
Cash clinches up with Reid and pushes him back against the cage.
Reid looking to slow down the pace here.
Reid is working for a takedown up against the cage. He can't get it on this occasion though.
Cash holding his opponent close, against the cage.
Reid taking a breather.
Cash wants to push off and get back to the center of the mat but Reid has him pressed against the cage.
Reid prevents Cash from breaking the clinch.
Reid keeps control of Cash as he tries to wriggle out of the double underhooks.
Cash is pressed up against the cage. Reid has hold of a leg and is looking to drag Cash down to the mat. Cash avoids the attempt though and has circled away. We're back to striking at a distance.
Reid misses with a takedown attempt - Cash sprawls well and throws a nice strike on the way out which just misses.
As the round comes to an end the crowd are showing their appreciation for a great round of action.
Reid closes the distance and clinches up with Cash, looking for a takedown. Reid pushes Cash against the cage but Cash circles to the side and manages to break the clinch.
Reid keeps the fight on the outside.
Cash shoots in for a takedown! He's got it and he's managed to land in full mount! That's better than Cash was expecting from the takedown attempt, I'm sure!
Cash connects with a couple of good shots from mount.
And that�s the end of the round � the fighters go back to their corners.
Keon Cash dominated that round.
The referee calls time. The cornermen exit stage left and we're back to business.

Cash fails in his attempt to clinch.
Reid shoots in but doesn't get the takedown
and Cash moves into the clinch.
Cash has had enough of the clinch but Reid keeps him there for the moment.
Reid on the defensive, avoiding the knees to the body.
Both guys are working to get underhooks.
Cash blocks an elbow strike from Reid.
Cash breaks the clinch and we're back to striking at distance.
Reid shoots and misses
and Cash counters into the clinch. Nicely done.
Reid goes for a takedown in the clinch but Cash prevents it.
That's three failed takedown attempts in the round for Patrick Reid. That's going to take a lot out of him.
Cash escapes the clinch and we're back to striking.
Reid with a lazy takedown attempt
and Cash counters into the clinch. Nicely done.
Cash pulls guard effortlessly.
Reid is trying to work a guillotine from the top, or something like that? Don't know how he thinks he's going to get a finish from there.
Cash is trying to keep Reid in close.
Keon Cash has got the better of the ground game so far.
Reid stops Cash from standing up.
Reid trying to pass the guard but can't manage it just yet.
Both fighters are absolutely exhausted here.
Reid is holding a leg here, probably looking for an ankle lock - he drops back and goes for it! Cash is in trouble! Is it all over??? No! Cash has escaped and now he's on top!
That's one minute gone in the round.
Reid has his foot on Cash's thigh. He's trying to push off and get in position for a triangle, I think. Cash works his way back into a safe position though.
Cash wants to get up but he can't break Reid's closed guard. He needs to be careful trying to break the legs open, as he's open to submissions here.
Reid looking for a guillotine here but Cash defends easily.
Reid has his foot on Cash's thigh. He's trying to push off and get in position for a triangle, I think. Cash works his way back into a safe position though.
Reid lands a beautiful switch and he's in full mount! That could spell trouble for Cash!
Cash reaches up to try and pull Reid in and control his posture, but Reid latches on to an arm and pivots quickly for an armbar! Cash taps out and this one is all over!
Ladies and gentlemen, after 1:58 of round 2, we have a winner by way of Submission (Armbar). Patrick Reid!
|
|
|
|
|
|
|
|
|
|
|
|
|
|
|
|
|
|
|
|
|
|
|
| S |
C
A |
G |
S |
C
B |
G |
|
S |
C |
G |
|
energy
A | B |
|
hype
A | B |
|
pop
A | B |
|
mgr
A | B |
|
FIGHT
RATING
100% |
|
|
|
|
|
|

