|
|
PBP Commentary |
Coming up we have a heavyweight MMA rules bout between Strawberry Kool Aid (ranked 0 p4p, 0 weight class) and Jake Anderson (ranked 0 p4p, 0 weight class). Over to our ring announcer for the fighter introductions!
 |
|
 |
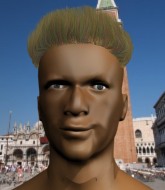
| 186 cm
25
244 lbs
1 - 0 - 0 |
|
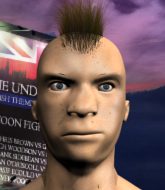
193 cm
22
272 lbs
0 - 0 - 0 |
Good takedowns
Counter striker
Granite chin |
|
BJJ Blue Belt
Brawler
Solid chin |
|
| |
|
Ladies and gentlemen. This fight is 3 rounds, in the heavyweight division.
Introducing the fighter to my left, fighting out of the red corner.
With a record of
1 - 0 - 0, fighting out of St Petersburg, Strawberry Kool Aid!
And introducing the fighter to my right, fighting out of the blue corner.
With a record of
0 - 0 - 0, fighting out of St Petersburg, Jake Anderson!
The judges for this bout are Viktor Lagutenko, Igor Prikhodko and Fedor Mirinova.

The bell rings for round one and we are underway!
Kool Aid avoids the clinch attempt nicely.

A momentary lapse in concentration from Anderson enables Kool Aid to shoot in and score with a neat double leg. Anderson manages to secure a closed guard as the fighters hit the mat.
It looks like the ref is thinking about a standup.
Kool Aid trying to pass the guard but can't manage it just yet.
Kool Aid pushes down on Anderson's leg and manages to get into half guard.
Kool Aid is looking to take a break and control but Anderson is keeping him honest, looking to work from the bottom.
Anderson is trying to get back to full guard.
Kool Aid working some ground and pound from close in. He's looking to maintain this position and strike for a while by the looks of things... although he'll probably advance to full mount in a minute now I've said that.
Anderson avoiding damage under a succession of punches from Kool Aid.
Anderson is trying to control but Kool Aid manages to pass to mount!
Anderson regains half guard.
Kool Aid lands with a punch from half guard.
Kool Aid has been looking to land a fair amount of strikes on the ground. He might be looking to soften his opponent up in order to work for a submission.

That's one minute gone in the round.
Kool Aid thows a huge punch but Anderson dodges it nicely.
Kool Aid seems to be taking a bit of a break to think of his next move. He lands a short punch in the meantime.
Kool Aid working over Anderson with some ground and pound. Anderson looks like he wants out of this position, which is understandable.
Kool Aid throwing punches and elbows but they're not doing any damage.
The fighters are pressed up against the cage, both looking to find a bit of space to work.
Kool Aid scoring with strikes to the body and head.
Anderson has hold of Kool Aid's hands but Kool Aid slips his arm to the side and lands an elbow.
Kool Aid is nestled in close to Anderson, controlling him well. He's worked in a nice elbow to the side of the head as well, for good measure.
Kool Aid working some ground and pound from close in. He's looking to maintain this position and strike for a while by the looks of things... although he'll probably advance to full mount in a minute now I've said that.
Fantastic stuff here - a very entertaining period of action, which has drawn cheers from the crowd.
Kool Aid working the head and body with strikes.
Kool Aid looks to score some points with some ground and pound.
Anderson is trying to defend against the ground and pound but Kool Aid scores with a couple of nice shots.
Kool Aid seems content to maintain position for now, rather than mounting any offense.
The ref warns both fighters not to hold the cage as they work up against the meshing.
Kool Aid throws a strike but Anderson avoids it easily and moves to full guard.

That's two minutes gone in the round.
Anderson has momentary wrist control but Kool Aid slips an elbow through the middle.
Kool Aid landing with the ground and pound.
Kool Aid is intent on slowing down the pace of the fight, simply looking to control.
Anderson not looking particularly offensive just at the moment.
There's a bit of a scramble here and now Anderson is on top in guard.
Kool Aid wants to stand but Anderson is controlling the position.
Anderson trying to control but Kool Aid is working from the bottom.

That's three minutes gone in the round.
Anderson pressing down on his opponent's thigh, looking to pass guard. Kool Aid is keeping the position for now.
Anderson must be cautious of submissions here, given that his opponent has the superior Jiu Jitsu.

Kool Aid manages to escape and get back to his feet.
Anderson closes this distance looking for a takedown but Kool Aid circles away.
Kool Aid shoots in with a takedown attempt and he has Anderson pinned against the cage. Anderson gets the underhooks and manages to circle away.
Kool Aid shoots in for a takedown but Anderson shows good takedown defense.

That's four minutes gone in the round.
Anderson stuffs a takedown. It's all about dictating where the fight takes place and Anderson wants it to stay on the feet.
That's three failed takedown attempts in the round for Strawberry Kool Aid. That's going to take a lot out of him.
Kool Aid dives in and grabs Anderson's left leg, looking for a takedown. Anderson pushes down on Kool Aid's head and hops out.
Anderson fails with a rather predictable takedown attempt.
Anderson doesn't manage to clinch there - Kool Aid circles away.
Kool Aid fakes an overhand right and shoots for a takedown. Anderson sprawls well initially but Kool Aid persists and gets the takedown into half guard.
Kool Aid looks to land a strike but Anderson avoids it nicely and regains full guard.
The crowd are going absolutely nuts as the round comes to an end - what a fantastic round of action!
Kool Aid scores with a decent looking elbow strike.
This has been an exciting period of action!
Kool Aid throwing elbows and punches but not connecting, as Anderson works some decent striking defense from the bottom.
Kool Aid postures up and lands some nice ground and pound.
And that�s the end of the round � the fighters go back to their corners.
Strawberry Kool Aid dominated that round.
Well, the break between rounds is over. Let's get back to the scrappin!

Kool Aid avoids a kick to the body.
A momentary lapse in concentration from Anderson enables Kool Aid to shoot in and score with a neat double leg. Anderson manages to secure a closed guard as the fighters hit the mat.
Anderson looking to control.
Kool Aid scoring with punches to the head and body.
Anderson looking to sweep here. No luck so far.
Kool Aid in full guard, throwing the ground and pound. No damage this time.
Kool Aid with a couple of shots to the head there. Not particularly brutal.
Anderson is trying to control the position but Kool Aid postures up.
Anderson is working an open guard here, looking to improve his position. No doubt that will leave him open to counters but at least he's being more offensive.
Kool Aid cracks Anderson with a solid left hand.
This has been an exciting period of action!
Anderson keeping full guard, as Kool Aid tries to pass.
Kool Aid wants to control from the top but Anderson keeps moving.
That's one minute gone in the round.
Kool Aid looking to pass the guard.
Kool Aid not doing a lot at the moment. He'll have to show some more aggression or the fight will get stood up.
Kool Aid lands a couple of elbows.
Kool Aid with a couple of shots to the head there. Not particularly brutal.
Anderson wants to sweep but no luck.
Anderson is breathing heavily.
Kool Aid engaging in some classic timewasting tactics.
Kool Aid is working the ground and pound from guard. He might want to try advancing position though to get more of an impact.
That's two minutes gone in the round.
Kool Aid pushing down on Anderson's thigh, trying to pass to half guard. He's managed it... Nice work.
Kool Aid looks towards his corner to check for any instructions. The corner give him nothing to work with, so he cracks Anderson with a short hammerfist. I guess that's as good as any advice he could get in this position.
Kool Aid lands a big shot. The thud that echoes around the arena is like music to the fans' ears.
This has been an exciting period of action!
Kool Aid drops an elbow to the side of Anderson's head.
Kool Aid is working hard to pass the guard. He's done it - he's now in full mount! Trouble for Anderson!

Kool Aid wants to finish this one by submission but Anderson is holding onto his waist, trying to prevent any attacks from Kool Aid.
Anderson is trying desperately to improve position.
Kool Aid looking to control and managing it successfully.
That's three minutes gone in the round.
Kool Aid has controlled the position for a good 20 seconds, which will no doubt be starting to frustrate his opponent.
Kool Aid landing punches.
Kool Aid lands with some vicious ground and pound - can Anderson hang on?
Kool Aid with a couple of short strikes.
Kool Aid is in the full mount, landing strikes.
Kool Aid is in the full mount, landing strikes.
We've seen a great period of action over the last minute or so - credit to both fighters for going all out!
Kool Aid breaks from Anderson's wrist control and lands an elbow.
Anderson working to try and regain half guard.
That's four minutes gone in the round.
Kool Aid sitting in mount, just looking to control for the moment.
Kool Aid is in the full mount, landing strikes.
Kool Aid with the ground and pound from mount.
Kool Aid landing strikes from the mount and Anderson is in trouble!
Kool Aid punishing his opponent with strikes.
Kool Aid lands a big shot there that rocks Anderson but he's holding on and managing to survive for now.
Kool Aid cracks Anderson with a nasty head shot there - the crowd let out an audible gasp there, as the noise reverberated around the arena.
The crowd are going absolutely nuts as the round comes to an end - what a fantastic round of action!
Kool Aid raining down shots from the mount!
Strawberry Kool Aid overall seems to be getting the better of the ground position in the fight so far.
Kool Aid scores with a couple of good head shots there.
And that�s the end of the round � the fighters go back to their corners.
Strawberry Kool Aid dominated that second round.
The referee calls time. The cornermen exit stage left and we're back to business. Ladies and gentlemen, this is the final round!

Kool Aid shoots in for a takedown! He's got it and he's managed to land in full mount! That's better than Kool Aid was expecting from the takedown attempt, I'm sure!
Kool Aid controlling from mount.
Kool Aid is really dominating this fight. Is there anything that Anderson can do to turn this around?
Kool Aid fakes a shot to the body and cracks his opponent in the head. Nice ground and pound there!
BOOM! Kool Aid connects with a massive shot to the dome!
Kool Aid in mount throwing good strikes here, bouncing his opponent's head off the canvas.
The crowd are loving this. Great action here.
The referee warns Anderson that he has to improve his position here as he takes two more clean shots to the head.

Anderson is rocked!
Whack. That's a big, big shot from Kool Aid! Anderson is out cold! This one is all over!
Ladies and gentlemen, after 1:04 of round 3, we have a winner by way of KO (Strikes). Strawberry Kool Aid!
During a confident post fight interview, Strawberry Kool Aid thanked all his fans. He seemed very genuine when describing how motivated his fans keep him.
|
|
|
|
|
|
|
|
|
|
|
|
|
|
|
|
|
|
|
|
|
|
|
| S |
C
A |
G |
S |
C
B |
G |
|
S |
C |
G |
|
energy
A | B |
|
hype
A | B |
|
pop
A | B |
|
mgr
A | B |
|
FIGHT
RATING
100% |
|
|
|
|
|
|

