|
|
PBP Commentary |
Coming up we have a heavyweight MMA rules bout between Gareth Bolenge (ranked 0 p4p, 0 weight class) and Chris Hampson (ranked 0 p4p, 0 weight class). Hampson has chosen Some Bodies Gonna Get It as his entrance music. Gareth Bolenge looks tired to me. Hopefully he has got enough gas left in the tank to put in a good performance.
 |
|
 |
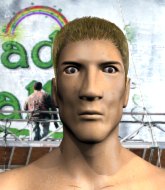
| 200 cm
25
260 lbs
0 - 4 - 0 |
|
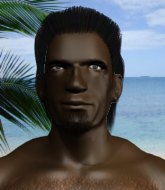
198 cm
25
225 lbs
2 - 0 - 0 |
BJJ Blue Belt
Solid Muay Thai
Big heart |
|
BJJ White Belt
Good elbows
Granite chin |
|
| |
|
Ladies and gentlemen. This fight is 3 rounds, in the heavyweight division.
Introducing the fighter to my left, fighting out of the red corner.
With a record of
0 - 4 - 0, fighting out of Hilo, Gareth Bolenge!
And introducing the fighter to my right, fighting out of the blue corner.
With a record of
2 - 0 - 0, fighting out of Hilo, Chris Hampson!
The judges for this bout are , and .

The bell rings for round one and we are underway!
Hampson tries to clinch but Bolenge is having none of it.
Hampson tries to clinch but Bolenge moves away

and Bolenge holds on and brings the fighters into a clinch.
Hampson tries to land a shot to the body but it's blocked.
Hampson makes some space for himself and lands an uppercut.
Bolenge takes a shot to the head.
Hampson has a couple of punches blocked by Bolenge.
Hampson misses with a hook to the ribs.
A hook to the body from Hampson.
Bolenge drops down for a takedown but doesn't get it.

Hampson breaks the clinch and we're back to striking at distance.
Bolenge avoids a punch combination nicely.

Hampson clinches up against the cage.
Hampson wants to break free but Bolenge has control.
Hampson lands a nice shot to the body.
Bolenge is breathing heavily.
This is a great period of action - very entertaining stuff!
Bolenge blocks a couple of punches on the inside.
Bolenge has Hampson pressed up against the cage and is working for takedown. Hampson manages to improve position though and keeps the fight standing.
Bolenge has Hampson pressed up against the cage and is working for takedown. Hampson manages to improve position though and keeps the fight standing.
That's three failed takedown attempts in the round for Gareth Bolenge. That's going to take a lot out of him.
Hampson lands a hook that snaps the head of Bolenge backwards.
Hampson's corner calls for him to break the clinch, which he does.
A punch combination from Hampson misses.

That's one minute gone in the round.
Hampson fails with an attempt to clinch.
Hampson moves into the clinch.
A quick uppercut on the inside from Hampson.
Hampson scores with a nice hook to the head.
A quick uppercut on the inside from Hampson.
Hampson lands with a quick shot inside that doesn't really do much damage.
Hampson lands with a short punch from the clinch.
Hampson lands with a right to the head.
Hampson pushes Bolenge back against the cage and lands a hook to the side of the head.
A nice left hand lands by Hampson.
Hampson struggles to land a body shot inside as Bolenge controls his hands.
Hampson digs a right hand into Bolenge's ribs. Those have got to be taking their toll on Bolenge's gas tank.
Hampson lands with a short shot to the head.
Hampson lands with a short shot to the head.
The fans in attendance giving it up for the two fighters, who have really let it all hang out in the last minute or so!
Hampson swings away with an uppercut that misses.
Bolenge is trying to work for a single leg takedown but Hampson pulls him back up using the underhooks.
Hampson misses with some punches.
With the fighters clinched against the cage, Hampson creates a bit of distance for himself and scores with a nice uppercut.
Bolenge drops down looking for an ankle pick but Hampson pulls his leg out and moves away.

That's two minutes gone in the round.
Hampson tries to clinch there but Bolenge circles away.
Chris Hampson is looking to keep the fight on the feet at all costs.
Hampson looks to land a combination but Bolenge avoids it well.
Bolenge avoids the clinch attempt nicely.
Hampson lands with a nice combination. Bolenge backs away looking to recover.
Hampson doesn't manage to clinch there - Bolenge circles away.
Wow, both these guys are really going for it!
Hampson fakes with an overhand right and moves in to clinch with Bolenge, pushing him back against the cage.
Hampson softening up his opponent with strikes, against the cage.
Hampson gets double underhooks to prevent a takedown attempt from Bolenge.
A short right from Hampson on the inside.
Hampson lands a nice uppercut.
Bolenge can't get the takedown.
Hampson pushes Bolenge back against the cage and lands a hook to the side of the head.
Hampson misses with some punches.

That's three minutes gone in the round.
A hook to the body from Hampson.
Hampson prevents the takedown attempt.
Hampson makes some space for himself and lands an uppercut.
Hampson throws a hook to the body. More of an arm punch but it's all scoring with the judges.
Hampson breaks the clinch and we're back to striking at distance.
Hampson clinches.
Hampson gets through Bolenge's defenses to land a nice punch to the side of the head.
Hampson tries to break free but Bolenge pushes him back against the cage.
Bolenge is looking for a takedown.
Hampson lands with a quick shot inside that doesn't really do much damage.
Hampson lands with a right to the head.
Hampson misses with some punches.
Hampson lands with a left to the head.
Hampson misses with the head strike.
Hampson is defending well against a takedown attempt.
Hampson throws a blind hook that connects with the side of Bolenges head.
Hampson gets underhooks to prevent Bolenge's takedown attempt.
Bolenge has Hampson pressed up against the cage and is working for takedown. Hampson manages to improve position though and keeps the fight standing.

That's four minutes gone in the round.
Hampson throws a blind hook that connects with the side of Bolenges head.
Hampson lands a body punch.
Wooooo! Give it up for these two warriors! They are putting on a show!
Hampson can't find room to land a body shot as Bolenge controls the action.
A quick uppercut on the inside from Hampson.
Hampson tries a shoulder strike but it doesn't do any damage.
Hampson scores with a nice hook to the head.
Hampson stops a takedown attempt from Bolenge.
Bolenge is working for a takedown up against the cage. He can't get it on this occasion though.
Bolenge keeps control of Hampson as he tries to wriggle out of the double underhooks.
A nice left hand lands by Hampson.
A nice left hand lands by Hampson.
Bolenge wants a takedown but no success here.
The crowd are going absolutely nuts as the round comes to an end - what a fantastic round of action!
Hampson lands on the inside with an uppercut.
Hampson prevents a takedown attempt there.
Hampson pushes off and circles away, back to the middle of the mat.
And thats the end of the round the fighters go back to their corners.
Chris Hampson dominated that round.
That's time! Back to the action!

Hampson tries to close the distance and clinch up against the cage but Bolenge paws at him with a jab and circles away.
Hampson tries to clinch but Bolenge is having none of it.
Hampson fails with an attempt to clinch.
Hampson rushes Bolenge and pushes him back against the cage in a clinch.
Hampson scores with a shoulder strike.
Hampson is pressed up against the cage. Bolenge has hold of a leg and is looking to drag Hampson down to the mat. Hampson avoids the attempt though and has circled away. We're back to striking at a distance.
Bolenge shoots for a double leg takedown but Hampson sprawls well. He's pushed Bolenge's face into the mat and manages to get back to his feet relatively easily.
Bolenge closes this distance looking for a takedown but Hampson circles away.
That's three failed takedown attempts in the round for Gareth Bolenge. That's going to take a lot out of him.
Hampson stalks Bolenge and leaps in with a furious combination of punches. Uppercuts and crosses smash into Bolenge's face. Bolenge staggers backwards, shaken.
Hampson fakes with an overhand right and moves in to clinch with Bolenge, pushing him back against the cage.
Hampson has been the more effective fighter overall so far.
Hampson is trying to break the clinch but Bolenge has him pressed against the cage.
The fans in attendance giving it up for the two fighters, who have really let it all hang out in the last minute or so!
Hampson pushes Bolenge back against the cage and lands a hook to the side of the head.
Hampson lands with a right to the head.
Hampson lands a right hand.
Bolenge takes a shot to the head.
Hampson lands with a light punch inside.
Hampson misses with a punch on the inside.
Both fighters are absolutely exhausted here.
Nice body punch from Hampson.
That's one minute gone in the round.
A hook to the body from Hampson.
A shot in the inside from Hampson.
Hampson gets through Bolenge's defenses to land a nice punch to the side of the head.
Hampson breaks the clinch.
Bolenge shoots in for a double leg but Hampson sprawls well. That's going to sap some energy.
Chris Hampson seems to be the more aggressive standup fighter in this bout.
Hampson wants to land a leg kick but Bolenge is out of range.
Hampson is looking to clinch.
Bolenge swings and misses with a hook to the body.
Hampson scores with a nice looking left hook and follows it up with an uppercut!
Hampson is looking to clinch but Bolenge is avoiding it.
Hampson gets in close and instigates a clinch.
Hampson lands punches inside but they're not really causing much damage.
A shot in the inside from Hampson.
Hampson scores with a shoulder strike.
Hampson misses with a hook to the ribs.
Hampson gets underhooks to prevent Bolenge's takedown attempt.
Bolenge blocks a body shot from Hampson.
That's two minutes gone in the round.
Hampson tried to land a shot to the body but connects with Bolenge's elbow.
Bolenge tries to score a body lock takedown but Hampson shows good agility there to stay on his feet.
Hampson misses with a short punch on the inside.
Wooooo! Give it up for these two warriors! They are putting on a show!
Hampson gets double underhooks to prevent a takedown attempt from Bolenge.
Hampson working some nice short punches in the clinch.
A short right from Hampson.
Bolenge goes for a takedown attempt but Hampson pushes him away and we're back to fighting at a distance.
Hampson misses with a double jab.
Bolenge looks for a takedown here. Will he get it? Hampson is fending him off so far but Bolenge persists. Nope, Hampson circles away and we're back to standing.
Hampson tries to clinch but is not successful on this occasion.
Bolenge throws a wild combination but nothing lands.
Bolenge shoots in but no luck this time.
That's three minutes gone in the round.
Hampson is looking to clinch but Bolenge is avoiding it.
Hampson wants to clinch but Bolenge slips to the side
and Bolenge counters into the clinch. Nicely done.
A short right from Hampson on the inside.
Bolenge blocks a body shot from Hampson.
Chris Hampson seems to be working more effectively in the clinch in the fight so far.
Bolenge has dropped down and is looking to force the takedown but it's defended by Hampson after a bit of a struggle.
Bolenge goes for a takedown in the clinch but Hampson prevents it.
Bolenge tries for a takedown. No joy.
Hampson gets double underhooks to prevent a takedown attempt from Bolenge.
Hampson is leaning against Bolenge and scores with a nice uppercut to the body.
A head punch on the inside from Hampson fails to land.
Bolenge goes for a takedown attempt but Hampson pushes him away and we're back to fighting at a distance.
Bolenge shoots in but no luck this time.
That's four minutes gone in the round.
Hampson wants to clinch up but Bolenge keeps it at a distance.
Hampson wants to clinch.
Hampson throws a wild combination but nothing lands.
Horrible takedown by Bolenge or perhaps it was just good defense by Hampson which made him look bad.
Hampson doesn't manage to clinch there - Bolenge circles away.
Bolenge tries to shoot in for a takedown. He's got hold of a leg but Hampson swivels and escapes.
Bolenge circles away from the clinch attempt.
Hampson fails in his attempt to clinch.
As the round comes to an end the crowd are showing their appreciation for a great round of action.
Bolenge looks for a takedown here. Will he get it? Hampson is fending him off so far but Bolenge persists. Nope, Hampson circles away and we're back to standing.
We've seen a great period of action over the last minute or so - credit to both fighters for going all out!
Hampson moves in looking to clinch but Bolenge pushes him off.
Hampson tries to bum rush Bolenge with a series of wild strikes but Bolenge uses good footwork to avoid the assault.
And thats the end of the round the fighters go back to their corners.
Chris Hampson showed his class in that round. I'd imagine he'll take it on all the scorecards.
That's the end of the interval. I'm sure that seemed a lot quicker than a minute for our two fighters! Back to the action. Let's get this one finished - here comes the final round!

Bolenge tries to shoot in for a takedown. He's got hold of a leg but Hampson swivels and escapes.
This is turning into a torrid day at the office for Bolenge. He's trying desperately to land a takedown but he's failing miserably and getting slapped silly on the feet to compound his misery.
Hampson closes the distance and clinches.
Hampson working some nice short punches in the clinch.
Bolenge tries for a takedown but Hampson manages to get underhooks.
Hampson scores with a nice hook to the head.
Hampson lands with a light punch inside.
Hampson lands on the inside with an uppercut.
Hampson working aggressively here.
Hampson scores with a nice hook to the head.
Hampson lands with a quick shot inside that doesn't really do much damage.
A left hand lands to the body for Hampson.
A quick uppercut on the inside from Hampson.
Hampson lands punches inside but they're not really causing much damage.
Hampson makes some space for himself and lands an uppercut.
A shot in the inside from Hampson.
Hampson lands with a good tight uppercut to the head.
Both fighters are breathing heavily.
Hampson misses with a short punch on the inside.
The crowd are loving this. Great action here.
Hampson lands a left hand that snaps the head of Bolenge backwards.
That's one minute gone in the round.
A body shot lands from Hampson.
Bolenge drops down looking for an ankle pick but Hampson pulls his leg out and moves away.
That's three failed takedown attempts in the round for Gareth Bolenge. That's going to take a lot out of him.
Hampson is looking to clinch.
Hampson tries to clinch up but Bolenge circles away and keeps his distance.
Hampson has taken the fight to the clinch.
Hampson lands a left hand.
Hampson wants to break free. God knows he wants to breaaaak freeee.
Hampson misses with some punches.
Hampson lands a right hand.
A quick uppercut on the inside from Hampson.
Bolenge drops to a knee looking for a takedown but Hampson gets the underhooks and prevents it.
Hampson lands with a short punch from the clinch.
Hampson working on landing some head shots here - that one got through nicely.
That's two minutes gone in the round.
A short left from Hampson.
Bolenge has Hampson pressed up against the cage and is working for takedown. Hampson manages to improve position though and keeps the fight standing.
Bolenge is trying to work for a single leg takedown but Hampson pulls him back up using the underhooks.
Hampson lands a hook to the side of the head.
Hampson lands a body punch - he's looking to wear down Bolenge.
Hampson throws a punch but it's blocked by Bolenge.
Hampson wants to break free. God knows he wants to breaaaak freeee.
Hampson working on landing some head shots here - that one got through nicely.
The crowd cheering loudly, showing their appreciation for the quality fight we're seeing here.
Bolenge wants a takedown but no success here.
Hampson is defending well against a takedown attempt.
Hampson scores with a shoulder strike.
Bolenge drops to a knee looking for a takedown but Hampson gets the underhooks and prevents it.
Hampson lands a body punch in the clinch.
Hampson lands a nice uppercut.
Hampson scores with a shoulder strike.
That's three minutes gone in the round.
Bolenge blocks a punch to the side of the head.
Hampson fails to land with a short punch on the inside.
Hampson misses with the head strike.
Bolenge is trying to drag Hampson to the mat but Hampson just about manages to keep his footing. He used the cage to his advantage there.
Bolenge tries for a takedown. No joy.
A right hand to the body from Hampson.
Hampson prevents the takedown attempt.
Hampson lands with a quick shot inside that doesn't really do much damage.
Hampson breaks the clinch.
Bolenge changes levels and looks for a double leg takedown. Hampson tries to avoid it but Bolenge manages to keep hold of a leg and drag Hampson to the ground. Hampson escapes though and pops straight back up to his feet.
Hampson throws a right and a left that both miss.
Hampson moves in looking to clinch but Bolenge pushes him off.
Bolenge looks for a takedown here. Will he get it? Hampson is fending him off so far but Bolenge persists. Nope, Hampson circles away and we're back to standing.
Hampson lands a two punch combo.
That's four minutes gone in the round.
Bolenge shoots in for a takedown but doesn't get it.
Hampson darts in trying to clinch
and Bolenge counters by moving into the clinch. Good anticipation by Bolenge.
Bolenge wants a takedown but no success here.
Hampson wants to push off and get back to the center of the mat but Bolenge has him pressed against the cage.
Hampson prevents a takedown attempt there.
Bolenge wants a takedown.
Hampson gets underhooks to prevent Bolenge's takedown attempt.
Fantastic stuff here - a very entertaining period of action, which has drawn cheers from the crowd.
Hampson struggles to land a body shot inside as Bolenge controls his hands.
Bolenge changes levels and goes for a takedown here. Hampson fights it off and pushes away nicely.
As the round comes to an end the crowd are showing their appreciation for a great round of action.
Hampson fails with an attempt to clinch.
Gareth Bolenge has stepped it up - he knows he needs a finish here!
Chris Hampson is fighting for a decision - hopefully he's judged it right and he's actually winning the fight.
Nice takedown defense from Hampson. No joy for Bolenge on that attempt.
And that's the end of the fight!
Chris Hampson comfortably won the final round on my scorecard.
Well Hampson has outworked and out performed his opponent in all aspects of the game today. He was simply too good and the decision should be no more than a formality. Over to the ring announcer for the scorecards.
Ladies and gentlemen, after 3 rounds of action, we go to the scorecards for a decision.
Judge Andi Peters scores the fight 27:30
Judge Gordon Ramsey scores the fight 27:30
Judge Frank Skinner scores the fight 27:30
In favor of your winner, by unanimous decision... Chris Hampson!
Chris Hampson took his opportunity to call for a title shot in his post fight interview.
|
|
|
|
|
|
|
|
|
|
|
|
|
|
|
|
|
|
|
|
|
|
|
| S |
C
A |
G |
S |
C
B |
G |
|
S |
C |
G |
|
energy
A | B |
|
hype
A | B |
|
pop
A | B |
|
mgr
A | B |
|
FIGHT
RATING
100% |
|
|
|
|
|
|
