|
|
PBP Commentary |
Coming up we have a featherweight MMA rules bout between Bada Boom (ranked 0 p4p, 0 weight class) and Neil Mendoza (ranked 0 p4p, 0 weight class). Chooooooooon! I think Boom might be my favorite fighter, now he's come out to Metallica - All Nightmare Long. Both fighters look fresh as a daisy as they make their way towards the cage.
 |
|
 |
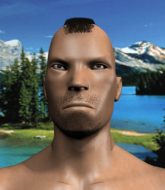
| 170 cm
22
152 lbs
3 - 1 - 0 |
|
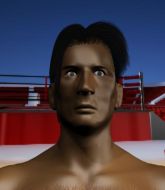
168 cm
19
151 lbs
3 - 1 - 0 |
Good takedowns
Counter striker
Granite chin |
|
BJJ Blue Belt
Decent boxing
Granite chin |
|
| |
|
Ladies and gentlemen. This fight is 3 rounds, in the featherweight division.
Introducing the fighter to my left, fighting out of the red corner.
With a record of
3 - 1 - 0, fighting out of Tokyo, Bada Boom!
And introducing the fighter to my right, fighting out of the blue corner.
With a record of
3 - 1 - 0, fighting out of Tokyo, Neil Mendoza!
The judges for this bout are Ren Mimura, Taro Takaoka and Yukihiro Shimada.

The bell rings for round one and we are underway!
Mendoza misses with a wild combination.
The fighters circle momentarily. Mendoza darts into range and connects with a nice straight punch.

Boom shoots in and gets a takedown into half guard. Boom showed some decent athleticism there.
Boom is trying to advance to mount but he's lost his balance and Mendoza reverses the position - he's now on top in Boom's guard.
Boom working a defensive guard here.

Boom has his foot on Mendoza's thigh. He's trying to push off and get in position for a triangle, I think. Mendoza works his way back into a safe position though.
Boom working from the bottom, still in full guard. He's managed to get a loose triangle. Mendoza doesn't seem to be doing much to defend here, obviously he feels comfortable in the position. Mendoza manages to throw the legs off his shoulder and he's back into guard - no problem.
Boom is looking for a triangle but Mendoza pushes his legs off easily.
The ref warns both fighters not to hold the cage as they work up against the meshing.

That's one minute gone in the round.
Boom looking for a guillotine here but Mendoza defends easily.
Mendoza wants to stand but Boom has a closed guard, so he can't escape.
Boom has a loose triangle. He'll be looking to tighten that up but Mendoza can see exactly what he's planning and manages to posture up and free himself.
Boom wants to sweep but no luck.

That's two minutes gone in the round.
A lull in the action here being met with boos from the crowd.
Boom looking for submissions off his back, moving his hips, looking for an opening.
Mendoza has decided he wants to stand but the closed guard of Boom is proving hard to escape from.
Boom wants to sweep but no luck.
Mendoza must be cautious of submissions here, given that his opponent has the superior Jiu Jitsu.
Mendoza avoids a guillotine attempt easily.
Boom throws a couple of shots from the bottom but they don't land.

That's three minutes gone in the round.
Boom looking for submissions off his back, moving his hips, looking for an opening.
Boom looking to hit a scissor sweep but Mendoza is one step ahead there.
Boom escapes his hips to the side and looks to be working for an armbar. Mendoza gives him a little smile and shakes his head. No chance.
Boom is breathing heavily.
Boom has an omoplata and is looking to use it perhaps as a submission or perhaps to transition. Mendoza is in a bit of discomfort here, but he's managed to free himself and has dived into side control! That didn't work out too well for Boom.

That's four minutes gone in the round.
A few boos can be heard. I'm sure they will multiply if the fighters don't pick up the pace.
Boom tries to get back to half guard but can't.
Boom is looking to slip a leg under and get half guard but Mendoza is one step ahead and moves to full mount!
The fighters are pressed up against the cage, both looking to find a bit of space to work.
Boom working to try and regain half guard.
The crowd thankful this round is nearly over.
Boom tries to improve his position but instead Mendoza has taken his back!
And that�s the end of the round � the fighters go back to their corners.
Bada Boom dominated that round.
The fighters get back to their feet, the hooter sounds and we're back to the action!

Mendoza throws a hook but Boom blocks it.
Mendoza cracks Boom with a right hand to the side of the head.
Mendoza swinging wilding here.
Mendoza tries to clinch up.
Boom changes levels and looks for a double leg takedown. Mendoza tries to avoid it but Boom manages to keep hold of a leg and drag Mendoza to the ground. Mendoza escapes though and pops straight back up to his feet.
Mendoza will need to tighten up his combinations if he doesn't want to gas himself out, swinging at thin air.
Mendoza throws a combination but comes up with nothing but fresh air.
Mendoza misses with a wild combination.
Boom shoots in and bounces Mendoza off the cage to secure the takedown into guard.

Boom decides he's had enough of playing guard and decides to stand. Come on Mendoza, up you get!
That's one minute gone in the round.
Mendoza cracks Boom with a good jab.
A big left from Mendoza misses.
Mendoza throws a right and a left that both miss.
Boom shoots in for a takedown. "I don't think so" says Mendoza as he avoids it easily.
Mendoza throws a series of punches but Boom avoids them all with ease.
Mendoza looks to land a combination. Boom sees it coming but can only parry a couple of the shots.
Boom slips a jab and a cross from Mendoza.
Neil Mendoza is looking to keep the fight on the feet at all costs.
Mendoza looks to score with a jab to the body but Boom is just out of range.
Boom fails with the takedown.
That's three failed takedown attempts in the round for Bada Boom. That's going to take a lot out of him.
Boom ducks under a wild hook from Mendoza.
Good exchange - Mendoza coming out on top.
Boom closes the distance and clinches up with Mendoza, looking for a takedown. Boom pushes Mendoza against the cage but Mendoza circles to the side and manages to break the clinch.
Mendoza throws a combination but it was largely blocked by Boom.
That's two minutes gone in the round.
Mendoza will need to tighten up his combinations if he doesn't want to gas himself out, swinging at thin air.
Mendoza is breathing heavily.
Boom throws a front kick aimed at Mendoza's knee but Mendoza avoids it well.
Mendoza looks to land a combination but Boom avoids it well.
Mendoza misses with a wild combination.
Mendoza tries to clinch up but Boom circles away and keeps his distance.
Mendoza throws out a token jab with nothing on it.
Mendoza throws a right and a left that both miss.
Mendoza looks to score with a combo but nothing lands.
Boom shoots in for a takedown - he's clinched up with Mendoza but Mendoza pushes him off and we're back to square one.
Mendoza looks to land a left hand but Boom moved out of range nicely.
Boom bobs and weaves into range and then changes levels and scores with a nice takedown into side control.
That's three minutes gone in the round.
Boom goes for an armbar here - this could be all over! But no, Mendoza has escaped beautifully and is now on top in side control! Oh, that's unlucky for Boom but great work by Mendoza.
Boom tries to improve position but can't.
Mendoza wants to stand but Boom has his arm trapped.
Boom tries to slip a leg under to move to half guard but Mendoza presses down on the leg and jumps into full mount!
Boom is in all sorts of trouble here.
That's four minutes gone in the round.
The crowd are hurling abuse towards the fighters... You can hardly blame them though because there isn't a lot going on in the fight.
Boom is working hard here to advance position.
Boom slips a leg in and gets back to half guard.
And that�s the end of the round � the fighters go back to their corners.
A close second round but Neil Mendoza will probably get the nod - 10:9.
Well, the break between rounds is over. Let's get back to the scrappin! This is the final round!

Boom ducks under a wild hook from Mendoza.
Boom fails to land the takedown.
Some wild striking there from Mendoza.
Boom shoots in for a takedown and gets it.
Boom is looking for a kimura but Mendoza is holding onto that half guard position, so it's hard for Boom to get the leverage.
Mendoza is trying to stand back up but Boom is controlling him
Boom wants to pass the guard but Mendoza is defending well.
Boom is looking for an arm triangle, whilst trying to pass to side control. Mendoza doesn't seem that keen to cooperate though. No luck this time Boom.
Both fighters are breathing heavily.
That's one minute gone in the round.
Mendoza is looking to escape.
Mendoza is refusing to be controlled, as Boom sits in half guard.
Mendoza pushes Boom off looking to stand but Boom dives back in and keeps control.
That's two minutes gone in the round.
The crowd are getting on the fighters' backs, as the pace has dropped off in the last minute or so.
Boom looking to pass the half guard. Not this time.

Well, the referee has seen enough. Neither fighter is active enough on the ground so he's stood them back up.
Boom looks for a takedown. He's got it. We're now in half guard.
Boom is trying for a guillotine from the top but the pressure isn't in the right place so Mendoza is just riding it out for now. Boom eventually gives up the hold.
Boom wants to control but Mendoza is keeping him busy.
That's three minutes gone in the round.
Boom is working for a submission of some sort.
Boom stops Mendoza from getting back to his feet.
Boom is looking to advance position but Mendoza won't allow it.
Mendoza is looking to get back to is feet but Boom passes into side control.
Boom wants to control but Mendoza is keeping him busy.
That's four minutes gone in the round.
A few boos can be heard. I'm sure they will multiply if the fighters don't pick up the pace.
The referee decides to stand the fighters back up.
Mendoza cracks Boom with a right hand to the side of the head.
Mendoza tries to bum rush Boom with a series of wild strikes but Boom uses good footwork to avoid the assault.
Neil Mendoza seems to be the more aggressive standup fighter in this bout.
Boom avoids a punch combination nicely.
Mendoza fails to land with a series of punches.
Boom defending well as Mendoza loads up on a big left hand.
Boom steps to the side to avoid the strikes from Mendoza.
Mendoza tries to clinch up.
Mendoza throws a hook but Boom blocks it.
Boooooooooooooooooooo!!! God, this has been a terrible round. Come on you two, sort yourselves out!
Boom slips a jab from Mendoza.
Boom gets a takedown into half guard.
Mendoza is staying active underneath Boom, who seems content to just control the action from this position.
And that's the end of the fight!
Bada Boom showed his dominance in that final round.
I think Boom has won this one but let's see what the judges have to say. Over to the ring announcer for the scorecards.
Ladies and gentlemen, after 3 rounds of action, we go to the scorecards for a decision.
Judge Ren Mimura scores the fight 29:28
Judge Taro Takaoka scores the fight 29:28
Judge Yukihiro Shimada scores the fight 29:28
In favor of your winner, by unanimous decision... Bada Boom!
|
|
|
|
|
|
|
|
|
|
|
|
|
|
|
|
|
|
|
|
|
|
|
| S |
C
A |
G |
S |
C
B |
G |
|
S |
C |
G |
|
energy
A | B |
|
hype
A | B |
|
pop
A | B |
|
mgr
A | B |
|
FIGHT
RATING
26% |
|
|
|
|
|
|

