|
|
PBP Commentary |
Coming up we have a bantamweight MMA rules bout between Jameson Connemara (ranked 0 p4p, 0 weight class) and William Hatfield (ranked 0 p4p, 0 weight class). Hatfield comes into a darkened arena with his song building. Country Boy Can Survive kicks in, the lights come on and the crowd goes wild! What a showman! I can't wait for this one - let's get the fighter introductions out of the way and get this one started!
 |
|
 |
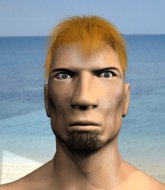
| 175 cm
19
144 lbs
5 - 0 - 0 |
|
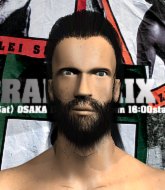
169 cm
20
143 lbs
3 - 0 - 0 |
Decent wrestler
Excellent boxer
KO power |
|
BJJ Purple Belt
Counter striker
Intelligent |
|
| |
|
Ladies and gentlemen. This fight is 3 rounds, in the bantamweight division.
Introducing the fighter to my left, fighting out of the red corner.
With a record of
5 - 0 - 0, fighting out of Amsterdam, Jameson Connemara!
And introducing the fighter to my right, fighting out of the blue corner.
With a record of
3 - 0 - 0, fighting out of Amsterdam, William Hatfield!
The judges for this bout are Radbod Blank, Albert Achterberg and Nard Betker.

The bell rings for round one and we are underway!
Nice takedown defense from Connemara. No joy for Hatfield on that attempt.
Connemara throws a body punch but Hatfield moves out of range.
Connemara throws a leg kick that is checked

and Hatfield counters with a nice double leg into half guard.
Connemara is doing well to avoid being mounted. He's controlling the position at the moment.
The ref warns both fighters not to hold the cage as they work up against the meshing.
Connemara wants to control but Hatfield is keeping busy.
Connemara on his back here. We all know that wrestlers don't like being on their back so let's see if Connemara tries to get out of the position.

Hatfield is working for a kimura but Connemara is defending it quite comfortably.
Hatfield is looking to advance position but Connemara won't allow it.
Hatfield is looking to pass Connemara's guard but actually Connemara recovers to full guard.

That's one minute gone in the round.
Hatfield pressing down on his opponent's thigh, looking to pass guard. Connemara is keeping the position for now.
Hatfield trying to control but Connemara is working from the bottom.
Hatfield throwing strikes but missing.
The fighters are pressed up against the cage, both looking to find a bit of space to work.
Hatfield is fighting to break Connemara's control of his arms but Connemara is doing a good job of controlling the position at the moment.

That's two minutes gone in the round.
Connemara looking to hit a scissor sweep but Hatfield is one step ahead there.
Connemara is trying to keep Hatfield in close.

The referee decides to stand the fighters back up.
Connemara scores with a crisp jab that stopped Hatfield in his tracks.
Connemara throws a jab but it's blocked by Hatfield.
Hatfield has a nice red mark on his side after a thudding body kick by Connemara.
Hatfield scores with a nice takedown into half guard. Let's see what he's got on the ground.
Hatfield is working for submissions here but there's nothing on.
This has been an exciting period of action!
Hatfield wants to work for an arm triangle but Connemara is really keeping half guard well and defending the submission attempt.

That's three minutes gone in the round.
Connemara wants to improve his position but Hatfield is controlling well.
Connemara has his hands clasped together around Hatfield's back. He's all about the action.
Connemara has no desire to be mounted, so is trying to control. Hatfield is working away from the top position though.
Connemara tries to get to full guard but Hatfield has control of the leg.
Connemara is defending against the submission attempts here by Hatfield.

That's four minutes gone in the round.
Hatfield is thinking about going for an arm triangle but he can't free his leg.
Connemara gets back to full guard.
The crowd applaud the fighters efforts here as the round comes to an end.
Hatfield throwing strikes from guard but Connemara blocks nicely.
Connemara is trying to keep Hatfield in close.
And that�s the end of the round � the fighters go back to their corners.
A close round but William Hatfield will probably get the nod.
The fighters' corners scream their final instructions, as the referee calls time. Here we go, back to the action!

Nice shot by Connemara.
Connemara scores with a jab.
Connemara throws a lazy uppercut
and Hatfield counters with a driving takedown into guard. Nice work there by Hatfield.
Hatfield tries to free his leg and advance position but Connemara is retaining full guard.
Connemara wants to sweep here but Hatfield controlling him for the moment.
Hatfield drops back, looking for a kneebar! Connemara looks panicked! The fighters roll across the mat, one looking to finish, one looking to escape. Connemara looks to have wriggled free... Yes, he's got his leg free and he's dived into side control! Good work there from Connemara!
The crowd are loving this. Great action here.
Hatfield is looking to reverse the position.
That's one minute gone in the round.
You can see the frustration on Hatfield's face, being in this tough position on the bottom.

Connemara decides to take the fight back to the feet.
Connemara throws a leg kick but Hatfield sees it coming and moves out of range.
Connemara swats away the attempt to clinch by Hatfield.
Hatfield will have to do better than that with his takedown attempts.
Hatfield takes a shot to the nose. Hopefully that hasn't broken it.
That's two minutes gone in the round.
Left hook, right uppercut from Connemara.
Hatfield misses with a takedown attempt
and Connemara counters with a right hand to the body.
Connemara tried to score with a low kick but Hatfield checks it.
Hatfield fails with an attempt to clinch.
Hatfield drives through with a really nice takedown into side control.
Wooooo! Give it up for these two warriors! They are putting on a show!
Connemara is looking to regain half guard here but Hatfield keeps moving and retains side control.
Connemara is working hard here to advance position.
Hatfield wants to work for a kimura but he's foiled early by Connemara, who protects the arm well.
Hatfield fails to land a wild elbow strike.
That's three minutes gone in the round.
Hatfield throws a strike aimed at the side of Connemara's head but Connemara avoids it well.
Hatfield working hard here to secure a kimura but he's not really in the right position for it.
Hatfield tries for an arm triangle. That looks pretty tight to me. Is this one over!?! Possibly, maybe, no Hatfield has let go of the choke. Obviously it wasn't as tight as we thought!
Connemara knows he needs to get back to his feet asap. He's simply no match for Hatfield on the ground.
Connemara is trying to get back to half guard. He's pushing on Hatfield's leg. He's managed it. Nice work.
That's four minutes gone in the round.
Connemara is trying to escape back to his feet but Hatfield uses the scramble to pass into side control.
Hatfield tries for an arm triangle. That looks pretty tight to me. Is this one over!?! Possibly, maybe, no Hatfield has let go of the choke. Obviously it wasn't as tight as we thought!
Connemara is looking for a sweep.
As the round comes to an end the crowd are showing their appreciation for a great round of action.
Hatfield goes for an armbar! This could be all over! Wait, no, Connemara rolls with the submission and now he's on top in Hatfield's guard! Nice work there by Connemara!
And that�s the end of the round � the fighters go back to their corners.
That was a close second round but I would say that Jameson Connemara will probably get the nod.
The fighters' corners scream their final instructions, as the referee calls time. Here we go, back to the action! This is the final round!

Hatfield shoots in for a takedown but Connemara shows good takedown defense there and keeps this one on the feet.
Hatfield shoots in looking for a double leg takedown. Connemara defends it nicely.
Connemara throws a jab to the body, straight down the pipe. Boom. That sent Hatfield stumbling backwards but he manages to regain his composure quickly.
Connemara throws out a powerful jab.
Jab, jab by Connemara - just one landing.
Hatfield ducks under a wild hook from Connemara.
It's a brutal combination of punches from Connemara! Hatfield is backing up but he can't get away as Connemara lands with one final shot to the jaw that drops Hatfield and ends the fight. Great knockout.
Ladies and gentlemen, after 0:53 of round 3, we have a winner by way of TKO (Punches). Jameson Connemara!
Jumping up and down and very excited, Jameson Connemara waved his t-shirt featuring Untouchable Fight Nutrition's logo in front of the cameras.
|
|
|
|
|
|
|
|
|
|
|
|
|
|
|
|
|
|
|
|
|
|
|
| S |
C
A |
G |
S |
C
B |
G |
|
S |
C |
G |
|
energy
A | B |
|
hype
A | B |
|
pop
A | B |
|
mgr
A | B |
|
FIGHT
RATING
100% |
|
|
|
|
|
|
