|
|
PBP Commentary |
Coming up we have a light heavyweight MMA rules bout between Lars Holm (ranked 0 p4p, 0 weight class) and Bryant Ward (ranked 0 p4p, 0 weight class). Holm comes to the cage accompanied by Gary Jules - Mad World. Man, I cannot wait for this one!
 |
|
 |
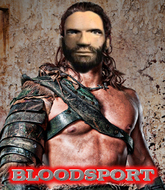
| 191 cm
21
212 lbs
2 - 1 - 0 |
|
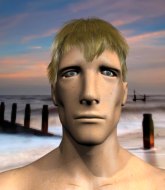
195 cm
27
220 lbs
8 - 2 - 0 |
BJJ Brown Belt
World class boxer
Very quick |
|
BJJ Purple Belt
Excellent boxer
Heavy handed |
|
| |
|
Ladies and gentlemen. This fight is 3 rounds, in the light heavyweight division.
Introducing the fighter to my left, fighting out of the red corner.
With a record of
2 - 1 - 0, fighting out of Hilo, Lars Holm!
And introducing the fighter to my right, fighting out of the blue corner.
With a record of
8 - 2 - 0, fighting out of Hilo, Bryant Ward!
The judges for this bout are Chris Saunders, Micheangelo Fripello and Paul Gruel.

The bell rings for round one and we are underway!
Ward throws a leg kick but Holm sees it coming and moves out of range.

Holm moves into the clinch.
Ward is trying to break free.
An uppercut on the inside fails to land for Holm.

Holm manages to break the clinch.
Holm gets a clinch.
Holm lands a shoulder strike that jolts his opponent's head backwards.
Holm is trying to break the clinch but Ward is controlling him.
Holm pushes off and circles away, back to the middle of the mat.
Holm swinging wildly here.
Holm takes the fight into the clinch.
Holm lands a right hand that snaps the head of Ward backwards.
A frustrated look appears on Holm's face as he tries to break the clinch.
The two fighters are working to gain dominance in the clinch.

That's one minute gone in the round.
Holm prevents Ward from breaking the clinch.
Holm can't find room to land a body shot as Ward controls the action.
Holm escapes the clinch and we're back to striking.
Holm has Ward up against the cage in a clinch.
Ward prevents a body shot from Holm.
An uppercut to the body lands inside from Holm.
Some stalling of biblical proportions here from Ward.
Ward wants to break free but Holm has control.
Holm throws a hook to the body. More of an arm punch but it's all scoring with the judges.
An uppercut on the inside fails to land for Holm.
Holm gets double underhooks to prevent a takedown attempt from Ward.
Holm working hard to break the clinch.

That's two minutes gone in the round.

Ward breaks from the clinch.
Holm closes the distance and clinches.
Ward blocks a body shot from Holm.
Holm lands a left hand.
Ward drops to a knee looking for a takedown but Holm gets the underhooks and prevents it.
Holm is trying to slow down the pace in the clinch, to catch his breath.
Wooooo! Give it up for these two warriors! They are putting on a show!
Holm takes a shot to the head.
Holm breaks from the clinch.
Lars Holm seems to be the more aggressive standup fighter in this bout.
Holm swinging wildly here.
Lars Holm is looking to keep the fight on the feet at all costs.
Holm showing good head movement there, avoiding the strikes from Ward.

That's three minutes gone in the round.
Ward throws a right and a left that both miss.
Holm fails to land with the punch combination there - jab, cross, hook, miss, miss, miss.
Holm takes a jab on the nose. He smiles like he loves it and keeps coming.
Ward throws a wild combination but nothing lands.
Holm rushes Ward and pushes him back against the cage in a clinch.
Holm lands a hook to the side of the head.
Ward swings away with an uppercut that misses.
Both guys are working to get underhooks.
A quick uppercut on the inside from Holm.
Ward keeps control of Holm as he tries to wriggle out of the double underhooks.
Holm scores with a hook to the body.
Holm misses with a hook from the clinch.

That's four minutes gone in the round.
Ward blocks a couple of punches on the inside.
Ward blocking some punches.
The crowd cheering loudly, showing their appreciation for the quality fight we're seeing here.
Holm digs a right hand underneath Ward's ribcage. Ward let out a lung full of air as it connected.
Holm tries to stall but Ward uses the opportunity to gain a better position.
Holm breaks the clinch.

Ward is looking for a takedown here. He's shot in and has managed to get it, finishing up in Holm's half guard.
The referee must be thinking about standing these guys back up.

Holm looking to force a kimura from the bottom here. He's concentrating on that move too much though and Ward pushes past his half guard into mount!
Holm is trying to escape the mount.
As the round comes to an end the crowd are showing their appreciation for a great round of action.
Ward controlling the pace for now.
Holm is desperately trying to improve his position but Ward has a good base and remains in mount.
And that�s the end of the round � the fighters go back to their corners.
Lars Holm dominated that round.
That's the end of the round. The referee orders the cornermen out of the cage so we can get back down to business.

Holm is on the wrong end of a nice combination from Ward.
Ward fakes high and swings low for a body shot but Holm manages to avoid it.
Holm misses with a looping right.
Lars Holm is looking to throw some combinations by the looks of things.
Holm moves into the clinch successfully.
Lars Holm has scored more points in the clinch so far.
Holm tries to throw a body punch but Ward avoids it by throwing Holm back against the cage.
Holm throws a blind hook that connects with the side of Wards head.

It looks like Bryant Ward has been cut.
A frustrated look appears on Holm's face as he tries to break the clinch.
Holm tries to break the clinch but Ward is controlling the position.
Holm lands with a short head shot on the inside.
Ward tries to break free but Holm pushes him back against the cage.
Ward can't get the takedown.
Holm breaks the clinch and we're back to striking at distance.
Ward throws a body punch but Holm moves out of range.
Ward tries to keep at a distance but Holm has taken the fight into the clinch.
That's one minute gone in the round.
A hook to the body from Holm.
The fighters are starting to get sweaty, which will make takedowns a bit more tricky.
Holm breaks the clinch and we're back to striking at distance.
Holm clinches with his opponent.
Holm doesn't land with the attempted body shot.
A frustrated look appears on Holm's face as he tries to break the clinch.
Ward blocks a punch to the side of the head.
Holm pushes off and circles away, back to the middle of the mat.
Ward throws a combination. Holm tries to block but a couple of punches get through.
Ward fails with a rather predictable takedown attempt.
Ward scores with the left hand. Holm knows he should have avoided that one.
Holm closes the distance and clinches.
That's two minutes gone in the round.
The fans in attendance giving it up for the two fighters, who have really let it all hang out in the last minute or so!
Ward takes a shot to the head.
Ward takes a shot to the head.
A shot in the inside from Holm.
A right handed body shot lands from Holm.
Holm tries a shoulder strike but it doesn't do any damage.
Holm working aggressively here.
An uppercut on the inside fails to land for Holm.
Ward is trying to push Holm away but Holm has him pressed against the cage, so he's going nowhere.
Ward is stalling here.
Ward is trying to break free.
Holm pushes Ward back against the cage and unloads with a body punch.
Holm misses with a short punch on the inside.
Holm breaks the clinch and we return to the middle of the mat.
That's three minutes gone in the round.
Holm moves into range and clinches up with Ward.
Ward looks like he'd prefer to be striking at range right now.
Holm pushes off and circles away, back to the middle of the mat.
Holm has managed to clinch.
Ward blocking some punches.
Ward slows down the pace here.
Holm stays in close to his opponent and throws a right hand to the body.
Holm escapes the clinch and we're back to striking.
Holm gets a clinch.
Ward stalling in the clinch but Holm improves position.
Holm working aggressively here.
That's four minutes gone in the round.
Ward has hold of one of Holm's legs. Holm is fighting the takedown attempt but Ward gets the trip and lands the takedown into guard.
Holm looking to hit a scissor sweep but Ward is one step ahead there.
Fantastic stuff here - a very entertaining period of action, which has drawn cheers from the crowd.
Ward looking to pass the guard.
The fighters are pressed up against the cage, both looking to find a bit of space to work.
Holm looking to sweep here. No luck so far.
Holm trying to control the position.
Holm tries to land a sweep but no joy.
The crowd are going absolutely nuts as the round comes to an end - what a fantastic round of action!
Holm has managed to work for a loose triangle. I think Ward should be able to defend this one pretty easily though. Oh, Holm has tightened it up now! Ward should have reacted faster there - he's in big trouble and yes, he's tapped out! This one is all over!
Ladies and gentlemen, after 4:57 of round 2, we have a winner by way of Submission (Triangle). Lars Holm!
A very excited looking Lars Holm made sure he remembered to thank all the fans both in the arena and on the internet. He said all the coolest people spend all day on MMA websites, which got a big reaction.
|
|
|
|
|
|
|
|
|
|
|
|
|
|
|
|
|
|
|
|
|
|
|
| S |
C
A |
G |
S |
C
B |
G |
|
S |
C |
G |
|
energy
A | B |
|
hype
A | B |
|
pop
A | B |
|
mgr
A | B |
|
FIGHT
RATING
34% |
|
|
|
|
|
|

