|
|
PBP Commentary |
Coming up we have a heavyweight MMA rules bout between Anton Heynes (ranked 0 p4p, 0 weight class) and Pat Barry (ranked 0 p4p, 0 weight class). These two fighters really are very evenly matched on the feet - it will be fascinating to see who can assert themselves in that aspect of the fight.
 |
|
 |
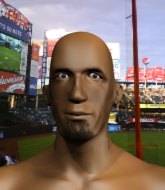
| 187 cm
25
255 lbs
1 - 0 - 0 |
|
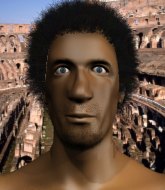
180 cm
25
250 lbs
3 - 3 - 0 |
BJJ Blue Belt
Excellent MT
Very strong |
|
BJJ White Belt
Good low kicks
Heavy handed |
|
| |
|
Ladies and gentlemen. This fight is 3 rounds, in the heavyweight division.
Introducing the fighter to my left, fighting out of the red corner.
With a record of
1 - 0 - 0, fighting out of Sydney, Anton Heynes!
And introducing the fighter to my right, fighting out of the blue corner.
With a record of
3 - 3 - 0, fighting out of Sydney, Pat Barry!
The judges for this bout are Donatello Bradman, Summer Carpenter and Bruno Hogan.

The bell rings for round one and we are underway!
The fight stays on the outside here - Heynes looks like he's thinking about clinching though.
Barry circles away from the clinch attempt.
Barry cracks Heynes with a good jab.
Barry avoids the clinch attempt nicely.

Heynes instigates a clinch.
With the fighters up against the cage, Heynes throws an elbow but misses.
Heynes lands a nice knee to the body.
Barry trying to stall but Heynes improves his position.
Heynes keeps the fight in the clinch, despite Barry's efforts to push away.
Barry looking to stall.
Heynes missing with knees to the body.
Heynes is trying to wear down his opponent with knees to the body.

That's one minute gone in the round.
Heynes displaying some good clinch control by pressing Barry up against the cage.

Barry pushes off and circles away, back to the middle of the mat.
Barry lands a leg kick and bounces back out of range.
Barry throws a decent looking leg kick but it doesn't land clean.
Heynes fails in his attempt to clinch.
Heynes takes an uppercut right on the button but keeps his composure.
Barry lands with a hook. Heynes tried to avoid it but it clipped the top of his head.
Heynes gets a clinch.
Heynes lands a knee to the body.
The pace really dropping off here, momentarily.

That's two minutes gone in the round.
Heynes lands an elbow just above Barry 's eye.

It looks like Pat Barry has been cut.
Barry is struggling to control the position.
We've seen a great period of action over the last minute or so - credit to both fighters for going all out!
Heynes managing to block the knees to the body from Barry.
Barry has had enough of the clinch and is looking to separate.
Heynes crunches a lovely knee into Barry's ribcage.

That's three minutes gone in the round.
Barry misses with a body punch.
Barry stalling in the clinch but Heynes improves position.
Barry tries to land a knee to the body but he is off balance and Heynes avoids it.
Barry misses with a hook to the ribs.
Heynes lands a glancing elbow in the clinch.
Heynes controlling the action here for a moment.
Barry tries to break free but Heynes pushes him back against the cage.
Heynes lands a good knee to the midsection. Barry won't want to take too many of those.
Barry can't find room to land a body shot as Heynes controls the action.

That's four minutes gone in the round.
Barry utilising his Muay Thai to score with a knee to the body.
Heynes tries to land a knee to the body but he is off balance and Barry avoids it.
Heynes prevents a body shot from Barry.
Heynes tries to land knees in the clinch but Barry avoids the damage to the body.
Heynes crunches a lovely knee into Barry's ribcage.
Come on Heynes - let's have some action - none of this stalling nonsense.
Barry has had enough of the clinch and is looking to separate.
As the round comes to an end the crowd are showing their appreciation for a great round of action.
Barry is trying to slow down the pace of the fight but Heynes is keeping busy.
Heynes putting his Muay Thai to good use. He has Barry in a tight clinch and is doing some damage with knees to the body.
And that�s the end of the round � the fighters go back to their corners.
That was a close round but I would say that Anton Heynes will probably get the nod.
The cut man is working on Pat Barry's cut.
The referee calls time. The cornermen exit stage left and we're back to business.

Heynes looks shocked there as he takes a right hand to the temple.
Barry scores with a nice right hand.
Barry misses with a straight right.
Barry avoids the clinch attempt nicely.
Heynes tries to clinch up but Barry circles away and keeps his distance.
Heynes tries to clinch but Barry is having none of it.
Barry chopping away at his opponent's legs.
Barry moves out of range of the strikes.
Heynes blocks a jab.
Barry scores with a one two! Heynes had his feet all tangled up there and couldn't avoid the strikes.
Barry drops his hands and takes a jab to the jaw for his troubles.
Heynes rushes Barry and pushes him back against the cage in a clinch.
Barry is trying to stall.
Barry managing to block the knees to the body from Heynes.
Heynes tries a knee to the head but Barry blocks it.
Wooooo! Give it up for these two warriors! They are putting on a show!
Barry looks like he'd prefer to be striking at range right now.
That's one minute gone in the round.
Heynes landing knees to the body.
Barry has had enough of the clinch but Heynes keeps him there for the moment.
Heynes tries a knee to the head but he's missed.
Heynes lands a nice elbow from the clinch.
Heynes leaning against his opponent.
Heynes working Barry over with knees to the body.
Barry on the defensive, avoiding the knees to the body.
Heynes putting his Muay Thai to good use. He has Barry in a tight clinch and is doing some damage with knees to the body.
Barry trying to land knees to the body.
Barry tries to break free but Heynes pushes him back against the cage.
Heynes landing knees to the body.
Anton Heynes has scored more points in the clinch so far.
That's two minutes gone in the round.
A right hand to the body from Barry.
Heynes just leaning against Barry, taking a breather.
This has been an exciting period of action!
Barry breaks the clinch.
Barry lands a straight punch to the body, keeping Heynes at a distance.
Barry swats away the attempt to clinch by Heynes.
Heynes checks a leg kick.
Pat Barry seems to be the more aggressive standup fighter in this bout.
Barry lunges in with swinging rights and lefts but Heynes circles away quickly and effectively.
Barry is breathing heavily.
A telegraphed right hand from Heynes misses the target.
Heynes moves into the clinch successfully.
Barry wants to strike at distance but he can't break free of the clinch.
Barry on the defensive, avoiding the knees to the body.
Heynes blocks a knee to the body. He'll have a nicely bruised forearm in the morning.
That's three minutes gone in the round.
Barry on the defensive, avoiding the knees to the body.
Heynes lands a good knee to the midsection. Barry won't want to take too many of those.
The fighters are pressed against the cage, as the pace of the fight slows.
Barry can't find room to land a body shot as Heynes controls the action.
The fighters are pressed against the cage, as the pace of the fight slows.
Barry avoids the elbow strike from Heynes, against the cage.
That's four minutes gone in the round.
Barry breaks from the clinch.
Heynes moves in looking to clinch but Barry pushes him off.
Barry keeps the fight on the outside.
Heynes tries to close the distance and clinch up against the cage but Barry paws at him with a jab and circles away.
Heynes looks to score with a combo but nothing lands.
Barry circles away from the clinch attempt.
Heynes moves into the clinch successfully.
Heynes is looking to score with knees to the body. Maybe he'll change it up and go body then head. Barry is defending well for now.
Barry lands a knee to the head.
As the round comes to an end the crowd are showing their appreciation for a great round of action.
Barry wants to break free but Heynes has control.
Barry wants to break the clinch but can't.
The referee is keeping an eye on Barry - much more stalling and he will separate the fighters.
And that�s the end of the round � the fighters go back to their corners.
Anton Heynes dominated that second round.
The cut man is working on Pat Barry's cut.
The referee calls time. The cornermen exit stage left and we're back to business. Ladies and gentlemen, this is the final round!

Barry blocks a jab.
Barry circles away from the clinch attempt.
Pat Barry seems to be getting the better of the standup.
Barry connects with an inside leg kick.
Barry throws a nice inside leg kick.
Barry avoids the clinch attempt nicely.
Barry throws a combination but comes up with nothing but fresh air.
Heynes fails in his attempt to clinch.
Heynes tries to close the distance and clinch up against the cage but Barry paws at him with a jab and circles away.
Barry lands a nice leg kick that just misses Heynes's sensitive parts.
Barry throws a good cross that connects.
Barry loads up on a big right hand but Heynes slips the punch.
Heynes blocks a jab.
Heynes swings away but doesn't land with a series of punches.
Heynes ducks under a wild hook from Barry.
Heynes rushes Barry and pushes him back against the cage in a clinch.
Barry wants to stall.
Barry tries to break the clinch but Heynes is controlling the position.
That's one minute gone in the round.
Heynes misses with an elbow over the top.
Barry breaks the clinch and we're back to striking at distance.
Heynes closes the distance and clinches.
Heynes is stalling here. The referee will be looking to step in if he doesn't pick up the pace.
Barry looks like he'd prefer to be striking at range right now.
Heynes pushes off and fires off an elbow that misses, before clinching up again, against the cage.
Knees to the body from Heynes.
Barry stalling against the cage.
Barry managing to block the knees to the body from Heynes.
That's two minutes gone in the round.
Heynes is pushing Barry up against the cage, for a bit of lean and pray action. Action being used the in the loosest possible sense of the word.
Barry lands with a short head shot on the inside.
A real battle for position is taking place between these two warriors.
Heynes lands an elbow inside that Barry shrugs off.
Heynes is pushing Barry up against the cage, for a bit of lean and pray action. Action being used the in the loosest possible sense of the word.
Barry breaks the clinch.
That's three minutes gone in the round.
Heynes moves out of range of the leg kick from Barry.
Heynes wants to clinch.
Heynes fails in his attempt to clinch.
Heynes is looking to take this fight into the clinch.
Heynes keeping his hands up high there, blocking the jab from Barry.
Heynes blocks a jab.
A chopping leg kick lands by Barry.
Heynes throws a shot from downtown. Barry moves away and avoids it.
Barry staying out of range there.
Heynes on the wrong end of a nice low kick. He's acting like it's no big deal but he doesn't want to take many more of those.
Barry is looking to slow Heynes down with leg kicks.
Barry blocks a head kick by Heynes.
Good leg kick by Barry there. It's the ones that make that thud noise that hurt and that was an almighty thud.
Wow, both these guys are really going for it!
Both fighters are breathing heavily.
That's four minutes gone in the round.
Barry cracks the inside of Heynes's front leg.
Barry throws a leg kick but Heynes checks it.
Heynes tries to close the distance and clinch up against the cage but Barry paws at him with a jab and circles away.
The fighters circling - Barry throws out the jab but it was never going to land.
Heynes is looking to clinch but Barry is avoiding it.
Heynes misses with the combination.
Barry staying out of range there.
The crowd cheering loudly, showing their appreciation for the quality fight we're seeing here.
A telegraphed right hand from Barry misses the target.
Heynes uses good footwork to avoid the strikes from Barry.
Heynes tries to clinch there but Barry circles away.
Heynes is looking to clinch.
Heynes throws out a loose jab but Barry uses good head movement to avoid it.
Barry changes levels and scores with a jab to the body.
As the round comes to an end the crowd are showing their appreciation for a great round of action.
Barry scores with a jab to the jaw of his opponent.
Barry jabs away that one connects to the head of his opponent.
Barry swinging wildly here.
Pat Barry has stepped it up - he knows he needs a finish here!
Anton Heynes is fighting for a decision here - he's started to take the cautious approach.
Barry missing with a left hand there. Heynes was out of range so wasted energy throwing that one.
And that's the end of the fight!
Pat Barry comfortably won the final round on my scorecard.
I think Heynes has won this one but let's see what the judges have to say. Over to the ring announcer for the scorecards.
Ladies and gentlemen, after 3 rounds of action, we go to the scorecards for a decision.
Judge Donatello Bradman scores the fight 29:28
Judge Summer Carpenter scores the fight 29:28
Judge Bruno Hogan scores the fight 29:28
In favor of your winner, by unanimous decision... Anton Heynes!
|
|
|
|
|
|
|
|
|
|
|
|
|
|
|
|
|
|
|
|
|
|
|
| S |
C
A |
G |
S |
C
B |
G |
|
S |
C |
G |
|
energy
A | B |
|
hype
A | B |
|
pop
A | B |
|
mgr
A | B |
|
FIGHT
RATING
68% |
|
|
|
|
|
|
