|
|
PBP Commentary |
Coming up we have a heavyweight MMA rules bout between David Chase (ranked 0 p4p, 0 weight class) and Drunken Hare (ranked 0 p4p, 0 weight class). Both these guys have really solid chins. Will we see a standup war or will they both decide that a knockout is unlikely and try to win the fight elsewhere?
 |
|
 |
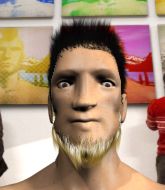
| 195 cm
20
270 lbs
5 - 4 - 0 |
|
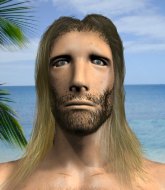
182 cm
19
265 lbs
5 - 5 - 0 |
BJJ Purple Belt
Counter striker
KO power |
|
BJJ Blue Belt
Brawler
Granite chin |
|
| |
|
Ladies and gentlemen. This fight is 3 rounds, in the heavyweight division.
Introducing the fighter to my left, fighting out of the red corner.
With a record of
5 - 4 - 0, fighting out of London, David Chase!
And introducing the fighter to my right, fighting out of the blue corner.
With a record of
5 - 5 - 0, fighting out of London, Drunken Hare!
The judges for this bout are Richard Clark, Donald Grub and Daniel Bishop.

The bell rings for round one and we are underway!
Hare keeps the fight standing with a nice sprawl.
Chase shoots in but no luck this time.
Chase throws a right and a left that Hare avoids nicely.

Hare gets a takedown into half guard.

Hare is looking for a kimura but Chase is holding onto that half guard position, so it's hard for Hare to get the leverage.
Hare trying to control the action but Chase is working from the bottom.
Chase missing with punches from the bottom.
Chase wants to improve his position but Hare is controlling well.
Hare looking to pass the half guard. Not this time.
Hare is looking for a kimura here.
Chase wants to improve his position but Hare is controlling well.

That's one minute gone in the round.
Chase makes his way to full guard. A much better position for Chase.
Chase controls Hare momentarily but Hare frees himself.
Hare must be cautious of submissions here, given that his opponent has the superior Jiu Jitsu.

The referee decides to stand the fighters back up.
No luck for Hare with that takedown attempt.
Hare looks gassed!
Chase closes the distance and gets a double leg, slamming Hare to the mat! Hare manages to get full guard.
Chase passes easily into side control. Nice work.
Chase creates a bit of distance and throws down some hard shots.
Chase advances to mount.
The ref warns both fighters not to hold the cage as they work up against the meshing.

That's two minutes gone in the round.
Chase lands a big shot there that rocks Hare but he's holding on and managing to survive for now.
Chase controlling the pace for now.
Chase will need to keep those long limbs tucked in whilst he's on the ground, to prevent any submissions.
Chase looking for a guillotine from mount but Hare is having none of it.
Chase wants to finish this one by submission but Hare is holding onto his waist, trying to prevent any attacks from Chase.
Chase has been looking to land a fair amount of strikes on the ground. He might be looking to soften his opponent up in order to work for a submission.
Hare holding onto his opponent's waist for dear life, as Chase tries to land some strikes to get him to release his grip.
Hare tries to lock up and control but Chase gives him a forearm to the face and pushes him away.
Chase trying to control but he's not successful this time.

That's three minutes gone in the round.
Chase moves into side control, trying to work for a kimura. That looks painful! Will he finish!!?? No, Hare has worked his arm free - good work by Hare!
Chase trying to control the action but Hare is working from the bottom.
Hare prevents Chase from improving position.
Chase is looking to finish here, going for an Americana. Hare knows the correct defense though, so he's OK.
Chase is looking to take a break and control but Hare is keeping him honest, looking to work from the bottom.

That's four minutes gone in the round.
There's not a lot going on here and the crowd are letting the fighters know they're not willing to tolerate a lack of action.
Hare wants to get back to his feet.
Hare tries to buck Chase off but Chase is having none of it.
Hare is working hard to escape and get back to his feet. After a battle for position, Chase asserts his dominance and retains side control.
The referee decides to stand the fighters back up.
Chase shoots in but doesn't get the takedown
and Hare counters with a nice shoot takedown that brings the fighters to the ground.
That's three failed takedown attempts in the round for David Chase. That's going to take a lot out of him.
Hare tries to free his leg and advance position but Chase is retaining full guard.
Chase is looking to get back to his feet but can't, whilst Hare is controlling him.
Both fighters really going for it on the ground here!
Chase looking to sweep here. No luck so far.
And that�s the end of the round � the fighters go back to their corners.
A close round but Drunken Hare will probably get the nod.
The referee calls time. The cornermen exit stage left and we're back to business.

Hare looks for a takedown. He's got it. We're now in half guard.
Chase won't allow Hare to pass to mount.
Chase trying to hold on to Hare's head to control him but Hare postures up.
Hare wants to pass the guard but Chase is defending well.
Hare is persisting with the attempt to improve his position.
Hare blocks the strikes from Chase.
Chase moves into full guard.
Chase working a defensive guard here.
Hare thinks about going for a leg but decides against it, in order to maintain the position.
That's one minute gone in the round.
The referee has ruled that neither fighter is active enough on the ground and has stood them back up.
Hare gets his head snapped back by a nice shot there.
Drunken Hare seems to be the more aggressive standup fighter in this bout.
Both fighters are absolutely exhausted here.

Chase clinches up with Hare and pushes him back against the cage.
Chase is working for a takedown up against the cage. He can't get it on this occasion though.
Hare missing with knees to the body.
Hare tries to jump guard but he falls flat on his backside. Chase smiles and moves away.
Chase with a poor takedown
and Hare counters with a shoot takedown. Chase fights it but they end up in guard.
The fighters are pressed up against the cage, both looking to find a bit of space to work.
Hare thows a big elbow that misses.
Hare looking to control the position here, rather than advance.
Hare missing there with some ground and pound from the guard.
That's two minutes gone in the round.
There's a bit of a scramble here and now Chase is on top in guard.
Hare throwing strikes off his back to little effect.
Chase wants to control from the top but Hare keeps moving.
Chase passes Hare's right leg, so he's now in half guard.
Hare wants to get back to his feet.
Hare on the receiving end of some nice ground and pound.
Chase trying to pass the guard but Hare defending well.
Chase looks over to his corner - he wants some instructions but his corner are not responding.
Chase wants to lay and pray for a moment but Hare keeps working.
That's three minutes gone in the round.
Hare moves into full guard.
Chase trying to control but Hare is working from the bottom.
Chase drops back looking for a leg! Hare is in trouble here! The fighters roll with the hold and Hare manages to kick Chase off! Chase jumps back into Hare's guard.
Hare looking to control.
Chase slips effortlessly into side control - very nice.
Chase tries for a kimura. Not really close to a finish though.
Chase working hard here to secure a kimura but he's not really in the right position for it.
That's four minutes gone in the round.
Well. There's a bit of a lull in the action here and the crowd are starting to get restless.
Chase prevents Hare from escaping the position.
Chase moves into full mount!
Hare is wriggling around trying to escape.

Chase is standing up, even though he is in mount.
Nice takedown defense from Hare. No joy for Chase on that attempt.
And that�s the end of the round � the fighters go back to their corners.
A close second round but Drunken Hare will probably get the nod - 10:9.
The referee calls time. The cornermen exit stage left and we're back to business. This is the final round!

Hare looking for a takedown here - he's got it.
Hare wants to pass the guard but Chase is keeping the position.
Chase looking for submissions from the bottom here. Moving his hips around, possibly looking for an armbar.
Chase is working actively off his back, looking to secure an arm or perhaps work for a triangle.
Hare trying to control but Chase is working from the bottom.
Chase controls Hare momentarily but Hare frees himself.
Both fighters are breathing heavily.
Hare stands and steps away. Chase gets to his feet too and we're back to the striking game.
That's one minute gone in the round.
Chase misses with a takedown attempt
and Hare counters with a nice double leg into guard.
Hare is sitting in close to Chase's body. Chase has gone for a guillotine from the bottom. Oh damn, that looks pretty tight! Hare is panicking - it looks like this one could be all over! Yes, Hare is tapping! That was a very nice submission by Chase.
Ladies and gentlemen, after 1:25 of round 3, we have a winner by way of Submission (Guillotine). David Chase!
|
|
|
|
|
|
|
|
|
|
|
|
|
|
|
|
|
|
|
|
|
|
|
| S |
C
A |
G |
S |
C
B |
G |
|
S |
C |
G |
|
energy
A | B |
|
hype
A | B |
|
pop
A | B |
|
mgr
A | B |
|
FIGHT
RATING
100% |
|
|
|
|
|
|
