|
|
PBP Commentary |
Coming up we have a heavyweight MMA rules bout between Jello Biafra (ranked 0 p4p, 0 weight class) and Jon Hawkins (ranked 0 p4p, 0 weight class). Fingers crossed for an exciting fight - I'm sure both fighters are looking for a nice under the table bonus!
 |
|
 |
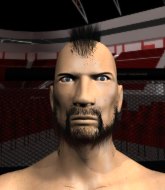
| 185 cm
17
280 lbs
0 - 1 - 0 |
|
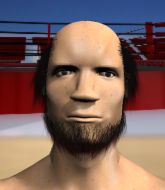
196 cm
24
255 lbs
5 - 4 - 0 |
BJJ Blue Belt
Brawler
KO power |
|
BJJ Blue Belt
Brawler
Granite chin |
|
| |
|
Ladies and gentlemen. This fight is 3 rounds, in the heavyweight division.
Introducing the fighter to my left, fighting out of the red corner.
With a record of
0 - 1 - 0, fighting out of Montreal, Jello Biafra!
And introducing the fighter to my right, fighting out of the blue corner.
With a record of
5 - 4 - 0, fighting out of London, Jon Hawkins!
The judges for this bout are Gregory Folan, William Peck and Ian Loll.

The bell rings for round one and we are underway!
Hawkins throws a couple of head shots and lands with the final one - a decent hook, which struck Biafra on the side of the head.

It looks like Jello Biafra has been cut.
Biafra could do with losing a few pounds - he looks very soft around the mid section, to put it politely.
A head kick from Biafra lands but Hawkins takes it in his stride.
The crowd are loving this. Great action here.
Hawkins tries to clinch but Biafra moves out of range.

Hawkins drops down and drives through with a powerful takedown into guard.
Biafra trying to control the position.
Hawkins is in close to Biafra's body, working some short punches and elbows.
Biafra seems keen to control Hawkins's posture.
The fighters are pressed up against the cage, both looking to find a bit of space to work.
Hawkins throws an elbow that misses. Biafra uses the momentum to reverse the position. He's now in Hawkins's guard. Nice move by Biafra!
Biafra trying to land body shots but he keeps hitting the mat.
Biafra trying to control but Hawkins is working from the bottom.
Biafra won't allow Hawkins to get back to his feet.

That's one minute gone in the round.
Biafra trying to land body shots but he keeps hitting the mat.
Biafra trying to land body shots but he keeps hitting the mat.
Biafra might be looking to lock onto one of his opponent's long limbs for a submission, whilst we're on the ground.
Biafra prevents Hawkins from getting back to his feet.
Biafra works over Hawkins with some ground and pound from guard.
Hawkins is pulling down on Biafra's head. It's preventing any offense from Biafra, at least for the moment.
Hawkins working the defensive guard well to avoid strikes from Biafra.
Hawkins avoiding any damage from the ground and pound.
Biafra stops Hawkins from standing up.
The ref warns both fighters not to hold the cage as they work up against the meshing.
Biafra throws a big elbow that misses.
Biafra landing some decent shots from guard.
Biafra works a leg free and moves into half guard.

That's two minutes gone in the round.
Hawkins avoiding damage under a succession of punches from Biafra.
This has been an exciting period of action!
Biafra seems very keen to just sit and control from half guard but Hawkins does not like that idea so much and is remaining active off his back.
Hawkins trying to control from the bottom.
Hawkins blocking the ground and pound attempt from Biafra.
Biafra thows a huge punch but Hawkins dodges it nicely.
Biafra missing with the ground and pound from half guard.
Biafra missing with some ground and pound from the half guard.
Biafra sitting in half guard, looking to land shots. Hawkins defending well though.
Hawkins keeping his head moving to avoid the ground and pound.
Biafra sitting in half guard, looking to land shots. Hawkins defending well though.
The fighters are starting to get a bit slippery now, which will make submissions a bit more difficult.
Hawkins avoiding damage under a succession of punches from Biafra.
Hawkins wants to get back to his feet.
Biafra missing with the ground and pound from half guard.

That's three minutes gone in the round.
Biafra trying to control the action but Hawkins is working from the bottom.

Biafra is trying a forearm choke� I don't think that's going to do much at this level of the game.
Hawkins really doesn't want to stay on the ground with Biafra. If he can't get it back to his feet, it's only a matter of time before he'll be tapping out.
Hawkins wants to get back to his feet.
Biafra is working for a kimura but Hawkins is defending it quite comfortably.
Biafra looks to land a strike but Hawkins avoids it nicely and regains full guard.

That's four minutes gone in the round.
Biafra landing some decent shots from guard.
Biafra throwing shots from guard but he's hitting more mat than opponent.
Biafra is sitting in guard, working some ground and pound.
Biafra prevents Hawkins from getting back to his feet.
Hawkins looks winded!
Biafra pressing down on his opponent's thigh, looking to pass guard. Hawkins is keeping the position for now.
The crowd are going absolutely nuts as the round comes to an end - what a fantastic round of action!
Biafra throwing strikes from guard but Hawkins blocks nicely.
And that�s the end of the round � the fighters go back to their corners.
Jello Biafra dominated that round.
The cut man is working on Jello Biafra's cut.
That's the end of the round. The referee orders the cornermen out of the cage so we can get back down to business.

Hawkins slips a jab and a cross from Biafra.
Biafra shoots for a takedown but Hawkins saw that one coming a mile off and avoided it easily.
Biafra lands with a good body shot.
Hawkins fails with the takedown.
Biafra looks to have improved his striking defense since last time we saw him fight.
Biafra misses with a body shot. Nice footwork from Hawkins.
The fighters circle momentarily. Biafra darts into range and connects with a nice straight punch.

Biafra throws a loose over hand right and dives in with a double leg takedown. Hawkins tries to sprawl but it's too late and the fighters hit the mat. Biafra is in Hawkins's guard.
Biafra stops Hawkins from standing up.
We've seen a great period of action over the last minute or so - credit to both fighters for going all out!
Hawkins keeping moving, preventing Biafra from controlling successfully.
Biafra has been looking to land a fair amount of strikes on the ground. He might be looking to soften his opponent up in order to work for a submission.
Hawkins can't keep his opponent in guard - Biafra advances to half guard, no doubt looking to mount.
Hawkins is breathing heavily.
Biafra not throwing his punches with enough precision this time.
That's one minute gone in the round.
Biafra sitting in half guard, looking to land shots. Hawkins defending well though.
Hawkins avoiding damage under a succession of punches from Biafra.
Biafra throwing shots but Hawkins is blocking nicely.
Hawkins on the receiving end of some nice ground and pound.
Biafra missing with the ground and pound from half guard.
Hawkins keeping his head moving to avoid the ground and pound.
Biafra thumps the canvas. Not on purpose obviously - he just missed Hawkins's head.
Hawkins gets full guard.
Biafra chips away with some ground and pound.
Biafra is looking to work some ground and pound but Hawkins has wrist control.
Hawkins not looking particularly offensive just at the moment.
We get told so often about how wrestlers don't like to be on their backs. Let's see if Hawkins can do anything to dispel that myth.
Biafra prevents Hawkins from getting back to his feet.
Biafra postures up in Hawkins's guard and throws a big left but Hawkins blocks it.
That's two minutes gone in the round.
Hawkins wants to stand up but Biafra is controlling him.
The crowd cheering loudly, showing their appreciation for the quality fight we're seeing here.
Hawkins keeping moving, preventing Biafra from controlling successfully.
Biafra trying to land body shots but he keeps hitting the mat.
Hawkins is looking to stand up but Biafra isn't so interested in that idea.
Biafra throws a big elbow that misses.
Biafra postures up in Hawkins's guard and throws a big left but Hawkins blocks it.
Biafra throwing strikes from guard but Hawkins blocks nicely.
Hawkins wants to stand up but Biafra is controlling him.
That's three minutes gone in the round.
Biafra throwing strikes but missing.
Biafra wants to control from the top but Hawkins keeps moving.
Biafra lands a nice shot whilst sitting in his opponent's guard.
Biafra postures up.
Biafra throwing elbows and punches but not connecting, as Hawkins works some decent striking defense from the bottom.
Biafra working from the guard for now, landing some ground and pound.
Biafra advances position into side control!
Hawkins managing to avoid any damage from the strikes thrown by Biafra.
That's four minutes gone in the round.
Biafra throwing strikes but missing, from side control.
Biafra landing with strikes to the head and body from side control.
The crowd are loving this. Great action here.
Hawkins defending against the ground and pound.
The strikes coming from Biafra are missing the target in this wave of attacks.
Biafra misses with an attempted head punch from side control.
Biafra is chipping away with strikes.
Hawkins can't do much from the bottom here.
Biafra misses with a strike but at least he's keeping busy, looking to cause some damage - that will still help him when it comes to the judges scorecards.
Hawkins wants to get back to his feet but Biafra drags him back down.
The crowd are going absolutely nuts as the round comes to an end - what a fantastic round of action!
Biafra throwing shots but missing, from side control.
Biafra working the head with strikes.
Hawkins is not in a great position here, taking some shots.
And that�s the end of the round � the fighters go back to their corners.
Jello Biafra dominated that second round.
The cut man is working on Jello Biafra's cut.
That's the end of the interval. I'm sure that seemed a lot quicker than a minute for our two fighters! Back to the action. This is the final round!

Biafra closes this distance looking for a takedown but Hawkins circles away.
Hawkins is trying hard to land a takedown here. Biafra sprawls well and keeps this one on the feet.
Biafra throws a head kick that misses and slips in the process. He scrambles back to his feet and the fighters circle.
Jello Biafra is looking to throw some combinations by the looks of things.
Biafra tries to shoot in for a takedown. He's got hold of a leg but Hawkins swivels and escapes.
Biafra tries to score a power double leg takedown but Hawkins sees that one coming and sprawls well. That will dishearten Biafra somewhat.
That's three failed takedown attempts in the round for Jello Biafra. That's going to take a lot out of him.
Biafra throws a sloppy head kick and Hawkins moves out of range easily.

Hawkins darts in and clinches Biafra up against the cage.
Hawkins is working hard here but doesn't seem to be able to control effectively, up against the cage.
Hawkins is working for takedown but Biafra is calmly controlling the position for now.
Hawkins takes a big intake of breath there - he's definitely tired.
Biafra has picked Hawkins up - he's going for a ride! Biafra dumps his opponent to the mat with a thud and settles into half guard.
That's one minute gone in the round.
Biafra not throwing his punches with enough precision this time.
Biafra is trying to control the action in half guard but Hawkins is working away on the bottom, looking perhaps to get back to full guard.
Biafra is looking for a kimura but Hawkins is holding onto that half guard position, so it's hard for Biafra to get the leverage.
Hawkins is trying to control but can't.
Biafra prevents Hawkins from standing back up.
Hawkins has hold of Biafra's hands but Biafra slips his arm to the side and lands an elbow.
Biafra thumps the canvas. Not on purpose obviously - he just missed Hawkins's head.
Biafra sitting in half guard, looking to land shots. Hawkins defending well though.
Hawkins keeping his head moving to avoid the ground and pound.
Biafra throwing punches and elbows but they're not doing any damage.
Hawkins pushes Biafra off looking to stand but Biafra dives back in and keeps control.
Biafra throwing shots but they're hitting the canvas more than the man.
That's two minutes gone in the round.
Biafra is keeping good posture, landing some ground and pound.
Biafra not landing any meaningful shots this time.
Hawkins wants to get back to his feet.
Wooooo! Give it up for these two warriors! They are putting on a show!
Ground and pound from Biafra.
Biafra missing with the ground and pound from half guard.
Biafra not throwing his punches with enough precision this time.
Hawkins is looking to escape.
Hawkins keeping his head moving to avoid the ground and pound.
Biafra seems to be taking a bit of a break to think of his next move. He lands a short punch in the meantime.
Biafra seems very keen to just sit and control from half guard but Hawkins does not like that idea so much and is remaining active off his back.
Biafra not landing any meaningful shots this time.
That's three minutes gone in the round.
Hawkins blocking the ground and pound attempt from Biafra.
Biafra not throwing his punches with enough precision this time.
Biafra thows a huge punch but Hawkins dodges it nicely.
Hawkins is staying active underneath Biafra, who seems content to just control the action from this position.
Biafra working over Hawkins with some ground and pound. Hawkins looks like he wants out of this position, which is understandable.
Biafra missing with the ground and pound from half guard.
Biafra missing with the ground and pound from half guard.
Biafra throwing shots but Hawkins is blocking nicely.
Hawkins blocking the ground and pound attempt from Biafra.
Biafra working Hawkins over with strikes.
Nice strikes from Biafra there.
Hawkins keeping his head moving to avoid the ground and pound.
That's four minutes gone in the round.
Hawkins is trying to maintain the position but Biafra is very close to passing his half guard.
We've seen a great period of action over the last minute or so - credit to both fighters for going all out!
Biafra seems very keen to just sit and control from half guard but Hawkins does not like that idea so much and is remaining active off his back.
Hawkins is trying to stand up here but Biafra is controlling him well.
Hawkins blocking the ground and pound attempt from Biafra.
Nice strikes from Biafra there.
Biafra not landing any meaningful shots this time.
Biafra looks to score some points with some ground and pound.
Biafra thumps the canvas. Not on purpose obviously - he just missed Hawkins's head.
The crowd are going absolutely nuts as the round comes to an end - what a fantastic round of action!
Biafra trying to control from half guard but Hawkins is working away.
Hawkins blocking the ground and pound attempt from Biafra.
And that's the end of the fight!
Jello Biafra showed his dominance in that final round.
Well I reckon that's a shut out for Biafra, winning every round. Will the judges agree? They are the ones who matter, even if they are often depressingly incompetent. Over to the ring announcer for the scorecards.
Ladies and gentlemen, after 3 rounds of action, we go to the scorecards for a decision.
Judge Gregory Folan scores the fight 30:27
Judge William Peck scores the fight 30:27
Judge Ian Loll scores the fight 30:27
In favor of your winner, by unanimous decision... Jello Biafra!
|
|
|
|
|
|
|
|
|
|
|
|
|
|
|
|
|
|
|
|
|
|
|
| S |
C
A |
G |
S |
C
B |
G |
|
S |
C |
G |
|
energy
A | B |
|
hype
A | B |
|
pop
A | B |
|
mgr
A | B |
|
FIGHT
RATING
74% |
|
|
|
|
|
|
