|
|
PBP Commentary |
Coming up we have a welterweight MMA rules bout between Blaise Lamont (ranked 0 p4p, 0 weight class) and Ozuma Obata (ranked 0 p4p, 0 weight class). Chooooooooon! I think Lamont might be my favorite fighter, now he's come out to Twisted Nerve. Obata is bouncing up and down as he enters the arena, backed by Hijack The Terrorist Group - Hijack. These two fighters really are very evenly matched on the feet - it will be fascinating to see who can assert themselves in that aspect of the fight.
 |
|
 |
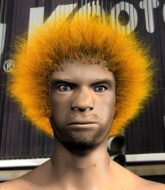
| 181 cm
33
180 lbs
22 - 14 - 0 |
|
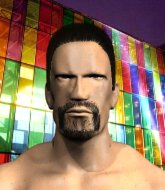
191 cm
28
186 lbs
16 - 12 - 0 |
Good wrestling
World class boxer
Insanely flexible |
|
Olympic wrestler
World class MT
Good gas tank |
|
| |
|
Ladies and gentlemen. This fight is 3 rounds, in the welterweight division.
Introducing the fighter to my left, fighting out of the red corner.
With a record of
22 - 14 - 0, fighting out of Rio de Janeiro, Blaise Lamont!
And introducing the fighter to my right, fighting out of the blue corner.
With a record of
16 - 12 - 0, fighting out of Rio de Janeiro, Ozuma Obata!
The judges for this bout are Mauricio Rocha, Alexandre Firmino and Paulo Santos.

The bell rings for round one and we are underway!
Lamont takes a jab on the nose. He smiles like he loves it and keeps coming.
Obata lands an overhand right.

It looks like Blaise Lamont has been cut.
Lamont shoots in and drives through. Obata sprawls well.
Obata keeps the fight standing with a nice sprawl.
Obata misses with a wild body shot.
Obata swings and misses with a hook to the body.
Lamont fails with a takedown attempt.
That's three failed takedown attempts in the round for Blaise Lamont. That's going to take a lot out of him.
Obata throws a right and a left that both miss.
Obata misses with a body shot.
Lamont swinging wildly here.
Obata misses the shot to the body.
Ozuma Obata is looking to keep the fight on the feet at all costs.

That's one minute gone in the round.
Obata throws a combination but comes up with nothing but fresh air.
Lamont shoots in for a takedown but doesn't get it.
Lamont takes a swing at Obata's ribcage but misses.

Lamont closes the distance and looks for a trip takedown... aaaand he's got it - Lamont lands in his opponent's guard.
The fighters are pressed up against the cage, both looking to find a bit of space to work.
Obata wants to stand and escape but Lamont is having none of it.
Lamont postures up to throw the ground and pound strikes but they don't connect.
Lamont prevents Obata from getting back to his feet.
Lamont throwing shots from guard but he's hitting more mat than opponent.
Lamont cracks Obata with a solid left hand.
Lamont missing there with some ground and pound from the guard.

That's two minutes gone in the round.
Obata wants to stand but Lamont is controlling the position.
Lamont content to strike from guard, landing some decent shots.
Obata is looking to get back to his feet but can't, whilst Lamont is controlling him.
Obata working the defensive guard well to avoid strikes from Lamont.
The ref warns both fighters not to hold the cage as they work up against the meshing.
This has been an exciting period of action!
Obata preventing the ground and pound from doing any damage.
Lamont postures up and scores with a shot to the body and a follow up elbow to the head.
Obata utilising some decent striking defenses from the guard, preventing the ground and pound.
Lamont pressing down on his opponent's thigh, looking to pass guard. Obata is keeping the position for now.
Obata is looking to stand up but Lamont isn't so interested in that idea.
Lamont with a nice head shot there.

That's three minutes gone in the round.

Lamont drops back looking for a leg! Obata is in trouble here! The fighters roll with the hold and Obata manages to kick Lamont off! Lamont jumps back into Obata's guard.
Obata is looking to get back to his feet but can't, whilst Lamont is controlling him.
Lamont throws a big elbow that misses.
Lamont looking to sit in guard and control but Obata gets the butterfly guard and sweeps. He's now in the guard on the top.
Lamont is trying to control the position from the bottom.
Lamont has been looking to land a fair amount of strikes on the ground. He might be looking to soften his opponent up in order to work for a submission.
Obata tries to stand but Lamont is controlling from the bottom.

That's four minutes gone in the round.
Obata is using up a lot of energy trying to get back to his feet. Perhaps he should improve his position first.
Lamont looking to hit a scissor sweep but Obata is one step ahead there.
As the round comes to an end the crowd are showing their appreciation for a great round of action.
Obata wants to stand but Lamont is controlling his posture from full guard.
And that�s the end of the round � the fighters go back to their corners.
Blaise Lamont dominated that round.
The cut man is working on Blaise Lamont's cut.
That's the end of the interval. I'm sure that seemed a lot quicker than a minute for our two fighters! Back to the action.

A left lands for Obata.
Obata misses the body punch
and Lamont counters nicely by changing levels and landing a hook to the body.
Ozuma Obata seems to be the more aggressive standup fighter in this bout.
Obata swinging wildly here.
Lamont is looking to take this fight into the clinch.
Obata lands a beauty of a right hand that gets the crowd cheering.
Obata misses with a double jab.
Lamont throws a looping left and ducks down for a takedown. He's got his arms around Obata's waist but Obata gets an underhook and avoids the takedown by throwing Lamont off to one side.
Obata gets his head snapped back by a nice shot there.
This fight brought to you by 5M nutrition - it's mmmmm tasty. Nice jab by Obata.
That's one minute gone in the round.
Sloppy strikes from Obata. Those never looked like landing.
Obata ducks down and throws a hook to the body but Lamont moves away.
Obata swings for the body but Lamont moves out of range.
Lamont is trying hard to land a takedown here. Obata sprawls well and keeps this one on the feet.
The fighters are starting to perspire pretty heavily.
Lamont takes a jab on the nose. He smiles like he loves it and keeps coming.
Ozuma Obata seems to be getting the better of the standup.
A punch combination from Obata misses.
Lamont scores with a three punch combo!
Obata gets taken down but at least he's managed to land in guard.
Obata preventing the ground and pound from doing any damage.
The fans in attendance giving it up for the two fighters, who have really let it all hang out in the last minute or so!
Lamont stops Obata from standing up.
That's two minutes gone in the round.
Lamont in full guard, throwing the ground and pound. No damage this time.
Lamont is standing up over Obata. Obata looks to escape but Lamont dives into side control.
Lamont lands a few punches from side control.
Lamont is looking to take a break and control but Obata is keeping him honest, looking to work from the bottom.
Lamont is putting a hurting on Obata here, landing some big shots from side control.
Lamont scoring with punches from side control.

Obata is rocked!
Lamont misses with a strike but at least he's keeping busy, looking to cause some damage - that will still help him when it comes to the judges scorecards.
Obata managing to avoid any damage from the strikes thrown by Lamont.
Obata wants to get back to his feet but Lamont drags him back down.
That's three minutes gone in the round.
Lamont in side control, throwing shots but Obata defends.
Obata is trying to stand back up. He's worked his way up against the cage but Lamont has just dragged him back down to the mat.
Obata is not content to let Lamont control the position.
Blaise Lamont overall seems to be getting the better of the ground position in the fight so far.
Lamont taking a break here but Obata is having none of it and regains half guard.
Obata looks like he's trying to stand up.
That's four minutes gone in the round.
Lamont thumps the canvas. Not on purpose obviously - he just missed Obata's head.
Obata blocking the ground and pound attempt from Lamont.
Lamont not throwing his punches with enough precision this time.
Obata is trying to stand up here but Lamont is controlling him well.
Obata blocking the ground and pound attempt from Lamont.
Obata wants to get back to his feet.
Lamont is keeping good posture, landing some ground and pound.
Obata is trying to stand up here but Lamont is controlling him well.
We've seen a great period of action over the last minute or so - credit to both fighters for going all out!
As the round comes to an end the crowd are showing their appreciation for a great round of action.
Lamont throwing shots but Obata is blocking nicely.
Lamont is looking for a kimura. It's going to be difficult to finish that from half guard though and Obata defends it well.
And that�s the end of the round � the fighters go back to their corners.
Blaise Lamont dominated that second round.
The cut man is working on Blaise Lamont's cut.
That's the end of the interval. I'm sure that seemed a lot quicker than a minute for our two fighters! Back to the action. This is the final round!

Lamont takes one to the chin there.
Obata displays good takedown defense there as he swats away a double leg from Lamont.
Lamont tries for a takedown but Obata sees it coming a mile off and avoids it easily.
Lamont fails with the takedown.
That's three failed takedown attempts in the round for Blaise Lamont. That's going to take a lot out of him.
Lamont changes levels and looks for a double leg takedown. Obata tries to avoid it but Lamont manages to keep hold of a leg and drag Obata to the ground. Obata escapes though and pops straight back up to his feet.
Obata swings for the body but Lamont moves out of range.
Lamont fails with a takedown attempt.
Obata fakes high and swings low for a body shot but Lamont manages to avoid it.
That's one minute gone in the round.
Obata throws a hook to the body but it doesn't connect.
Lamont shoots in for a takedown but Obata shows good takedown defense.
Lamont scores with a body shot.
Obata misses with a looping left.
Obata thuds a left hand into Lamont's body.
Obata is throwing a lot of body shots here, looking to wear down Lamont rather than just go for the knockout.
Lamont moves away from the strike by Obata.
Lamont pushes forward with a 1-2 combination that forces Obata back to the cage. Lamont follows up with a solid lead hook to the liver.
Obata swings and misses with a hook to the body.
Lamont misses with a takedown attempt - Obata sprawls well and throws a nice strike on the way out which just misses.
Obata throws a hook to the body but it doesn't connect.
That's two minutes gone in the round.
Obata uses good footwork to get in and out and land a nice right hand before Lamont has time to react.
Nice takedown defense from Obata. No joy for Lamont on that attempt.
Obata throws a series of punches but Lamont moves out of range.
Ozuma Obata has stepped it up - he knows he needs a finish here!
No joy there for Obata, who threw a few shots but didn't land.
Lamont ducks under a wild hook from Obata.
The crowd are loving this. Great action here.
Lamont fails with a rather predictable takedown attempt.
Obata slips in close and lands a nice hook before moving back out of range.
Obata cracks a nice hook into Lamont's ribs.
Obata lands a jab-cross combination.
Blaise Lamont is fighting for a decision here - he's started to take the cautious approach.
That's three minutes gone in the round.
A big left from Obata misses.
Obata throws out a loose jab but Lamont uses good head movement to avoid it.
Lamont moves away from the strike by Obata.
Obata looks to score with a jab to the body but Lamont is just out of range.
Lamont closes the distance, clinches up and gets a nice trip takedown into side control. Very smooth.
Lamont working the ground and pound.
Obata is not content to let Lamont control the position.

Obata explodes and escapes back to his feet! Nice escape there!
Lamont lands a body shot.
Lamont cracks Obata with a nice right hand that draws applause from the crowd.
Lamont has been working on his balance at Soco na m�e - Stand Up Striking, so perhaps that has help him stuff some of the takedown attempts by Obata.
That's four minutes gone in the round.
Obata takes a swing at Lamont's ribcage but misses.
Lamont fails to land the takedown.
Obata ducks down and throws a hook to the body but Lamont moves away.
Obata thows a left - swing and a miss!
Lamont feints and as Obata raises his hands in defense, Lamont changes levels and drives through with a takedown into guard.
Fantastic stuff here - a very entertaining period of action, which has drawn cheers from the crowd.
Lamont throwing strikes from guard but Obata blocks nicely.
Lamont wants to pass the guard but Obata is keeping the position.
As the round comes to an end the crowd are showing their appreciation for a great round of action.
Lamont throws a big elbow that misses.
And that's the end of the fight!
I would just about give that final round to Ozuma Obata.
I think Lamont has won this one but let's see what the judges have to say. Over to the ring announcer for the scorecards.
Ladies and gentlemen, after 3 rounds of action, we go to the scorecards for a decision.
Judge Mauricio Rocha scores the fight 29:28
Judge Alexandre Firmino scores the fight 29:28
Judge Paulo Santos scores the fight 29:28
In favor of your winner, by unanimous decision... Blaise Lamont!
A very excited looking Blaise Lamont made sure he remembered to thank all the fans both in the arena and on the internet. He said all the coolest people spend all day on MMA websites, which got a big reaction.
|
|
|
|
|
|
|
|
|
|
|
|
|
|
|
|
|
|
|
|
|
|
|
| S |
C
A |
G |
S |
C
B |
G |
|
S |
C |
G |
|
energy
A | B |
|
hype
A | B |
|
pop
A | B |
|
mgr
A | B |
|
FIGHT
RATING
68% |
|
|
|
|
|
|
